Clesana C1 Manual
- Operating instructions manual (17 pages) ,
- Installation instructions manual (17 pages) ,
- Installation manual (32 pages)
Advertisement
Introduction
About this manual
These operating instructions familiarise you with the characteristics and functions of the waterless toilet Clesana C1. The manual contains important information for the correct and safe handling of the toilet.
- Read these operating instructions carefully before the initial start-up.
- Keep this manual safe so that the information is available at all times.
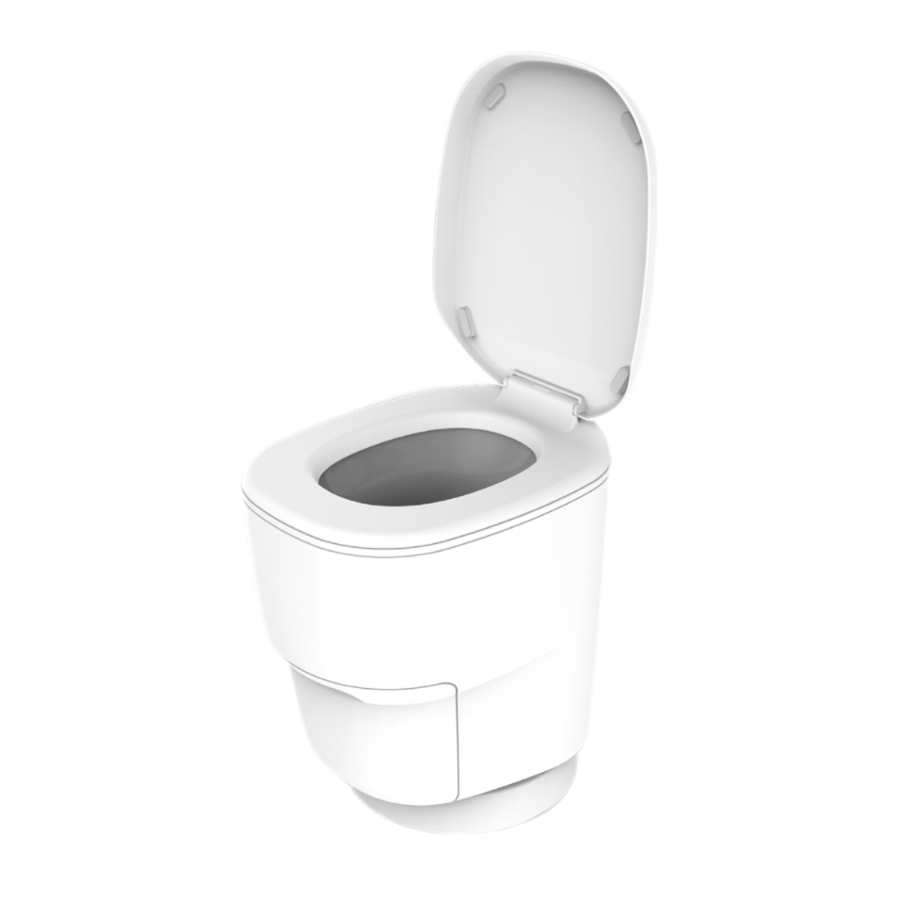
Design and function
Overview

| No. | Description | Function |
| 1 | Lid/glass |
|
| 2 | Foil cassette | Mounting of the foil liner |
| 3 | Foil compartment |
|
| 4 | Control panel/display |
|
| 5 | Housing/base body | Mounting of lid/glass, foil cassette, Teflon tape and tray |
| 6 | L-adapter |
|
| 7 | Round base | Placing and free mounting of the toilet in the room |
| 8 | Tray | Mounting of up to 6 bags. This corresponds to 2 bag chains with 3 bags each. |
| 9 | Teflon tape (PTFE Tapes) | Preventing the sticking and tearing of welding seam in the welding process |
| 10 | Rotation discs | Pairing of the base body with the L-adapter/base |
The Clesana C1 is the first mobile waterless toilet which operates based on the bag-welding principle. After each toilet trip the toilet welds the toilet content in a separate foil bag.
The foil bag is made of a multiple-folded continuous foil, the foil liner, previously mounted on the foil cassette (2) and is inserted in the foil compartment (3). The foil bag replicates a toilet bowel.
Once the flushing process is triggered via the control panel (4) the toilet pulls the foil from the foil cassette (2) automatically, welds it and prepares for the next use of the toilet.
The odour-proof closed foil bags are collected in the tray (8).
Control panel

| No. | Description | Function |
| 1 | Display | Display of the remaining large flushing processes |
| 2 | "Small flushing process" button |
|
| 3 | "Large flushing process" button |
|
| 4 | "Separate" button | Creating a single bag with subsequent pressing of buttons (2) or (3) |
| 5 | Arrow keys |
|
Display
 | The toilets is ready for operation. Displayed numbers stand for the still available "Large flushing processes".
| ||
 | The toilets is not ready for operation. The toilet lid is not properly closed.
| ||
 | The toilets is not ready for operation. There is not enough foil available.
| ||
 | The toilets is not ready for operation. There is a fault in the welding unit.
| ||
 | The toilets is not ready for operation. The tray must be emptied.
| ||
 | The toilets is not ready for operation. The battery voltage is too low.
| ||
 | The toilets is not ready for operation.
| ||
 | Status display of the process flow The process is stopped if the lid or the tray is opened during the running process.
| ||
 | Bag size display The bag size displayed on the Display will be produced.
|
Preparation
Check the status of the toilet
 The display shows the theoretically available number of large bags. If the content in the foil compartment is heavier than 500 g, the weight can pull down the foil liner and falsify the number on the display.
For technical reasons, a low residual foil always remains on the foil liner.
- Check that there is enough foil for a complete bag before each use of the toilet and in particular when the display shows less than 5 available bags.
- Make sure that there is always enough refill foil liner near the Clesana C1.
Insert or change the foil liner
- Press the rear tab of the lid unit forward (2) and lift it upwards with both hands (2).

- Take the foil cassette out of the toilet and insert lay it upside down on an even surface.
![]()
- Place the foil liner over the foil cassette. The protruding foil liner points downwards.

- Rotate the foil cassette and pull the protruding foil approx. 10 cm upwards.

- Reinsert the foil cassette with the protruding foil pointing upwards in the foil compartment. Make sure no foil is jammed between the foil compartment and the foil cassette.

- Pull the foil upwards until you see at least 4 visible folds.
![]()
- Fold the foil inwards and distribute it evenly in the foil compartment.
![]()
- Place the lid unit by fixing it in the front area (1) and then snapping it in the groove in the rear area of the Clesana C1 (2).
![]()
- Press and hold the arrow button on the control panel for 3 seconds (until the circle appears).
![]()
- The foil tube is welded.
- The counter is reset.
- The toilets is ready for operation.


Operating steps after the toilet trip
Use the absorber for fluid binding

Health impairment through improper use.
- Do not swallow the absorber.
- Do not allow the absorber to come into contact with the eyes.
For binding the fluids (e.g. Urine) we recommend the use of Clesana Super Absorber. The powder shell dissolves upon coming into contact with the fluids. The powder binds the fluids in the foil bag.

Note the filling level
Toilet paper should not be over the prescribed maximum filling level, otherwise the welding can be interrupted.
- Maximum filling level of a large bag
![]()
- Maximum filling level of a small bag
![]()
- Maximum filling level of an extra small bag
![]()
- Exceeding the maximum filling level
![]()


 Note the correct position of the toilet paper:
- With large bags below the white plastic ring shining through the film
- With small bags bellow the upper transport rollers
- With extra small bags bellow the welding jaws
Start flushing process
During the flushing process the individual bags are separated from each other by welding. After three bags the bag chain is automatically separated from the foil linger and falls into the tray.

Fig. 1: Select small or large flushing process on the control panel
- "Small flushing process" button
- "Large flushing process" button
- "Separate" button
- Check the filling level of the toilet (See "Note the filling level").
- Close the toilet lid.
- Select the bag size on the control panel with button (1) or
| Display | Bag size | Button | Bag length | Max. bag per liner | Recommended |
 | Small | 1 x Flush ing process small | Approx. 20cm | 38 | "Small business" and "Large business" with less paper |
 | Large | 1 x Flush ing process large | Approx. 30cm | 26 | "Large business" with normal paper quantity |
 | Extra Small | 2 x Flushing process small | Approx. 15cm | 50 | "Small business" without paper |
 | Extra Large | 2 x Flushing pro cesslarge | Approx. 40cm | 19 | "Large business" with lots of paper. Is separated automatically. |
Within 3 seconds after the last pressing of the button the bag size can be freely changed by pressing the button again. After 3 seconds the Display changes to "Status display of the process flow" and the last displayed bag size is produced
- The flushing process is started.
- Selected button (1) or (2) flashes.
- The additional button (3) is flashing while the bag chain is separated automatically.
- Wait until all buttons of the control panel light up.
- The flushing process is completed.

Fig. 2: Empty the tray after the separation of the second bag chain
- The flushing process is completed.
- If the second bag chain is separated automatically, follow the prompt on the Display (4) and empty the tray.

Optional operating steps
Perform manual bag separation
With this function you can separate the bag from the foil liner after flushing process and can remove it directly out of the tray.

Fig. 3: Perform manual bag separation
- Check the filling level of the toilet (See "Note the filling level").
- Close the toilet lid.
- Press and hold for 3 seconds one after the other the button (3), followed by button (1) or (2), depending on the bag size you wish to use.
- The flushing process is started.
- Button (3) and selected button (1) or (2) flashes.
- Wait until all buttons of the control panel light up.
- The flushing process is completed.
- The filled and welded bag is separated and is in the tray.

Fig. 4: Empty the tray after manual separation of the bag chain
- Follow the prompt on the Display (4) and empty the tray.

Interrupt the flushing process
With this function you can interrupt the welding or separation process any time, e.g. if you have selected the incorrect bag size on the control panel. The welding jaws return to the start position after the interruption.
If the foil has been transported before the program interruption, the counter on the Display is adjusted accordingly.

Fig. 5: Interrupt the flushing process
- Press and hold the arrow button (1), while a process is in progress.
- Message "E6" appears on the Display.
- Confirm the message by pressing the arrow button (1).
- Wait until all buttons of the control panel light up.
- The program interruption is completed.
Restart the toilet
You can restart the toilet if the control panel does not respond or if there is an error. The number of remaining toilet trips is stored.

- Press and hold simultaneously the arrow button (3), the "Flushing process" button (1) and the "Separate" button (2).
- The toilet restarts.
- Wait until all buttons of the control panel light up.
- If the error persists, preform a troubleshooting (See "Troubleshooting").
Cleaning and maintenance
Cleaning
NOTE! Damage to the toilet through improper cleaning.
- Do not clean the toilet with running water (e.g. With a hose).
- If the welding unit comes into contact with water: Let the toilet to dry for 24 hours without inserted foil liner.
- Do not use bleach.
Since the Clesana C1 operates without water, and the "Foil bowl" is renewed with each use, it is very low maintenance. We recommend however to clean the following components regularly with a moist cloth and commercially available cleaning materials:
- Toilet glass
- Toilet lid
- Foil compartment
- Base body
Change the Teflon tape
After approx. 1500 weldings or separations the non-stick coating of the Teflon tapes over the welding wires looses its effectiveness. The loss of the non-sticking effect leads to problems in the transport and the welding of the plastic foils.
- Both Teflon tapes must always be changed at the same time.
- The number of welding and separation cycles can be queried via the Display on the control panel. For this, open the lid and press the small button twice for flushing. The "Total" number is the same as the number of cycles.
Remove the Teflon tapes
- Take the foil cassette out of the toilet.
- Close the toilet lid.
- Press the "Flushing process" button on the control panel and open the toilet lid after approx. 2 seconds.

- The flushing process is interrupted.
- The distance between the welding jaws is 6 to 10 cm.
- Insert the tip of a slotted screwdriver in the recess and lever the first Teflon tape out of the guide.

- Repeat the process for the second Teflon tape.
- Dispose of the removed Teflon tap in the household waste.


Insert the Teflon tapes
NOTE! Damage to the welding mechanism due to falling off of the Teflon tape
If previously removed Teflon tapes are used again they can fall off due to the worn retaining lug. The welding mechanism might be damaged if the welding process is performed without Teflon tapes.
- Do not use any previously removed Teflon tapes.
- Make sure that when mounting the Teflon tapes all retaining lugs are snapped into place and are not damaged.
- Click the first Teflon tape in the guide rail.
- Repeat the process for the second Teflon tape.
- Close the toilet lid.

- The welding jaws return to their original position.
- The toilets is ready for use.

Maintenance
NOTE! Opening the base body.
Opening the base body can result in irreversible damage to the C1. This would void the guarantee.
- Do not open the base body.
Error codes
| Error | Cause | Troubleshooting | ||
| E1 | The toilet does not initialize. |
| ||
| E2 | The toilet lid has been opened during the process. |
| ||
| E3 | The tray has been opened during the process. |
| ||
| E4 | Voltage drop bellow 8.4V on the printed circuit board |
| ||
| E5 | The battery voltage is less than 11.8V |
| ||
| E6 | Confirm program abort |
| ||
| E8 E9 | Light barrier error |
| ||
| E10 E11 | Motor error |
| ||
| E12 | Overcurrent on the left welding jaw motor, possible object between the welding jaws |
| ||
| E13 E14 | Error on the left welding jaw motor |
| ||
| E15 | Overcurrent on the right welding jaw motor, possible object between the welding jaws |
| ||
| E16 E17 | Error on the right welding jaw motor |
| ||
| E18 | Overcurrent on upper roller motor, possible foil wrapping |
| ||
| E19 E20 | Error on the upper roller motor |
| ||
| E21 | Overcurrent on lower roller motor, possible foil wrapping |
| ||
| E22 | Error on the lower roller motor |
| ||
| E23 | Error on the lower roller motor |
| ||
| E24 E25 | Safety Timer On |
| ||
| E26 | Welding overcurrent |
| ||
| E27 | Interruption of the welding current |
| ||
| E28 | Overtemperature when welding |
| ||
| E29 | Printed circuit board error |
| ||
| E30 | Fan overcurrent |
| ||
| E31 | Fan error |
| ||
| E32 | No foil |
| ||
| E34 | No power when welding |
| ||
| E35 | Short circuit of the welding current |
| ||
| E36 | Welding is too cold, low temperature |
| ||
| E37 | Unexpected temperature change while welding |
| ||
Troubleshooting
| Fault | Display | Possible Cause | Remedy |
| The toilet cannot be used |  | Battery voltage < 11.8 V |
|
 | The lid is open or is not mounted. |
| |
| The magnets of the lower rubber pads of the lid are missing. |
| ||
 | The tray is not inserted or is full. |
| |
| The magnets behind the tray have fallen out of their seat. |
| ||
 | No more foil in the foil compartment. |
| |
| The control panel does not light up | — | The toilet is in standby. |
|
| There is no voltage. |
| ||
| The control panel or the toilet is defective. |
| ||
| The bag is leaking | — | There is foreign object in the welding seam e.g. Toilet paper. |
|
| The Teflon tape is defective, worn or loose. |
| ||
| Defective welding rod |
| ||
| Separation not successful | — | There is foreign object in the welding seam e.g. Toilet paper. |
|
| The welding rod is defective. |
| ||
| The bag sticks to the Teflon tape | — | The Teflon tape is worn out. |
|
| The length of the bag is irregular | — | The foil is jammed between the foil compartment and the cassette. |
|
| The bag length varies with content and filing process. |
| ||
| The bag wraps itself around the transport rollers | — | The bags accumulate in the tray and are pulled upwards and in the transport rollers. |
|
| — | The foil sticks to the Teflon tape. |
|
Consumables and accessories
You can also obtain consumables and accessories quickly and easily via the Clesana Online Shop.

www.shop.clesana.com
FAQ
All FAQ & Information are available at clesana.com.
Can the bags be put in the compost (biowaste)?
No, the bags must be disposed of with the household waste. A biologically degradable variant is currently being evaluated. In addition, human faeces must not be disposed of in organic waste.
Can the bags be disposed of in commercially available waste containers (residual waste)?
Yes, unless there are separate regulations in this respect.
Are the bags odour-proof?
In room temperature the bags are odour-proof for at least 2 weeks. With higher temperatures it is recommended to dispose of the bags within 2 days.
Can I use the toilet again immediately after the triggering of the flushing process?
No, the previous "Flushing process" must be completed first. Opening the lid earlier can cause a malfunction.
Can I weld other things in the bag?
Yes, basically biowaste, nappies or feminine hygiene products can be welded. However, no sharp-edged objects or hot ashes should be put in the bag. Note the maximum filling level!
Does the toilet function only with a 12V voltage?
Yes, only this power supply is currently possible. Operation using mains voltage of 230 volts is possible only with a special power supply unit.
How stable is the toilet?
The load-bearing capacity of the toilet with closed lid is 150 kg (sitting person).
Technical specifications
| Characteristic | Value | Unit |
| Height Width L-Adapter/round base length | 515 363 516/461 | mm mm mm |
| Seat height | 478 | mm |
| Weight of C1 with L-Adapter/with round base | 13.8/13.1 | kg |
| Supply voltage | 11.8–15 | V |
| Rated voltage | 12 | V |
| Current consumption (max.) | 22 | A |
| Power consumption in standby | 0.28 | W |
| Power consumption (max.) | 265 | W |
| Energy consumption in separation process | 1.7 ±0.17 | Wh |
| Energy consumption in welding process | 0.55 ±0.06 | Wh |
| Usage temperature | 5–40 | °C |
| IP protection class | X4 (splash water protection) | — |
Safety
This chapter contains important information on safety of the device. Read the safety instructions thoroughly before start-up and operation.
Warning signs and symbols
Warning signs are used in this manual in order to alert you against property damage and personal injuries.
| Warning symbol | Warning word | Meaning |
| | CAUTION | Hazards for persons. Non-compliance can result in minor injuries. |
| | NOTE | Information for avoiding property damage. |
| Symbol | Meaning | |
| | Important information, e.g. for better comprehension or for facilitating work processes | |
| 1., 2. | Several action steps that you must perform in the order specified | |
 | Important details in graphics | |
 | Motion sequences in graphics | |
Proper use
The waterless toilet Clesana C1 is intended to be used for sanitary bagging of excrements and personal hygiene articles. Bagging of nappies or biowaste is also possible. Different uses are not allowed. The device is intended exclusively for non-public areas.
Possible misuse
Not intended use of the device can result in property damage and personal injuries. For example, the device is not suitable for the following uses:
- Bagging of pointed or sharp-edged objects (e.g. broken glass, needles, razor blades.
- Bagging of burning or red hot objects (e.g. ashes, cigarettes, matches).
- Bagging of liquids and chemicals that could react with the bag.
- Bagging of foodstuffs or organisms.
- Use as climbing aid.
User qualification
Persons, children and people with physical, sensory or mental disabilities not familiar with the device should use the Clesana C1 only under the supervision or according to the instructions of a responsible person.
Maintenance works must be carried out by authorised qualified persons. Contact your dealer if needed.
Operation
- Regularly check that all functions are carried out correctly.
- After each use and before leaving the Clesana C1 unattended, make sure that the flushing process is completed and that the toilet is ready for use.
- Never operate the Clesana C1 without correctly mounted lid and fully inserted tray.
The Soft-Close mechanism closes the toilet lid automatically. This mechanism will be damaged if the lid is manually pressed downwards.
- Never press the toilet lid downwards.
- Never use the toilet without inserted foil liner.
Cleaning and maintenance
- Perform only the cleaning works described in these operating instructions and note the associated safety instructions.
- Do not clean the toilet with running water.
Clesana foil liners ensure a reliable functioning of your Clesana C1. The use of other foil liners can result in malfunctions.
- Use only Clesana foil liner.
Modifications and repairs
Repairs not properly carried out can result in accidents and property damage.
- Do not open the base body.
- Do not install any additional components and do not make any modifications to the device.
- Contact your dealer if a defect is suspected.
Residual risks
Live parts
Opening the base body can expose the live parts. There is a risk of life threatening electrocution.
- Do not open the base body.
Burning or pointed objects
Burning objects ignite the foil bag and cause fires. Pointed objects damage the foil bag, soiling the tray.
- Do not dispose of any burning materials such as cigarettes, matches or hot ashes in the toilet.
- Do not dispose of pointed or shape-edged objects in the toilet.
Water ingress
Water can penetrate in the inside of the toilet through a not closed lid or a not correctly inserted tray, cause a short-circuit and damage the electronic control or the welding mechanism. This may result in malfunctions and damage to the components.
- Do not expose the Clesana C1 to jet water (e.g. when taking a shower).
- Use the toilet only when seated.
- Never operate the Clesana C1 in a wet room without the lid properly placed and fully inserted tray.
- If the welding unit comes into contact with water: Let the toilet to dry for 24 hours without inserted foil liner.
Moving parts
The Clesana C1 has a rotating mechanism for optimal positioning. If the area around the toilet is obstructed by objects, the rotating of the toilet may result in crushing of fingers.
- Keep the surroundings of the toilet free of objects.
Harmful substances
Swallowing the absorber can lead to nausea and stomach discomfort. Eye contact can pose the risk of sever eye irritation.
- Keep the absorber away from the reach of children.
- Note the safety data sheet of the absorber, available on the website: https://clesana.com/infobereich/.
- In the event of eye contact, rinse the eyes with running water for several minutes.
- If you have swallowed the absorber, rinse your mouth with water and drink up plenty of water.
- See a physician in case of persistent discomfort.
Documents / Resources
References

Download manual
Here you can download full pdf version of manual, it may contain additional safety instructions, warranty information, FCC rules, etc.
Advertisement


Need help?
Do you have a question about the C1 and is the answer not in the manual?
Questions and answers