Samson Q2U Manual
- Owner's manual (24 pages) ,
- Owner's manual (12 pages) ,
- Owner's manual (53 pages)
Advertisement
Introduction
The Q2U combines the convenience of digital and analog audio capture into one microphone. With XLR and USB outputs, the Q2U is the easily fits into your home studio and mobile recording, as well as stage performance. The pack includes a desktop tripod stand, mic clip, foam windscreen, XLR cable and USB cable...everything you need to start recording right out of the box.
For recording music, podcasts, house of worship services, meetings or conferences, the Q2U is the perfect solution for recording quality digital audio on your computer or sound reinforcement. Just plug in and start creating!
Features
- Dynamic Microphone with USB digital output and standard XLR analog output.
- Full range, linear frequency response for accurate sound reproduction.
- Unidirectional, pick-up pattern picks up the sound in front of the microphone and minimizes ambient and background noise.
- Compatible with most any Mac or PC recording software
- Onboard headphone amplifier with level control for zero-latency monitoring, plus you can use the output to connect active studio monitors.
- Computer-controlled analog Input Gain makes it easy to set the proper level and get a clean signal.
- A desktop tripod stand, tripod extension, mic clip, foam windscreen, 10' USB cable and 10' XLR cable are included to easily set up the microphone right out of the box.
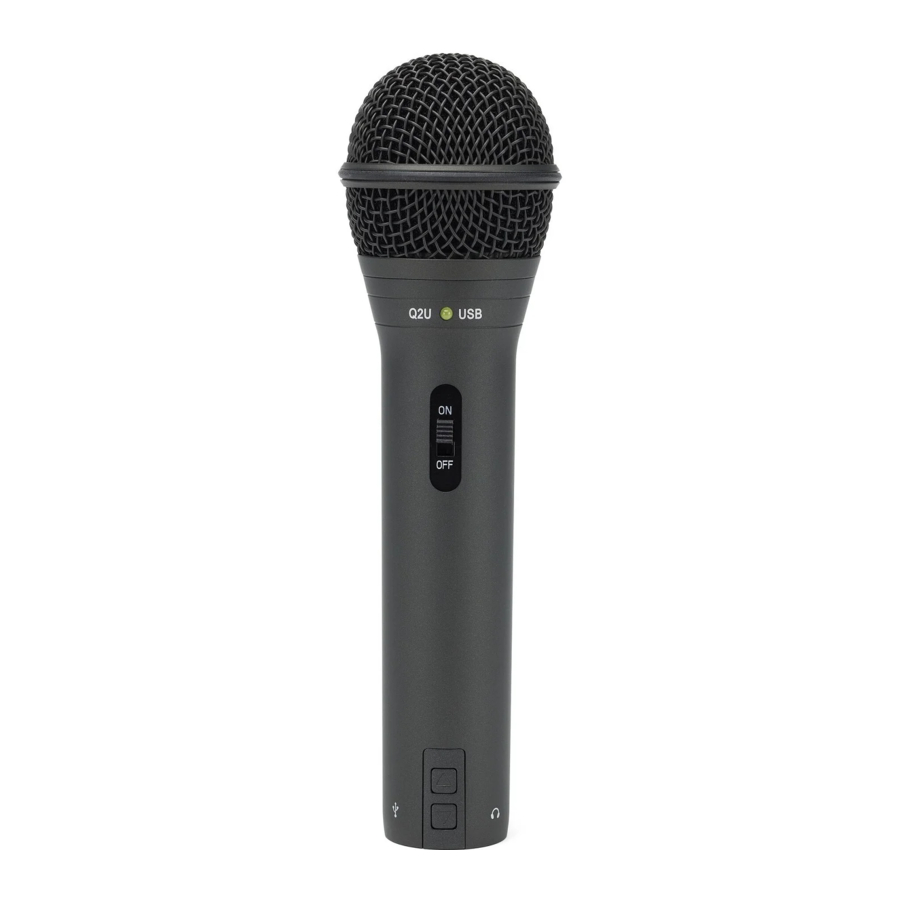
Q2U Layout

- Windscreen – Dual stage grill protects the capsule and helps reduce wind noise and p-popping.
- Capsule – Internally shock mounted dynamic microphone element with cardioid pick up pattern.
- LED – The dual color Power/Clip LED lights green to indicate power, and flashes red when the input mic is overloaded or clipping.
- ON/OFF switch – Used to turn the microphone USB and XLR outputs on or off.
- Output Level control – Up and Down buttons control the headphone output volume.
- XLR connector – Standard Male XLR connector with analog output for connecting to a standard microphone preamp.
- USB – Mini-B size USB connector for interfacing with your PC or Mac computer.
- Headphone Output – 3.5mm stereo jack for connecting headphones or studio monitors. The headphone output provides a mix of the direct signal from the microphone and the audio playback from the computer.
Getting Started - Connecting to a Computer
Using the Q2U with a computer is a simple procedure that takes just a few minutes. Simply connect the included USB cable to an available USB port on your computer and begin recording.
Using the Q2U with Windows Computers
- From the Start Menu, open the Control Panel and select Sound.
Under the Playback and Recording tabs, select the Samson Q2U as the audio device. - To adjust the gain of the microphone, click the Properties button, and then select the Levels tab. You can view the volume level as either a percentage or in dB, by right clicking on the number box.
- If the microphone LED is lighting red, turn this control down until the LED no longer flashes red.
- In the Playback tab, select the Level tab and set the computer's Master Volume to 100%. Use the Q2U's Output Level buttons to control the overall output from the headphones or speaker.
- To adjust the direct monitoring level in the Playback tab by moving the fader labeled Microphone.
Using the Q2U with Apple OSX
- Open System Preferences from the dock or the main Apple Menu.
- Select the Sound preference icon, choose the Input tab and select Q2U.
- Set the gain of the Q2U by adjusting the Input volume slider at the bottom of the Sound dialog box.
- Set the Q2U as playback volume by clicking the Output tab and select Q2U, adjust the Output volume slider at the bottom of the Sound dialog box to the maximum setting and use the Q2U's front panel Volume knob to control the overall output from the headphones or speakers.
- To turn direct monitoring on or off, open the Audio/MIDI Setup utility located in the Utility folder inside the Applications folder. Then click the check-box in the Thru column in Audio/MIDI Setup.
Quick Start
Follow this simple quick start for a typical set-up to start recording.
Using the Q2U with a computer

- Unpack the Q2U, and position the microphone on the desktop stand.
- Set the Q2U's ON/OFF switch to the "ON" position and point the end of the microphone towards the performer.
- Connect headphones to the Headphone output located on the bottom of the microphone.
- Plug the mini-B (small) end of the USB cable to the Q2U and plug the other end of the cable into an available USB port on your computer.
- Launch your recording software, turn down the main output level and select the Q2U for the input and outputs.
- Set up a mono record track in your software.
- Set the level of the microphone following the instructions in "Getting Started - Connecting to a Computer".
- Set the level of your headphones to a comfortable listening level by using the Up and Down Output Level Control buttons.
- Press the record button and start creating.
Microphone Placement
In order to maximize the quality of your recordings, you should pay careful attention to the placement and positioning of the Q2U for the instrument or vocalist that you are miking. The Q2U is a unidirectional microphone with a cardioid pickup pattern. Cardioid microphones, exhibit a phenomenon known as proximity effect. Proximity effect is a resulting change in the frequency response of a microphone based on the position of the mic capsule relative to the sound source. In general, as the microphone moves closer to the sound source, the bass response increases.
You can also make subtle changes to the frequency response by making minor adjustment to the position. Specifically, when you point a cardioid mic directly at the sound source (on axis) you will get the best frequency response, however when you start pointing the microphone slightly away (off axis) you will notice the high frequency response dropping off and the microphone will start to sound like it has more bass and less highs.
For most vocal applications you'll want to position the microphone directly in front of the artist about 4 to 18 inches. This will pickup the voice while minimizing unwanted background or ambient noise. If you are close miking vocals, and notice plosive sounds, like p-pops, caused by plosive consonants set the microphone to a slight angle to reduce p-popping. Slight changes to the angle of the microphone in reference to the sound source can make some pretty amazing equalization adjustments. This can be a very useful technique in capturing the optimum sound of drum set, acoustic guitar, piano or other instruments in a live room or sound stage. Experimentation and experience are the best teachers in getting good sounds, so plug in and start creating!
Using the Q2U with a mixer
Using the XLR Output you can connect the Q2U to a standard PA mixer for live sound applications or when recording through an audio interface. Connect the included XLR cable to your mixer Set the ON/OFF switch to the "ON" position.
Follow the manufacturer's instructions for setting the microphone level of the mixer or audio interface.
P-Popping
Sometimes when recording vocals certain plosive consonants (like hard "P" and "B" sounds) overload the input of the microphone which causes clipping and adds distortion to your recording. These are some of the worst sounds that can make their way into your recording. Once recorded, they are almost impossible to remove and can be very distracting to your listener. In addition to the dual stage grill, the Q2U includes a large foam windscreen which reduces the effect of the blasts of air from vocalists when pronouncing words that include these hard consonant sounds. The pop filter also helps to protect the microphone element from moisture.
Stand Mounting
The Q2U includes a tripod desktop microphone stand. The desktop stand includes an extension piece. This allows you to raise the height of the microphone towards the performers mouth.
Additionally, the Q2U can be mounted to any standard microphone stand using the included mic clip. Simply screw the Q2U mic clip on to your mic stand or boom arm and adjust the microphone to the desired angle.
Polar Pattern & Frequency Response
Two characteristics of a microphone are its polar pattern and frequency response. The polar pattern describes the directionality of the microphone and the frequency response is a graphical representation to how the microphone reacts to different frequencies.
The Q2U is a unidirectional microphone which captures sound in front of the microphone and rejects sound from the sides and back. This allows for better separation of performers or instruments in the studio, and picks up more of the performer sound in relation to the sound of the room. For information on microphone technique visit samsontech.com.
Polar Pattern

Frequency Response

Specifications
Element Type: Dynamic
Polar pattern: Cardioid
Frequency Response: 50Hz - 15 kHz
Power Requirements: 5V DC USB Power
Controls: On/Off Switch, Headphone Volume
Output Connectors: Mini-B USB, XLR, 3.5mm TRS Stereo Headphone
Sample Rate: 44.1/48kHz
Bit Rate: 16bit
Sensitivity: -54 dBV/Pa
Max SPL: 148 dB SPL
Headphone Output Power: 10mW @ 16 ohms
Included Accessories: USB cable, XLR cable, tripod stand, tripod extension, microphone clip, foam windscreen
Weight: 11.2oz / 317.5g
Dimensions: 7.5 " x 2.2 " (diameter) / 190 mm x 55 mm (diameter)
At Samson, we are continually improving our products, therefore specifications and images are subject to change without notice.
Documents / Resources
References
Download manual
Here you can download full pdf version of manual, it may contain additional safety instructions, warranty information, FCC rules, etc.
Advertisement


Need help?
Do you have a question about the Q2U and is the answer not in the manual?
Questions and answers