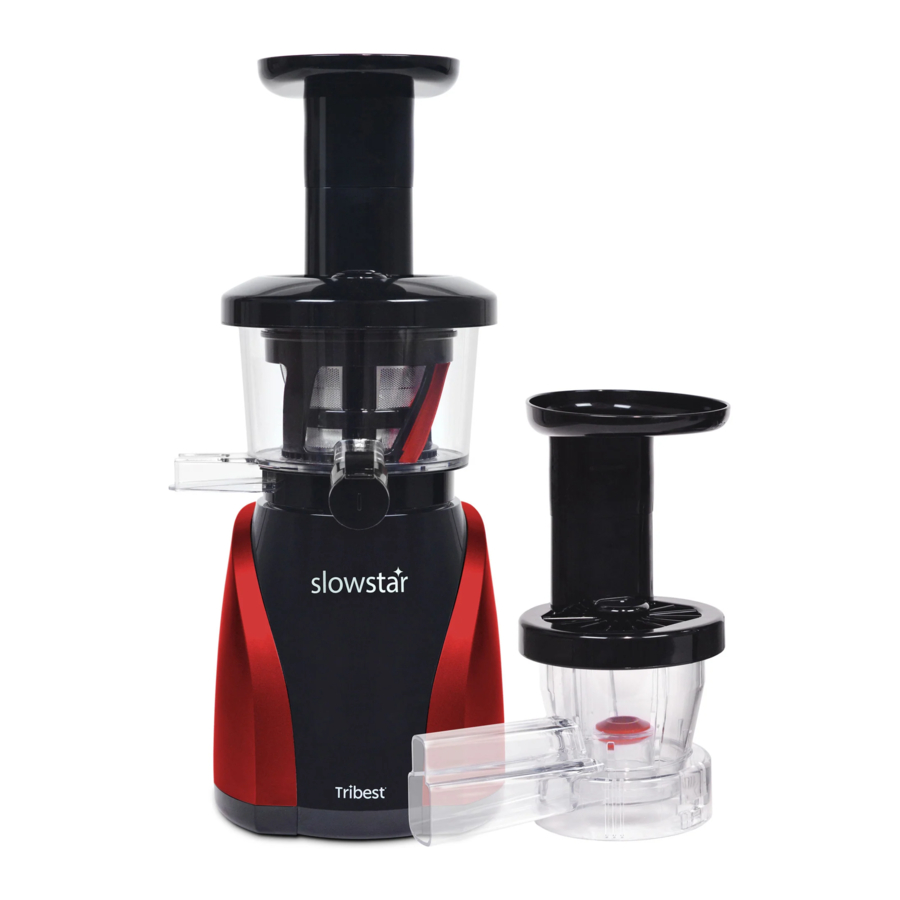
Tribest slowstar SW-2000 / SW-1000 / SW-2000-B Manual
- Operation manual (30 pages) ,
- Operating manual (28 pages) ,
- Operation manual (68 pages)
Advertisement
FEATURES
- Slow juicing at approximately 47 RPM
The Slowstar extracts juice using a slow juicing mechanism to retain the maximum amount of nutrients and enzymes for a naturally healthier juice. - Mincing and Homogenizing with the Mincer Attachment (SW-2000 only)
With the Mincer Attachment, included with the SW-2000 (not included in SW-1000), mincing foods is easy and simple. Easily mince foods, from fruits and vegetables to meats and fish, to make sauces and meat balls. - Double-Edged Duoblade Ultem Auger
Unlike ordinary vertical slow juicers, which have a single-bladed auger, the Slowstar is equipped with a unique Duoblade Auger, which has two blades to cut stringy vegetables, such as celery. The result is juicing with less jamming and improved juice quality with less pulp mixed into the juice. - Torque Power equivalent to a 9 HP motor
The powerful 200 watt motor and 3-stage reduction gear system produce the torque power equivalent to a 9 HP motor. - Juice Cap
The Juice Cap prevents leaks and drips when switching juice containers. The cap is detachable for easy cleaning, if needed. Closing the juice outlet with the Juice Cap allows pre-mixing of the juices, if desired. - Easy to assemble & disassemble
The Auger Housing and Main Body detach easily for efficient cleaning and assembly. - Additional Safety Switch
All parts must be assembled properly. The Feeding Chute Assembly and Auger Housing must be locked securely in place in order to turn on the Slowstar, assuring safe operation. - Virtually BPA-Free Ultem Duoblade Auger and Juicing Screen
- On/Off/Reverse Switch
- Full 10-year warranty
PARTS
- Plunger
![]()
- Cleaning Brush
![]()
- Feeding Chute Assembly
![]()
- Mincer Lid
![]()
- Mincer Lid
- Double Edged Duoblade Auger
![]()
- Juicing Screen
![]()
- Pulp Wiping Assembly
![]()
- Auger Housing
![]()
- Auger Housing for Mincer
![]()
- Auger Housing for Mincer
- Main Body
![]()
- Juice Container & Pulp Container
![]()
- Power switch
![]()
- Additional Safety Switch Link
The Main Body, Auger Housing, and Feeding Chute Assembly must be assembled before the switch is turned on. (otherwise the Slowstar will not turn on)


The Slowstar will not operate unless the Main Body, the Auger Housing and Auger Housing Lid are properly assembled with the inner safety switch locked in place.
HOW TO ASSEMBLE
- Insert the Pressure Plug (located at the bottom of the Auger Housing) by inserting it into the Pulp Outlet properly, as shown in the picture.

- Attach the Auger Housing or Auger Housing for Mincer to the Main Body. Rotate the housing clockwise towards the Safety Switch Link.

- Place the Juicing Screen into the Pulp Wiping Assembly, then assemble the Pulp Wiping Assembly with the Auger Housing. Assemble the Auger Housing with the Pulp Wiping Assembly by aligning the marks on each of the units as shown in the picture.
![]()
- Place the Duoblade Auger into the center of a the Juicing Screen or Auger Housing for Mincer.

- Assemble the Feeding Chute Assembly/ Mincer Lid. Match the marks on Feeding Chute Assembly/Mincer Lid to the marks on Auger Housing/Auger Housing for Mincer, then rotate the Feeding Chute Assembly towards the mark on the Handle of Auger Housing as shown on the picture.
![]()
Assemble the Feeding Chute Assembly last. If the Feeding Chute Assembly is assembled before the Auger Housing is assembled on the Main Body, the Auger Housing and the Main Body cannot be assembled.


- Place the juice and pulp containers as shown in the picture. Both containers look identical.
- Plug the Power Cord into the power outlet.
HOW TO USE
- Prepare ingredients for juicing
- Cut stringy, fibrous ingredients (such as celery or kale) into 4-5 inch pieces for best juicing results. For even better results, cut the ingredients to a width of 1 inch and insert the pieces one by one.
- Cut carrots into halves or quarters lengthwise before feeding them into the Feeding Chute.
- Cut fruits into small pieces so they can go smoothly through the Feeding Chute, and remove any big hard seeds.
- Feed the ingredients into the Feeding Chute piece by piece in order to properly extract juice without clogging.
- The amount of juice extracted would vary depending on the water content of the ingredient.
- Soak hard grains in clean water for about 4-8 hours before mincing, or it may cause overload damage to the Slowstar.
- Turn on the Machine
- Check that the power switch is at the 'OFF' position. Then plug the cord into the wall outlet before turning it on.
- Do not run the Slowstar without juicing or mincing foods for more than 1 minute. (It may wear out the Duoblade Auger and/or the Juicing Screen any may cause a malfunction.
- Check that the Juice and Pulp Containers are properly placed at the base of the spouts to prevent juice or pulp leakage.
- Push the switch to 'ON' position to start operation.
![]()
- Check that the power switch is at the 'OFF' position. Then plug the cord into the wall outlet before turning it on.
- Insert clean ingredients into the Feeding Chute with the Plunger
Tips:- Use the freshest ingredients possible for optimal juice extraction.
- Soak refrigerated vegetables in drinking water for at least 10 minutes.
- Soak pine needles in water for an hour before juicing.
- Chop arrow root to smallest size possible in order to extract the juice.
- In order to extract green angelica juice, use only the leaves or chopped stems smaller than 2cm.
- Remove seeds first when juicing fruits with hard seeds.
- While in use, the Slowstar may make some noise, which is normal.
- Please insert ingredients one by one, when switching to a different ingredient wait until the previous ingredient is fully extracted.
- Use the freshest ingredients possible for optimal juice extraction.

NOTES AND

- It is best to drink the juice right after extraction.
- The Slowstar may be used for preparing seasonings (garlic or pepper), but when grinding grains, be sure to soak for least 4-8 hours (not doing so may damage the machine and cause malfunctions).
- Do not operate the Slowstar with wet hands, completely dry your hands before operating; otherwise an electric shock, short circuit, or fire may occur.
- Do not operate the Slowstar for more than 30 minutes continuously. Otherwise the motor may overheat and a malfunction may occur. Please let it rest for 5 minutes before continuing.
- Do not insert any utensils, knives, or fingers into the Slowstar. Please use the Plunger to push down the food. Placing foreign objects into the juicer may damage some parts of the machine, cause injury, or accident.
- Do not insert fruits without removing the seeds first. Hard seeds in the feeding chute may damage or cause the machine to malfunction.
What to do when the machine stops working while in operation.
If the Slowstar stops in the middle of operation, please turn the switch to the 'OFF' position first. Turn the switch to 'REVERSE' position to disloadge the fruit or vegetable pieces that are stuck between the Duoblade Auger and the Auger Housing. Turn the switch to the 'OFF' position then to the 'ON' position. (Repeat this procedures up to 3 times or as many times as necessary). Upon releasing the 'REVERSE' button, the Slowstar will stop.
- While operating the Slowstar in the 'ON' position, please turn the switch to the 'OFF' position and wait until the Slowstar stops completely before using the 'REVERSE' function. If the Slowstar is switched to 'REVERSE' before the Slowstar stops completely, it may cause a malfunction.
- If the Slowstar still does not work, please turn the switch to the 'OFF', unplug the machine, disassemble the parts and clean it before trying to operate again.
How to use the Mincing Attachment (SW-2000 Model Only)
- Assemble the Auger Housing for Mincer with the Main Body. Rotate the housing clock wise towards the Safety Link.
- Place the Duoblade Auger into the middle of the Auger Housing for the Mincer.
- Match the Mincer Lid marks with the Auger Housing for Mincer marks, and then rotate the Mincer Lid towards the Auger Housing for Mincer handle marks to lock in place.
- Place a container under the Outlet.
- Put ingredients into the Feeding Chute.
HOW TO DISASSEMBLE

- Before turning off the Slowstar, remove the fibers in the Auger Housing simply by pouring 1 or 2 cups of water into the Feeding Chute after each use (Self-Cleaning).
- Turn off the Slowstar first, then unplug the machine.
- Disassemble the Feeding Chute Assembly first by rotating counter-clockwise (shown as 3 in the picture).
- Disassemble the Auger Housing from the Main Body in the direction of 4a and 4b in the picture.
![]()
Only after disassembling the Feeding Chute Assembly can the Auger Housing be detached from the Main Body. - Disassemble the parts as the reverse sequence of assembling.
- Disassemble the Feeding Chute Assembly by rotating it counter-clockwise.
![]()
- Remove the Duoblade Auger.
![]()
- Disassemble the Juicing Screen.
![]()
- Remove the Pulp Wiping Assembly.
![]()
- Disassemble the Feeding Chute Assembly by rotating it counter-clockwise.


Please be aware that unless Slowstar is cleaned right after each use, residue may build up.
This may lower the performance of the Slowstar or cause difficulties in cleaning.
HOW TO CLEAN AND STORE
- Please turn on the Slowstar and pour 1-2 cups of water into the Feeding Chute to clean out most of the pulp remaining in the housing.
- Disassemble the parts.
- Clean the disassembled parts under running water using the cleaning brush.
- Do not use a steel brush, abrasive solvent, or harsh cleaning agent.
- Do not use an automatic dishwasher or dish dryer.
- Do not clean the Main Body with running water. Clean the Main Body with a damp, soft towel.
- After cleaning each part, dry each part completely, and place it on a clean surface.
TIPS:
- Order of Disassembly and Assembly
- Disassembly:
- Disassemble the Feeding Chute Assembly by rotating it counter-clockwise.
- Disassemble the Duoblade Auger Housing by rotating it counter-clockwise.
- Separate all parts in the Auger Housing.
- Clean all juicing parts with the Cleaning Brush under running water.
- Dry all parts completely.
- Assembly:
- Assemble the Auger Housing on the top of the Main Body by rotating it clockwise.
- Install the Pulp Wiping Assembly inside of the Auger Housing.
- Insert the Juicing Screen into the Pulp Wiping Assembly.
- Insert the Duoblade Auger into the Juicing Screen.
- Assemble the Feeding Chute Assembly on top of the Auger Housing by rotating it clockwise.
- Disassembly:
- If the Feeding Chute Assembly lid does not open after operation
- Press the switch to the 'REVERSE' position 2-3 times first, then press the switch to the 'ON' position to remove any residue that may be stuck between the Auger Housing and Lid.
CLEANING THE JUICE CAP:
- Disassemble the Auger Housing
- Flip open the Juice Cap
- Rinse thoroughly under running water
* If needed, remove the gray silicone seal off of the cap and rinse with water. Air-dry completely before reattaching the seal.
TIPS FOR SILICONE PARTS
- Silicone parts can be disassembled and washed.
- Fully dry the silicone parts after washing.
- Please check if the silicone parts are assembled correctly.
*Juice may leak if you do not assemble the silicone parts properly.
Silicone Blade

- Disassembly: Hold the Tail portion (2 in the drawing) of the silicone blade and push upward to the middle (3 in the drawing) of the blade slot, then pull outward.
- Assembly:
- Insert the Head portion (1 in the drawing) into the middle of the blade slot in the Rotator (3 in the drawing), making sure the Silcone Blade groove and the Rotator blade slot groove fit together, and slide the Head upward.
- Insert the Tail portion into the middle of the blade slot, making sure the Silcone Blade groove and the Rotator blade slot groove fit together, and slide the Tail downward.
*After inserting pull the Silicone Blade tabs on the inside to make sure it is securely assembled.
Sealing ring

- Disassembly: Push from the bottom side of the Auger Housing (smaller silicone ring) for easy cleaning.
- Assembly: After it is thoroughly dried, put the sealing ring properly back in its place. Push the sealing ring (with the larger side facing up) back in place from the inside of the Auger Housing.
Pressure Plug
After washing, put the Pressure Plug in correctly as shown in the picture.

TROUBLESHOOTING
| Status | Checklist |
The Slowstar does not work |
|
Motor stops during use |
|
Amount of juice is too little |
|
Juice Container is shaking in the middle of operation |
|
Seems like the Duoblade Auger is grinding |
|
Hearing a lot of sounds coming from the Slowstar |
|
Juice is spilling out of the Slowstar |
|
| After extraction, the color of the Juicing parts and Juice Container are different. |
|
| The Feeding Chute Assembly does not disassemble easily. |
|
WHEN YOU NEED SERVICE
In the unlikely event that you need service on your Slowstar, or if it fails to function properly while within the warranty period during normal household operation, contact the Slowstar Warranty Service Center. For all service inquiries, please first contact the Slowstar Warranty Service Center for a return merchandise authorization (RMA) number and proper routing instructions.
Slowstar Warranty Service
Center Tribest Corporation 1143 N. Patt St.
Anaheim, CA 92801
TEL: 888-254-7336, FAX: 714-879-7140
If You Need Service:
- Call the Slowstar Warranty Service Center (888-254-7336) to get a Return Merchandise Authorization (RMA) number to send your Slowstar to the service center.
Returns will NOT be accepted without an RMA number clearly written on the box. - Pack your Slowstar securely in the original shipping box. Make sure all affected parts are enclosed.
- Fill out the service request form and enclose it in the shipping box.
- Seal the shipping box securely with packing tape.
- Address the box to the Slowstar Warranty Service Center. Be sure to put your return address on the outside of the package.
- It is always wise to insure the package against possible damages or loss in transit.
Ship prepaid.
Detach Form on dotted Line
SERVICE REQUEST FORM
First Name Initial Last Name
Address: Street Apt #
City State Zip
Phone
Serial # Model #
Date of Purchase Place of Purchase
Name of parcel/post carrier (In case of damage during delivery)
Reason for service request (use additional paper if more space is needed)
JUICER RECIPES
Citrus Blend
2 small grapefruits (peeled and cut into 4 to 6 pieces)
3 medium sized oranges (peeled and cut into 4 pieces)
½ small lemon (peeled and cut into 2 pieces)
½ small lime (peeled and cut into 2 pieces)
Note:
- For sweeter taste – use less lemon and lime
- It is not necessary to peel the lemon or lime Method: Juice all together and enjoy.
Apple Lemonade
3 farm apples (Yellow Delicious, Pippin, or Granny Smith)
3 medium sized oranges (Peeled and cut into 4 pieces)
½ lemon (Peel is optional for sweeter flavor) Method: Juice all together and enjoy.
Wheatgrass Delight
4 handfuls wheatgrass
4 carrots (Cut in 2 to 4 pieces)
1 firm apple (Cut into 6 pieces)
Thin slice Ginger
Method: Juice all together and enjoy.
Ambrosia Nectar
2 bunches of grapes
3 apples (Yellow Delicious, Granny Smith, or Pippin –cut into 6 pieces)
1 kiwi (peeled and cut into 2 pieces)
1 slice honeydew (cut into cubes)
1 slice pineapple (cut into cubes)
1 whole lemon (peeled and cut into 4 pieces) ½ cup cranberries
Method:
- Alternate juicing grapes, kiwi pieces, melon cubes, pineapple cubes, apple pieces, and cranberries.
- Juice lemon separately and add to taste.
Note: Quantities of ingredients may be varied with good results. Do not be afraid to experiment according to your own taste.
Watermelon Quench
1 Watermelon with seeds – if organically grown, add rind also
Method:
- Slice watermelon into pieces that fit easily into the feeding chute of the juicer.
- Juice and enjoy.
Mellow Melon Punch
¼ cantaloupe (cut into cubes)
¼ honeydew (cut into cubes)
2 slices of watermelon (cut into cubes)
Method:
Juice all together and enjoy.
Snappy Apple
7 apples (Fuji, Granny Smith, Yellow Delicious- Cut into 4 to 6 pieces)
½ jalapeño
¼ lime 1 kiwi
Method:
- Juice kiwi and lime first.
- Next juice jalapeño.
- Finish by juicing the apples.
Dr. Walkers Choice (#61)
10 oz. Carrots (Cut into 4 pieces) 6 oz. spinach
Method: Alternate juicing spinach and carrots.
Green Tang
2 pineapple wedges (cut into smaller pieces)
1 sprig of mint
3 handfuls of wheatgrass
¼ lemon
1 slice of ginger for flavor
Method:
- Juice wheatgrass.
- Juice the mint.
- Juice lemon.
- Juice pineapple cubes.
Note: Pineapple wedge is a 1 round slice of whole pineapple cut into quarter pieces). If pineapple is not organically grown, remove the outer skin before juicing.
Oriental Express
3 leaves of Napa cabbage- cut lengthwise
4 stalks of Bok Choy with leaves – cut lengthwise
2 stalks of anise (Fennel) with green stem and leaves
6 medium carrots (cut into 4 pieces)
2 apples (Yellow Delicious, Fuji or Granny – cut into 4 to 6 pieces)
Method:
- Juice Napa cabbage, Bok Choy, and fennel first.
- Juice apples second.
- Juice carrots into the rest of the juice.
MINCER RECIPES
(SW-2000 model only)
Rye Raw Bread
2 cups of rye (soak overnight)
½ cup of sunflower seeds (soak overnight)
2 tablespoon of caraway seed ½ teaspoon of sea salt
Method (Use Mincing Attachment):
- Mix all ingredients together in a bowl.
- Feed into machine a little at a time.
- Collect and shape into pretzels, braided together, etc. for a variety of shapes.
- Dry in the dehydrator until crisp. Can be served with dips, soups, etc.
Mochi (rice cake)
2 cups of steamed rice (medium grain Calrose rice recommended)
1 tablespoon of extra virgin olive oil
Method (Use Mincing Attachment):
1. Prepare steamed rice.
- Add olive oil into the feeding chute while running the machine.
- Feed your steamed rice into the feeding chute.
- Collect rice cake coming out of the Homogenizer and shape it in round stick.
Note: Before processing, mix spices such as minced garlic or onion with the rice to flavor your rice cake. Slice the rice cake into diagonal slices. Dehydrate them and add to your soup.
Cashew-Curry Croquettes
2 cups of cashew
1 cup of sprouted wheat
3 tablespoon of curry paste (Available from Gourmet Food Shops)
1 teaspoon of Vege-salt
Method (Use Mincing Attachment):
- Put the cashews and sprouted wheat berries into the Feeding Chute.
- Add curry paste and Vege-salt a little at a time while texturizing.
- Collect the texturized mixtures.
- Mix together by hand or with a wooden spoon.
- Form into croquettes and garnish with tomatoes, radish and cucumber.
Pecan Pleasers
2 cups of pecan
1 cup of sprouted wheat berries
¼ cup of Spanish onion
1 teaspoon of poultry seasoning ½ teaspoon of Vege-salt
Method (Use Mincing Attachment):
- Put pecans, wheat berries, and onion into the Feeding Chute.
- Collect mixture in a bowl.
- Add the poultry seasoning and Vege-salt.
- Mix thoroughly by hand or with a wooden spoon.
- Shape into small wafers and serve on cucumber slices with tomato or avocado on top.
Cashew Poppy
1 cup sprouted wheat berries
¼ cup of poppy seeds
¼ cup of sunflower seeds
1 cup of cashew
½ teaspoon of vanilla
4 tablespoon of honey
Method (Use Mincing Attachment):
- Soak wheat berries for 12 hours for the sprout tips to emerge.
- Soak sunflower seeds for 6 hours.
- Homogenize the wheat berries, sunflower seeds, cashew and poppy seeds by inserting them into the feeding chute.
- Collect the mixture into a bowl.
- Add vanilla and honey and mix together.
- Roll into balls and place on a plate.
Uncooked Banana- Blueberry Ice Cream Pie
1 cup of soaked almonds
½ cup of sesame seeds
1 cup of cashews
½ cup of raisins
½ cup of dates
½ cup of pecans
1 tablespoon of vanilla
2 tablespoon of honey
7 frozen bananas (without skins)
1 ½ cup of frozen blueberries
1 kiwi
2 large strawberry (sliced)
Method (Use Mincing Attachment):
- Grind almonds, cashews, sesame, pecans, dates, and raisins together.
- Mix in the vanilla and honey; knead to form dough: them press into a 9-inch pie dish to form a crust. Let crust sit for 3 to 4 hours or place in a food dehydrator for about 45 minutes.
- Grind frozen bananas and frozen blueberries together to make ice cream.
- Put ice cream into the crust, top with slices of strawberries and kiwi. Slice and serve.
SPECIFICATION
| PRODUCT | Juicer |
| MODEL | SW-2000, SW-1000 |
| VOLTAGE | USA: 120V~, 60Hz |
| EUROPE/ASIA: 220~240V, 50/60Hz | |
| POWER CONSUMPTION | 200W |
| RPM | 47 |
| TORQUE POWER | 9.4 HP |
| MAXIMUM USE | Less than 30 minutes continuously |
| CORD LENGTH | 51 in. |
| NET WEIGHT | 19 lbs. |
| DIMENSION | 190(W) x 225(L) x 460(H) mm |
| COMPRESSION TYPE | Low Speed Compresson |
| WARRANTY | 10 Years |
IMPORTANT SAFEGUARDS
WARNINGS AND CAUTIONS
Death or serious injury may occur if the instructions are not followed.
Physical injury or property damage may occur if the instructions are not followed.
When using electrical appliances, basic safety precautions should always be employed, including the following:
- Read all instructions.
- To protect against the risk of electrical shock do not immerse the Main Body of the Slowstar in water or other liquid.
- Close supervision is necessary when any appliance is used by or near children.
- Unplug the Slowstar from the electrical outlet when not in use, before assembly or disassembly of parts, and before cleaning.
- Avoid contact with moving parts.
- Do not operate any appliance with a damaged power cord or plug. Do not operate if the Slowstar malfunctions or if the Slowstar is dropped or damaged in any manner. Contact the nearest authorized service facility for examination, repair, and/or electrical/ mechanical adjustments.
- Do not use parts that are not recommended or sold by the manufacturer of the Slowstar, as it may cause fire, electric shock, or injury.
- Do not use outdoors.
- Do not let the power cord hang over the edge of a table or counter.
- Do not let the cord come in contact with hot surfaces, including the stove.
- Always make sure that the Feeding Chute Assembly is locked securely in place before turning on the Slowstar. Do not unfasten the Feeding Chute Assembly while the Slowstar is in operation.
- Be sure to turn the switch to the 'OFF' position after each use. Make sure the motor stops completely before disassembling.
- Do not put your fingers or other objects into the Slowstar openings while it is in operation. If food is lodged in the Feeding Chute, use the Plunger or another piece of fruit or vegetable to push the lodged food down. If the food is still lodged, turn the Slowstar off, unplug it, and disassemble the Slowstar to remove the remaining food.
- Do not use the Slowstar if the Pulp Wiping Assembly is damaged.
SAVE THESE INSTRUCTIONS
- Do not disassemble, fix, or alter the Slowstar; otherwise fire, electric shock, or injury may occur; contact the manufacturer for repair.
![]()
- When the cord or the plug is destroyed or damaged, do not plug it into an electrical socket. Contact a licensed electrician for repair; otherwise electric shock, short circuit, or fire may occur.
![]()
- Do not put a foreign obejct into any opening or hole in the Slowstar; otherwise fire, electric shock, or injury may occur.
![]()
- Do not place the Slowstar near a hot surface or pour water into the Main Body; otherwise electric shock or injury may occur.
![]()
- Close supervision is absolutely necessary when any appliance is used near children; improper handling or dropping of the Slowstar may result in injury or failure of the product.
![]()
- While the Slowstar is in use, do not disassemble or insert fingers/foreign objects into the Feeding Chute or Juice Outlet; otherwise injury or accident may occur.
![]()
- Do not plug/unplug the machine while your hands are wet; otherwise electric shock or injury may occur.
![]()
- Plug in the cord correctly; otherwise electric shock or fire may occur.
![]()
- Use only proper voltage electricity; otherwise, electric shock or fire may occur. Use a transformer when using a different voltage electricity.
![]()
- Do not bend or tie the cord by force. Do not jerk or place the cord near high temperatures. Do not place the cord under a heavy object or plug into a narrow place. Damage to the cord may cause electric shock or fire.
![]()


PRECAUTIONS
- The Slowstar must be operated on an even surface; otherwise injury or accident may occur.
- Do not place any foreign objects, such as forks, knifes, or spoons, into the juice outlet under any circumstances; otherwise injury or accident may occur.
- Do not move the Slowstar during operation; otherwise fire, electric shock, or injury may occur.
- If the Duoblade Auger stops while the Slowstar is in use, turn the switch to the 'REVERSE' position for 2-3 seconds; then push the 'ON' button. If the Slowstar is kept running when there is an overload, the motor may overheat and this may result in a malfunction.
- Do not assemble or disassemble the parts while in operation; otherwise a malfunction or injury may occur. Please assemble or disassemble the parts after stopping the Slowstar, and unplug the cord from the outlet.
- Do not use any utensil other than Plunger while inserting ingredients into the Feeding Chute; otherwise injury or accident may occur.
- Do not operate the Slowstar for more than 30 minutes at a time; otherwise the motor may overheat and a malfunction may occur. Please wait 5 minutes before operating the Slowstar again.
- Do not apply excessive impact on the Slowstar or drop it; otherwise electric shock, impairment, or fire may occur.
- Please unplug the Slowstar when not in use, and do not unplug it by pulling the cord, otherwise, injury, accident, or malfunctioning may occur.
- Stop operating the Slowstar if a strange noise, excessive heat, or smoke is noticed. Contact the distributor or warranty service center.
- The Slowstar weighs approximately 9 kg, and must be moved using both hands. You may drop the Slowstar by moving it with one hand, and injury or a malfunction may occur.
- Do not wash the Slowstar with water higher than 80°F because it may result in a malfunction or product variation.
Documents / ResourcesDownload manual
Here you can download full pdf version of manual, it may contain additional safety instructions, warranty information, FCC rules, etc.
Download Tribest slowstar SW-2000 / SW-1000 / SW-2000-B Manual
Advertisement


Need help?
Do you have a question about the slowstar SW-2000 and is the answer not in the manual?
Questions and answers