Galanz GLOMJB17S2ASWZ-10 Manual
- Installation manual (44 pages) ,
- User manual (24 pages)
Advertisement
- 1 FEATURES
- 2 CONTROL PANEL
- 3 ACCESSORIES INSTRUCTION
- 4 SETTING UP YOUR MICROWAVE OVEN
-
5
OPERATION INSTRUCTION
- 5.1 Setting the Clock
- 5.2 Setting the Timer
- 5.3 Express Cooking
- 5.4 Microwave Cooking
- 5.5 Roast Cook
- 5.6 Sensor Cook
- 5.7 AirFry Cook
- 5.8 Convection
- 5.9 Microwave+Convection
- 5.10 Steam Cook
- 5.11 Weight Defrost
- 5.12 Time Defrost
- 5.13 1LB Defrost
- 5.14 Auto Cook
- 5.15 Using the Light
- 5.16 Using the Vent Fan
- 5.17 Using the Turntable
- 5.18 Add Time
- 5.19 Child Lock
- 6 CLEAN AND CARE
- 7 TROUBLESHOOTING
- 8 Specifications
- 9 IMPORTANT SAFETY INSTRUCTIONS
- 10 Documents / Resources
FEATURES
Features
- 7 AirFry Programs
- 7 auto-cook settings
- 11 variable power level
- 1000 watts of power
- Press number pad to express cooking
- Exhaust fan with four speeds
- Hidden vent
- LED lighting
- Child lock
- 12.8-inch glass turntable
Package contents
- 1.7 Cu. Ft. over-the-range microwave oven
- Air Fry Kit Steam Kit
- Turntable(with ring)
- Installation Hardware
- Grease Filter
- Exhaust Damper
- Installation Guide
- User Guide
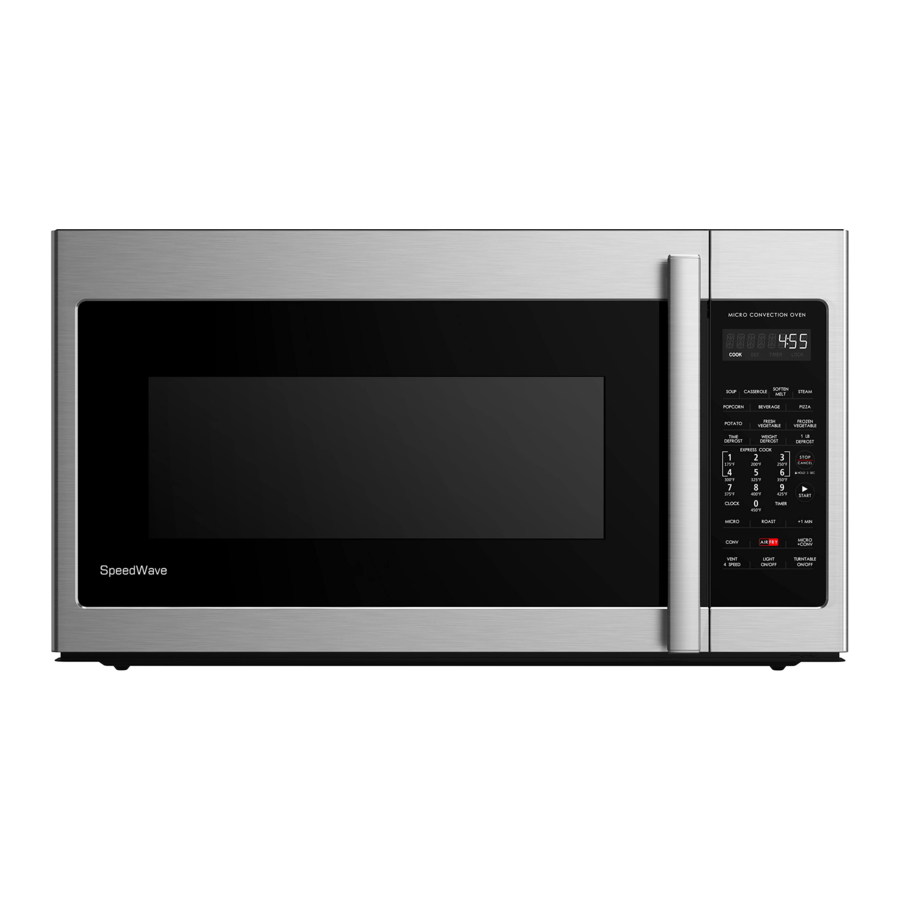
Microwave oven

- Door Safety Lock System
- Oven Window
- Plastic Roller Ring
- Plastic Shaft
- Control Panel
- Glass Turntable
- Air Fry Kit
- Steam Kit
CONTROL PANEL

| # | ITEM | DESCRIPTION |
| 1 | Display | The display includes a clock and indicators to tell you time of day, cooking time settings and cooking functions selected. |
| 2 | Cook Menus | Press to set auto cooking and sensor cooking programs. |
| 3 | Time Defrost | Use to set defrost program based on time. |
| 4 | Weight Defrost | Use to set defrost program based on weight. |
| 5 | 1 LB Defrost | Press to defrost frozen food quickly. |
| 6 | Number Pad | Press number pads to enter cooking time, power level, weight or temperature and you can set express cooking program by pressing 1—6pad. |
| 7 | Stop/Cancel | Press once to temporarily stop cooking, or twice to cancel cooking altogether, and use to set child lock. |
| 8 | Clock | Press to set clock time. |
| 9 | Start | Press to start the oven. |
| 10 | Roast | Press this button to start roast ro ram. |
| 11 | Timer | Press to set timer function. |
| 12 | Micro | Press to set microwave cooking program. |
| 13 | 1 Min | Press to add time. |
| 14 | Conv | Press to set convection cooking program. |
| 15 | AirFry | Press to set AirFry cooking program. |
| 16 | Light On/Off | Press set the controls Of the li ht outside the oven. |
| 17 | Micro + Conv | Press to set microwave and convection cooking program. |
| 18 | Vent 4 Speed | Press this button to change vent speed. |
| 19 | Turntable On/Off | Press to turn on/off the turntable. |
ACCESSORIES INSTRUCTION
| Product Name | Multi-function Steam Kit | Air Fry Kit |
| Model Number | QZ2550DA | QJ876S |
| Volume | Around o.6Gal (2.5L) | / |
| Dimension (DxH) | 10.2x6.4 in. (258mmx 163mm) | 10.63x3.94 in. (270mrnx100mm) |
| Net Weight | 1.1LB (0.5kg) | 161b (0.7kg) |
| Temperature | 40Fto 2480F(-20C -120 C) | <5000F(260 C) |
 Notes
Notes
- Please always use the steam kit with water.
- Please only use the airfry kit in convection, roast and airfry programs.
Name of accessories

- Stainless steel lid
- Steam kit base
- Steam basket
- Silica ring
- AirFry Pan
- Seal Ring
- Base
Preparation before using
- Please check all the components. Please do not use if any component is missing or damaged.
- Please make sure the screw on the carry handle is tight before using. Please tighten the screw if it is loose.
- Please make sure the silica ring is properly fitted. Please do not use the steam kit without the silica ring.
- Please clean the steam kit after using.
- Please carefully read the instruction before using this steam kit.
SETTING UP YOUR MICROWAVE OVEN

- Please add water into the steam kit base before using. Please always use the steam kit with water.
- You can directly put the food onto the stainless steel basket.
- If you see any sparking or hear sparking noise, please immediately stop the microwave and stop using the steam kit.
- Please place the steam kit in the center of turntable. This avoids the steam kit from hitting the walls of the cavity
- Please do not continually use for over 30 minutes.
- After cooking and removing the steam kit from the microwave, please be aware of hot steam escaping from the steam kit. When removing the airfry kit, please use heat-resistant glove.
Setting up your microwave oven
See the Installation Guide (included in your box) to install and set up your microwave.
Installing the turntable

Notes
- Never place the glass tray upside down. The glass tray should never be restricted.
- Both the glass tray and turntable ring must always be used during cooking.
- Always place all food and containers of food on the glass tray for cooking.
- If the glass tray or turntable ring cracks or breaks, contact your nearest authorized service center.
- Place the turntable ring in the round depression in the bottom of the microwave oven so that it turns freely.
- Place the glass turntable (flat side up) on the turntable ring so that the hub engages the turntable shaft in the bottom of the oven. The glass turntable should not turn freely when it is correctly installed.
OPERATION INSTRUCTION
Setting the Clock
This is a 12 or 24 hour clock. In standby mode, press CLOCK button once to choose 12 hour clock and if you want to choose 24 hour clock, press CLOCK button again.
Example 1: suppose you want to set the clock to 5:00 p.m. on 12 hour clock.
- In standby mode, press CLOCK button once.
- Press number pads the display will show "5:00"
- Press CLOCK button once. The display will show "SELECT 1-AM 2-PM".
- Press number pad "PM 5.00" will display.
Example 2: suppose you want to set the clock to 5:00 p.m. on 24 hour clock.
- In standby mode, press CLOCK button twice.
- Press number pads the display will show "17:00"
- Press CLOCK button to confirm.
Notes
During cooking, you can press CLOCK button to check the clock. Beeps will sound to remind you to re-enter the time, if you enter time is beyond the scope of clock when you set the clock.
Setting the Timer
- In standby mode, press TIMER button once.
- Use the number buttons to enter time.
- Press START button
Notes Once you have set the timer function, the timer countdown will always be displayed in standby mode, and you can press STOP/CANCEL to cancel the timer function. You can press TIMER to check the countdown during cooking. When the countdown ends, the buzzer will beep to remind you.
Express Cooking
In standby mode, press a number pad (1, 2, 3, 4, 5 or 6) once, the system starts the cooking program directly with the corresponding time (respectively 1 minute, 2 minutes, 3 minutes, 4 minutes, 5 minutes and 6 minutes). The microwave oven will Start to cook at full power level.
Microwave Cooking
- In standby mode, press MICRO button once.
- Use the number pads to enter cooking time. The longest time is 99 minutes and 99 seconds
- Press MICRO button once again, and then use the number pads to enter power level.
- Press START button to confirm.
| Use number button choose cooking power level | |||
| Press Number button | Power level (Display) | Press Number button | Power level (Display) |
| 1, 0 | 100% (PL: Hi) | 4 | 40% (PL: 40) |
| 9 | 90% (PL: 90) | 3 | 30% (PL: 30) |
| 8 | 80% (PL: 80) | 2 | 20% (PL: 20) |
| 7 | 70% (PL:70) | 1 | 10% (PL: 10) |
| 6 | 60% (PL: 60) | 0 | 0% (PL: 00) |
| 5 | 50% (PL: 50) | ||
Notes
During cooking, you can press MICRO button to check the power level, and you can adjust the power level by pressing number buttons when the display shows the power level.
Roast Cook
- In standby mode, press ROAST button repeatedly to choose the temperature.(450F→425F→400F→375F).
- Use the number pads to enter cooking time. The longest time is 99 minutes and 99 seconds
- Press START button to confirm.
Notes
During cooking, you can press ROAST button once to check the temperature.
Sensor Cook
The sensor features detect the increasing humidity released during cooking. The oven automatically adjusts the cooking time to various types and amounts of food.
For Casserole, Pizza, Potato, Fresh Vegetable or Frozen Vegetable:
- In standby mode, press CASSEROLE, PIZZA, POTATO,FRESH VEGETABLE or FROZEN VEGETABLE button once.
- Press START button to start.
| Menu | Weight/Serving | Maximum Time |
| CASSEROLE | 4-32 oz | 8:45 |
| PIZZA | 5-16 oz | 3:00 |
| POTATO | 1-3 servings (6-8 oz/serving) | 15:00 |
| FRESH VEGETABLE | 5-24 oz | 10:00 |
| FROZEN VEGETABLE | 5-24 oz | 15:00 |
Notes
The system will judge the required time according to the steam produced by the food. After cooking for a period of time, the display will show the remaining time, If the cooking time exceeds the maximum time and the countdown time is not detected, the cooking ends and displays "E-23". The system will detect if there is any error during the time of air blowing. If there is any error (such as short circuit or open circuit of the sensor), the system will automatically stop working. The display screen will show "E-25" and the system will send out 5 "BE-" alarm sounds.
AirFry Cook
- In standby mode, press AIR FRY button once, the display shows " ENTER FOOD TYPE CODE 1 TO 7".
- Press number pad to choose food type, the display will show the food, and make you to choose the weight.
- After choosing the weight, the time will be showed, and press START button to start cooking, the display will show "PREHEAT".
- When meet the temperature, "PREHEAT DONE, PLACE FOOD IN OVEN" will display and beeps will sound to remind you place the food.
- open the door and place food in oven, "CLOSE THE DOOR AND PRESS START"will display.
- Close the door and press START button to start cooking.
| Press Number | Menu | Number Pad | Weight | Cooking Time |
| 1 | French Fries | 1 | 8oz | 26:00 |
| 2 | Popcorn Chicken | 1 | 8oz | 22:00 |
| 2 | 10oz | 24:00 | ||
| 3 | 12oz | 26:00 | ||
| 4 | 16oz | 28:00 | ||
| 3 | Chicken Drumsticks | 1 | 8oz | 24:00 |
| 2 | 12oz | 27:00 | ||
| 3 | 16oz | 30:00 | ||
| 4 | 20oz | 33:00 | ||
| 5 | 24oz | 36:00 | ||
| 4 | Chicken Wings | 1 | 8oz | 23:00 |
| 2 | 12oz | 26:00 | ||
| 3 | 16oz | 29:00 | ||
| 4 | 20oz | 32:00 | ||
| 5 | Onion Rings | 1 | 8oz | 18:00 |
| 6 | Chicken Nuggets | 1 | 6oz | 16:00 |
| 2 | 8oz | 18:00 | ||
| 3 | 10oz | 20:00 | ||
| 4 | 12oz | 22:00 | ||
| 7 | Mozzarella Sticks | 1 | 6oz | 16:00 |
| 2 | 8oz | 17:00 | ||
| 3 | 10oz | 18:00 | ||
| 4 | 12oz | 19:00 | ||
| 5 | 14oz | 20:00 | ||
| 6 | 16oz | 21:00 |
Convection
With Preheat
- In standby mode, press CONV button once, the display will show " SELECT TEMPERATURE".
- Press number pad to choose the temperature, the display will show "PRESS START OR PRESS CONV"
- Press START button to start preheat, the display will show "PREHEAT".
- When meet the temperature, "PREHEAT DONE, PLACE FOOD IN OVEN" will display and beeps will sound to remind you place the food.
- Open the door and place food in oven, "CLOSE THE DOOR AND ENTER COOKTIME".
- Use the number pad to enter the cook time, press STARTbutton to start cooking.
Without Preheat
- In standby mode, press CONV button once, the display will show " SELECT TEMPERATURE".
- Press number pad to choose the temperature, the display will show "PRESS START OR PRESS COW"
- Press CONV button to confirm the temperature, and use the number pad to enter the cooking time.
- Press START button to start cooking.
Notes
During the cooking, press CONV button once to check the temperature.
Microwave+Convection
- In standby mode, press MICRO+CONVbutton repeatedly to choose the temperature. (400F → 350F → 250F)
- Use the number pad to enter the cooking time.
- Press STARTbutton to start cooking.
Notes
During the cooking, press MICRO+CONV button once to check the temperature.
Steam Cook
For Egg, Carrots, Broccoli or Rice:
- o r In standby mode, press the STEAM button once, the display will shows "USE STEAM KIT" first, and shows "PRESS 1-EGGS 2-CARROTS 3-BROCCOLI 4-RlCE".
- Press number pad "1, 2, 3, 4" to choose food type, and the display will shows "ADD WATER TO STEAM KIT", then shows the cooking time.
- Press START button to start cooking.
| Press number | Menu | Weight/Serving | Time |
| 1 | EGGS | 1-8 servings | 15:00 |
| 2 | CARROTS | 4-10 oz | 15:00 |
| 3 | BROCCOLI | 4-8 oz | 9:00 |
| 4 | RICE | 1-3/2 cup | 30:00 |
Weight Defrost
The oven allows you to defrost food based on the weight entered by user. The defrosting time and power level are automatically set once the food weight is entered. The frozen food weight ranges is 1-96 oz.
- In standby mode, press WEIGHT DEFROST button once. The display will shows "ENTER WEIGHT OZ".
- Press number button to enter food weight.
- Press START button to confirm.
Time Defrost
- Press TIME DEFROST. The display will shows "ENTER DEFROST TIME".
- Press number pad to enter the time. The time range must be between 00:01 and 99:99.
- Press START to start defrosting. The remaining cooking time is displayed.
1LB Defrost
This feature allows you to defrost food quickly.
- In standby mode, press 1LB DEFROST button once.
- Press START button to confirm.
Notes
- During defrost, the oven will sound beep and pause to remind user to turn the food over, after that, press START button to resume.
- Use small smooth strips of aluminum foil to cover edges and thinner sections of the food.
Auto Cook
For Soup, Popcorn, or Beverage:
- In standby mode, press the SOUP,POPCORN, or BEVERAGE button once.
- Use number button "1 or 3" to select food weight or servings.
- Press START button to confirm.
| Menu | Press number | Weight/Serving | Time |
| SOUP | 1 | I bowl | 2:30 |
| 2 | 2 Bowls | 3:40 | |
| 3 | 3 Bowls | 4:50 | |
| POPCORN | 1 | 3.5 oz | 2:05 |
| 2 | 3 oz | 1:50 | |
| BEVERAGE | 1 | 1 cup | 1:30 |
| 2 | 2 cups | 2:40 | |
| 3 | 3 cups | 3:50 |
For Soften Butter, Melt Butter, Soften Ice Cream, or Soften Cheese:
- Press the SOFTEN/MELT button once, the display will show "PRESS 1-SOFTEN BUTTER 2-MELT BUTTER 3-SOFTEN ICE CREAM 4-SOFTEN CHEESE".
- Use number pad to select food type, the display shows "PRESS 1—STICK 2—STlCKS"or shows "PRESS 1--4 oz 2--8oz.
- Use number pad to select food serving or weight.
- Press START button to confirm.
| Menu | Press Number | Press number | Weight/Serving | Time |
| SOFTEN BUTTER | 1 | 1 | 1 stick | 1.20 |
| 2 | 2 sticks | 1.40 | ||
| MELT BUTTER | 2 | 1 | 1 stick | 1.20 |
| 2 | 2 sticks | 1.40 | ||
| SOFTEN ICE CREAM | 3 | 1 | 4 oz | 0:30 |
| 2 | 8 oz | 0:45 | ||
| SOFTEN CHEESE | 4 | 1 | 4 oz | 1.00 |
| 2 | 8 oz | 1.30 |
Using the Light
This feature is designed for the convenience of doing things outside the oven. To turn on the light at the bottom of the oven, press LIGHT ON/OFF button
| Press LIGHT ON/OFF button | Display |
| Once | HIGH |
| Twice | LOW |
| 3 times | OFF |
Using the Vent Fan
Your oven can be used as a range hood. When it is turned on, the fan motor starts filtering out smoke, odors, and grease generated from cooking. In stand by mode, the vent fan is manually control, continuous press VENT 4 SPEED can choose five cycle gears:
| Press VENT 4 SPEED button | Display |
| Once | BOOST |
| Twice | HIGH |
| 3 times | MEDIUM |
| 4 times | LOW |
| 5 times | OFF |
Notes
When you turn on the fan on the boost wind and start cooking, it has five gears (Boost/High/Medium/Low/Off) can be switched in the first 12 minutes. During 12 minutes to 18 minutes, there are four gears (High/Medium/Low/Off) switched. The rest of the time runs to the end of cooking in the Medium gear. (Medium/Low/Off )can be switched.
Using the Turntable
Usually, the turntable works. But the user can set the turntable to stop spinning by press TURNTABLE ON/OFF button.
| Press TURNTABLE ON/OFF button | Display |
| Once | OFF |
| Twice | ON |
Notes
In the setting of microwave cooking, press "TURNTABLEON/OFF" to preset the state of the turntable. This setting is only effective for microwave cooking this time. If microwave cooking is finished or cancelled, the rotary table will be in the default working state next time it enters the cooking state. Auto cook, Steam cook, AirFry cook, Sensor cook and defrost do not support press TURNTABLE ON/OFF button to set the state of the turntable during setup.
Add Time
During cooking, simply press the +1 Min button repeatedly to add cook time 1± minutes. The longest cooking time is 99 minutes and 99 seconds.
Notes
Auto cook, sensor cook, airfry cook, steam menus and defrost cant be added cooking time.
Child Lock
The child lock prevents unsupervised operation by children and this program only works in standby mode
- To set: In standby mode, press and hold LOCK more than 3 seconds, then a beep will sound, "LOCK ON" appears on the display for 3 seconds and lock indication will light. In the lock state, all buttons are disabled.
- To cancel: Press and hold LOCK for more than 3 seconds, then a beep will sound, "LOCK OFF"appears on the display and lock indication comes off.
CLEAN AND CARE
Cleaning the outside of your microwave
Exterior
The outside surface is precoated steel and plastic. Clean the outside with mild soap and water, then rinse and dry with a soft cloth. Do not use any type of household or abrasive cleaner.
Door
Wipe the window on both sides with a damp cloth to remove any spills or spatters. Metal parts will be easier to maintain if wiped frequently with a damp cloth. Avoid the use of spray and other harsh cleaners as they may stain, streak, or dull the door surface.
Control panel
If the control panel is dirty, open the microwave door before cleaning. Wipe the panel with a cloth dampened slightly with water only. Dry with a soft cloth. Do not scrub or use any sort of chemical cleaners. Close the door and press Stop to clear any buttons you may have pressed.
Cleaning the inside of your microwave
Interior
Wipe with a soft cloth and warm water. Do not use abrasive or harsh cleaners or scouring pads. For baked-on food, use baking soda or a mild soap, then rinse thoroughly with hot water.
Waveguide cover
The waveguide cover is located on the ceiling inside the microwave cavity. It is made from mica so requires special care. Keep the waveguide cover clean to assure good microwave performance. Carefully wipe with a damp cloth any food spatters from the surface of the cover immediately after they occur. Built-up splashes may overheat and cause smoke or possibly catch fire, DO NOT REMOVE THE WAVEGUIDE COVER.
Removing odors
Occasionally, a cooking odor may remain in the microwave. To remove, combine one cup water, grated peel and juice of one lemon, and several whole cloves in a two-cup glass measuring cup. Boil for several minutes using 100% power, then let it cool in the microwave. Wipe the interior with a soft cloth.
Turntable and turntable support
Remove the turntable and turntable support and wash them in mild, sudsy water. For stubborn stains, use a mild cleanser and non-abrasive scouring sponge. You can also wash them in the top rack of a dishwasher. The turntable motor shaft is not sealed, so excess water or spills should be wiped up immediately.
Cleaning and replacing the filters
Cleaning the grease filters
Clean the filters at least once a month. Never use the fan or microwave without the filters in place.
- Pull down slightly on the tab toward the front of the microwave to remove the filter. Repeat for the other filter.
- Soak the filter in a sink or dish pan filled with hot water and detergent.
![]()
DO NOT use ammonia or other alkali. They will react With the filter material and darken it. - Agitate and scrub the filter with a brush to remove embedded dirt.
- Rinse thoroughly and shake dry.
- Replace by fitting the filter back into the opening.


Replacing the charcoal filter
A charcoal filter is used for nonvented, recirculated installation. The filter should be changed every 6 to 12 months depending on use.
- Disconnect power to the microwave at the circuit breaker or by unplugging it.
- Remove the louver mounting screws from the top center of the louver, then push down on the tabs at each end of the louver to disengage it.

- Pull the louver away from the unit.

- Replace the charcoal filter. Make sure that the wire mesh is visible from the front.

- Carefully push the louver back into place and replace the louver mounting screws.


Changing the light bulbs
Countertop light (exterior)
- Disconnect power to the microwave at the circuit breaker or by unplugging it.
- Remove the screw holding the light cover in place, then remove the light cover.
![]()
The light cover may become very hot. Do not touch the glass when the light is on. - Remove the old light bulb, then replace with a new bulb.
![]()
Do not use a bulb larger than 30 watts. - Replace the light cover and secure it with the screw.
")
")
Microwave light (interior)
- Disconnect power to the microwave at the circuit breaker or by unplugging it.
- Remove the louver mounting screws from the top center of the louver, then push down on the tabs at each end of the louver to disengage it.
 - Step 1")
- Pull the louver away from the unit.
 - Step 2")
- Open the light cover located behind the filter by removing the light cover screw, then carefully pulling up on the front edge.
 - Step 3")
 - Step 1")
 - Step 2")
 - Step 3")
- Remove the old light bulb, then replace with a new bulb.
![]()
Do not use a bulb larger than 30 watts. - Replace the microwave light cover by carefully pushing it into place.
- Push the louver back into place and replace the louver mounting screws.
 - Step 4")
 - Step 4")
TROUBLESHOOTING
If you have a problem with your microwave, review the following chart for a possible solution. If the microwave still does not work properly, contact the nearest authorized service center.
| Error Code | Failure Mode | Action (Customer Service # 1-800-562-0738) |
E-21 | Open circuit alarm of humidity sensor |
|
E-22 | Short circuit alarm of humidity sensor | |
E-23 | Humidity sensor detection alarm (the sensor cook runs for the longest time) |
|
E-24 | Sensor cook alarm when the door is opened during cooking (the door is open for 3 seconds) | Please close the door and restart cooking If the error re-occurrs, contact customer service for assistance. |
E-25 | Calibration error alarm | Please contact customer service at 1-800-62-0738 for assistance. |
E-11 | Open circuit alarm of temperature sensor |
|
E-12 | Short circuit alarm of temperature sensor | |
E-13 | Ultra high temperature protection. When the temperature in the oven is greater than 452F (250C) | Unplug the oven and allow it to cool. Recommend waiting at least 30 minutes. Plug the oven back in and listen for the cooling fan, if the error code does not immediately appear again, ty to warm a cup of water for 30 seconds on microwave. If the error re-occurrs, contact customer service for assistance. |
E-15 | Ultra low temperature protection. After 10 minutes of continious operation, the temperature in the oven is lower than 104F (40C) |
|
E-d1 | Membrane was held for too long |
|
Specifications
Model GLOMJB17S2ASWZ-10
Rated Voltage 120V/60Hz
Rated Input Power 1500W
Rated Output Power 1000W
Microwave Capacity 1.7 cu.ft
Turntable Diamter 12.8 (inch)
External Dimensions (WxHxD) 29 7/8 x 17 7/16 x 16 7/8 inch
Internal Dimensions ((WxHxD) 21 7/16 x 14 1/8 x 10 9/16 inch
Certifications UL approved
Power cord length 39.8 in.(1010mm)
IMPORTANT SAFETY INSTRUCTIONS
Precautions to avoid possible exposure to excessive microwave energy:
- Do not attempt to operate this microwave with the door open because this can result in harmful exposure to microwave energy. It is important not to defeat or tamper with the safety interlocks.
- Do not place any object between the microwave front face and the door or allow soil or cleaner residue to accumulate on sealing surfaces.
- Do not operate the microwave if it is damaged. It is particularly important that the microwave door closes properly and that there is no damage to the:
- DOOR (bent)
- HINGES and LATCHES (broken or loosened)
- DOOR SEALS and SEALING SURFACES
- The microwave should not be adjusted or repaired by anyone except properly qualified service personnel.
I
To reduce the risk of burns, electric shock, fire, injury to persons, or exposure to excessive microwave oven energy when using your oven, follow these basic safety precautions.
- Read all instructions before using the oven.
- Read and follow the specific:"Precautions to avoid possible exposure to excessive microwave energy:".
- This appliance must be grounded. Connect only to a properly grounded outlet. See "GROUNDING INSTRUCTIONS".
- Install or locate this appliance only in accordance with the provided installation instructions.
- Some products such as whole eggs and sealed containers (closed glass jars, for example) are able to explode and should not be heated in this oven.
- Use this appliance only for its intended use as described in this manual. Do not use corrosive chemicals or vapors in this appliance. This type of oven is specifically designed to heat, cook, or dry food. It is not designed for industrial or laboratory use.
- As with any appliance, close supervision is necessary when used by children.
- To reduce the risk Offire in the oven cavity:
- Do not overcook food. Carefully monitor the appliance when paper, plastic, or other combustible materials are placed inside the oven to facilitate cooking.
- Remove wire twist-ties from paper or plastic bags before placing the bag in the oven.
- If materials inside the oven should ignite, keep the oven door closed, turn the oven off, and disconnect the power cord or shut off power at the fuse or circuit breaker panel.
- Do not use the cavity for storage purposes. Do not leave paper products, cooking utensils, or food in the cavity when not in use.
- Liquids, such as water, coffee, or tea, can be overheated beyond the boiling point without appearing to be boiling. Visible bubbling or boiling when the container is removed from the microwave oven is not always present. THIS COULD RESULT IN VERY HOT LIQUIDS SUDDENLY BOILING OVER WHEN THE CONTAINER IS DISTURBED OR A SPOON OR OTHER UTENSIL IS INSERTED INTO THE LIQUID.
- Do not overheat the liquid.
- Stir the liquid both before and halfway through heating it.
- Do not use straight-sided containers with narrow necks.
- After heating, allow the container to stand in the microwave oven for a short time before removing the container.
- Use extreme care when inserting a spoon or other utensil into the container.
- Do not heat oil or fat for deep-frying. It is difficult to control the temperature of oil in the microwave oven.
- Pierce foods with heavy skins such as potatoes, whole squash, apples, and chestnuts before cooking.
- The contents of feeding bottles and baby jars should be stirred or shaken, and the temperature should be checked before serving in order to avoid burns.
- Cooking utensils may become hot because of heat transferred from the heated food. Potholders may be needed to handle the utensil.
- Do not cover or block any openings on the appliance.
- Do not store or use this appliance outdoors. Do not use this product near water, for example, near a kitchen sink, in a wet basement, near a swimming pool, or similar locations.
- Do not operate this appliance if it has a damaged cord or a plug, if it is not working properly, or if it has been damaged or dropped.
- Do not immerse the cord or plug in water. Keep the cord away from heated surfaces. Do not let the cord hang over the edge of a table or counter.
- Use only thermometers which are specifically designed for use in microwave ovens.
- Be certain the glass tray and roller rings are in place when you operate the oven.
- This appliance should be serviced only by qualified service personnel. Contact the nearest authorized service facility for examination, repair, or adjustment.
- When cleaning surfaces of the door and oven that come together on closing the door, use only mild, nonabrasive soaps, or detergents applied with a sponge or soft cloth.
- VENTILATING HOODS:
- Clean Ventilating Hoods Frequently-Grease should not be allowed to accumulate on hood or filter.
- When flaming foods under the hood, turn the fan on.
- Use care when cleaning the vent-hood filter. Corrosive cleaning agents, such as lye-based oven cleaners, may damage the filter.
- To reduce the risk of fire and electric shock, install only above electric cooking equipment. If the over-the-cooktop microwave oven is intended to be used with either a gas or electric range, the following words or the equivalent shall be included: Suitable for use above both gas and electric cooking equipment.
- This device complies with Part 15 of the FCC Rules. Operation is subject to the following two conditions:
- this device may not cause harmful interference, and
- this device must accept any interference received, including interference that may cause undesired operation.
- Please note that changes or modifications of this product is not expressly approved by the party responsible for compliance could void the user's authority to operate the equipment.
Unpacking instructions
Carefully remove the microwave from the box. Save the box as it may make installation easier.
- Remove all packing materials from inside the oven cavity. However, DO NOT REMOVE THE WAVE GUIDE COVER, which is located on the right side in the oven cavity. Make sure that you have all items from the "Package contents". Read and save the instructions.
- Remove the feature sticker from the outside of the door, if there is one.
- Check the oven for any damage, such as misaligned or bent door, damaged door seals and sealing surfaces, broken or loose door hinges and latches, and dents inside the cavity or on the door. If there is any damage, do not operate the oven and contact your dealer.
See the Installation Guide for more information.
GROUNDING INSTRUCTIONS
This appliance must be grounded. In the event of an electrical short circuit, grounding reduces the risk of electric shock by providing an escape wire for the electric current. This appliance is equipped with a cord having a grounding wire with a grounding plug. The plug must be plugged into an outlet that is properly installed and grounded.
Improper use of the grounding plug can result in a risk of electric shock. Consult a qualified electrician or serviceman if the grounding instructions are not completely understood or if doubt exists as to whether the appliance is properly grounded.
Electrical requirements
The electrical requirements are a 120 volt 60 Hz, AC only, 20 amp outlet. It is recommended that a separate circuit serving only the oven be provided. The oven is equipped with a 3-prong grounding plug. It must be plugged into a wall receptacle that is properly installed and grounded.
Power Supply Cord
- A short power supply cord is provided to reduce the risks resulting from becoming entangled in or tripping over a longer cord.
- Longer cord sets or extension cords are available and may be used if care is exercised in their use.
- If a long cord or extension cord is used:
- The marked electrical rating of the cord set or extension cord should be at least as great as the electrical rating of the appliance.
- The extension cord must be a grounding-type 3-wire cord, and the longer cord should be arranged so that it will not drape over the counter top or table top where it can be pulled on by children or tripped over unintentionally.
- If it is necessary to use an extension cord, use only a 3-wire extension cord that has a 3-blade grounding plug, and a 3-slot receptacle that will accept the plug on the appliance. The marked rating of the extension cord shall be equal to or greater than the electrical rating of the appliance.
![information]() Notes
Notes - If you have any questions about the grounding or electrical instructions, consult a qualified electrician or service person.
- Galanz does not accept any liability for damage to the oven or personal injury resulting from failure to observe the electrical connection procedures.
Radio or TV interference
Should there be any interference caused by the microwave oven to your radio or TV, make sure that the microwave oven is on a different circuit. Relocate the radio or TV as far away from the oven as feasible or check the position and signal of the receiving antenna.
Cookware and cooking materials
Personal Injury Hazard
Tightly-closed containers could explode. Closed containers should be opened and plastic pouches should be pierced before cooking.
Cookware and other materials must fit on the turntable. Always use oven mitts or pot holders because cookware may become hot.
Refer to the Materials you can use and Materials to be avoided tables as a guide, then test before using.
Cookware and Materials Test:
- Fill a microwave-safe container with 1 cup (250 ml) of cold water, along with the cookware or materials in question.
- Cook on maximum power for one minute. Do not exceed one minute cooking time.
- Carefully feel the cookware or material. If the empty cookware or material is warm, do not use it for microwave cooking.
Materials you can use
| MATERIAL | REMARKS |
| Aluminum foil | Use as shielding only. Small, smooth pieces can be used to cover thin parts of meat or poultry to prevent overcooking. Arcing can occur if the foil is wrinkled or too close to oven walls. The foil should be at least 1 inch (2.5 cm) away from oven walls. |
| Browning dish | Follow the manufacturer's instructions. The bottom Of the browning dish must be at least 3/16-in. (5mm) above the turntable. Incorrect usage may cause the turntable to break. |
| Dinnerware | Use microwave safe only. Follow the manufacturer's instructions. Do not use cracked or chipped dishes. |
| Glass jars | Always remove the lid. Use only to heat food until just warm. Most glass jars are not heat resistant and may break. |
| Glassware Oven cooking bags | Use heat resistant oven glassware only. Make sure there is no metallic trim. Do not use cracked or chipped dishes. Follow the manufacturer's instructions. Do not close with a metal tie. Make slits to allow escape. |
| Paper plates and cups | Use for short-term cooking/warming only. Do not leave the oven unattended while cooking. |
| Paper towels | Use to cover food for reheating and absorbing fat. Use with supervision for short-term cooking only. |
| Parchment paper | Use as a cover to prevent splattering or a wrap for steaming. |
| Plastic | Use only if labeled "Microwave Safe."Follow the manufacturers instructions. Some plastic containers soften as the food inside gets hot. "Boiling bags" and tightly closed plastic bags should be slit, pierced, or vented, as indicated on the package. |
| Plastic wrap | Use microwave-safe only. Use to cover food during cooking to retain moisture. Do not allow plastic wrap to touch food. |
| Thermometers | Use microwave-safe only (such as meat and candy thermometers). |
| Wax paper | Use as a cover to prevent splattering and retain moisture. |
Materials to be avoided
| MATERIAL | REMARKS |
| Aluminum tray | May cause arcing. Use a microwave safe dish instead. |
| Food carton with metal handle | May cause arcing. Use a microwave-safe dish instead. |
| Metal or metal trimmed utensils | Metal shields the food from microwave energy. The metal trim may cause arcing. |
| Metal twist ties | May cause arcing and could cause a fire in the oven. |
| Paper bags | May cause a fire in the oven. |
| Plastic foam | Plastic foam may melt or contaminate the liquid inside when exposed to high temperature. |
| Wood | Wood will dry out when used in the microwave oven and may split or crack. |
If you have a claim under warranty, please call our Customer Service number: 1-800-562-0738. For faster service, please have the model number, serial number, and receipt ready for the operator to assist you.
Please mail your warranty card to the address below within 30 days of purchase. Galanz Americas, 55 Challenger Road, Suite 503, Ridgefield Park, NJ 07660.
Documents / ResourcesDownload manual
Here you can download full pdf version of manual, it may contain additional safety instructions, warranty information, FCC rules, etc.
Advertisement


Need help?
Do you have a question about the GLOMJB17S2ASWZ-10 and is the answer not in the manual?
Questions and answers