Blaupunkt 200 Series, Barcelona 200 Manual
- Operating and installation instructions (182 pages) ,
- Operating and installation instructions (186 pages) ,
- Operating and installation instructions (182 pages)
Advertisement
- 1 200 Series control
- 2 Controls-Palma 200 series
- 3 Safety notes
- 4 Road safety
- 5 Cleaning notes
- 6 Scope of delivery
- 7 Placing the device in operation
- 8 Volume
- 9 Display brightness
- 10 Traffic information
- 11 Digital Radio Mode( DAB) (DAB model only)
- 12 Analogue radio mode (FM/ AM)
- 13 CD (CD model only)/MP3/WMA mode
- 14 Inserting/ejecting a CD
- 15 Connecting
- 16 Bluetooth
- 17 External audio sources
- 18 DAB tuner settings (DAB models only)
- 19 Useful information
- 20 Technical data
- 21 Documents / Resources
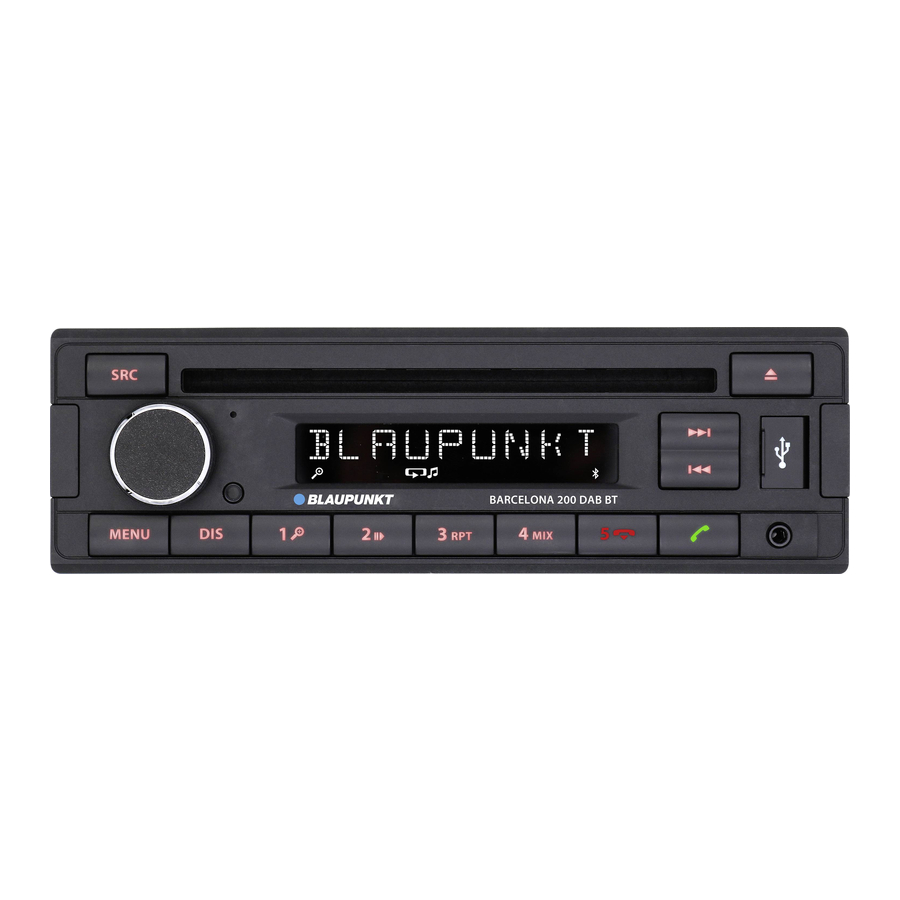
200 Series control

- SRC button
Select memory bank or audio source
Long press :Auto store - Rotary control
On/Off button
Short press: Switch on car sound system
In operation: Mute car sound system (Mute)
Long press :Switch off car sound system
Rotary control Volume control
In the menu: Change menu level, select menu item, change setting - Microphone
- CD tray ( for CD model )
- Display
![]() Button
Button
Radio mode: Set frequency,
CD/MP3/WMA mode:
Track selection, folder selection![]() button (Eject)
button (Eject)
(For CD model)
Eject a CD EQ button (For MP3 model)
Change the EQ function- USB port
- AUX-IN socket
![]() button
button
Short press: Answering a call, speed dial
Long press: Open the phone book of the cell phone or activate voice dialing![]() button
button
Ending/rejecting a phone call- Keys 1 - 5
- DIS button
Short press: Switch display
Long press: Switch display brightness - MENU button
Short press: Call up/close menu
Long press: Start scan function
Controls-Palma 200 series

- Microphone
- SRC button
Select memory bank or audio source
Long press :Auto store - DIS button
Switch display - Rotary control
On/Off button
Short press: Switch on car sound system
In operation: Mute car sound system (Mute)
Long press :Switch off car sound system
Rotary control Volume control
In the menu: Change menu level, select menu item, change setting - Display
![]() Button
Button
Radio mode: Set frequency, CD/MP3/WMA mode:
Track selection, folder selection- EQ button
Select favor EQ type - AUX-IN socket
- USB port
- SD card socket
![]() button
button
Short press: Answering a call, speed dial Long press: Open the phone book of the cell phone or activate voice dialing![]() button
button
Ending/rejecting a phone call- Keys 1 - 5
- PS button
Programme Search - SCAN button
Auto scan
 button
Safety notes
The car sound system was manufactured according to the state of the art and established safety guidelines. Even so, dangers may occur if you do not observe the safety notes in these instructions. These instructions contain important information to easily and safely install and operate the car sound system.
- Read these instructions carefully and completely before using the car sound system.
- Keep the instructions at a location so that they are always accessible to all users.
- Always pass on the car sound system to third parties together with these instructions.
In addition, observe the instructions of the devices used in conjunction with this car sound system.
Symbols used
These instructions employ the following symbols:
 |  Warns about injuries |
 |  Warns about damaging the CD drive |
 | Warns about high volume |
 | The CE mark confirms the compliance with EU directives. |
 | Identifies a sequencing step |
 | Identifies a listing |
Road safety
Observe the following notes about road safety:
- Use your device in such a way that you can always safely control your vehicle. In case of doubt, stop at a suitable location and operate your device while the vehicle is standing.
- Remove or attach the control panel only while the vehicle is standing.
- Always listen at a moderate volume to protect your hearing and to be able to hear acoustic warning signals (e.g. police sirens). During mute phases (e.g. when changing the audio source), changing the volume is not audible. Do not increase the volume during this mute phase.
General safety notes
Observe the following notes to protect yourself against injuries:
- Do not modify or open the device. The device contains a Class 1 laser that can cause injuries to your eyes.
- Do not increase the volume during mute phases, e.g. when changing the audio source. Changing the volume is not audible during a mute phase.
Use as directed
This car sound system is intended for installation and operation in a vehicle with 12 V vehicle system voltage and must be installed in a DIN slot. Observe the performance limits in the technical data. Repairs and installation, if necessary, should be performed by a specialist.
Installation instructions
You may only install the car sound system yourself if you are experienced in installing car sound systems and are very familiar with the electrical system of the vehicle. For this purpose, observe the installation instructions at the end of these instructions.
Cleaning notes
Solvents, cleaning and scouring agents as well as dashboard spray and plastics care product may contain ingredients that will damage the surface of the car sound system.
- Use only a dry or slightly moistened cloth for cleaning the car sound system.
- If necessary, clean the contacts of the control panel regularly using a soft cloth moistened with cleaning alcohol.
Scope of delivery
The scope of delivery includes:
1 Car sound system
1 Operating/installation instructions
1 Antenna connection adapter
2 Disassembly tools
Optional equipment
(not part of the scope of delivery)
Use only accessories approved by Blaupunkt. Information is available from your Blaupunkt specialised dealer or on the Internet under www.blaupunkt.com.
Placing the device in operation
Transport securing screws
Before the startup of the car sound system, ensure that the transport securing screws are removed (see the chapter "Installation instructions").
Important note for radio reception
This car sound system is designed for operation in different regions with different frequency ranges and station technologies. Available reception areas are "EUROPE", "ASIA", "USA", "SOUTH AMERICA" and "THAILAND".
You may have to set a suitable reception area first for the radio reception in the user menu (see the chapter "User settings", section "Making settings in the "TUNER" menu", menu item "TUNER AREA").
Switching on/off
Switching on/off with the On/Off button
![]() For switch -on, press On/Off button.
For switch -on, press On/Off button.
The car sound system switches on.
![]() To switch off the device, press and hold down the On/Off button for longer than 2 seconds.
To switch off the device, press and hold down the On/Off button for longer than 2 seconds.
The car sound system switches off.
Note:
If you switch on the car sound system while the vehicle ignition is switched off, it automatically switches off after 1 hour to preserve thevehicle battery.
Switching On/Off via vehicle ignition
The car sound systerm will switch off/on simulta neously with the ignition if the device is correctly connected to the vehicle's ignition as shown in the installation instructions and you did not switch the device off by pressing the On/Off button.
Volume
Adjusting the volume
You can adjust the volume in steps from 0 (off) to 40 (maximum).
![]() Turn on the rotary volume control button to chang the volume value.
Turn on the rotary volume control button to chang the volume value.
Muting the car sound system (Mute)
![]() Briefly press the On/Off button to mute the car sound system or to reactivate the pre vious volume.
Briefly press the On/Off button to mute the car sound system or to reactivate the pre vious volume.
While it is muted, the display shows "MUTE".
Notes:
If a telephone is connected with the car sound system, during communicate by telephone, press MUTE button, display shows MUTE, but actullymute is invaliable.
Display brightness
You can manually switch the display brightness between daytime mode and night-time mode.
Note:
![]() Press the DIS button for approx.2 seconds to change the display brightness.
Press the DIS button for approx.2 seconds to change the display brightness.
Traffic information
In the reception area "EUROPE", an FM station can idenitfy traffic reports by means of an RDS signal. If priority for traffic reports is switched on, a traffic report is automatically switched through, even if the car sound system is currently not in radio mode.
If priority is switched on, the display shows the traffic jam symbol (![]() ). "TRAFFIC" is displayed during a switched-through traffic announcement.
). "TRAFFIC" is displayed during a switched-through traffic announcement.
The priority is activated and deactivated in the user menu (Breifly press MENU button, enter "FM TUNER", menu item "TRAF ON").
Notes:
The volume is increased for the duration of the swithced-through traffic announce ment. You can adjust the minimum volume for traffic announcements (see the chapter "User settings", section "Making settings in the "VOLUME" menu", menu item "TRAFFIC VOL").
Digital Radio Mode( DAB) (DAB model only)
With DAB, you can enjoy radio in digital sound quality.
In contrast with standard radio broadcasting, several programmes (services) are always broadcast over the same frequency for DAB.
These services are combined into a so-called ensemble. In some cases, the same service can be received in different ensembles.
Note:
You will need a special DAB antenna to be able to receive DAB signals. This can be a separate DAB roof/window antenna or a DAB/AM/FM combination antenna.
Changing to DAB mode or selecting a DAB memory bank
![]() Press the SRC button repeatedly until the desired DAB memory bank is displayed: DAB1
Press the SRC button repeatedly until the desired DAB memory bank is displayed: DAB1 DAB2 DAB3 If DAB mode is switched on, the display shows the symbol ![]() .
.
Notes:
- Up to 5 services can be stored in each DAB memory bank.
- DAB memory banks can be activated or de activated via the user menu (adjust "User settings", section "Maki ng settings in the "DAB TUNER" menu, "BAND" menu item).
Tuning into ensembles/services
With DAB, several services broadcast over the same frequency are always combined into an "ensemble".
You can find new DAB using seek tuning.
Tune upwards:
![]() Briefly press the
Briefly press the  changes to next SERVICE in current ENSEMBLE. After last SERVICE from current ENSEMBLE next briefly press starts CHANNEL SCAN upwards to find next available ENSEMBLE. First SERVICE of new ENSEMBLE will be played.
![]() Press the button for approx. 2 sec-onds to CHANNEL SCAN upwards to find next available ENSEMBLE. First SERVICE of new ENSEMBLE will be played.
Press the button for approx. 2 sec-onds to CHANNEL SCAN upwards to find next available ENSEMBLE. First SERVICE of new ENSEMBLE will be played.
Notes:
- If last (highest) channel reached, tuning will change to first (lowest) channel and proceed further automatically.
Tune downwards:
![]() Briefly press the
Briefly press the  changes to previous SERVICE in current ENSEMBLE. After first SERVICE from current ENSEMBLE next briefly press starts CHANNEL SCAN udownwards to find next available ENSEMBLE. Last SERVICE of this ENSEMBLE will be played.
![]() Press the button for approx. 2 sec-onds to CHANNEL SCAN down to find next available ENSEMBLE.
Press the button for approx. 2 sec-onds to CHANNEL SCAN down to find next available ENSEMBLE.
Last SERVICE of new ENSEMBLE will be played.
Notes:
- If first (lowest) channel reached, tuning will change to last (highest) channel and proceed further automatically.
Saving a service or calling up a saved service
Select the desired DAB memory bank.
If necessary, set the desired service.
Press the station button If necessary, set the desired service.1 - 5 for approx. 2 seconds to store the current service under the button.
- or -
![]() Briefly press the station button 1 - 5 to call up the stored service.
Briefly press the station button 1 - 5 to call up the stored service.
Switching the display
![]() Press the DIS button to toggle between these displays:
Press the DIS button to toggle between these displays:
| Display | Meaning |
| ABCDEF | Service name |
| ABCDEF | Ensemble name |
| DAB1 5C or P1 5C | DAB memory bank/ frequency or Memory location/frequency |
| DAB1 18:30 or P1 18:30 | DAB memory bank/time or Memory location/time |
Analogue radio mode (FM/ AM)
RDS
Many FM stations broadcast an RDS (Radio Data System) signal in addition to their programme in the reception area "EUROPE" that allows the following additional functions:
- The station name is shown on the display.
- The car sound system recognises traffic announ- cements and news broadcasts and can auto matically switch them through in other oper ating modes (e.g. in CD mode).
- Alternate frequency: If RDS is activated, the car sound system automatically selects the best receivable frequency for the station that is cur rently set.
- Regional: At certain times, some radio stations divide their programme into regional pro grammes providing different content. If the REGIONAL function is activated, the car sound system changes only to those alternate frequencies on which the same regional programme is being broadcast.
The functions RDS and REGIONAL are activated and deactivated in the user menu (see the chapter "User settings", section "Making settings in the "TUNER" menu", menu items " REGIONAL").
Note:
While the RDS is activated, the AF function will be activated same time.
If you adjust a different Radio Area than "EUROPE", RDS automatically switched off
| Region | Memory banks |
| EUROPE | FM1, FM2, FMT, AM1, AM2,AMT |
| ASIA | |
| USA | |
| THAILAND |
Starting station seek tuning
Long press SRC button to start Travelstore.
The display shows "FM TSTORE".
Notes:
- For the reception area "EUROPE": In the FM waveband, only tra information stations are turned into if the priority for traffic information
![]() is switched on.
is switched on. - The sensitivity of seek tuning can be adjusted in seetting (High-Low).
Tuning into stations manually
Long press the  button to change to manual seeking.
The display shows " MANUAL".
Briefly press the button to change the frequecny in decrements/increments step.
Storing stations or calling stored stations
Select the desired memory bank.
If necessary, set the desired station.
Press the station button 1 - 5 > for approx. 2 seconds to store the current station under the button.
or -
Briefly press the station button 1 - 5 > to call up the stored station.
Scanning stations
With the scan function, you can scan either every receivable station or every stored station of the current waveband.
Scanning all receivable stations of the waveband
Press the button MENU for approx. 2 seconds to start scanning. During the scan, the display shows "SCAN" and the current frequency as well as memory bank or station name.
Briefly press the button 1-5 listening to the station that you request.
Storing stations automatically (Travelstore)
With Travelstore, you can automatically search for and stored the 5 FM stations o ering the strongest reception in the region in the FMT memory bank. Any previously stored stations in this memory bank are deleted in the process.
Select a memory bank of the desired waveband, e.g. FM1 or AM.
Press the SRC button for approx. 2 seconds. The tuner starts the automatic station seek tuning; the display shows "FM TSTORE" or "AM TSTORE". After the storing is completed, the radio plays the station at memory location 1 of the FMT or AMT level.
CD (CD model only)/MP3/WMA mode
Basic information
CD (CD model only)/MP3/WMA mode
This car sound system can be used to play back audio CDs (CDDA) and CD-R/RWs with audio, MP3 or WMA files asa well as MP3 or WMA files on USB data carriers.
Notes:
- To ensure proper functioning, use only CDs with the Compact-Disc logo.
- of Blaupunkt can not guarantee the flawless function copy-protected CDs and all CD blanks, USB data carriers available on the market.
Note the following information when preparing an MP3/WMA data carrier:
- Naming of tracks and directories.
- CD formats: CD-R/RW, Ø: 12 cm
- CD data formats: ISO 9669 Level 1 and 2, Joliet
- CD burn speed: Max. 16x (recommended)
- USB format/file system: Mass storage device FA 16/32.
- File extension of audio files:
- .MP3/.WMA/.FLAC/.AAC/
Changing to CD/MP3/WMA Mode
Press the SRC button repeatedly until the desir ed audio source is displayed:
- "CD": Inserted CD.
- "USB: USB data carrier connected.
- "AUX": Connected external audio source.
Notes:
- The respective audio source can be select ed only if a corresponding CD is inserted or a corresponding device is connected.
- If the car sound system first has to read the data of a connected device or data carrier before the playback, the display shows "READING". The duration of the reading depends on the data volume and design of the device or data carrier. If the device or data carrier is defective or the trans- ferred data cannot be played back, a corre sponding message appears on the display (e.g. "CD ERROR").
Inserting/ejecting a CD
Inserting a CD
Risk of severe damage to the CD drive!
Noncircular contoured CDs (shape CDs) and CDs with a diameter of 8 cm (mini CDs) must not be used.
We accept no responsibility for any damage to the CD drive that may occur as a result of the use of unsuitable CDs.
Note:
You must not hinder or assist the drive as it automatically draws in the CD.
If the inserted CD cannot be played back, "CD ERROR" is briefly displayed and the CD is automatically ejected after approx. 2 seconds.
Ejecting a CD
![]() Press the
Press the  button to eject an inserted CD.
Notes:
- If a CD is ejected and not removed, the drive will automatically draw it back in again after approx. 10 seconds.
- You can also eject CDs while the car sound system is switched off or while another au dio source is activated.
Connecting
Connecting/removing a USB data carrier
You can connect USB data carriers to the USB port at the front of the device.
Connecting a USB data carrier
Swich off the car sound system so that the data carrier will be correctly registered.
Connect the USB data carrier.
Turn on the car sound system. If the USB data carrier is initially selected as audio source, the data are read first.
Selecting tracks/folder
You can find new track or folder selectiing.
Long press the button for approx. 2 sec-
Short press the onds to select previous/next folder button to select previous/next track.
Interrupting playback
![]() Press the button
Press the button ![]() to interrupt the playback ("PAUSE") or to continue it.
to interrupt the playback ("PAUSE") or to continue it.
Playing tracks in random order
![]() Press the
Press the  button to change among the MIX playback modes.
If the MIX function is switched on, the icon (mix all tracks) or MIX ![]() (mix tracks of current folder) is shown on the display.
(mix tracks of current folder) is shown on the display.
Repeatedly playing individual tracks or directories
![]() Press the
Press the  button to change among the playback modes:
If the REPEAT function is switched on, the icon  (repeat tracks) or
(Repeat folder) is shown on the display. MIX
Configuring the display
![]() Press the DIS button once or several times to toggle between these displays:
Press the DIS button once or several times to toggle between these displays:
- Current playback total time.
- Track name, artist and album name must be stored as ID3 tag to be able to display them.
- The file and folder name is displayed only in MP3/WMA mode.
Bluetooth®
You can connect the car sound system via Bluetooth with other Bluetooth ready devices, such as cell phones or MP3 players. This allowsyou to use the car sound system with its integrated microphone as hand-free system for connected cell phones and control the audio output of other Bluetooth devices and play them back via loudspeakers of the car sound system (Bluetooth streaming).
Bluetooth technology is wireless is connection of short range. For this reason, Bluetooth devices must be located near the car sound system (in the vehicle)to establish and maintain a connection. To establish a Bluetooth connection, you must first pair the car sound system and the Bluetooth device. When you pair the devices, a Bluetooth connection is subsequently established automatically. This connection remains in effect as long as the Bluetooth devicesis within range.
Bluetooth® menu
In the Bluetooth menu, you find all the functions for pairing, connecting and managing Bluetooth® devices.
Calling the Bluetooth® menu
Briefly press the MENU button to open the user menu.
Turn the rotary control until the "BLUETOOTH" menu item is selected.
Press the rotary control to open the Bluetooth® menu.
Turn the rotary control until the desired menu item is selected.
- "DL P BOOK" is download phone book.
- "DEL PBOOK" is delete phone book.
Pairing and connecting a cell phone
If a connection with a cell phone currently exists, this connection is automatically disconnected if you pair and connect another cell phone.
![]() Search the car sound system from your cell phone and establish the connection. The display may show "PAIRED", followed by "CONNECTED", as soon as the car sound system and the cell phone are paired and con nected.-
Search the car sound system from your cell phone and establish the connection. The display may show "PAIRED", followed by "CONNECTED", as soon as the car sound system and the cell phone are paired and con nected.-
![]() In addition, the Bluetooth® icon
In addition, the Bluetooth® icon  fashes.
Telephone functions
Answering/rejecting an incoming phone call
With an incoming call, the display alternately shows "INCOMING CALL" and the number of the caller. The current audio source is muted and a ring tone is played via the loudspeakers of the car sound system.
![]() Press the
Press the ![]() button = to answer the call. "CALL" and the duration of the ongoing call are displayed.
button = to answer the call. "CALL" and the duration of the ongoing call are displayed.
![]() Press the
Press the  button to reject the call or to end the current call.
The display shows "CALL END".
Notes:
- During the call, you can adjust the volume with the volume control.
Calling an entry in the phone book
This function is available only if the phone book of the connected cell phone was transferred to the car sound system.
In the Bluetooth® menu, select the "PHONEBOOK" menu item.
Turn the rotary control to select you request phone number and press it to call out.
The display shows the first phone book entry.
Speed dial for any phone number or for the number dialed last or a stored number
With speed dial, you can make a callwithout first selecting the corresponding number.
To call the number dialed last, press the ![]() button and display shows the number dialed last.
button and display shows the number dialed last.
Bluetooth® streaming mode
Pairing and connecting a Bluetooth® streaming device
Repeatedly press the SRC button, untill "BT STREAM".
Press the button ![]() to start "BT STREAM" playing.
to start "BT STREAM" playing.
You can play back music from a Bluetooth® audio device via the loudspeakers of the car sound sys tem if the audio device supports the Bluetooth® profile A2DP (Advanced Audio Distribution Profile).
Notes:
- The Bluetooth® streaming mode can be se lected only if a suitable streaming device is connected.
- If a call is received during the music playback, the playback is interrupted and continued after the call.
External audio sources
Front AUX-IN socket
Increased risk of injury from connector.
In case of an accident, the protruding connector in the front AUX-IN socket may cause injuries. The use of straight plugs or adapters leads to an increased risk of injury.
For this reason, it is recommended to use angled jack plugs.
As soon as an external audio source, such as a portable MP3 player is connected to the front AUX-IN socket; , it can be selected with the SRC button. "AUX" then appears on the display.
Making settings in the "TUNER" menu
TRAFFIC INFO (traffic information)
(only for reception area EUROPE)
Only possible in FM radio mode: Switching priority for traffice announcements on or off.
Settings: ON,OFF.
If priority is switched on for traffic information, the display shows the icon .
.
BAND SELECTION
Activating or deactivating memory banks. Memory banks that can be deactivated:
| Region | Memory banks |
| EUROPE | FM2, FMT, AM, LW |
| ASIA | FM2, FMT, AM, AMT |
| USA | |
| THAILAND |
Settings in each case: ON, OFF.
Note: If a memory bank is deactivated, the stations stored in this memory bank are retained.
REGIONAL (only for reception area EUROPE)
Only possible in FM radio mode: Switching REGIONAL function ON or OFF. Settings: ON,OFF.
SENSITIVITY
Setting the sensitivity of station seek tuning. Settings: LO (low), HI (high).
RDS
Switching the RDS function is On or Off. Settings: ON,OFF.
AREA (reception area)
Select the reception area for the radio reception. Settings: EUROPE, ASIA, USA, THAILAND.
DAB tuner settings (DAB models only)
The following DAB settings can be changed in the "DAB Tuner " menu:
BAND SELECTION
Activating or deactivating memory banks.
Memory banks that can be deactivated:
DAB 2: ON or OFF.
DAB 3: ON or OFF.
Calling and exiting the "AUDIO" menu
Briefly press the MENU button to open the user menu.
Turn the rotary control until the "AUDIO" menu item is selected.
Sound settings
The following sound settings can be changed in the "AUDIO" menu:
- Adjusting bass and treble(- 7 -+7)
- Setting the left/right volume distribution (Balance) or front/rear (Fader) (F7 -R7)
- Adjusting the increase of bass at low volume (XBASS) (ON -OFF)
- Setting the 4-band equaliser (POP/ROCK /CALSSIC /FLAT/OFF)
Making settings in the "VOLUME" menu
ON VOLUME
Setting the power-on volume. Settings: ON VOLUME (power-on volume; 1-40) or LAST VOLUME (volume set last before switching off the car sound system).
TRAFFIC VOL(traffic information volume) (reception area EUROPE only)
Setting the minimum volume for announce ments. Settings: 1 – 40.
BEEP (button beep)
Switching the confirmation BEEP is On or Off. Settings: ON,OFF.
Making settings in the "CLOCK" menu
HOUR MODE
Selecting the 12 or 24-hour time. Settings: 12, 24.
SET
Setting the time.
Note:
When you set the time in 12-hour mode (HOUR MODE 12), an "AM" is displayed before the time for the time before noon or a "PM" for the time after noon.
RDS CLOCK (automatic time setting) (only for reception area EUROPE)
Switching automatic clock setting with clock data transmitted via RDS on or off. Settings: ON,OFF.
Making settings in the "VARIOUS" menu
VERSION
Displaying the current software version of the radio.
NORMSET
Restoring the original factory settings of the car sound system.
Useful information
Service
If you ever need to use a repair service you will find information about service partners in your country under www.blaupunkt.com.
Technical data
Voltage supply
Current consumption
In operation: < 10 A
: < 3.5 mA
Tuner
Wavebands in Europe/Asia/Thailand:
| FM: | 87.5 – 108 MHz |
| AM (MW): | 531 – 1,602 kHz |
Tuner
Wavebands in Europe/Asia/Thailand:
| FM: | 87.5 – 108 MHz |
| AM (MW): | 531 – 1,602 kHz |
Wavebands in the US:
| FM: | 87.7 – 107.9 MHz |
| AM (MW): | 530 – 1,710 kHz |
CD
Frequency range: 20 – 20,000 Hz
Pre-amp out
2 channels: 1.5 V
Input sensitivity
Front AUX-IN: 300 mV / 10 kΩ
Dimensions and weight(CD MODEL)
| W x H x D: | 178 x 50 x 160 mm |
| Weight: | approx. 1.55 kg |
Dimensions and weight(Model without CD)
| W x H x D: | 178 x 50 x 110 mm |
| Weight: | approx. 0.6 kg |
Dimensions and weight (2 Din MODEL)
| W x H x D: | 178 x 100 x 110 mm |
| Weight: | approx. 0.7kg |
Documents / Resources
References
Download manual
Here you can download full pdf version of manual, it may contain additional safety instructions, warranty information, FCC rules, etc.
Advertisement


Need help?
Do you have a question about the 200 Series and is the answer not in the manual?
Questions and answers