LauraStar SMART Manual
- Manual (246 pages) ,
- Quick start manual (106 pages) ,
- Instruction manual (75 pages)
Advertisement
- 1 Quick start guide
- 2 Overview and features
- 3 LAURASTAR SMART APP
- 4 Installation and storage
- 5 Start up
- 6 Ironing
- 7 Filling
- 8 Maintenance
- 9 Customer Service
- 10 Problems and solutions
- 11 Laurastar App questions and answers
- 12 Technical information
- 13 IMPORTANT SAFETY INSTRUCTIONS
- 14 Documents / Resources
Quick start guide

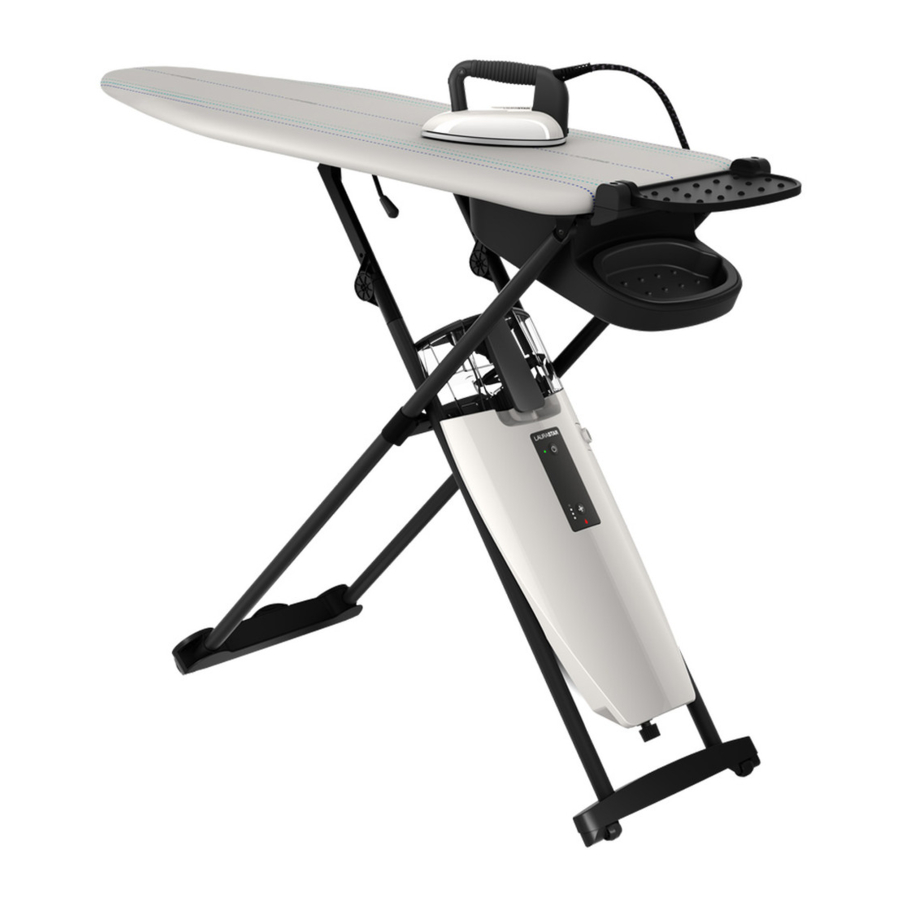
Overview and features

- Ironing board
- Iron
- Steam Hose
- Special Laurastar cover
- Safety storage box
- Folding iron-rest
- Adjustable height handles
- Steam hose holder
- Steam buttons
- Vacuum/blower button
- Water reservoir
- Small and large water reservoir lid
- Filter compartment and anti-scale filter
- Drain tray
- Steam generator
- Main ON/OFF button with indicator light
- Laurastar SenSteam button (option)
- Pulsed steam button (option)
- Fan speed button (4 speeds)
- Empty water indicator light
- Steam generator cap
- Drain cap
- Power plug and Electric cable
- Fan
- Fan plug
- Wheels
- Protective soleplate
- Protective soleplate hook (option)
Find all our tutorial videos and suggestions on www.laurastar.com

Your Laurastar product generates heat and steam. Various parts of the appliance may become very hot during operation and can cause burns.
NOTE: This appliance generates heat and can cause burns. Those parts which get very hot are marked with this symbol.

Failure to comply with this instruction manual and the safety instructions may result in serious injury or damage to property. The manufacturer accepts no responsibility for such injury or damage in the event that these safety instructions are not followed. Keep this instruction manual for reference by any and all persons who may use the appliance.
LAURASTAR SMART APP
- DOWNLOAD
the Laurastar App
If you have it already, make sure that the App is up to date.


- LAUNCH
the App
Launch the Laurastar App and follow the instructions on your smartphone or tablet.
Installation and storage
Installing your product

- Remove the appliance from the box and position it vertically on the ground in a closed position.
- Hold the table with one hand on the iron rest side (6). Hold the middle of the table (1) with the other hand and pivot it to a horizontal position (maximum height).
![]()
- Unfold the iron-rest to the open position.
![]()
- Fit the ironing board cover (4), securing it from the side of the iron rest to the tip of the ironing board, then adjust. The cover supplied with this product is specially designed to ensure uniform distribution of air over the whole board in vacuum or blower mode. Use only a Laurastar approved cover to ensure that its effectiveness is not impaired. The cover is washable at 30°C (warm water); do not spin dry.
- Take the iron (2) out of its safety storage box (5) and place it on the iron-rest (6).
- You can fold the iron-rest into the close position (6a) if you desire.
- Insert the steam hose holder (8) in one of the two holes beside the ironrest (6), fix the steam hose on the steam hose holder (3a). Insert the protective soleplate hook (28) in the other hole.
- You can lower the table height by clamping the handles (7). There are six levels. To lift the table, simply pull it up without using the handles.
- To move your Laurastar, simply raise the tip of the board and roll.


Preparing the appliance
We recommend that you rinse out the steam generator (15) before using it for the first time:

- Check that the plug (23) is disconnected from the mains socket.
![]()
- Set the ironing board (1) to its highest position, then remove the water reservoir (11).
- Place the drain tray(14) beneath the drain cap (22).
- First unscrew the steam generator cap (21), then unscrew the drain cap (22).
![]()
- Remove the small and the large lid (12) from the water reservoir. Remove the filter compartment with the filter (13).
![]()
- Fill the water reservoir with warm tap water up to the MAX level.
![]()
![]()
- Position the large funnel shaped lid (12) at the place of the water reservoir (11) on top of the steam generator (15) and place the water reservoir above it.
![]()
- Once all the water has flown through and the reservoir is empty, screw the two caps in place again.
- Dispose of the water.


Which water should be used
Your Laurastar has been designed for use with tap water. It is still absolutely necessary to use the supplied anti-scale filter (13) in order to benefit fully and longer from your Laurastar.
 NOTICE: Never use additives (e.g. per fumed water), water containing chemical products or water from tumble dryers as these products will have a detrimental effect on the function of your Laurastar.

Storing your system
- To turn your appliance off, press the main ON/OFF button (16).
- Remove the power plug (23) and roll the electric cable around the feet of the table. If your model has the automatic rewind, pull on the cable in order to activate the rewind. Automatic cable rewind is not available in the USA and in Taiwan.
![]()
- Place the steam hose holder (8) horizontally in the hole designed for this purpose.
- Place the iron in the iron safety storage box (5). Fold the iron-rest into the "close" position on top of the table. Hold the table with one hand on the iron rest side (6). With the other hand grasp the ironing board (1), tilt the table into the vertical position.
![]()
![]()
- Store your system in a vertical position. You can leave the water in the reservoir until the next usage.
- NOTE: if you store your system in a horizontal position, you must empty the water reservoir (11).


Start up

Always fill the water reservoir (11) completely before turning on your Laurastar. Operating the appliance without water could damage the appliance.
PLEASE NOTE: Operating the appliance without water will void any limited warranties provided with your appliance.
Installation of the anti-scale cartridge and filling
- Check that the power plug is disconnected from the mains socket.
![]()
- Set the ironing board to its highest position.
- Take the water reservoir (11) out. Take off the water reservoir lids. Install the anti-scale filter (13).
![]()
![]()
- Fill the reservoir with tap water. The filtered water has to reach the MAX level.
![]()
![]()
- Close the water reservoir with the lids and put the reservoir back on the steam generator (15).
- If the water does not flow, soak the anti-scale filter in cold water for 3 minutes.


User interface

- ON/OFF = the green indicator light flashes until the appliance is ready to be used.
![]() = Option Laurastar SenSteam. If your appliance is equipped with the Laurastar SenSteam option (17), the white indicator light signals that the function is on.
= Option Laurastar SenSteam. If your appliance is equipped with the Laurastar SenSteam option (17), the white indicator light signals that the function is on. -
![]() = Option Pulsed Steam. If your appliance is equipped with the Pulsed Steam option (18), the white indicator light signals that the function is ON. Fan speed button (19) = choice of four speeds. The white indicator light signals the intensity chosen.
= Option Pulsed Steam. If your appliance is equipped with the Pulsed Steam option (18), the white indicator light signals that the function is ON. Fan speed button (19) = choice of four speeds. The white indicator light signals the intensity chosen. - Empty water light (20) = the red drop shaped indicator light signals that there is no more water in the reservoir (11).
 = Option Laurastar SenSteam. If your appliance is equipped with the Laurastar SenSteam option (17), the white indicator light signals that the function is on.
  = Option Pulsed Steam. If your appliance is equipped with the Pulsed Steam option (18), the white indicator light signals that the function is ON. Fan speed button (19) = choice of four speeds. The white indicator light signals the intensity chosen.
 Switching on your appliance
- Insert the power plug (23) in the socket. If your model is equipped with the automatic rewinder, first pull the electric cable untill the end-of-cable mark is visible at the rewinder opening.
- Press the main ON/OFF button (16), the green indicator light will flash for 3-6 minutes.
![]()
![]()
- When the green indicator light stops flashing and stays on, the appliance is ready. You can start ironing.
- NOTE: For your comfort and safety, your Laurastar system will switch off after 10 minutes of non-use.
![]()


NOTE: Before ironing, or after an extended break, press the iron's steam button (9) or times, while pointing it away from the clothes. This will release any condensation from the iron and prevent water marks on the clothes.
Do not point the iron at people or pets while using vertical steam.
Ironing
Two ironing modes
For the best possible steam ironing result, we offer two modes of ironing:
- Blower mode:
![]() Pressing the vacuum/blower button (10) on the iron activates the fan (24) in blower mode. this blows air into the fabric from below, helping to reduce unwanted creases.
Pressing the vacuum/blower button (10) on the iron activates the fan (24) in blower mode. this blows air into the fabric from below, helping to reduce unwanted creases.
![]()
- Vacuum mode:
![]() Pressing the vacuum/blower button (10) again, activates the fan (24) in vacuum mode. This draws in air, holding the garment in place on the board to facilitate perfect pleats.
Pressing the vacuum/blower button (10) again, activates the fan (24) in vacuum mode. This draws in air, holding the garment in place on the board to facilitate perfect pleats.
![]()


Press the vacuum/blower button (10) to switch from blower to vacuum mode and vice versa. You can adjust the intensity (4 speeds) pressing the fan speed button (19) on the user interface of the steam generator.
LAURASTAR SENSTEAM

(certain models only)
Laurastar SenSteam (17) allows you to obtain an automatic steam diffusion without pressing the steam button (9). The steam is automatically activated when the iron moves forward and stops when the iron rests or moves back  . To switch back to regular mode, press the Laurastar SenSteam button (17) again.
PULSE

(certain models only)
Press the pulsed steam button (18) to activate the pulse function. Then press the steam button (9) to automatically generate small and regular steam jets  . To switch back to regular mode, press the pulsed steam button again (18).
Steam principle
Perfect ironing requires diffusion of steam across the fabric, in order to relax the fibres, and drying to fix them in place. Creases can only be completely removed if these conditions are present.
Advice: For best results, first iron the item with steam and then iron it again without steam, thereby enabling the iron to dry the fabric.
| IRONING MODE | Fabric type |  |  |  |  |  |  | Velvet |
| Blower | Back | Darts | Inside and linings, sleeves | Top and pleats | ✓ | ✓ | ✓ | |
| Vacuum | Buttons and collar | Turn-ups and pleats | Buttons and collars | Pleats | ✓ |
Protective soleplate
The protective soleplate is indispensable for dark-coloured fabrics which can become shiny, for delicate fabric like silk and synthetic fabrics which have a tendency to stick to the iron.
Using the protective soleplate (27):
- First place the tip of the iron (2) at the front of the protective soleplate (27) and lower the iron to fix it in place in the soleplate.
![]()
![]()
- Wait approximately 2 minutes for the soleplate to reach the correct temperature.


To remove the protective soleplate, pull on the tab and remove the iron while it is still hot. 
The protective soleplate is hot! Use caution when you remove the protective soleplate.
NOTICE: ALWAYS remove the protective soleplate after use.
Advice: For mohair, cashmere, velvet and angora: do not allow the fabric to come into contact with the protective soleplate (27). Iron the fabric at a distance of approximately 10 cm (4 in) while diffusing steam, so that the fabric does not become felted.  Then take the item of clothing in your hand and shake it to restore its volume.

For velvet, corduroy and jersey, we recommend steaming without the protective soleplate (27) at around 2-3 cm (1-2 in) from the fabric, then levelling out by hand.
Vertical smoothing out

Suspend the item of clothing on a hanger or on the vertical support bracket (available on www.laurastar.com or at your approved Laurastar retailer). Moving the iron from top to bottom, lightly touch the fabric using short bursts of steam. Note: almost all fabrics smooth out easily, with the exception of cotton, linen and certain silks. 
If a fabric is difficult to smooth out, place it on the ironing board and iron it normally.
Do not iron or vertical steam clothes that are being worn. Do not point vertical steam in the direction of people or pets.
Filling
Empty water indicator light and warning tone
A warning tone sounds and the empty water indicator light (20) flashes to signal that there is no water left in the steam generator's reservoir. 
As soon as the warning tone sounds, the steam stops and you must refill the water reservoir (11).

How to fill the water reservoir

- Remove the water reservoir (11) from its place. Take off the reservoir lids.
- Fill the reservoir with tap water. The filtered water must reach the MAX level.
- Close the lids and put the reservoir back in its place on top of the steam generator (15).
![]()

Maintenance
To extend the life of your appliance, we recommend that you rinse the steam generator and clean your iron every month or after every 10 hours of ironing.
the appliance should be UNPLUGGED, OFF and COLD before cleaning. Switch off and unplug the appliance. Allow your appliance to cool down for at least 2 hours. Always make sure your appliance is cold before cleaning!

NOTICE! Only rinse the appliance with water. NEVER use descaling products or other chemical products.
Cleaning the iron

If the iron's soleplate is dirty, use the cleaning mat in accordance with the instructions. This can be obtained at www.laurastar.com or from your approved Laurastar retailer. 
Stubborn stains can be cleaned using an abrasive dishwashing sponge. After completing this operation, remove the aluminium oxide present under the soleplate by cleaning it with a damp cloth. 
Clean the steam holes in the iron's soleplate as soon as they become blocked up or calcified. 
Anti-scale filter change
The anti-scale filter has to be changed when the granules are completely brown.

- Remove the water reservoir (11) from its place. Take off the water reser-voir lids. Remove the anti-scale filter (13).
![]()
- Dispose of the filter (13) in the regular houshold garbage and rinse thecompartment. Install a new anti-scale filter in the water reservoir.
![]()
- Fill the reservoir with tap water. The filtered water must reach the MAXlevel. Then put the reservoir back in its place on top of the steam generator (15).
![]()
![]()


Note: you can wash the plastic elements of the water reservoir (11)
Rinsing the steam generator
(cold iron only)
In order to prolong the effectiveness of your appliance and avoid any traces of limescale, you must rinse the steam generator (15) on a regular basis.
Only rinse with water. NEVER use descaling products or other chemical products.
Rinse the steam generator in accordance with the following instructions:

- Check that the power plug (23) is disconnected from the mains socket.
![]()
- Set the ironing board (1) to its highest position, then remove the water reservoir (11). Place the drain tray(14) beneath the drain cap(22).
- First unscrew the steam generatorcap (21) then the drain cap (22).
- Remove the small and the large lid from the water reservoir (12). Remo-ve the filtercompartment with the filter (13).
![]()
- Fill the water reservoir with warm tap water up to the MAX level.
![]()
- Position the large funnel shaped lid (12) at the place of the water reservoir (11) on top of the steam generator (15) and position the water reservoir above it. Then let the water flow through.
![]()
- Repeat the operation until the water coming out of the steam generator is free of residues. If no water comes out of the drain opening, call the Laurastar Customer Service department.
- Once all the water has flown through and the reservoir is empty, screw the two caps in place again. Dispose of the water. Place the filter back in the water reservoir, close with the lids and put the reservoir back in its place on top of the steam generator(15).


Customer Service
To contact Laurastar, visit the Consumer Service menu of our website:
www.laurastar.com
You will find other addresses of official importers and service partners, as well as the complete list of the Laurastar accessories.

Before returning any product to the Customer Service department, please refer to the Problems and Solutions section.
Problems and solutions
Before calling the Laurastar Customer Service department, please check the following points:
| Symptom | Likely cause | Remedy | |
| GENERATOR | Makes a buzzing noise when steam is emitted from the iron. | Vibration from the appliance. | This noise is normal for a new appliance, it will disappear in the course of use. |
| Makes a crackling noise when the appliance is switched on. | The appliance has been set to heat up but has not been filled with water. | Fill the water reservoir (11) | |
| The iron no longer emits steam. The pressure has fallen. |
|
| |
| IRON | The soleplate drips |
|
|
The iron does not heat up |
|
| |
| FAN | There is no sound from the fan | The fan plug (25) is disconnected from the mains socket. | Reconnect the fan plug (25) to the mains socket. |
| The tip of the ironing board table becomes wet when folded | There is condensation inside the ironing board table (1). |
|
Return to the Customer Service department
Switch off the appliance and disconnect the plug (23) from the mains socket. Locate your purchase contract, invoice or receipt. Call the Customer Service department and follow the instructions given.
Laurastar App questions and answers
| Question | Answer | Additional information | |
| APP LAURASTAR | How can I keep in memory the settings I have made with the App? | All the settings made with the Laurastar App are automatically stored in your Laurastar's memory and you will find them each time you turn on your appliance. | If several smartphones/tablets have been connected, your Laurastar will recognize the closest smartphone/tablet if the Bluetooth function is activated. |
| How many smartphones or tablets can I connect to my Laurastar? | It is possible to connect an unlimited number of different smartphones or tablets. When you start your Laurastar, you will find the settings of the last smartphone or tablet used. | Your Laurastar automatically loads the settings of the closest smartphone or tablet, if different from the last used and if the Bluetooth function is activated. | |
How can I restore the factory settings? | Make a simultaneousz long press on the main ON/OFF and the fan speed button. Keep the two buttons pressed for 10 seconds. When all the LEDs of the user interface start to blink, the factory settings are reset. | Intended or unintended incorrect handling might cause erasing of the factory settings. This voids the Laurastar warranty and possible costs of repair will be in charge of the user. |
Technical information
| Technical characteristics | ||
| CE | US | |
| Total output | 2200 W | 1600 W |
| Generator output | 1400 W | 1000 W |
| Iron output | 800 W | 600 W |
| Steam pressure | 3,5 bar | 50 psi |
| Steam generator capacity | 1,1 l | 37,2 oz. |
| Electricity supply | 220-240 VAC / 50-60 Hz | 120 VAC / 60 Hz |
| Weight of iron | 1,1 kg | 2,4 lb |
| Total weight | 23,1 kg | 51 lb |
| Board height | 82-102 cm | 32.3-40.2 in |
| Dimensions when folded (H x W x D) | 132 x 42 x 22 cm | 52 x 16.6 x 8.7 in |
Designation: Pressure steam ironing system
IMPORTANT SAFETY INSTRUCTIONS
When using an iron, basic precautions should always be followed, including the following:
READ ALL INSTRUCTIONS BEFORE USING
- Only use an iron for its intended use.
![shock hazard]() To avoid the risk of electric shock, do not immerse the iron in water or other liquids.
To avoid the risk of electric shock, do not immerse the iron in water or other liquids.- Always turn the iron OFF before plugging or unplugging the iron from the electrical outlet. Never pull on the cord to disconnect the iron from the electrical outlet; instead, grasp the plug and pull on the plug to disconnect the iron.
- Do not let the cord touch hot surfaces. Let the iron cool completely before putting the iron away. Coil the cord loosely around the iron when storing.
- Always disconnect the iron from the electrical outlet before filling the iron with water, emptying the water from the iron, and when the iron is not in use.
![shock hazard]() Do not operate the iron with a damaged cord or in the event the iron has been dropped or damaged. To avoid the risk of electric shock, do not disassemble the iron. Take it to a qualified serviceman for examination and repair. Incorrect assembly might result in a risk of electric shock when the iron is used after reassembly.
Do not operate the iron with a damaged cord or in the event the iron has been dropped or damaged. To avoid the risk of electric shock, do not disassemble the iron. Take it to a qualified serviceman for examination and repair. Incorrect assembly might result in a risk of electric shock when the iron is used after reassembly.- Close supervision is required for any appliance used by or near children. Do not leave the iron unattended while the iron is connected or on an ironing board.
![]()
Burns can occur from touching hot metal parts, hot water, or steam. Use caution when you turn a STEAM IRON upside down - there might be hot water in the reservoir.- To avoid a circuit overload, do not operate an iron on the same circuit with another high wattage appliance.
![burn hazard]()
![shock hazard]()
If an extension cord is absolutely necessary, a cord with an ampere rating equal to or greater than the maximum rating of the iron shall be used. A cord rated for less amperage can result in a risk of fire or electric shock due to overheating. Care shall be taken to arrange the cord so that it cannot be pulled or be tripped over.
 To avoid the risk of electric shock, do not immerse the iron in water or other liquids.
- This appliance is intended for private houshold use only.
- Only use this appliance indoors and for ironing textile items in accordance with this Operator Manual.
- In an emergency, immediately unplug the plug from the wall socket.
- The appliance must ONLY be connected to a grounded wall socket outlet. We recommend FI circuit breakers. The power plug must be easily accessible in case of emergency.
- The iron soleplate and steam jet are very hot. DO NOT iron or apply steam to clothing while it is being worn.
- Do not point steam in the direction of people or pets during vertical steaming.
- This appliance produces heat. Keep your hands and body away from the iron soleplate and steam jet while in use – they will be HOT. Take care when returning the steam iron to the iron rest.
![]()
CONTACT WITH STEAM UNDER PRESSURE CAN RESULT IN SEVERE BURNS.- DO NOT open the steam generator cap or the drain cap while operating the appliance.
- Never leave the appliance unattended while switched on.
- ALWAYS allow the appliance to cool down for at least 2 hours before emptying.
- Keep the iron and its cord out of reach of children less than 8 years of age when it is energized or cooling down.
- This appliance is NOT intended for use by children, or persons with reduced physical, sensory or mental capacity, or lack of experience, unless they are supervised by a person responsible for their safety. This appliance is NOT intended to be used by children under the age of 8 regardless of supervision or training.

Keep out of reach of children. Children must be supervised to ensure that they do not play with the appliance.

DO NOT drink filtered water. Keep out of reach of children. DO NOT ingest the demineralization granules. They may be disposed of with household waste.
![burn hazard]() Always place the iron on a flat, stable and fire-resistant surface. NEVER rest the iron on the ironing board cover or clothes. To avoid risk of fire, ensure that the iron is placed only on the iron rest.
Always place the iron on a flat, stable and fire-resistant surface. NEVER rest the iron on the ironing board cover or clothes. To avoid risk of fire, ensure that the iron is placed only on the iron rest.- Take care when removing and setting down the protective soleplate after use. Place the hot soleplate on the heat-resistant iron rest.
![]()
Cleaning, repairs, and maintenance on the appliance should ONLY be performed when the iron is switched off, cold and allowed to cool down for at least 2 hours. Unscrew the caps with care: any pressurized steam present will begin to escape after a few turns, posing a risk of burns.- Allow the iron to cool down completely before storing.
- DO NOT operate the appliance without water.
- Clean the exterior of the appliance with a soft, damp cloth. DO NOT use solvents, oil or petrol.
- DO NOT attempt to insert objects into the openings of the appliance. If water or a foreign body enters the appliance, immediately unplug the iron from the wall socket. Contact an authorized Laurastar Customer Service representative for information on repair.
![shock hazard]() To avoid risk of electric shock, DO NOT pull the electric cable from the wall socket – take a firm hold of the plug and remove it.
To avoid risk of electric shock, DO NOT pull the electric cable from the wall socket – take a firm hold of the plug and remove it.- Position the electric cable and the steam hose so that they cannot be pulled or caught to avoid a tripping hazard.
- The filling, or decalcifying, or rinsing, or inspection apertures that are under pressure, shall not be opened during use.
![shock hazard]() Do not use the appliance if it has been damaged in a fall, shows visible signs of damage, or has a faulty steam hose or electric cable. To avoid the risk of electric shock, do not open or disassemble the appliance. Contact an authorized Laurastar Customer Service representative for information on repair. Incorrect reassembly can cause a risk of electric shock when the appliance is used.
Do not use the appliance if it has been damaged in a fall, shows visible signs of damage, or has a faulty steam hose or electric cable. To avoid the risk of electric shock, do not open or disassemble the appliance. Contact an authorized Laurastar Customer Service representative for information on repair. Incorrect reassembly can cause a risk of electric shock when the appliance is used.
SAVE THESE INSTRUCTIONS
Documents / Resources
References
Download manual
Here you can download full pdf version of manual, it may contain additional safety instructions, warranty information, FCC rules, etc.
Advertisement


Need help?
Do you have a question about the SMART and is the answer not in the manual?
Questions and answers