Table of Contents
Advertisement
Available languages
Available languages
Owner's Manual
Bedienungsanleitung
Mode d'emploi
Manuale d'uso
Manual del usuario
Thank you, and congratulations on your choice of the SD-20.
Before using this unit, carefully read the sections entitled: "USING THE UNIT
SAFELY" and "IMPORTANT NOTES" (Owner's manual pp. 3--5). These
sections provide important information concerning the proper operation of the
unit. Additionally, in order to feel assured that you have gained a good grasp
of every feature provided by your new unit, Owner's manualshould be read in
its entirety. The manual should be saved and kept on hand as a convenient
reference.
Copyright © 2002 ROLAND CORPORATION
All rights reserved. No part of this publication may be reproduced in any form without
the written permission of ROLAND CORPORATION.
Advertisement
Table of Contents

Related Manuals for Edirol StudioCanvas SD-20


Summary of Contents for Edirol StudioCanvas SD-20
- Page 1 Mode d’emploi Manuale d’uso Manual del usuario Thank you, and congratulations on your choice of the SD-20. Before using this unit, carefully read the sections entitled: “USING THE UNIT SAFELY” and “IMPORTANT NOTES” (Owner’s manual pp. 3--5). These sections provide important information concerning the proper operation of the unit.
- Page 2 For the USA DECLARATION OF CONFORMITY Compliance Information Statement Model Name : SD-20 Type of Equipment : Sound Module Responsible Party : Roland Corporation U.S. Address : 5100 S. Eastern Avenue, Los Angeles, CA 90040-2938 Telephone : (323) 890 3700...
-
Page 3: Using The Unit Safely
• Do not excessively twist or bend the power to do so). Refer all servicing to your retailer, cord, nor place heavy objects on it. Doing so the nearest EDIROL/Roland Service Center, can damage the cord, producing severed or an authorized EDIROL/Roland elements and short circuits. - Page 4 • DO NOT play a CD-ROM disc on a conven- AC adaptor from the outlet, and request tional audio CD player. The resulting sound servicing by your retailer, the nearest Roland may be of a level that could cause permanent Service Center, or an authorized Roland hearing loss.
-
Page 5: Important Notes
Should you experience such problems, you should • Use a cable from Roland to make the connection. If relocate such wireless devices so they are at a greater using some other make of connection cable, please distance from this unit, or switch them off. -
Page 6: Table Of Contents
Contents USING THE UNIT SAFELY............3 IMPORTANT NOTES ..............5 Features of the SD-20 .............. 8 Check the contents of the package........9 Names of things and what they do........10 Front Panel .......................... 10 Rear Panel ........................... 11 Exchanging MIDI data with your computer..............12 Basic connections ....................... - Page 7 Contents Français Installation des pilotes et connexions (Windows).... 102 Connexion USB......................... 103 Connexion série........................ 115 Configuration et contrôle....................125 Activation des services en tâche de fond..............127 Vérification de la sortie son .................... 128 Installation des pilotes et connexions (Macintosh)..129 Connexion USB.........................
-
Page 8: Features Of The Sd-20
) and XGlite ( ) are trademarks of YAMAHA Corporation. * GS ( ) is a registered trademark of Roland Corporation. * Microsoft and Windows are registered trademarks of Microsoft Corporation. 206c * Windows® 98 is known officially as: “Microsoft® Windows® 98 operating system.”... -
Page 9: Check The Contents Of The Package
SD-20. You may want to mark the relevant check box as you * The SD-20 package does not include an external amp or speakers, or headphones. confirm the presence of You will need to provide these separately. -
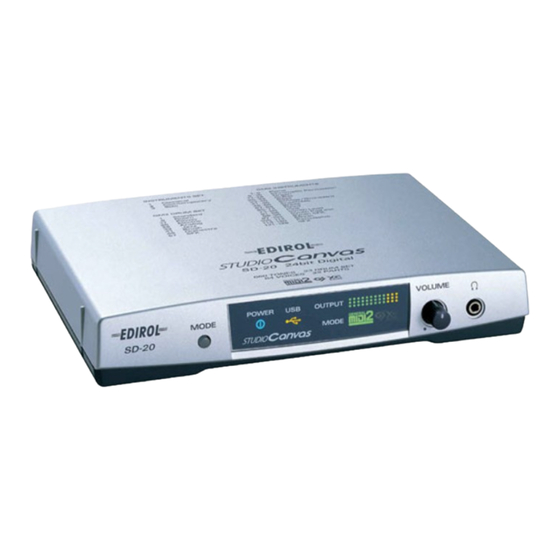
Page 10: Names Of Things And What They Do
Names of things and what they do Front Panel fig.front USB Indicator POWER Indicator OUTPUT Level Indicator MODE Button MODE Indicator Headphone Jack VOLUME Knob A. MODE Button The sound-module mode changes each time you press this button. (->About the sound generator modes (p. -
Page 11: Rear Panel
BUS POWER The SD-20 can be operated on bus power. "Bus power" refers to power that is supplied to the SD-20 from a computer via a USB cable. In this case, it is not necessary to connect the AC adaptor. -
Page 12: Exchanging Midi Data With Your Computer
Set this switch as appropriate for the computer or interface to which the SD-20 is connected. * If you change the setting of the computer switch, the SD-20 must be restarted. Turn the SD-20’s power switch OFF, then ON again. -
Page 13: Basic Connections
Windows machine Audio cable When connecting via a computer cable to a Macintosh Stereo set LINE OUT Optical digital When controlling cable the SD-20 from a MIDI device Computer switch DIGITAL INPUT MIDI cable Powered speaker MIDI OUT MIDI keyboard etc.. -
Page 14: About The Sound Generator Modes
■ Native mode This mode is unique to the SD-20. It provides three sound sets that can be switched using MIDI bank select messages. The way in which sounds are selected is different than in GM2 mode. For this reason, song data you create in Native mode will not play back correctly on GM2 sound modules other than the SD- Other functions are the same as in GM2 mode. - Page 15 GM format which does not include the extended specifications of GM2. ■ GS mode This sound generator mode supports the “GS” sound generator format promoted by Roland Corporation. In addition to the General MIDI functionality, this format expands the sound set, and also enhances compatibility by providing detailed specifications for functionality such as sound editing and effects (reverb and chorus).
-
Page 16: About Parts And Sounds
About the sound generator modes About parts and sounds The SD-20 is able to produce 32 different sounds at once. A sound generator such as the SD-20 that is able to produce many different sounds simultaneously is called a “multitimbral sound module.”... -
Page 17: Getting Connected And Installing Drivers (Windows)
A “driver” is software that transfers data between the SD-20 and application software running on your computer, when your computer and the SD-20 are connected by a USB cable. The driver sends data from your application to the SD-20, and from the SD-20 to your application. -
Page 18: Usb Connection
(e.g., Administrator). For details With the SD-20 disconnected, start up Windows. on user accounts, please Disconnect all USB cables except for a USB keyboard and USB mouse (if consult the system used). - Page 19 Getting connected and installing drivers (Windows) fig.2-2 Make sure that “What action do you want Windows to take?” is set to “Ignore.” If you changed “What If it is set to “Ignore”, simply click action do you want [OK]. Windows to take?” in If it is not set to “Ignore”, make a step 4, you must restore the previous setting after...
- Page 20 1. Set the computer switch of the installing the driver and SD-20 to USB. making settings. 2. With the SD-20’s power switch turned off, connect it to the AC adaptor. This unit is equipped with 3. Plug the AC adaptor into an AC power outlet.
- Page 21 Getting connected and installing drivers (Windows) fig.2-8_20 Make sure that the “Model” field indicates “EDIROL SD-20,” and click [Next]. Driver installation will begin. If in step 4 the “What action do you want Windows to take?” setting was not set to “Ignore”, a “Digital signature not found”...
- Page 22 "D:\DRIVER\USB_XP2K" and click [OK]. fig.2-11_20 The Found New Hardware wizard will appear. Make sure that the display indicates "EDIROL SD-20," and click [Finish]. Wait until "Found New Hardware" appears near the taskbar. Restart Windows. When driver installation has been completed, the System Setting Change dialog box will appear.
- Page 23 Getting connected and installing drivers (Windows) ■ Windows 2000 users With the SD-20 disconnected, start up Windows. Disconnect all USB cables except for a USB keyboard and USB mouse (if used). Log on to Windows as a user with administrative privileges (such as Administrator).
- Page 24 1. Set the computer switch of the SD-20 to USB. making settings. 2. With the SD-20’s power switch turned off, connect it to the AC adaptor. 3. Plug the AC adaptor into an AC power outlet.
- Page 25 (p. 235)) The Files Needed dialog box will appear. In the "Copy files from" area, type "D:\DRIVER\USB_XP2K" and click [OK]. fig.2-17b_30 The “Found New Hardware Wizard” may be displayed. Verify that “EDIROL SD-20” is displayed, and click [Finish].
- Page 26 Getting connected and installing drivers (Windows) Restart Windows. The System Settings Change dialog box may appear. Click [Yes]. Windows will restart automatically. If you changed “File signature verification” If you changed the “File signature verification” setting in step 5, restore the original setting after Windows restarts.
- Page 27 Getting connected and installing drivers (Windows) ■ Windows Me/98 users With the SD-20 disconnected, start up Windows. Disconnect all USB cables except for a USB keyboard and USB mouse (if used). Exit all currently running software (applications). Also close any open windows. If you are using virus checking or similar software, be sure to exit it as well.
- Page 28 SD-20 with 1. Set the computer switch of the SD-20 to USB. BUS power, please use the 2. With the SD-20’s power switch turned off, connect it to the AC AC adaptor while you are installing the driver and adaptor.
-
Page 29: Serial Connection
■ Windows XP users XP Professional, you must log on using a user name with an administrative Make sure that the power is turned off for the SD-20, your computer, and all account type (e.g., peripheral devices. Administrator). For details... - Page 30 Getting connected and installing drivers (Windows) fig.2-1 Open the Driver Signing Options dialog box. Click the Hardware tab, and then click [Driver Signing]. fig.2-2 Make sure that “What action do you want Windows to take?” is set to “Ignore.” If you changed “What If it is set to “Ignore”, simply click action do you want [OK].
- Page 31 Getting connected and installing drivers (Windows) fig.2-22_40 In this manual, the location In the dialog box that appears, of folders and files is given input the following into the in terms of the file path, “Open” field, and click [OK]. using \ as the delimiter.
- Page 32 Getting connected and installing drivers (Windows) The Roland Serial MIDI Driver Settings dialog box will appear. Set the following items. Click [OK]. fig.2-23_30 COM Ports Select the serial port (COM port) to which the SD-20’s serial port is connected. Switches Check “Use multiple ports.”...
- Page 33 Getting connected and installing drivers (Windows) ■ Windows 2000 users Make sure that the power is turned off for the SD-20, your computer, and all peripheral devices. Set the computer switch of the SD-20 to PC. Log on to Windows using...
- Page 34 Getting connected and installing drivers (Windows) fig.2-13_50 Make sure that “File signature verification” is set to “Ignore.” If it is set to “Ignore”, simply click [OK]. If it is not set to “Ignore”, make a note of the current setting (“Warn”...
- Page 35 2. When the “New hardware detection wizard” appears, click [Finish]. 3. Perform the installation as described in the “Troubleshooting” section on Device Manager shows “?”, “!”, or “USB Composite Device” (p. 235). The Roland Serial MIDI Driver Settings dialog box will appear. Set the following items. Click [OK]. fig.2-23b_40...
- Page 36 Getting connected and installing drivers (Windows) When driver installation has been completed, the Restart your computer dialog box will appear. Restart your computer. If you changed “File signature verification” If you changed the “File signature verification” setting in step 5, restore the original setting after Windows restarts.
- Page 37 Getting connected and installing drivers (Windows) ■ Windows Me/98 users Make sure that the power is turned off for the SD-20, your computer, and all peripheral devices. Set the computer switch of the SD-20 to PC. Use the computer cable to connect the serial connector of your computer to the SD-20.
- Page 38 Check the displayed contents, and click [Next]. The Computer Switch Setting dialog box will appear. Make sure that the computer switch on the rear of the SD-20 is set to [PC], and click [Next]. If it is not set to [PC], perform this procedure again from step 1.
-
Page 39: Settings And Checking
[Preferred device] (or in Windows XP, [Default device]), and select the following from the list that appears. For a USB EDIROL SD-20 PART A connection For a serial Roland Serial MIDI Out A connection Click OK to complete the settings. - Page 40 Properties" dialog box. Click the MIDI tab. fig.2-29_30 Set "MIDI output." Select [Single instrument], and choose one of the following from the list that appears. EDIROL SD-20 For a USB connection PART A For a serial Roland Serial MIDI connection Out A Click OK to complete the settings.
-
Page 41: Enabling Background Services
Getting connected and installing drivers (Windows) Enabling background services In Windows XP, perform these settings to make MIDI processing occur more smoothly. These settings are unavailable in Windows 2000/Me/98. Click the Windows start button, and from the menu that appears, select Control Panel. -
Page 42: Checking For Sound Output
Was the sample data played back? failure to play back If it was played back correctly, this means that the computer and the SD-20 correctly. are connected correctly, and that the drivers have been installed correctly. -
Page 43: Getting Connected And Installing Drivers (Macintosh)
A “driver” is software that transfers data between the SD-20 and application software running on your computer, when your computer and the SD-20 are connected by a USB cable. The driver sends data from your application to the SD-20, and from the SD-20 to your application. -
Page 44: Usb Connection
* Do not turn on the power of the SD-20 at this time. If the power of the SD-20 is turned on, a message like the following will appear when the Macintosh is started up. Perform the steps described below as appropriate for the message that is displayed. - Page 45 ■ Installing the SD-20 driver (OMS) Use the following procedure to install the SD-20 driver. The included SD-20 OMS driver is an add-on module for using the SD-20 Requires OMS 2.3.5 or with OMS. In order for you to use it, OMS must already be installed on the later.
- Page 46 [OK], click [Cancel] in the next screen. fig.3-7 Choose “Open” from the File menu. From the OMS Settings folder that you copied in step 1, select the SD-20 USB file, and click [Open]. fig.3-8_35 A screen like the one shown here will appear.
- Page 47 Click on the sound generator icons that are encircled in the following illustration. If sound is heard from the SD-20, the settings are correct. If MIDI is not being transmitted, the Macintosh will produce an alert sound.
- Page 48 Getting connected and installing drivers (Macintosh) Does the OUTPUT level indicator of the SD-20 move? If the OUTPUT level meter in the SD-20’s display is moving but you do not hear sound, check whether the volume of the SD-20 or your speaker system has been lowered.
- Page 49 ■ Installing the SD-20 driver (FreeMIDI) Use the following procedure to install the SD-20 driver. The included SD-20 FreeMIDI driver is an add-on module for using the SD-20 with FreeMIDI. In order to use it, FreeMIDI must be installed on the hard disk from which you started up.
- Page 50 If the SD-20 does not produce sound, refer to No If the OUTPUT level meter in the SD-20’s display is moving but you do not sound (p. 237). hear sound, check whether the volume of the SD-20 or your speaker system has been lowered.
-
Page 51: Serial Connection
Macintosh to the SD-20. This unit is equipped with a protection circuit. A brief With the SD-20’s power switch turned off, connect it to the AC adaptor. interval (a few seconds) after power up is required before the unit will operate Plug the AC adaptor into an AC power outlet. - Page 52 Getting connected and installing drivers (Macintosh) Verify the installation location, and click [Install]. fig.3-2_40 If a message like the following is displayed, click [Continue]. The other currently running applications will exit, and installation will continue. A dialog box will indicate Installation completed. Click [Restart] to restart your Macintosh.
- Page 53 PowerBooks, select the “SD-20 Modem Port” file. Opening the SD-20 Printer Port file Opening the SD-20 Modem Port file From the Edit menu, select OMS MIDI Setup. In the OMS MIDI Setup dialog box that appears, check Run MIDI in background, and click [OK].
- Page 54 Macintosh will produce an alert sound. Does the OUTPUT level indicator of the SD-20 move? If the OUTPUT level meter in the SD-20’s display is moving but you do not hear sound, check whether the volume of the SD-20 or your speaker system has been lowered.
- Page 55 From the File menu, choose [Exit]. If the AppleTalk confirmation dialog box sound (p. 237). appears, click [OK] to close the dialog box. This completes connections for the SD-20 and Macintosh, and installation of the MIDI driver. Now, MIDI data can be input and output (recorded and played).
- Page 56 ■ Installing the SD-20 driver (FreeMIDI) Use the following procedure to install the SD-20 driver. The included SD-20 FreeMIDI driver is an add-on module for using the SD-20 with FreeMIDI. In order to use it, FreeMIDI must be installed on the hard disk from which you started up.
- Page 57 Does the OUTPUT level indicator of the SD-20 move? If the OUTPUT level meter in the SD-20’s display is moving but you do not hear sound, check whether the volume of the SD-20 or your speaker system has been lowered. If the OUTPUT level meter does not move, check the connections and OMS settings once again.
-
Page 58: Anschlüsse Herstellen Und Treiber Installieren (Windows)
Cable SD-20 Computer Ein “Treiber” ist Software, die Daten zwischen dem SD-20 und Anwendungssoftware auf Ihrem Computer überträgt, wenn Ihr Computer und das SD-20 mit einem USB-Kabel miteinander verbunden sind. Der Treiber überträgt die Daten der Anwendung an das SD-20 sowie die Daten vom SD-20 an die Anwendung. -
Page 59: Usb-Verbindung
■ Windows XP-Anwender müssen Sie sich mit einem Benutzernamen vom Typ Administrationskonto (zum Beispiel Starten Sie Windows, wobei das SD-20 ausgesteckt ist. Administrator) anmelden. Stecken Sie alle USB-Kabel außer der USB-Tastatur und der USB-Maus aus Einzelheiten zu (falls vorhanden). Benutzerkonten erfahren... - Page 60 Anschlüsse herstellen und Treiber installieren (Windows) fig.2-1 Öffnen Sie das Dialogfeld Treibersignaturoptionen. Klicken Sie auf die Registerkarte Hardware und klicken Sie anschließend auf [Treibersignierung]. fig.2-2 Stellen Sie sicher, dass für “Welche Aktion soll Windows durchführen?” “Ignorieren” aktiviert ist. Wenn “Ignorieren” bereits Wenn Sie die Option für aktiviert ist, klicken Sie auf [OK].
- Page 61 Einstellungen vornehmen. 3. Verbinden Sie den Wechselstromadapter mit einer elektrischen Steckdose. Dieses Gerät wurde mit 4. Verwenden Sie das USB-Kabel, um das SD-20 mit Ihrem Computer zu einem Schutzschaltkreis verbinden. ausgestattet. Nach dem Einschalten benötigt das Bringen Sie den Netzschalter des SD-20 in die Position ON.
- Page 62 Anschlüsse herstellen und Treiber installieren (Windows) fig.2-6 Der Assistent Neue Hardware gefunden erscheint. Prüfen Sie, ob der Bildschirm “EDIROL SD-20” anzeigt, wählen Sie “Aus einer Liste wählen oder Speicherort angeben (Erweitert)” und klicken Sie auf [Weiter]. fig.2-7 Im Bildschirm wird folgende Meldung angezeigt: “Bitte...
- Page 63 D:\DRIVER\USB_XP2K ein und klicken Sie auf [OK]. fig.2-11_20 Der Assistent Neue Hardware gefunden erscheint. Prüfen Sie, ob EDIROL SD-20 angezeigt wird, und klicken Sie auf [Beenden]. Warten Sie, bis die Meldung “Neue Hardware gefunden” in der Nähe der Task-Leiste...
- Page 64 Anschlüsse herstellen und Treiber installieren (Windows) Starten Sie Windows neu. Nachdem der Treiber installiert wurde, wird das Dialogfeld Geänderte Systemeinstellungen angezeigt. Klicken Sie auf [Ja]. Wenn Sie “Welche Aktion soll Windows durchführen?” geändert haben Wenn Sie Welche Aktion soll Windows durchführen? in Schritt 5 geändert haben, sollten Sie die ursprüngliche Einstellung nach dem Neustart von Windows wiederherstellen.
- Page 65 Anschlüsse herstellen und Treiber installieren (Windows) ■ Windows 2000-Anwender Starten Sie Windows, wobei das SD-20 ausgesteckt ist. Stecken Sie alle USB-Kabel außer der USB-Tastatur und der USB-Maus aus (falls vorhanden). Melden Sie sich in Windows als Benutzer mit Administratorrechten an (z.B.
- Page 66 Anschlüsse herstellen und Treiber installieren (Windows) Schließen Sie das Dialogfeld Systemeigenschaften. Klicken Sie auf [OK]. Beenden Sie alle aktuell ausgeführten Programme (Anwendungen). Schließen Sie außerdem alle noch geöffneten Programmfenster. Wenn Sie ein Virenschutzprogramm oder ähnliche Software verwenden, müssen Sie diese ebenfalls beenden.
- Page 67 3. Verbinden Sie den Wechselstromadapter mit einer elektrischen während Sie den Treiber Steckdose. installieren und Einstellungen 4. Verwenden Sie das USB-Kabel, um das SD-20 mit Ihrem Computer zu vornehmen. verbinden. Dieses Gerät wurde mit Bringen Sie den Netzschalter des SD-20 in die Position ON.
- Page 68 D:\DRIVER\USB_XP2K ein und klicken Sie auf [OK]. fig.2-17b_30 Möglicherweise wird der “Neue Hardware gefunden” angezeigt. Prüfen Sie, ob “EDIROL SD-20” angezeigt wird und klicken Sie auf [Beenden]. Starten Sie Windows neu. Möglicherweise wird das Dialogfeld Geänderte Systemeinstellungen angezeigt. Klicken Sie auf [Ja].
- Page 69 Anschlüsse herstellen und Treiber installieren (Windows) ■ Windows Me/98-Anwender Starten Sie Windows, wobei das SD-20 ausgesteckt ist. Stecken Sie alle USB-Kabel außer der USB-Tastatur und der USB-Maus aus (falls vorhanden). Beenden Sie alle aktuell ausgeführten Programme (Anwendungen). Schließen Sie außerdem alle noch geöffneten Programmfenster. Wenn Sie ein Virenschutzprogramm oder ähnliche Software verwenden, müssen Sie diese...
- Page 70 3. Verbinden Sie den Wechselstromadapter mit einer elektrischen während Sie den Treiber Steckdose. installieren und Einstellungen vornehmen. 4. Verwenden Sie das USB-Kabel, um das SD-20 mit Ihrem Computer zu verbinden. Bringen Sie den Netzschalter des SD-20 in die Position ON. Dieses Gerät wurde mit einem Schutzschaltkreis fig.2-20_30...
-
Page 71: Serielle Verbindung
• Windows Me/98-Anwender ........(S. 80) Wenn Sie Windows XP ■ Windows XP-Anwender Professional verwenden, müssen Sie sich mit einem Benutzernamen vom Typ Stellen Sie sicher, dass das SD-20, Ihr Computer und alle peripheren Geräte Administrationskonto ausgeschaltet sind. (zum Beispiel Administrator) anmelden. Einzelheiten zu Stellen Sie den Computerschalter des SD-20 auf PC. - Page 72 Anschlüsse herstellen und Treiber installieren (Windows) fig.2-1 Abhängig von der Öffnen Sie das Dialogfeld Konfiguration Ihres Treibersignaturoptionen. Systems kann es vorkommen, dass das Klicken Sie auf die Registerkarte Symbol System nicht Hardware und klicken Sie sofort in der anschließend auf Systemsteuerung (in [Treibersignierung] .
- Page 73 Anschlüsse herstellen und Treiber installieren (Windows) Öffnen Sie das Dialogfeld “Ausführen...”. Klicken Sie auf die Windows-Schaltfläche Start. Wählen Sie im daraufhin angezeigten Menü die Option Ausführen fig.2-22_40 Geben Sie im angezeigten In diesem Dokument wird Dialogfeld Folgendes in das Feld die Position der Ordner “Öffnen”...
- Page 74 3. Führen Sie die Installation aus, wie im Abschnitt “Fehlerbehebung” in Device Manager shows “?”, “!”, or “USB Composite Device” (S. 235) beschrieben. Das Dialogfeld Roland Serial MIDI Driver Settings wird angezeigt. Nehmen Sie folgende Einstellungen vor. Klicken Sie auf [OK].
- Page 75 Anschlüsse herstellen und Treiber installieren (Windows) Wenn Sie “Welche Aktion soll Windows durchführen?” geändert haben Wenn Sie Welche Aktion soll Windows durchführen? in Schritt 5 geändert haben, sollten Sie die ursprüngliche Einstellung nach dem Neustart von Windows wiederherstellen. 1. Unter Windows XP Professional melden Sie sich in Windows mit einem Benutzernamen für das Administrationskonto an (z.B.
- Page 76 Anschlüsse herstellen und Treiber installieren (Windows) ■ Windows 2000-Anwender Stellen Sie sicher, dass das SD-20, Ihr Computer und alle peripheren Geräte ausgeschaltet sind. Melden Sie sich in Stellen Sie den Computerschalter des SD-20 auf PC. Windows mit einem Benutzernamen vom Typ...
- Page 77 Anschlüsse herstellen und Treiber installieren (Windows) fig.2-13_50 Stellen Sie sicher, dass für “Dateisignaturverifizierung” “Ignorieren” aktiviert ist. Wenn “Ignorieren” bereits aktiviert ist, klicken Sie auf [OK]. Wenn “Ignorieren” nicht aktiviert ist, notieren Sie sich die aktuelle Einstellung (“Warnen” oder “Sperren”). Ändern Sie dann die Einstellung auf “Ignorieren”...
- Page 78 Anschlüsse herstellen und Treiber installieren (Windows) Das Dialogfeld Welcome wird angezeigt. Klicken Sie auf [Next]. fig.2-22b Ein Dialogfeld ähnlich dem folgenden wird angezeigt. Klicken Sie auf [Next]. Wenn in Schritt 9 für “Dateisignaturverifizierung” nicht “Ignorieren” aktiviert wurde, erscheint die Meldung “Digitalsignatur nicht gefunden”. fig.2-16b_40 Wenn für “Dateisignaturverifizierung”...
- Page 79 Anschlüsse herstellen und Treiber installieren (Windows) Das Dialogfeld Roland Serial MIDI Driver Settings wird angezeigt. Nehmen Sie folgende Einstellungen vor. Klicken Sie auf [OK]. fig.2-23b_40 COM Ports Wählen Sie den seriellen Anschluss (COM-Anschluss) aus, mit dem der serielle Anschluss des SD-20 verbunden ist.
- Page 80 Anschlüsse herstellen und Treiber installieren (Windows) ■ Windows Me/98-Anwender Stellen Sie sicher, dass das SD-20, Ihr Computer und alle peripheren Geräte ausgeschaltet sind. Stellen Sie den Computerschalter des SD-20 auf PC. Verwenden Sie das Computerkabel, um eine Verbindung mit dem seriellen Anschluss Ihres Computers und dem SD-20 herzustellen.
- Page 81 Prüfen Sie den angezeigten Inhalt und klicken Sie auf [Next]. Das Dialogfeld Computer Switch Setting wird angezeigt. Prüfen Sie, ob der Computerschalter auf der Rückseite des SD-20 auf [PC] eingestellt ist und klicken Sie auf [Next]. Wenn der Schalter nicht auf [PC] steht, führen Sie die angegebenen Schritte ab Schritt 1 erneut aus.
-
Page 82: Einstellungen Und Überprüfung
Klicken Sie bei MIDI-Musikwiedergabe auf das ▼, das sich rechts von [Bevorzugtes Gerät] befindet (oder in Windows XP, [Standardgerät] und wählen Sie folgende Optionen aus der angezeigten Liste aus. Für eine USB- EDIROL SD-20 PART A Verbindung Für eine serielle Roland Serial MIDI Verbindung Out A Klicken Sie auf OK, um die Konfiguration abzuschließen. - Page 83 Klicken Sie auf das Register MIDI. fig.2-29_30 Konfigurieren Sie die “MIDI- Ausgabe”. Wählen Sie [Einzelnes Instrument] und wählen Sie eine der folgenden Optionen aus der angezeigten Liste. EDIROL SD-20 Für eine USB- Verbindung PART A Für eine serielle Roland Serial Verbindung MIDI Out A Klicken Sie auf OK, um die Konfiguration abzuschließen.
-
Page 84: Aktivierung Der Hintergrunddienste
Anschlüsse herstellen und Treiber installieren (Windows) Aktivierung der Hintergrunddienste Nehmen Sie unter Windows XP folgende Einstellungen vor, um eine reibungslose MIDI-Verarbeitung zu ermöglichen. Diese Einstellungen sind unter Windows 2000/Me/98 nicht verfügbar. Klicken Sie in Windows auf Start und wählen Sie im daraufhin angezeigten Menü... -
Page 85: Überprüfung Der Soundausgabe
Probleme wie z.B. Wurden die Beispieldaten wiedergegeben? fehlender Sound oder Wenn die Beispieldaten einwandfrei wiedergegeben wurden, bedeutet das, nicht einwandfreie dass Ihr PC und das SD-20 richtig angeschlossen sind und die Treiber Wiedergabe gelöst vorschriftsmäßig installiert wurden. werden können. -
Page 86: Anschlüsse Herstellen Und Treiber Installieren (Macintosh)
Cable SD-20 Computer Ein “Treiber” ist Software, die Daten zwischen dem SD-20 und Anwendungssoftware auf Ihrem Computer überträgt, wenn Ihr Computer und das SD-20 mit einem USB-Kabel miteinander verbunden sind. Der Treiber überträgt die Daten der Anwendung an das SD-20 sowie die Daten vom SD-20 an die Anwendung. -
Page 87: Usb-Verbindung
Verbinden Sie den Wechselstromadapter mit einer elektrischen Steckdose. Schalten Sie die Peripheriegeräte ein, die mit dem Macintosh verbunden sind. Lassen Sie das SD-20 dabei ausgeschaltet. Danach schalten Sie den Macintosh ein. * Schalten Sie zu diesem Zeitpunkt das SD-20 noch nicht ein. - Page 88 Ordner OMS der CD-ROM befindet. sich im Ordner OMS der CD-ROM befindet. * Trennen Sie das SD-20 vom Macintosh, bevor Sie die Installation ausführen. Beenden Sie alle aktuell ausgeführten Programme (Anwendungen). Sie benötigen den Adobe Wenn Sie ein Virenschutzprogramm oder ähnliche Software verwenden, Acrobat Reader, um OMS_2.3_Mac.pdf...
- Page 89 Wählen Sie im Menü File die Option “Open”. Wählen Sie im Ordner OMS Settings, den Sie in Schritt 1 kopiert haben, die Datei SD-20 USB, und klicken Sie auf [Open]. fig.3-8_35 Ein Dialogfeld ähnlich dem hier gezeigten Dialogfeld wird angezeigt.
- Page 90 Soundgenerator-Symbol bewegen, ändert sich der Mauszeiger zu einem . Klicken Sie auf die Soundgeneratorsymbole, die in der Abbildung mit einem Kreis markiert wurden. Wenn das SD-20 Sound ausgibt, wurden die Einstellungen korrekt vorgenommen. Wenn keine MIDI-Daten übertragen werden, gibt der Macintosh einen...
- Page 91 Bewegt sich die OUTPUT-Pegelanzeige des SD-20? Wenn sich die Output-Pegel-Messanzeige in der Anzeige des SD-20 bewegt, aber kein Sound zu hören ist, prüfen Sie, ob die Lautstärke des SD-20 oder Ihres Lautsprechersystems zurückgedreht wurde. Wenn sich die OUTPUT- Pegel-Messanzeige nicht bewegt, prüfen Sie noch einmal die Anschlüsse und die OMS-Einstellungen.
- Page 92 FreeMIDI auf der Festplatte installiert sein, von der Sie den Computer gestartet haben. * Trennen Sie das SD-20 vom Macintosh, bevor Sie die Installation ausführen. Beenden Sie alle aktuell ausgeführten Programme (Anwendungen). Wenn Sie ein Virenschutzprogramm oder ähnliche Software verwenden, müssen Sie diese ebenfalls beenden.
- Page 93 Wählen Sie im Menü File die Option Open. Wählen Sie im Ordner FreeMIDI Settings , den Sie in Schritt 1 kopiert haben, die Datei SD-20 USB, und klicken Sie auf [Open]. Prüfen Sie, ob die MIDI-Übertragung und der MIDI-Empfang fehlerfrei erfolgen.
- Page 94 Bewegt sich die OUTPUT-Pegelanzeige des SD-20? Wenn sich die Output-Pegel-Messanzeige in der Anzeige des SD-20 bewegt, aber kein Sound zu hören ist, prüfen Sie, ob die Lautstärke des SD-20 oder Ihres Lautsprechersystems zurückgedreht wurde. Wenn sich die OUTPUT- Pegel-Messanzeige nicht bewegt, prüfen Sie noch einmal die Anschlüsse und die OMS-Einstellungen.
-
Page 95: Serielle Verbindung
Produkt benötigt Installieren Sie den SD-20-Treiber wie anschließend beschrieben. OMS 2.3.5 oder später. Der SD-20 OMS-Treiber im Lieferumfang ist ein Add-On-Modul für die Verwendung des SD-20 mit OMS. Damit Sie dieses Modul verwenden OMS befindet sich im können, muss OMS auf der Festplatte, von der der Computer gestartet Ordner OMS2.3.8, der sich... - Page 96 Anschlüsse herstellen und Treiber installieren (Macintosh) Doppelklicken Sie auf das Symbol SD-20 Serial Installer (das sich im Ordner Driver – OMS Driver auf der CD-ROM befindet), um das Installationsprogramm zu starten. Prüfen Sie, ob der richtige Installationsordner ausgewählt ist, und klicken Sie auf [Install].
- Page 97 Sie auf [Open]. Ein Dialogfeld ähnlich dem hier gezeigten Dialogfeld wird angezeigt. fig.3-15_90 Beim Anschluss an einen kombinierten Modem/ Druckeranschluss, wie z.B. PowerBooks, wählen Sie die Datei “SD-20 Modem Port”. Opening the SD-20 Modem Port file Opening the SD-20 Printer Port file...
- Page 98 Aktivieren Sie im daraufhin angezeigten Dialogfeld OMS MIDI Setup die Option Run MIDI in background und klicken Sie auf [OK]. fig.3-18 Opening the SD-20 Modem Port file Opening the SD-20 Printer Port file Wählen Sie im Menü File die Option Make Current.
- Page 99 Bewegt sich die OUTPUT-Pegelanzeige des SD-20? Wenn sich die Output-Pegel-Messanzeige in der Anzeige des SD-20 bewegt, aber kein Sound zu hören ist, prüfen Sie, ob die Lautstärke des SD-20 oder Ihres Lautsprechersystems zurückgedreht wurde. Wenn sich die OUTPUT- Pegel-Messanzeige nicht bewegt, prüfen Sie noch einmal die Anschlüsse und die OMS-Einstellungen.
- Page 100 Wenn das Dialogfeld About Quick Setup angezeigt wird, klicken Sie auf [Cancel]. Wählen Sie im Menü File die Option Open. Öffnen Sie den Ordner FreeMIDI Settings, der in Schritt 1 kopiert wurde, wählen sie die Datei für den Anschluss, mit dem das SD-20 verbunden ist, und klicken Sie auf [Open].
- Page 101 Bewegt sich die OUTPUT-Pegelanzeige des SD-20? Wenn sich die Output-Pegel-Messanzeige in der Anzeige des SD-20 bewegt, aber kein Sound zu hören ist, prüfen Sie, ob die Lautstärke des SD-20 oder Ihres Lautsprechersystems zurückgedreht wurde. Wenn sich die OUTPUT- Pegel-Messanzeige nicht bewegt, prüfen Sie noch einmal die Anschlüsse und die OMS-Einstellungen.
-
Page 102: Installation Des Pilotes Et Connexions (Windows)
SD-20 Computer Un “pilote” est un logiciel qui sert à transférer les données entre le SD-20 et le logiciel tournant sur votre ordinateur, lorsque votre ordinateur et le SD-20 sont reliés par un câble USB. Le pilote transmet les données de l'application au SD-20 et vice-versa. -
Page 103: Connexion Usb
Pour Le SD-20 déconnecté, démarrez l’ordinateur. plus de détails sur les Débranchez tous les câbles USB, à l’exception de ceux du clavier et de la comptes utilisateur, souris (le cas échéant). - Page 104 Installation des pilotes et connexions (Windows) fig.2-1 Ouvrez la boîte de dialogue Options de signature des pilotes. Cliquez sur l’onglet Matériel, puis cliquez sur [Signature du pilote]. fig.2-2 Assurez-vous que l’option “Que voulez-vous faire ?” est définie sur “Ignorer” Si vous avez modifié Si c'est le cas (“Ignorer”), cliquez “Que voulez-vous faire sur [OK].
- Page 105 3. Branchez l’adaptateur secteur sur une prise secteur. d'un circuit de protection. Après la mise sous tension, 4. Utilisez le câble USB pour relier le SD-20 à votre ordinateur. attendez quelques secondes avant d'utiliser Placez l’interrupteur d’alimentation du SD-20 sur la position ON.
- Page 106 L’écran indiquera “Veuillez choisir vos options de recherche et d’installation”. Sélectionnez “Ne pas rechercher. Je vais choisir le pilote à installer” puis cliquez sur [Suivant]. fig.2-8_20 Vérifiez que le champ “Modèle” indique “EDIROL SD-20” puis cliquez sur [Suivant]. L’installation du pilote commence.
- Page 107 “D:\DRIVER\USB_XP2K”, puis cliquez sur [OK]. fig.2-11_20 La boîte de dialogue Assistant ajout de nouveau matériel s’affiche. Vérifiez que l’écran indique “EDIROL SD-20”, puis cliquez sur [Terminer]. Attendez que “Nouveau matériel détecté” s’affiche près de la barre des tâches.
- Page 108 Installation des pilotes et connexions (Windows) Redémarrez Windows. Une fois l’installation du pilote terminée, la boîte de dialogue Modification des paramètres système s’affiche. Cliquez sur [Oui]. Si vous avez modifié “Que voulez-vous faire ?” Si vous avez modifié “Que voulez-vous faire ?” à l’étape 5, restaurez le paramètre d’origine après le redémarrage de Windows.
- Page 109 Installation des pilotes et connexions (Windows) ■ Windows 2000 Le SD-20 déconnecté, démarrez l’ordinateur. Débranchez tous les câbles USB, à l’exception de ceux du clavier et de la souris (le cas échéant). Ouvrez une session Windows en tant qu’utilisateur doté de droits d’administration (Administrateur, par exemple).
- Page 110 1. Placez l’interrupteur informatique du SD-20 sur USB. du pilote et sa configuration. 2. Le SD-20 étant éteint (hors tension), branchez-le à l’adaptateur secteur. 3. Branchez l’adaptateur secteur sur une prise secteur. 4. Utilisez le câble USB pour relier le SD-20 à votre ordinateur.
- Page 111 Installation des pilotes et connexions (Windows) Placez l’interrupteur d’alimentation sur ON. Cet appareil est équipé d'un circuit de protection. Après la mise sous tension, attendez quelques secondes avant d'utiliser l’appareil. Si, à l’étape 5, l’option “Vérification de la signature des pilotes” n’a pas été...
- Page 112 Installation des pilotes et connexions (Windows) fig.2-17b_30 La boîte de dialogue “Assistant Nouveau matériel détecté” peut s'afficher. Vérifiez que “EDIROL SD-20” est affiché, puis cliquez sur [Terminer]. Redémarrez Windows. La boîte de dialogue Modification des paramètres système peut s'afficher. Cliquez sur [Oui]. Windows redémarre automatiquement.
- Page 113 Installation des pilotes et connexions (Windows) ■ Windows Me/98 Le SD-20 déconnecté, démarrez l’ordinateur. Débranchez tous les câbles USB, à l’exception de ceux du clavier et de la souris (le cas échéant). Quittez tous les logiciels (applications) actifs. Fermez également toutes les fenêtres éventuellement ouvertes. Si vous utilisez un anti-virus, quittez-le également.
- Page 114 3. Branchez l’adaptateur secteur sur une prise secteur. du pilote et sa configuration. 4. Utilisez le câble USB pour relier le SD-20 à votre ordinateur. Cet appareil est équipé Placez l’interrupteur d’alimentation du SD-20 sur la position ON. d'un circuit de protection.
-
Page 115: Connexion Série
Si vous utilisez Windows ■ Windows XP XP Professional, vous devez ouvrir une session avec un nom d’utilisateur Vérifiez que le SD-20, l’ordinateur et tous les périphériques externes sont disposant des droits éteints (hors tension). d’administrateur. Pour plus de détails sur les comptes utilisateur, Placez l’interrupteur informatique du SD-20 sur PC. - Page 116 Installation des pilotes et connexions (Windows) fig.2-1 Ouvrez la boîte de dialogue Options de signature du pilote. Cliquez sur l’onglet Matériel, puis cliquez sur[Signature du pilote]. fig.2-2 Assurez-vous que l’option “Que voulez-vous faire ?” est définie sur “Ignorer.” Si vous avez modifié Si c'est le cas (“Ignorer”), cliquez “Que voulez-vous faire sur [OK].
- Page 117 Installation des pilotes et connexions (Windows) fig.2-22_40 Dans la boîte de dialogue qui Dans ce document, s’affiche, tapez ce qui suit dans le l’emplacement des champ “Ouvrir”, puis cliquez sur dossiers et des fichiers est [OK]. donné en termes de chemin, avec \ comme délimiteur.
- Page 118 Installation des pilotes et connexions (Windows) La boîte de dialogue Roland Serial MIDI Driver Settings (Paramètres du pilote MIDI série Roland) s’affiche. Réglez les paramètres suivants. Cliquez sur [OK]. fig.2-23_30 COM Ports Sélectionnez le port série (COM port) auquel le port série du SD-20 est relié.
- Page 119 Installation des pilotes et connexions (Windows) ■ Windows 2000 Vérifiez que le SD-20, l’ordinateur et tous les périphériques externes sont éteints. Ouvrez une session Windows avec un nom Placez l’interrupteur informatique du SD-20 sur PC. d'utilisateur disposant des droits d'administration (ex.
- Page 120 Installation des pilotes et connexions (Windows) fig.2-13_50 Assurez-vous que l'option “Vérification des signatures de fichiers” est définie sur “Ignorer”. Si c'est le cas (“Ignorer”), cliquez sur [OK]. Si elle n’est pas définie sur “Ignorer”, notez le paramètre indiqué (“Avertir” ou “Bloquer”). Choisissez ensuite “Ignorer”...
- Page 121 Installation des pilotes et connexions (Windows) La boîte de dialogue Bienvenue s'affiche. Cliquez sur [Suivant]. fig.2-22b Une fenêtre semblable à la suivante s'affiche. Cliquez sur [Suivant]. Si, à l’étape ?, l’option “Vérification de la signature des pilotes” n’a pas été définie sur “Ignorer”, une boîte de dialogue “Signature numérique introuvable”...
- Page 122 Installation des pilotes et connexions (Windows) La boîte de dialogue Roland Serial MIDI Driver Settings (Paramètres du pilote MIDI série Roland) s’affiche. Réglez les paramètres suivants. Cliquez sur [OK]. fig.2-23b_40 COM Ports Sélectionnez le port série (COM port) auquel le port série du SD-20 est relié.
- Page 123 Installation des pilotes et connexions (Windows) ■ Windows Me/98 Vérifiez que le SD-20, l’ordinateur et tous les périphériques externes sont éteints. Placez l’interrupteur informatique du SD-20 sur PC. Utilisez le câble série pour relier le connecteur série de votre ordinateur au SD-20.
- Page 124 Vérifiez le contenu et cliquez sur [Suivant]. La boîte de dialogue Computer Switch Setting s'affiche. Vérifiez que l’interrupteur informatique à l’arrière du SD-20 est placé sur [PC], puis cliquez sur [Suivant]. S’il n’est pas placé sur [PC], recommencez la procédure à partir de l’étape 1.
-
Page 125: Configuration Et Contrôle
Pour Lecture MIDI, cliquez sur le ▼ situé à droite de [Périphérique par défaut] (avec Windows XP, [Périphérique par défaut]), puis sélectionnez ce qui suit dans la liste qui s’affiche. Pour une EDIROL SD-20 connexion USB PART A Pour une Roland Serial MIDI connexion série Out A Cliquez sur [OK] pour confirmer. - Page 126 Propriétés de multimédia. Cliquez sur l'onglet MIDI. fig.2-29_30 Spécifiez la “Sortie MIDI”. Sélectionnez [Instrument unique], puis choisissez-en dans la liste qui s’affiche. EDIROL SD-20 Pour une connexion USB PART A Pour une Roland Serial connexion série MIDI Out A Cliquez sur [OK] pour confirmer.
-
Page 127: Activation Des Services En Tâche De Fond
Installation des pilotes et connexions (Windows) Activation des services en tâche de fond Avec Windows XP, appliquez ces paramètres pour un meilleur traitement MIDI. Ces paramètres ne sont pas disponibles avec Windows 2000/Me/98. Cliquez sur le bouton Démarrer de Windows, puis dans le menu qui s’affiche, choisissez Panneau de configuration. -
Page 128: Vérification De La Sortie Son
L’exemple de données a-t-il été lu ? certains problèmes, Si c’est le cas, cela signifie que l’ordinateur et le SD-20 sont correctement comme l’absence de son connectés et que les pilotes ont été bien installés. ou l’échec en lecture. -
Page 129: Installation Des Pilotes Et Connexions (Macintosh)
SD-20 Computer Un “pilote” est un logiciel qui sert à transférer les données entre le SD-20 et le logiciel tournant sur votre ordinateur, lorsque votre ordinateur et le SD-20 sont reliés par un câble USB. Le pilote transmet les données de l'application à SD-20 et vice-versa. -
Page 130: Connexion Usb
Allumez ensuite le Macintosh. * N’allumez pas le SD-20 maintenant Si le SD-20 est allumé, un message similaire à celui présenté ici s'affiche à la mise sous tension du Macintosh. Suivez une des procédures décrites ci-après, selon le message qui s'affiche. - Page 131 Insérez le CD-ROM dans le lecteur de CD-ROM. Acrobat Reader peut être téléchargée depuis le site web d’Adobe http:// Cliquez deux fois sur l'icône SD-20 USB Installer (dans le dossier Driver - www.adobe.com (cette OMS Driver du CD-ROM) pour lancer l'installeur. URL peut être modifiée sans préavis.)
- Page 132 [Annuler] dans la boîte suivante. fig.3-7 Choisissez “Open” dans le menu File. Dans le dossier OMS Settings que vous avez copié à l'étape 1, sélectionnez le fichier SD-20 USB, puis cliquez sur [Open]. fig.3-8_35 Un écran similaire à celui présenté ici s'affiche.
- Page 133 Installation des pilotes et connexions (Macintosh) fig.3-9_35 Dans le menu Edit, sélectionnez OMS MIDI Setup. Dans la boîte de dialogue OMS MIDI Setup qui s'affiche, sélectionnez Run MIDI in background (Lancer MIDI en tâche de fond), puis cliquez sur [OK]. fig.3-10 Dans le menu File, sélectionnez Make Current (Rendre actif).
- Page 134 Si le vumètre OUTPUT du SD-20 est actif mais que vous n'entendez rien, vérifiez que le volume est bien réglé sur le SD-20 ou sur votre système audio. Si le vumètre OUTPUT n'est pas actif, vérifiez à nouveau les connexions et les paramètres OMS.
- Page 135 Munissez-vous du CD-ROM. Insérez le CD-ROM dans le lecteur de CD-ROM. Cliquez deux fois sur l'icône SD-20 USB Installer (dans le dossier Driver - FreeMIDI - USB Connection du CD-ROM) pour lancer l'installeur. Vérifiez l’emplacement de l’installation et cliquez sur [Install].
- Page 136 Quand la boîte de dialogue About Quick Setup s'affiche, cliquez sur [Annuler]. Dans le menu File, sélectionnez Open. Sélectionnez SD-20 USB dans le dossier FreeMIDI Settings que vous avez copié à l'étape 1, puis cliquez sur [Open]. Vérifiez que l'envoi et la réception MIDI fonctionnent correctement.
- Page 137 Si le vumètre OUTPUT du SD-20 est actif mais que vous n'entendez rien, vérifiez que le volume est bien réglé sur le SD-20 ou sur votre système audio. Si le vumètre OUTPUT n'est pas actif, vérifiez à nouveau les connexions et les paramètres OMS.
-
Page 138: Connexion Série
Utilisez un câble informatique série pour relier le port modem ou le port d’imprimante de votre Macintosh au SD-20. Cet appareil est équipé d'un circuit de protection. Le SD-20 étant éteint, branchez-le à l’adaptateur secteur. Après la mise sous tension, attendez quelques secondes avant d'utiliser Branchez l’adaptateur secteur sur une prise secteur. - Page 139 Insérez le CD-ROM dans le lecteur de CD-ROM. OMS_2.3_Mac.pdf. La fig.3-14_40 dernière version d’Adobe Acrobat Reader peut être Cliquez deux fois sur l'icône SD-20 Serial Installer (dans le dossier Driver - téléchargée depuis le site OMS Driver du CD-ROM) pour lancer l'installeur. web d’Adobe http:// www.adobe.com (cette URL peut être modifiée...
- Page 140 [Annuler] dans la boîte suivante. fig.3-7 Choisissez “Open” dans le menu File. Ouvrez le dossier OMS Settings que vous avez copié à l’étape 1, sélectionnez un fichier comme nom du port auquel le SD-20 est connecté, puis cliquez sur [Open].
- Page 141 PowerBook, sélectionnez le fichier Opening the SD-20 Modem Port file Opening the SD-20 Printer Port file “SD-20 Modem Port”. Dans le menu Edit, sélectionnez OMS MIDI Setup. Dans la boîte de dialogue OMS MIDI Setup qui s'affiche, sélectionnez Run MIDI in background (Lancer MIDI en tâche de fond), puis cliquez sur [OK].
- Page 142 Si le vumètre OUTPUT du SD-20 est actif mais que vous n'entendez rien, vérifiez que le volume est bien réglé sur le SD-20 ou sur votre système audio. Si le vumètre OUTPUT n'est pas actif, vérifiez à nouveau les connexions et les paramètres OMS.
- Page 143 Si vous utilisez un anti-virus, quittez-le également. Munissez-vous du CD-ROM. Insérez le CD-ROM dans le lecteur de CD-ROM. Cliquez deux fois sur l'icône SD-20 Serial Installer (dans le dossier Driver - FreeMIDI Driver - Serial Connection du CD-ROM) pour lancer l'installeur. Cliquez sur [Install].
- Page 144 Si le vumètre OUTPUT du SD-20 est actif mais que vous n'entendez rien, vérifiez que le volume est bien réglé sur le SD-20 ou sur votre système audio. Si le vumètre OUTPUT n'est pas actif, vérifiez à nouveau les connexions et les paramètres OMS.
-
Page 145: Collegamenti E Installazione Dei Driver (Windows)
Cable SD-20 Computer Un “driver” è un programma che trasferisce i dati tra l’SD-20 e il programma utilizzato sul computer attraverso un cavo USB. Il driver trasmette i dati dall’applicazione all’SD-20 e viceversa. L’SD-20 può funzionare utilizzando l’“alimentazione BUS” fornita tramite il cavo USB. -
Page 146: Connettore Usb
■ Utenti Windows XP collegarsi con un nome utente dotato di privilegi di tipo amministrativo (ad esempio Administrator). Dopo aver scollegato l’SD-20, avviare Windows. Per maggiori Scollegare tutti i cavi USB, ad eccezione della tastiera e del mouse, se informazioni sugli utilizzati. - Page 147 Collegamenti e installazione dei driver (Windows) fig.2-2 Se al passo 4 il Accertarsi che “Scegliere una parametro “Scegliere delle seguenti opzioni” sia una delle seguenti impostato su “Ignora”. impostazioni” è stato Se è attivata l’opzione “Ignora” modificato, dopo aver fare clic su [OK]. installato il driver è...
- Page 148 USB. configurazione. 2. Dopo aver spostato l’interruttore di alimentazione dell’SD-20 su OFF, collegare l’adattatore AC. Questo apparecchio è 3. Inserire l’adattatore AC in una presa di corrente. provvisto di un circuito di protezione.
- Page 149 Collegamenti e installazione dei driver (Windows) fig.2-8_20 Accertarsi che il campo “Modello” visualizzi “EDIROL SD-20”, e fare clic su [Avanti]. La procedura di installazione del driver verrà avviata. Se al passo 4 l’impostazione “Scegliere una delle seguenti opzioni” non è stata impostata su “Ignora”, comparirà...
- Page 150 Collegamenti e installazione dei driver (Windows) fig.2-11_20 Verrà visualizzata la finestra di dialogo Installazione guidata nuovo hardware. Accertarsi che sullo schermo sia visualizzato “EDIROL SD-20”, e fare clic su [Fine]. Attendere fino a quando nella barra delle applicazioni non appare il messaggio “Trovato nuovo hardware”.
- Page 151 Collegamenti e installazione dei driver (Windows) ■ Utenti Windows 2000 Dopo aver scollegato l’SD-20, avviare Windows. Scollegare tutti i cavi USB, ad eccezione della tastiera e del mouse, se utilizzati. Collegarsi a Windows con i privilegi di un amministratore, ad esempio come Administrator.
- Page 152 1. Impostare l’interruttore di di configurazione. selezione computer dell’SD-20 su USB. 2. Dopo aver spostato l’interruttore di alimentazione dell’SD-20 su OFF, collegare l’adattatore AC. Questo apparecchio è provvisto di un circuito di 3. Inserire l’adattatore AC in una presa di corrente.
- Page 153 Viene visualizzata la finestra di dialogo Richiesta file Nella zona “Copia file da” immettere “D:\DRIVER\USB_XP2K” e fare clic su [OK]. fig.2-17b_30 Potrebbe comparire la finestra di dialogo “Installazione guidata nuovo hardware”. Accertarsi che “EDIROL SD-20” sia visualizzato e fare clic su [Fine].
- Page 154 Collegamenti e installazione dei driver (Windows) Riavviare Windows. Viene visualizzata la finestra di dialogo Modifica impostazioni di sistema. Fare clic su [Sì]. Windows verrà riavviato automaticamente. Se è stata modificata l’impostazione “Verifica firma file” Se l’impostazione “Verifica firma file” è stata cambiata al passo 5, ripristinare l’impostazione originale dopo aver avviato Windows.
- Page 155 Collegamenti e installazione dei driver (Windows) ■ Utenti Windows Me/98 Dopo aver scollegato l’SD-20, avviare Windows. Scollegare tutti i cavi USB, ad eccezione della tastiera e del mouse, se utilizzati. Chiudere tutti i programmi in corso di esecuzione. Chiudere anche le altre finestre aperte. Se si utilizza un programma antivirus o simile, accertarsi che sia anch’esso chiuso.
- Page 156 Anche se si prevede di utilizzare l’alimentazione 1. Impostare l’interruttore di selezione computer dell’SD-20 su USB. tramite BUS, si consiglia di 2. Dopo aver spostato l’interruttore di alimentazione dell’SD-20 su OFF, utilizzare l’adattatore AC durante l’installazione del collegare l’adattatore AC.
-
Page 157: Collegamento Seriale
■ Utenti Windows XP Professional, è necessario collegarsi con un nome utente dotato di privilegi Accertarsi che l’SD-20, il computer e tutte le periferiche siano spenti. di tipo amministrativo (ad esempio Administrator). Per maggiori informazioni Impostare l’interruttore di selezione computer dell’SD-20 su PC. - Page 158 Collegamenti e installazione dei driver (Windows) fig.2-1 Aprire la finestra di dialogo Opzioni firma driver. Fare clic sulla scheda Hardware e poi sul pulsante [Firma driver]. fig.2-2 Accertarsi che “Scegliere una delle seguenti opzioni” sia impostato su “Ignora”. Se al passo 8 il parametro Se è...
- Page 159 Collegamenti e installazione dei driver (Windows) fig.2-22_40 Nella finestra di dialogo che In questo manuale, la appare, immettere quanto segue posizione delle cartelle e nel campo “Apri” e fare clic su dei file è indicata nel [OK]. percorso del file utilizzando il carattere \ come delimitatore.
- Page 160 Collegamenti e installazione dei driver (Windows) Verrà visualizzata la finestra di dialogo Roland Serial MIDI Driver Settings. Impostare i seguenti parametri. Fare clic su [OK]. fig.2-23_30 COM Ports Selezionare la porta seriale (porta COM) cui è collegata la porta seriale dell’SD-20.
- Page 161 Collegamenti e installazione dei driver (Windows) ■ Utenti Windows 2000 Accertarsi che l’SD-20, il computer e tutte le periferiche siano spenti. Impostare l’interruttore di selezione computer dell’SD-20 su PC. Collegarsi a Windows con un nome utente Utilizzare il cavo del computer per collegare il connettore seriale del dotato di privilegi di tipo computer all’SD-20.
- Page 162 Collegamenti e installazione dei driver (Windows) fig.2-13_50 Accertarsi che “Verifica firma file” sia impostato su “Ignora”. Se è attivata l’opzione “Ignora” fare clic su [OK]. Se non è impostata su “Ignora” prendere nota dell’impostazione corrente (di avviso o di blocco). Modificare quindi l’impostazione su “Ignora”...
- Page 163 Collegamenti e installazione dei driver (Windows) fig.2-22b Verrà visualizzata una finestra di dialogo simile a quella visualizzata. Fare clic su [Avanti]. Se al passo ?l’impostazione “Verifica firma file” non è stata impostata su “Ignora”, verrà visualizzato il messaggio “Firma digitale non trovata”. fig.2-16b_40 Se “Verifica firma digitale”...
- Page 164 Collegamenti e installazione dei driver (Windows) Verrà visualizzata la finestra di dialogo Roland Serial MIDI Driver Settings. Impostare i seguenti parametri. Fare clic su [OK]. fig.2-23b_40 COM Ports Selezionare la porta seriale (porta COM) cui è collegata la porta seriale dell’SD-20.
- Page 165 Collegamenti e installazione dei driver (Windows) ■ Utenti Windows Me/98 Accertarsi che l’SD-20, il computer e tutte le periferiche siano spenti. Impostare l’interruttore di selezione computer dell’SD-20 su PC. Utilizzare il cavo del computer per collegare il connettore seriale del computer all’SD-20.
- Page 166 Controllare il contenuto della finestra e fare clic su [Avanti]. Viene visualizzata la finestra di dialogo Computer Switch Setting. Accertarsi che l’interruttore di selezione computer sul retro dell’SD-20 sia impostato su [PC] e fare clic su [Avanti]. Se non è impostato su [PC], ripetere la procedura a partire dal passo 1.
-
Page 167: Configurazione E Verifica
In Riproduzione musica MIDI, fare clic su ▼ a destra di [Periferica preferenziale] (o in Windows XP, [Periferica predefinita]) e selezionare quanto segue nell’elenco visualizzato. Per una connessione EDIROL SD-20 PART A Per una connessione Roland Serial seriale MIDI Out A Fare clic su OK per completare le impostazioni. - Page 168 EDIROL SD- Per una connessione USB 20 PART A Per una Roland Serial connessione MIDI Out A seriale Fare clic su OK per completare le impostazioni. Passare alla pagina seguente. (-> Verifica dell’audio (pag. 170))
-
Page 169: Attivazione Dei Servizi In Background
Collegamenti e installazione dei driver (Windows) Attivazione dei servizi in background In Windows XP, seguire la procedura di configurazione sotto illustrata per rendere più fluida l’elaborazione MIDI. Queste impostazioni non sono disponibili sotto Windows 2000/Me/98. In Windows, fare clic sul pulsante Start e nel menu selezionare Pannello di controllo. -
Page 170: Verifica Dell'audio
I dati esempio sono stati riprodotti? problemi, come la Se i dati sono stati riprodotti correttamente, il computer e l’SD-20 sono mancanza d’audio o la collegati correttamente e anche i driver sono stati installati opportunamente. riproduzione errata. -
Page 171: Collegamenti E Installazione Dei Driver (Macintosh)
Cable SD-20 Computer Un “driver” è un programma che trasferisce i dati tra l’SD-20 e il programma utilizzato sul computer attraverso un cavo USB. Il driver trasmette i dati dall’applicazione all’SD-20 e viceversa. L’SD-20 può funzionare utilizzando l’“alimentazione BUS” fornita tramite il cavo USB. -
Page 172: Collegamento Usb
Accendere le periferiche collegate al Macintosh, ad eccezione dell’SD-20. Accendere quindi il Macintosh. * Per il momento non accendere l’SD-20. Se l’SD-20 è acceso, comparirà un messaggio, come quello sotto illustrato, quando viene avviato il Macintosh. Seguire una delle procedure sotto indicate a seconda del messaggio visualizzato. - Page 173 Seguire la procedura sotto indicata per installare il driver SD-20. Il driver OMS di questo Il driver SD-20 OMS è un modulo aggiuntivo che permette di utilizzare l’SD- prodotto necessita di 20 con OMS. Per poterlo utilizzare, OMS deve essere già stato installato OMS 2.3.5 o superiore.
- Page 174 [Cancel] nella finestra successiva. fig.3-7 Selezionare “Open” nel menu File. Nella cartella OMS Settings copiata al passo 1, selezionare il file SD-20 USB e fare clic su [Open]. fig.3-8_35 Verrà visualizzata una finestra di dialogo simile a quella visualizzata.
- Page 175 . Fare clic sulle icone del generatore di suoni evidenziate nella figura che segue. Se l’SD-20 emette dei suoni, le impostazioni sono corrette. Se i segnali MIDI non vengono trasmessi, il Macintosh emetterà...
- Page 176 Collegamenti e installazione dei driver (Macintosh) L’indicatore di livello OUTPUT dell’SD-20 si sposta? Se l’indicatore di livello OUTPUT nel display dell’SD-20 si sposta ma non viene emesso alcun suono, controllare se il volume dell’SD-20 o degli altoparlanti è al minimo. Se l’indicatore di livello OUTPUT non si sposta, ricontrollare i collegamenti e le impostazioni OMS.
- Page 177 Collegamenti e installazione dei driver (Macintosh) ■ Installazione del driver SD-20 (FreeMIDI) Seguire la procedura sotto indicata per installare il driver SD-20. Il driver SD- 20 FreeMIDI in dotazione è un modulo aggiuntivo che permette di utilizzare l’SD-20 con FreeMIDI. Per poterlo utilizzare, FreeMIDI deve essere già...
- Page 178 Nella finestra di dialogo About Quick Setup, fare clic su [Cancel]. Nel menu File selezionare Open. Selezionare SD-20 USB nella cartella FreeMIDI Settings copiata al passo 1 e fare clic su [Open]. Controllare che l’invio e la ricezione MIDI siano corrette.
- Page 179 Collegamenti e installazione dei driver (Macintosh) L’indicatore di livello OUTPUT dell’SD-20 si sposta? Se l’indicatore di livello OUTPUT nel display dell’SD-20 si sposta ma non viene emesso alcun suono, controllare se il volume dell’SD-20 o degli altoparlanti è al minimo. Se l’indicatore di livello OUTPUT non si sposta, ricontrollare i collegamenti e le impostazioni OMS.
-
Page 180: Collegamento Seriale
Tramite un cavo da computer collegare la porta del modem o quella della stampante del Macintosh all’SD-20. Questo apparecchio è Dopo aver spostato l’interruttore di alimentazione dell’SD-20 su OFF, provvisto di un circuito di collegare l’adattatore AC. protezione. È necessario aspettare qualche secondo dopo l’accensione prima... - Page 181 Seguire la procedura sotto indicata per installare il driver SD-20. Il driver OMS di questo Il driver SD-20 OMS è un modulo aggiuntivo che permette di utilizzare l’SD- prodotto necessita di 20 con OMS. Per poterlo utilizzare, OMS deve essere già stato installato OMS 2.3.5 o superiore.
- Page 182 [OK], fare clic su [Cancel] nella finestra successiva. fig.3-7 Selezionare “Open” nel menu File. Aprire la cartella OMS Settings copiata al passo 1, selezionare il file corrispondente al nome della porta cui è collegato l’SD-20 e fare clic su [Open].
- Page 183 PowerBooks, selezionare il file “SD-20 Modem Port”. Opening the SD-20 Modem Port file Opening the SD-20 Printer Port file Nel menu Edit selezionare OMS MIDI Setup. Nella finestra di dialogo OMS MIDI Setup visualizzata, selezionare Run MIDI in background e fare clic su [OK].
- Page 184 . Fare clic sulle icone del generatore di suoni evidenziate nella figura che segue. Se l’SD-20 emette dei suoni, le impostazioni sono corrette. Se i segnali MIDI non vengono trasmessi, il Macintosh emetterà...
- Page 185 Collegamenti e installazione dei driver (Macintosh) L’indicatore di livello OUTPUT dell’SD-20 si sposta? Se l’indicatore di livello OUTPUT nel display dell’SD-20 si sposta ma non viene emesso alcun suono, controllare se il volume dell’SD-20 o degli altoparlanti è al minimo. Se l’indicatore di livello OUTPUT non si sposta, ricontrollare i collegamenti e le impostazioni OMS.
- Page 186 Collegamenti e installazione dei driver (Macintosh) ■ Installazione del driver SD-20 (FreeMIDI) Seguire la procedura sotto indicata per installare il driver SD-20. Il driver SD-20 FreeMIDI in dotazione è un modulo aggiuntivo che permette di utilizzare l’SD-20 con FreeMIDI. Per poterlo utilizzare, FreeMIDI deve essere già...
- Page 187 Nel menu File selezionare Open. Aprire la cartella FreeMIDI Settings copiata al passo 1, selezionare il file corrispondente al nome della porta cui è collegato l’SD-20 e fare clic su [Open]. Controllare che l’invio e la ricezione MIDI siano corrette.
- Page 188 Collegamenti e installazione dei driver (Macintosh) L’indicatore di livello OUTPUT dell’SD-20 si sposta? Se l’indicatore di livello OUTPUT nel display dell’SD-20 si sposta ma non viene emesso alcun suono, controllare se il volume dell’SD-20 o degli altoparlanti è al minimo. Se l’indicatore di livello OUTPUT non si sposta, ricontrollare i collegamenti e le impostazioni OMS.
-
Page 189: Conexión E Instalación De Los Controladores (Windows)
Un “controlador” es software que transfiere datos entre el SD-20 y el software de aplicación que esté ejecutando en su sistema, cuando su PC y el SD-20 están conectados por un cable USB. El controlador pasa los datos de la aplicación al SD-20 y del SD-20 a la aplicación. -
Page 190: Conexión Usb
(por Con el SD-20 desconectado, inicie Windows. ejemplo, Administrador). Desconecte todos los cables USB excepto el del teclado USB y el ratón USB (si Para obtener más se utilizan). - Page 191 Conexión e instalación de los controladores (Windows) fig.2-2 Asegúrese de que “¿Que acción desea que realice Windows?” esté establecido en “Ignorar”. Si está establecido en “Ignorar”, sólo tiene que hacer clic en [Aceptar]. Si ha modificado la Si no está establecido en configuración de “¿Qué...
- Page 192 SD-20 en USB. 2. Con el interruptor de alimentación del SD-20 en la posición OFF, conecte el dispositivo al adaptador de corriente alterna. 3. Conecte el adaptador de corriente alterna en un enchufe de toma de Esta unidad viene corriente alterna.
- Page 193 Seleccionaré el controlador para instalar” y haga clic en [Siguiente]. fig.2-8_20 Asegúrese de que el campo “Modelo” indique “EDIROL SD-20” y haga clic en [Siguiente]. Entonces empezará la instalación del controlador. fig.2-9_30 Aparecerá el cuadro de diálogo Insertar disco. Haga clic en [Aceptar].
- Page 194 [Aceptar]. fig.2-11_20 Aparecerá el asistente para Hardware nuevo encontrado. Asegúrese de que la pantalla indique “EDIROL SD-20”, y haga clic en [Finalizar]. Espere hasta que se indique “Hardware nuevo encontrado” cerca de la barra de tareas.
- Page 195 Conexión e instalación de los controladores (Windows) ■ Usuarios de Windows 2000 Con el SD-20 desconectado, inicie Windows. Desconecte todos los cables USB excepto el del teclado USB y el ratón USB (si se utilizan). Inicie Windows como usuario con privilegios administrativos (por ejemplo, Administrador).
- Page 196 Conexión e instalación de los controladores (Windows) Cierre el cuadro de diálogo Propiedades del sistema. Haga clic en [Aceptar]. Salga de todo el software que se esté ejecutando (aplicaciones). Cierre cualquier ventana que esté abierta. Si utiliza software como programas antivirus, también debe cerrarlo.
- Page 197 1. Disponga el interruptor de sistema del SD-20 en USB. de utilizar normalmente el SD-20 con la alimentación 2. Con el interruptor de alimentación del SD-20 en la posición OFF, por bus, utilice el conecte el dispositivo al adaptador de corriente alterna.
- Page 198 Conexión e instalación de los controladores (Windows) fig.2-18_30 Aparecerá el cuadro de diálogo Archivos necesarios. En el área “Copiar archivos de”, escriba “D:\DRIVER\USB_XP2K” y haga clic en [Aceptar]. fig.2-17b_30 Es posible que se indique “Asistente para agregar hardware nuevo encontrado”. Compruebe que “EDIROL SD- 20”...
- Page 199 Conexión e instalación de los controladores (Windows) ■ Usuarios de Windows Me/98 Con el SD-20 desconectado, inicie Windows. Desconecte todos los cables USB excepto el del teclado USB y el ratón USB (si se utilizan). Salga de todo el software que se esté ejecutando (aplicaciones).
- Page 200 1. Disponga el interruptor de sistema del SD-20 en USB. normalmente el SD-20 con 2. Con el interruptor de alimentación del SD-20 en la posición OFF, la alimentación por bus, utilice el adaptador de conecte el dispositivo al adaptador de corriente alterna.
-
Page 201: Conexión En Serie
■ Usuarios de Windows XP Si utiliza Windows XP Professional, debe iniciar la sesión utilizando un Asegúrese de que el SD-20, el PC y todos los dispositivos periféricos estén nombre de usuario con apagados. algún tipo de cuenta administrativa (por ejemplo, Administrador). - Page 202 Conexión e instalación de los controladores (Windows) fig.2-1 Abra el cuadro de diálogo Opciones de firma del controlador. Haga clic en la ficha Hardware y, a continuación, haga clic en [Firma del controlador]. fig.2-2 Asegúrese de que “¿Que acción desea que realice Windows?” esté...
- Page 203 Conexión e instalación de los controladores (Windows) Abra el cuadro de diálogo “Ejecutar...”. Haga clic en el botón Inicio de Windows. En el menú que aparece, seleccione “Ejecutar...”. fig.2-22_40 En el cuadro de diálogo que En este manual, la aparece, escriba lo siguiente en el ubicación de las carpetas y campo “Abrir”...
- Page 204 3. Efectúe la instalación como se describe en el apartado “Resolución de problemas” de Device Manager shows “?”, “!”, or “USB Composite Device” (pág. 235). Aparecerá el cuadro de diálogo Roland Serial MIDI Driver Settings (Configuración del controlador MIDI de serie Roland).
- Page 205 Conexión e instalación de los controladores (Windows) Si modificó “¿Qué acción desea que realice Windows?” Si modificó la configuración de ¿Qué acción desea que realice Windows? en el paso 5, restaure la configuración original después de que Windows se reinicie. Si utiliza Windows XP Professional, debe iniciar la sesión de Windows utilizando un nombre de usuario con cuenta administrativa (por ejemplo, Administrador).
- Page 206 Conexión e instalación de los controladores (Windows) ■ Usuarios de Windows 2000 Asegúrese de que el SD-20, el PC y todos los dispositivos periféricos estén apagados. Inicie una sesión en Disponga el interruptor de sistema del SD-20 en PC. Windows utilizando un...
- Page 207 Conexión e instalación de los controladores (Windows) fig.2-13_50 Asegúrese de que “Verificación de la firma del archivo” esté establecido en “Ignorar”. Si está establecido en “Ignorar”, sólo tiene que hacer clic en [Aceptar]. Si no está establecido en “Ignorar”, anótese la configuración actual (“Advertir”...
- Page 208 Conexión e instalación de los controladores (Windows) Aparecerá el cuadro de diálogo Welcome (Bienvenido). Haga clic en [Next] (Siguiente). fig.2-22b Aparecerá un cuadro de diálogo como el que se muestra. Haga clic en [Next] (Siguiente). Si en el paso 9 la configuración de “Verificación de la firma del archivo” no se estableció en “Ignorar”, aparecerá...
- Page 209 Conexión e instalación de los controladores (Windows) Aparecerá el cuadro de diálogo Roland Serial MIDI Driver Settings (Configuración del controlador MIDI de serie Roland). Configure los siguientes elementos. Haga clic en [OK] (Aceptar). fig.2-23b_40 COM Ports (Puertos COM) Seleccione el puerto serie (puerto COM) al que esté...
- Page 210 Conexión e instalación de los controladores (Windows) ■ Usuarios de Windows Me/98 Asegúrese de que el SD-20, el PC y todos los dispositivos periféricos estén apagados. Disponga el interruptor de sistema del SD-20 en PC. Conecte el conector serie del PC al SD-20 con el cable de PC.
- Page 211 Aparecerá el cuadro de diálogo System Settings Change (Cambio de configuración del sistema). Asegúrese de que el interruptor de sistema del panel posterior del SD-20 esté establecido en [PC] y haga clic en [Next] (Siguiente). Si no está establecido en [PC], vuelva a realizar el procedimiento desde el paso 1.
-
Page 212: Configuración Y Comprobación
▼ que aparece a la derecha de [Dispositivo preferido] (o en Windows XP, [Dispositivo predeterminado]) y seleccione lo siguiente en la lista que aparece. Para una conexión EDIROL SD-20 PARTE A Para una conexión Roland Serial MIDI en serie Out A Haga clic en [Aceptar] para completar la configuración. - Page 213 Haga clic en la ficha MIDI. fig.2-29_30 Especifique la “Salida de MIDI”. Seleccione [Instrumento único] y escoja una de las siguientes opciones en la lista que aparece. EDIROL SD-20 Para una conexión USB PARTE A Para una Roland Serial conexión en serie MIDI Out A Haga clic en [Aceptar] para completar la configuración.
-
Page 214: Habilitación De Servicios En Segundo Plano
Conexión e instalación de los controladores (Windows) Habilitación de servicios en segundo plano En Windows XP, efectúe las siguientes configuraciones para que el proceso de MIDI se lleve a cabo de forma óptima. Estas configuraciones no están disponibles en Windows 2000/Me/98. Haga clic en el botón Inicio de Windows y, en el menú... -
Page 215: Comprobación De La Salida De Sonido
¿Se han reproducido los datos de muestra? reproducir correctamente. Si se han reproducido correctamente, significa que el PC y el SD-20 se han conectado correctamente y los controladores se han instalado de manera satisfactoria. -
Page 216: Conexión E Instalación De Los Controladores (Macintosh)
Un “controlador” es software que transfiere datos entre el SD-20 y el software de aplicación que esté ejecutando en su sistema, cuando su PC y el SD-20 están conectados por un cable USB. El controlador pasa los datos de la aplicación al SD-20 y del SD-20 a la aplicación. -
Page 217: Conexión Usb
Apague el Macintosh y todos los aparatos periféricos conectados a éste. Disponga el interruptor de sistema del SD-20 en USB. Con el interruptor de alimentación del SD-20 en la posición OFF, conecte el dispositivo al adaptador de corriente alterna. Conecte el adaptador de corriente alterna en un enchufe de toma de corriente alterna. - Page 218 Acrobat Reader desde el sitio web de Adobe: http://www.adobe.com. Haga doble clic en el icono SD-20 USB Installer (que se encuentra en la (Puede que este URL se carpeta Driver - OMS Driver del CD-ROM) para iniciar el instalador. modifique sin previo aviso.)
- Page 219 [Cancel] en la siguiente pantalla. fig.3-7 Elija “Open” del menú File. En la carpeta OMS Settings que ha copiado en el paso 1, seleccione el archivo SD-20 USB y haga clic en [Open]. fig.3-8_35 Aparecerá una pantalla como la que se muestra aquí.
- Page 220 Conexión e instalación de los controladores (Macintosh) fig.3-9_35 En el menú Edit, seleccione OMS MIDI Setup. En el cuadro de diálogo OMS MIDI Setup que aparece, seleccione Run MIDI in background y haga clic en [OK]. fig.3-10 En el menú File, elija Make Current. Si no puede seleccionar Make Current, significa que ya se ha aplicado y puede continuar con el siguiente paso.
- Page 221 ¿Se mueve el indicador de nivel de salida (OUTPUT) del SD-20? Si el medidor de nivel OUTPUT de la pantalla del SD-20 se mueve pero no oye ningún sonido, compruebe si se ha bajado el volumen del SD-20 o sus altavoces.
- Page 222 Si utiliza software como programas antivirus, debe cerrarlo también. Prepare el CD-ROM. Coloque el CD-ROM en la unidad de CD-ROM. Haga doble clic en el icono SD-20 USB Installer (que se encuentra en la carpeta Driver - FreeMIDI - USB Connection del CD-ROM) para iniciar el instalador.
- Page 223 Cuando aparezca el cuadro de diálogo About Quick Setup, haga clic en [Cancel]. En el menú File, elija Open. Seleccione SD-20 USB de la carpeta FreeMIDI Settings que ha copiado en el paso 1 y haga clic en [Open]. Compruebe que la transmisión y la recepción MIDI se realicen correctamente.
-
Page 224: Conexión En Serie
¿Se mueve el indicador de nivel de salida (OUTPUT) del SD-20? Si el medidor de nivel OUTPUT de la pantalla del SD-20 se mueve pero no oye ningún sonido, compruebe si se ha bajado el volumen del SD-20 o sus altavoces. - Page 225 Acrobat Reader desde el sitio web de Adobe: Haga doble clic en el icono SD-20 Serial Installer (que se encuentra en la http://www.adobe.com. carpeta Driver - OMS Driver del CD-ROM) para iniciar el instalador. (Puede que este URL se modifique sin previo aviso.)
- Page 226 [Cancel] en la siguiente pantalla. fig.3-7 Elija “Open” del menú File. Abra la carpeta OMS Settings copiada en el Paso 1, seleccione el nombre del puerto en el que esté conectado el SD-20 y haga clic en [Open].
- Page 227 PowerBooks, seleccione el archivo “SD-20 Modem Port”. Opening the SD-20 Modem Port file Opening the SD-20 Printer Port file En el menú Edit, seleccione OMS MIDI Setup. En el cuadro de diálogo OMS MIDI Setup que aparece, seleccione Run MIDI in background y haga clic en [OK].
- Page 228 ¿Se mueve el indicador de nivel de salida (OUTPUT) del SD-20? Si el medidor de nivel OUTPUT de la pantalla del SD-20 se mueve pero no oye ningún sonido, compruebe si se ha bajado el volumen del SD-20 o sus altavoces.
- Page 229 Si utiliza software como programas antivirus, debe cerrarlo también. Prepare el CD-ROM. Coloque el CD-ROM en la unidad de CD-ROM. Haga doble clic en el icono SD-20 Serial Installer (que se encuentra en la carpeta Driver - FreeMIDI Driver - Serial Connection del CD-ROM) para iniciar el instalador.
- Page 230 En el menú File, elija Open. Abra la carpeta FreeMIDI Settings copiada en el Paso 1, seleccione el nombre del puerto en el que esté conectado el SD-20 y haga clic en [Open]. Compruebe que la transmisión y la recepción MIDI se realicen correctamente.
- Page 231 ¿Se mueve el indicador de nivel de salida (OUTPUT) del SD-20? Si el medidor de nivel OUTPUT de la pantalla del SD-20 se mueve pero no oye ningún sonido, compruebe si se ha bajado el volumen del SD-20 o sus altavoces.
-
Page 232: Troubleshooting
• Is the SD-20 connected correctly? Make sure that the USB connector of your computer is connected to the SD-20 by a USB cable. Check this, and if you are using Windows, close the Sound and Multimedia Properties dialog box (Multimedia Properties in Windows 98), re-open the same dialog box once again, and specify the audio and MIDI input/output destinations. - Page 233 USB cable connected, and restart your Macintosh. If it is still not detected, shut down your Macintosh, and then restart it. The SD-20 will not be detected if it is connected to the USB connector on the Macintosh keyboard. Please connect the SD-20 to a USB connector on the Macintosh itself.
- Page 234 ”Found unknown device” appears even though you installed the driver If your computer or USB hub has two or more USB connectors, and you connect the SD-20 to a USB connector to which the SD-20 has never been connected before, the “Unknown device” dialog box may appear even on a computer onto which you have already installed the driver.
- Page 235 [OK]. In the same way, delete all indications of “?Composite USB Device,” “?USB Device,” “USB Device,” and “USB composite device” that you find. 9. If you find EDIROL SD-20 USB Driver with a yellow “!” or a red “?” displayed beside it, delete this in the same way.
- Page 236 Troubleshooting 12. Restart Windows. Then install the driver once again."Getting connected and installing drivers (Windows)" (p. 17). * If the problem still occurs after you have taken the above measures, please refer also to the Readme file for the USB driver. The Readme file is on the CD-ROM. [ Location ] Windows 2000 users: In the CD-ROM,...
- Page 237 SD-20. Next, turn the SD-20’s power off, then switch it on again. • Did you reconnect the USB cable or turn the power of the SD-20 off and on? Exit all applications that are using the SD-20, and turn the power of the SD-20 off and then on once again.
- Page 238 If the INST level meter is moving but you do not hear sound, check whether the volume of the SD- 20 or your speakers has been lowered. If the INST level meter of the SD-20 is not moving, recheck the connections and "OMS settings" (p. 46), (p. 52) / "FreeMIDI settings" (p. 49), (p. 56).
- Page 239 Is it possible that you have the Computer switch set to MIDI, even though the SD-20 is connected via USB? If you intend to use a USB connection, set the Computer switch to USB. You must not use a USB cable to connect the SD-20 to your computer if the Computer switch remains set at MIDI.
- Page 240 2. Log on to Windows as a user with administrative privileges (such as Administrator). 3. After connecting the SD-20 to your computer via a USB cable, turn on the power of the SD-20. 4. Exit all applications before deleting the driver.
- Page 241 1. With all USB cables disconnected, start up Windows. (USB keyboard and USB mouse excepted) 2. After connecting the SD-20 to your computer via a USB cable, turn on the power of the SD-20. 3. Exit all applications before deleting the driver.
- Page 242 [Roland Serial MIDI Out A]. 4. In the lower right of the dialog box, click [Properties]. 5. In the Roland Serial MIDI Out A Properties dialog box, click [Settings]. 6. The Roland Serial MIDI Driver Settings dialog box will appear.
- Page 243 ■ How many MIDI OUT ports can I use? If [Use multiple ports] is checked, you will be able to use the multiple ports of the SD-20 from your computer via the Roland serial MIDI driver.
- Page 244 ■ Setting the computer switch of the sound module Set the computer switch of the SD-20 sound module to [PC], as directed by the comment in the "Driver's Information" area. If you change the setting of the computer switch, you need to switch off the sound module, then turn it on again.
- Page 245 Manager]. 5. Double-click "Sound, video and game controllers." A list of device will appear. 6. Right click "Roland Serial MIDI Driver," and choose Uninstall from the menu that appears. 7. A dialog box will ask you to confirm device removal.
- Page 246 If you're running the SD-20 on BUS power, disconnect the USB cable that connects the SD-20 to the Macintosh. 2. Delete the SD-20 Serial Driver from the OMS Folder inside the System folder, or delete SD- 20 Serial from the FreeMIDI Folder.
-
Page 247: Appendices
Appendices Instrument list (GM2 / Native mode) * To select sound sets, you can use either NRPN or exclusive messages. Piano PC LSB Classic Set Voices Contemp Set Voices Solo Set Voices MSB: 96 MSB : 97 MSB : 98 Piano 1 Ac.Piano St.Piano 1... - Page 248 Appendices Accordion F French Acc St.FrenchAcc Accordion I It Muset St.It Muset Harmonica Harmonica 2 St.Harmonica Bandneon Bandneon 1 St.Bandneon Guitar PC LSB Classic Set Voices Contemp Set Voices Solo Set Voices MSB: 96 MSB : 97 MSB : 98 Nylon Gt Nylon Gt 2 Nylon Gt 3...
- Page 249 Appendices Ensemble PC LSB Classic Set Voices Contemp Set Voices Solo Set Voices MSB: 96 MSB : 97 MSB : 98 Strings Strings 2 St.Strings Orchestra Orchestra 2 St.Orchestra 60’Strings Oct.Strings St.OctStr 1 Slow Strings SlowStrings2 St.Slow Str Syn.Strings1 BriteSyn.Str StackSyn.Str Syn.Strings3 Oct.SynStr 1...
- Page 250 Appendices Shakuhachi Shakuhachi 2 Shaku.vib Whistle Whistle 2 Whistle vib Ocarina Ocarina 2 Ocarina vib Synth lead PC LSB Classic Set Voices Contemp Set Voices Solo Set Voices MSB: 96 MSB : 97 MSB : 98 Square Wave MG Square OB Square Square Fat Square...
- Page 251 Appendices Taisho Koto Taisho Koto2 St.T Koto Kalimba Kalimba 2 St.Kalimba Bag Pipe Bag Pipe 2 St.Bag Pipe Fiddle Fiddle vib Fiddle 2 vib Shanai Shanai 2 St.Shanai Percussive PC LSB Classic Set Voices Contemp Set Voices Solo Set Voices MSB: 96 MSB : 97 MSB : 98...
-
Page 252: Instrument List (Gs Mode)
Appendices Instrument list (GS mode) Piano Guitar Ensemble CC00 GS Set Voices CC00 GS Set Voices CC00 GS Set Voices Piano 1 Nylon Gt. Strings Piano 1w Ukulele Orchestra Piano 1d Nylon Gt.o SlowStrings Nylon Gt.2 Piano 2 SynStrings1 Piano 2w Steel Gt. - Page 253 Appendices Synth lead Percussive CC00 GS Map Voices CC00 GS Set Voices Square Wave Tinkle Bell Square Agogo Sine Wave Steel Drums Saw Wave Woodblock Castanets Doctor Solo Taiko SynCalliope Concert BD ChifferLead Melo. Tom 1 Charang Melo. Tom 2 Solo Vox Synth Drum 5th Saw...
-
Page 254: Instrument List (Xglite Mode)
Appendices Instrument list (XGlite mode) Piano Percussive Organ Fretless Bass 70's Percussive Organ 1 Fretless Bass 2 CC00 XG Set Elements Detuned Percussive Organ 2 Fretless Bass 3 Grand Piano Light Organ Fretless Bass 4 Grand Piano KSP Percussive Organ 2 Slap Bass 1 Piano Strings Rock Organ... - Page 255 Appendices Brass Ethnic, etc Charang Lead Distorted Lead CC00 XG Set Elements CC00 XG Set Elements Voice Lead Trumpet Sitar Warm Trumpet Detuned Sitar Fifths Lead Sitar 2 Big Five Trombone Tamboura Trombone 2 Bass & Lead Banjo Big & Low Tuba Muted Banjo Fat &...
-
Page 256: Drum Set List (Gm2 / Native Mode)
Appendices Drum set list (GM2 / Native mode) Classical Set Contemporary Set Solo Set Standard Set StandardSet2 St.Standard Room Set Room Set 2 St.Room Power Set Power Set 2 St.Power Electric Set Dance Set Rust Set Analog Set Rave Set Analog2 Set Jazz Set Jazz Set 2... - Page 257 Appendices ■ Classical set drum set (1) <-: Same as the percusion sound of “Standard Set” (PC001) * BANK MSB=104, LSB=0 fig.drum24-87 PC 1 PC 9 PC 17 PC 25 PC 26 Standard Set Room Set Power Set Erectric Set Analog Set High Q <-...
- Page 258 Appendices ■ Classical set drum set (2) * BANK MSB=104, LSB=0 fig.drum24-87 PC 33 PC 41 PC 49 PC 57 Jazz Set Brush Set OrchestraSet SFX Set <- <- ClosedHi-hat <- <- Pedal Hi-hat <- <- Open Hi-hat <- <- Ride Cymbal1 <- <-...
- Page 259 Appendices ■ Contemporary set drum set (1) <-: Same as the percusion sound of “StandardSet2” (PC001) * BANK MSB=105, LSB=0 fig.drum24-87 PC 1 PC 9 PC 17 PC 25 PC 26 Standard Set2 Room Set 2 Power Set 2 Dance Set Rave Set High Q <-...
- Page 260 Appendices ■ Contemporary set drum set (2) * BANK MSB=105, LSB=0 fig.drum24-87 PC 33 PC 41 PC 49 PC 57 Jazz Set 2 Brush Set 2 OrchestraSet SFX Set <- <- ClosedHi-hat <- <- Pedal Hi-hat <- <- Open Hi-hat <- <- Ride Cymbal1...
- Page 261 Appendices ■ Solo set drum set (1) <-: Same as the percusion sound of “St.Standard” (PC001) * BANK MSB=106, LSB=0 fig.drum24-87 PC 1 PC 9 PC 17 PC 25 PC 26 St.Standard St.Room St.Power Rust Set Analog2 Set High Q <- <- <-...
- Page 262 Appendices ■ Solo set drum set (2) * BANK MSB=106, LSB=0 fig.drum24-87 PC 33 PC 41 PC 49 PC 57 St.Jazz St.Brush OrchestraSet SFX Set <- <- ClosedHi-hat <- <- Pedal Hi-hat <- <- Open Hi-hat <- <- Ride Cymbal1 <- <- <-...
-
Page 263: Drum Set List (Gs Mode)
Appendices Drum set list (GS mode) GS Set STANDARD ROOM POWER ELECTRONIC TR-808 JAZZ BRUSH ORCHESTRA... - Page 264 Appendices ■ GS mode drum set (1) fig.drum25-99 PC 1 / PC 33 PC 9 PC 17 PC 25 PC 26 PC 41 PC 49 STANDARD / JAZZ ROOM POWER ELECTRONIC TR-808 BRUSH ORCHESTRA ---- ---- ---- ---- ---- ---- ---- ---- ----...
- Page 265 Appendices ■ GS mode drum set (2) fig.drum35-108 PC 57 ---- ---- ---- ---- High Q Slap Scratch Push Scratch Pull Sticks Square Click Metronome Click Metronome Bell Guitar Fret Noise Guitar cutting Guitar cutting String slap of double Fl.Key Click Laughing Scream Punch...
-
Page 266: Drum Set List (Xglite Mode)
Appendices Drum set list (XGlite mode) XG Set XG Set Standard Kit SFX Kit 1 Standard Kit 2 SFX Kit 2 Room Kit Rock Kit Electro Kit Analog Kit Jazz Kit Brush Kit Classic Kit... - Page 267 Appendices ■ XGlite mode drum set (1) * BANK MSB=127, LSB=0 fig.drum12-64 PC001 PC002 PC009 PC017 PC025 Standard Kit Standard Kit 2 Room Kit Rock Kit Electro Kit Surdo Mute <- <- <- <- Surdo Open <- <- <- <- Hi Q <- <-...
- Page 268 Appendices ig.drum72-84 PC001 PC002 PC009 PC017 PC025 Standard Kit Standard Kit 2 Room Kit Rock Kit Electro Kit Samba Whistle L <- <- <- <- Guiro Short <- <- <- <- Guiro Long <- <- <- <- Claves <- <- <- <- Wood Block H...
- Page 269 Appendices fig.drum53-84 PC001 PC026 PC033 PC041 PC049 Standard Kit Analog Kit Jazz Kit Brush Kit Classic Kit Ride Cymbal Cup <- <- <- <- Tambourine <- <- <- <- Splash Cymbal <- <- <- <- Cowbell Cowbell Analog <- <- <- Crash Cymbal 2 <-...
- Page 270 Appendices ■ XGlite mode drum set (3) * BANK MSB=126, LSB=0 fig.drum36-90 PC001 PC002 SFX Kit 1 SFX Kit 2 Cutting Noise Cutting Noise 2 Door Squeak Door Slam String Slap Scratch Cut Scratch H 3 Wind Chime Telephone Ring 2 Flute Key Click Car Engine Igni- Car Tires Squeal...
- Page 271 STUDIO CANVAS Date : April 1, 2001 Model :SD-20 MIDI Implementation Chart Version : 1.00 (GM2/Native/GS mode) Transmitted Recognized Function... Remarks Basic Default 1–16 Channel Changed 1–16 Default Mode 3 Mode Messages Mode 3, 4 (M = 1) Altered ************** Note 0–127...
-
Page 272: Specifications
Specifications ■ Model: Studio Canvas SD-20 (General MIDI2 / GS format / XGlite format) ●Number of Parts ●Dimensions 203 (W) x 159 (D) x 35 (H) mm 8 (W) x 6-5/16 (D) x 1-7/16 (H) inches ●Maximum Polyphony ●Weight 64 voices 0.4 kg... - Page 273 MEMO...
- Page 274 MEMO...
- Page 275 Computer Cable Wiring Diagrams For PC (9-pin) (Sold separately: RS-232C) mini DIN, 8-pin, male 6 7 8 D-sub, 9-pin, female mini DIN, 8-pin, male D-sub, 9-pin, female HSKo 1 HSKi 2 TXD- 3 GND 4 5 GND 3 4 5 RXD- 5 2 RXD For Apple Macintosh (Sold separately: RS-422)
- Page 276 Information When you need repair service, call your nearest EDIROL/Roland Service Center or authorized EDIROL/Roland distributor in your country as shown below. IRELAND HONG KONG BARBADOS PERU CYPRUS Roland Ireland Parsons Music Ltd. A&B Music Supplies LTD Audionet Radex Sound Equipment Ltd.
Need help?
Do you have a question about the StudioCanvas SD-20 and is the answer not in the manual?
Questions and answers