Moorebot Scout, Track Set Scout Manual
- Owner's manual (37 pages) ,
- Quick start manual (27 pages) ,
- Faq (14 pages)
Advertisement
- 1 What's in the box
- 2 What can the unit do
- 3 Getting Started
-
4
App Illustrated
- 4.1 Overview of the App
- 4.2 Sign up your Moorebot Account
- 4.3 Connecting to the Device via Wi-Fi Direct
- 4.4 Connecting the Device to your Home Wi-Fi Network
- 4.5 Over-The-Air update
- 4.6 Controlling the unit with live video
- 4.7 Set up a Patrol
- 4.8 Setup Detect for Motion/Human Body/Dogs and Cats
- 4.9 Track and Follow a human or a pet
- 4.10 Scratch Programming
- 4.11 Work with Alexa
- 4.12 Built-In-Self-Test
- 5 Add-on tools
- 6 Technical Specifications
- 7 Custom Scratch API for the Unit
- 8 Safety Instructions
- 9 Contact us
- 10 Documents / Resources
What's in the box
- Scout Robot
- Charging Station
- Adhesive tape (x2)
- Type-C USB cable
- Quick Start Guide
- Lubricant for Mecanum wheels
When track is used, charging station needs to raise up 7mm.

Scout doesn't provide a power adapter. It is recommended to use a USB 2.0 Type A adapter with 5V and >2A output. Some fast chargers with Type C output are NOT suitable for Scout.
Place the charging station in an area with good lighting conditions to the floor or wall with the supplied adhesive tape. Not recommended to stick the charging station to painted wood flooring. Scout's Mecanum wheels and docking to the charging station are optimized for hard floor. Change to track for better navigation.
Don't remove the sticker underneath the charging station. If the charging station is too low, it may not have good contact to the charging pins on the bot.
What can the unit do

- Monitoring. Scout is a smart robot with an FHD camera on wheels. Once connected, the App can control Scout move around. Night vision is supported. Scout by default recognizes many objects including human bodies and pets.
- Record videos and take pictures on demand. Use the "Moorebot Scout" App or send commands from Amazon Alexa, videos and pictures can be recorded. Cloud service is also available.
- Patrol. Scout is capable of patrolling the house on its own. Set up the patrol path in the App as well as the triggers such as the timer, sound, sensors from the smart home system, etc. During the patrols, Scout can avoid obstacles on the way, calculate its path and go back to its charging station once done. Scout may have difficulties navigating in a narrow and/or crowded environment with many obstacles.
- Programming and add-on tools. Scratch language is supported in the App. Learning programming becomes easy. Users can also design new extension tools for Scout and add on to the extension port. Explore the endless possibilities. For more details, please refer to information on www.moorebot.com.
Getting Started
Place the charging station
Affix the charging station to the floor or against the wall using the supplied adhesive tape.
To support patrol, it is important to make sure that the charging station does NOT move around. If placing on carpeting it is recommended to affix to the wall or baseboard using the adhesive tape supplied.
It is also recommended to have at least 3 ft open space on each side of the charging station, so that it is easier for the bot to navigate back to its charging station with running into too many obstacles.
Plug the Type C USB cable into the charging station and into a 5V > 2A USB adapter (not supplied).
Scout is capable of identifying its charging station within 6 ft range and backing into it. Make sure that the charging station is placed under good lighting conditions. During the night, Scout relies on its own IR light source. The Battery Indicator reflects the charging status.
Several tasks can only be performed when Scout is in the charging station. These include software OTA (over-the-air) update, BIST (built-in-self-test), the start of patrol, monitoring with motion detect, and reboot.
Avoid heat sources or other battery-unfriendly conditions to place the charging station.
Charge the Battery
Place the rear of Scout in the Charging Station making sure it's in contact with the charging pins.
You will see 4 blue flashing LEDs on the top of Scout and hear a tone confirming Scout has connected and is charging.
All 4 LED lights will remain lit when Scout is fully charged. This may take up to 3 hours to complete.
Powering the Unit On & Off
Press the "On & OFF" button for 2 seconds until the Power LED lights up. The system boots up. The power up process could take up to one minute. There is a sound alert when the system is fully on.
Press and hold the button for 3 seconds to turn it off.
When Scout is turned off and is placed in the charging station, the bot automatically boots up.
Features that require Scout to boot up, such as OTA (Over-the-Air) update are better to have the bot in the charging station. Otherwise, users must manually power up the bot again.
Reset
To reset the robot, long-press the "RESET" at the rear of the robot for >8 seconds. The robot restores the factory condition and turns it off. This resets the password and unbinds the robot from the previous user account.
Recovery
Recovery restores the factory settings including the operating systems. Once recovery is performed, users need to OTA update the firmware to the latest version again.
To perform recovery, power down the robot first. Press down both "RESET" and the "POWER" buttons simultaneously for >3 seconds. (Recommend to press the REST button first.) The LED indicators blink for several minutes until the robot shuts down. Manually power up the robot again. The LED indicators blink for several minutes again. When the blink stops, the recovery is complete.
Connecting the Unit
What you need:
- Smartphone or tablet with Android OS 6.0 and later or iOS 11.0 and later. The smartphone shall support the 5GHz band of the Wi-Fi.
- Wireless network (for Wi-Fi Router mode)
Download the App
For Android devices
Go to Google Play Store, search for "Moorebot Scout", then download and install the App on your Android device.

For iOS devices
Go to App Store, search for "Moorebot Scout", then download and install the App on your iOS device.

Scout can be controlled using the IOS or Android App only not from a PC or MAC.
Connect to the unit
There are two ways that a mobile phone can connect to Scout, Wi-Fi Direct Mode (or AP mode) and Wi-Fi Router Mode. Out of the factory, the Wi-Fi on Scout is set to the Wi-Fi Direct Mode. Only after home Wi-Fi router information is set, users can press the Wi-Fi button to select between the Wi-Fi direct mode and the Wi-Fi router mode.
It is recommended to do a reset first before setting up the Wi-Fi connection.
In the Wi-Fi Direct Mode, mobile phones link to Scout directly. Users can see in the mobile phone a Wi-Fi named "robot_scout_XXXXXX". Follow the App and use the default password (e.g. "r0123456") to connect. Once connected to Scout, users shall control the robot and view the video.
The second mode is Wi-Fi Router mode. Follow the App, select your home Wi-Fi router SSID, and enter the password. If the robot connects to your home Wi-Fi router successfully, it produces a sound alert and switches to the Wi-Fi router mode automatically, and goes online. In this mode, the robot becomes an Internet-of-Things (IoT) device and can be accessed from the internet via a secured Peer-to-Peer connection. In the Wi-Fi router mode, when the Wi-Fi LED indicator blinks, it indicates that the robot is not connected. When the LED indicator stays on, it indicates that the robot is connected.
Press the "Wi-Fi mode select button" to change between the two Wi-Fi modes.
Scout is optimized to rely on the 5GHz band of the Wi-Fi. 5GHz has higher bandwidth but it is more line-in-sight. 2.4GHz band may have better area coverage. For iOS users, make sure the "Local Network" of the Scout App is granted. Otherwise, the OS doesn't allow Wi-Fi Direct connection. In rare cases, some models of iPhones need to disable mobile data, and put the phone in "Airplane" mode. At end of pairing process, the iPhone needs to enable data service again, either through phone data service or fall back to connecting home WiFi. Otherwise, the pairing will expire on the App.
App Illustrated
Overview of the App
Moorebot Scout App allows users to connect the robot to mobile phones either directly or through the internet. Users can control the robot's movement and view its video with different resolutions (e.g. 720P/1080P). Scout, when it is in its charging station, can become a standard IP camera or monitor. It supports motion detect, and many other IP cameras features.
Patrol paths can be set up for Scout to conduct patrol with different triggers, such as the timer, voice control through Alexa, even sensors in your smart home system. Scout can generate a report and send a notice after each patrol. If human bodies or pets are detected, a 13-second video clip can be uploaded to the cloud server. The cloud server can be disabled on the setup page.
Moorebot Scout App also supports Scratch Programming. Users can program and control the robot with this graphical programming interface.
Sign up your Moorebot Account

Open the Moorebot Scout App and follow the instructions to set up your Moorebot account to register and control your Scout.
You will be receiving a confirmation code to the email address you use so be sure to check your spam folder or whitelist emails from
Moorebot-noreply@mail.moorebot.com
Once sign up, a free trial of the cloud service is granted. Users can enjoy benefits such as notifications to the mobile phone, video storage on the cloud, and more. Monthly or annual payment to extend the cloud service is accepted. The transaction is based on a secure platform by Stripe.
Scout's cloud server is Amazon AWS. The root server is based in the east coast of the United States. We keep high standards regarding privacy and data security.
Connecting to the Device via Wi-Fi Direct

Turn on the robot. Make sure your Scout in the Charging Station and follow the instruction in the App.
After it powers up, the Wi-Fi shall stay in the "Wi-Fi Direct" Mode, which is the out-of-factory condition. Scan Wi-Fi around you. There should be Wi-Fi with the SSID name robot_scout_XXXXXX. This is Scout.
Connect to it with the default password r0123456. For iOS users, you need to grant "local access" to Scout App.

Next, choose a new password for your Scout.
Now, you can play with the robot already. Scout supports WPA2 protocol only.
Connecting the Device to your Home Wi-Fi Network

If you want to set up the robot as an IoT device, follow the App, choose or type in your home Wi-Fi SSID and provide the password. This must be done in the "Wi-Fi Direct" mode when the mobile phone connects to Scout.
If successful, the robot can switch to the "Wi-Fi Router" mode automatically and connect to the internet. You can control the robot and view the video worldwide in "Wi-Fi Router" mode.
Over-The-Air update

Once Scout connects to the internet, check the setting Tab and see if there is a new Firmware Update available. The Over-The-Air (OTA) update could take several minutes and may require manual reboot.
Controlling the unit with live video
The main control panel is shown below. The controller is overlaid with the camera view from Scout.

The following table illustrates the icons in the App.
| Icon | Functions or Status |
 | Status showing Scout is Wi-Fi direct mode, where Scout connects to the mobile phone directly. Green indicates that the mobile phone is connected with Scout. Red indicates unconnected. |
 | Status showing Scout is Wi-Fi router mode, where Scout connects to home Wi-Fi router and goes online. Green indicates that the mobile phone is connected with Scout. Red indicates unconnected. |
 | Indicate that the robot is in the charging station. Press to get out of the charging station. Only when the robot is outside the charging station, it can be controlled to move around. User must press this button to release the robot first. |
 | Indicate that the robot is outside the charging station. Press to return to the charging station. |
 | Patrol paths. Press the "+" to create and name new path. Long press the existing path to delete. To create new patrol path, users control Scout to navigate. A path is drawn. When Scout returns to its charging station, it saves the path and follows path for future patrol. |
 | "Track and Follow" a human or a pet. The robot tends to track and follow the subject in the middle of the camera image. |
 | Setup motion detect. Motion detect only works when Scout is in the charging station. |
 | Take a photo and store in local memory. |
 | Record video clip and store in local memory. |
 | Enable and Disable speaker. |
Set up a Patrol
Multiple patrol paths can be set up with different names. To set up the patrol path, users must tap the "path" symbol in the App, provide a new pathname and manually control the robot to create the desired path. The patrol path setup must start with Scout in its charging station. The charging station is the coordinates (0,0).
To complete the path set up, users can either drive the robot to the far side and hit the "return home" button, or drive the robot back to the Charger Station, then press the "stop" button to save. Only when the robot can find its charging station at the end of the patrol path, the new path can be saved. Scout will remember it, follow the path to patrol whenever needed, and go back to its charging station once the job is complete.
The video of each patrol can be stored locally onto the flash memory inside Scout. When enabled in the setup and human bodies and/or pets are detected, Scout would upload 13-second video clips to the cloud server.
To delete the paths, long-press the pathname, an "x" sign pops up. Tap the "x", the path is deleted.
Once the patrol path is set, users can trigger patrol using a timer, triggering events in smart home system (e.g. door sensor), and Alexa/Siri voice.
Due to certain limitations, only one path can be triggered by Alexa at the moment. If not specified, that is the last executed patrol path.
Tips for Patrol Accuracy
Scout relies on sensor fusion to navigate including camera, IMU, and motors. For each patrol, the robot should return within 6 ft of the charger in order to dock reliably. When setting up the patrol path, users should not stay in front of the camera. This could affect feature extraction in computer vision. There may also be slight difference when setting up the patrol path during the day, and patrol in nightvision.

Setup Detect for Motion/Human Body/Dogs and Cats
Automatic detect of motion, human body, dogs and cats can be enabled in the App set up section. Motion detect in the entire camera view or selected zone works only when Scout is in the charging station as stationary camera.
Scout also supports recognition of human body, dogs and cats. These detect features work when the bot is in the charging station or during patrol. They are not available when users drive the bot manually.
When users enable the cloud service, push messages can be sent to user's mobile phone with a 13-second video after the detects are triggered.
Track and Follow a human or a pet
The robot is capable of identifying a human body or a pet and following the subject. This is a fun feature. The launch button is at the lower-right corner of the main video and control page, with square in the icon. When a subject is identified, the red box appears and the robot follows the subject around. If there are multiple subjects in the camera, the robot tends to track the one in the middle. That may change in the future software release. The scanning and the tracking App screen shots are in below:

Scratch Programming
Scout supports standard Scratch programming. There are a lot of tutorials out there to learn this type of graphic programming. The site by MIT is a good reference.
https://scratch.mit.edu/
The following is the UI for Scratch Programming. Several samples are provided in the App.

This graphical program generates Python codes and runs on Scout's ROS system. The Scout Scratch modules are divided into several categories, System, Media, Motion Control, Ai functions, Logic, Math, Loops, Lists, and Variables. Among them, Logic, Math, Loops, Lists, and Variables are standard modules by Blockly.
The APIs for System, Media, Motion Control and Ai functions are listed in the Appendix I of this user manual. Please refer to the latest App as more functions are constantly added to this program.
Work with Alexa
Scout is a "work with Alexa" device. Users can pair the robot with Alexa account. Video can be streamed to Echo Show or other screen devices. Voice commands can control the movement of the robot.
At the moment, only one patrol path is triggered by Alexa.

To pair with an Alexa account, follow Scout App, log in to your Alexa account. Your Scout is paired with your Alexa.
Alexa Voice Commands
The following table contains the voice commands to control the robot.
| Skills | Launch Phrase | Description | |
| 1 | Video skill | "Alexa, show my camera." | Stream video to Echo Show and Spot. Camera name can be customized. |
| 2 | Start patrol | "Alexa, ask robot Scout to start patrol." | Voice command to start patrol. Only default patrol path can be activated by voice. |
| 3 | Stop patrol | "Alexa, ask robot Scout to stop patrol." | Voice command to stop patrol. Scout is expected to go back to its charging station. |
| 4 | Leave the charging station | "Alexa, ask robot Scout to leave the charging station." | Scout will come out of its charging station. |
| 5 | Return to the charging station | "Alexa, ask robot Scout to return to the charging station." | Scout will go back to its charging station, if it can identify a right path. |
| 6 | Start recording | "Alexa, ask robot Scout to start recording." | Start video recording and store in local on-board flash. |
| 7 | Stop recording "Alexa, | ask robot Scout to stop recording." | Stop video recording. |
| 8 | Take photo | "Alexa, ask robot Scout to take a photo." | Take a photo and store in local on-board flash. |
| 9 | Turn left | "Alexa, ask robot Scout to turn left." | Make Scout turn left. |
| 10 | Turn right | "Alexa, ask robot Scout to turn right." | Make Scout turn right. |
| 11 | Move to the left | "Alexa, ask robot Scout to move to the left by XYZ inch(es)." | Move to the left. XYZ is a number. The default is 1 inch. |
| 12 | Move to the right | "Alexa, ask robot Scout to move to the right by XYZ inch(es)." | Move to the right. XYZ is a number. The default is 1 inch. |
| 13 | Move forward | "Alexa, ask robot Scout to move forward by XYZ inch(es)." | Make Scout move forward. XYZ is a number. The default is 1 inch. |
| 14 | Move backward | "Alexa, ask robot Scout to move backward by XYZ inch(es)." | Make Scout move backward. XYZ is a number. The default is 1 inch. |
| 15 | Clockwise rotate | "Alexa, ask robot Scout to rotate clockwise by XYZ degree(s)." | Make Scout rotate clockwise. XYZ is a number. The default is 45 degrees. |
| 16 | Counter-clock wise rotate | "Alexa, ask robot Scout to rotate counter clockwise by XYZ degree(s)." | Make Scout rotate counter clockwise. XYZ is a number. The default is 45 degrees. |
SiRi Voice Commands

To use SiRi voice control, go to the setup section of Scout iOS App. Tap "Config Siri Shortcuts".
Users can pair any SiRi phases to the following robot control comments. More controls will be available in the future through software update.

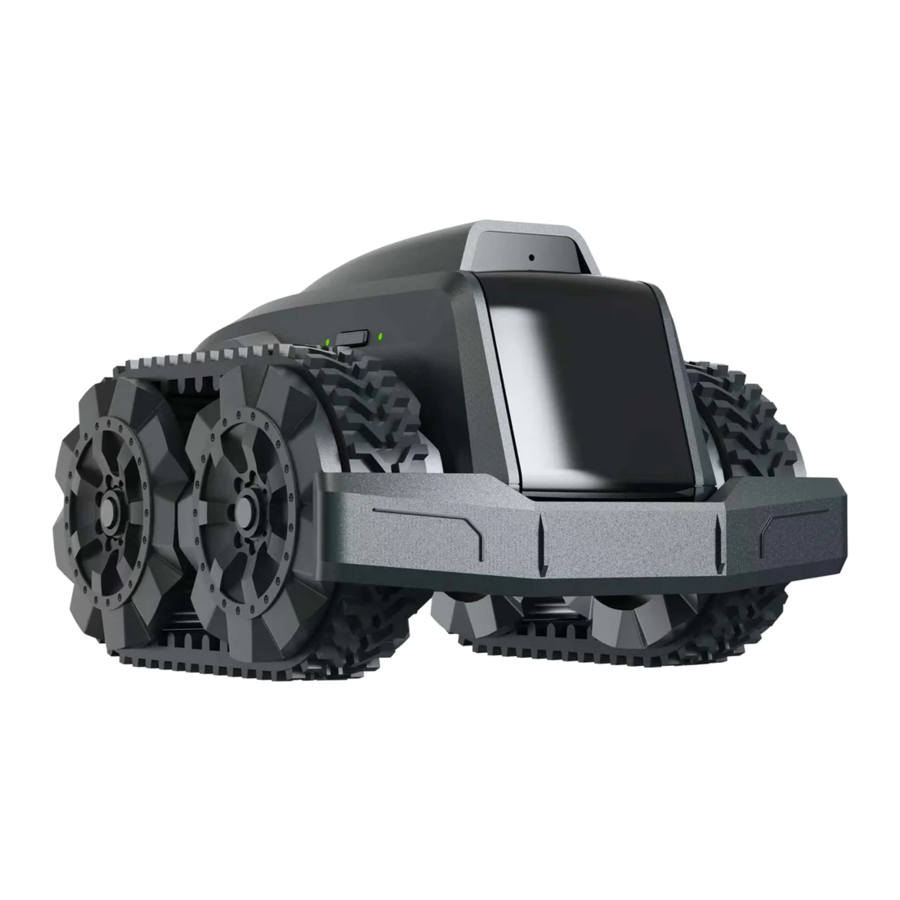
Select Between Mecanum Wheels and Track
Users have options to use either Mecanum wheels or Track. Track version has better navigation performance while Mecanum wheels with omni-directional movement is more fun. Track brings the robot a little bit higher. Users who use the original small charger may have to raise the charger higher for the Track version. The selection can be set at the first launch of the App or in the App setup section.


Built-In-Self-Test
BIST is a built-in automated diagnosis program to cover hardware testing. To perform BIST, the App must connect to the robot in either Wi-Fi direct mode or in Wi-Fi router mode. Place the robot on its charging station, start the BIST program in the App setup section. The robot moves out and produces some high-pitched sound. In the end, a report is generated on the App.
Add-on tools
Scout is also a robotic development platform. A UART port is available on the top of the robot. Remove the metal panel, the UART port is accessible. One can use 3D printing to design new tools for Scout. From LED torch to toy gun, to a robotic arm. Only imagination is the limit. Complex tools may require C/C++ programming. Scout's robotic control layer is open source. For serious developers, please contact us at contactus@moorebot.com for more information.
Technical Specifications
Communication
Dual-band 2.4G/5G Wi-Fi 802.11 a/b/g/n
Bluetooth 4.2 (off by default)
Power Supply
USB 5V, >2A
Battery
Battery Type: 18650 Rechargeable Li-ion Battery
Battery Capacity: 2000mAh (expected to operate for >2 hours, without Night Vision)
Camera
Sensor: 2M Pixel CMOS (1080P)
Angle: Wide Angle 120 degree
Night Vision: IR Infrared (mechanical IR cut)
Audio
1W Speaker
1x Microphone
CPU
Quad-Core ARM A7 @1.2GHz
512MB LPDDR III
4GB eMMC Storage
OS
Linux + ROS
Motors & Wheels
4x high-speed DC motors
4x novel Mecanum wheels
Sensors
6DoF IMU
Light sensor
ToF (Time to Flight)
Waterproof
Scout: Not waterproof
Scout E: IPX4 waterproof
Maximum Speed
~2km/h or ~1.2miles/h
Operating Temperature
0C to 40C
Custom Scratch API for the Unit
System
| Module Name | start |
| Blckly Function | System_start |
| Python code | rollereye.start() |
| Function info | Start program |
| Module Name | timer (start / stop / pause) timing |
| Blckly Function | Timer_control |
| Python code | rollereye.timerStart() / rollereye.timerPause() / rollereye.timerStop() |
| Function info | Start / Stop / Pause the timer |
| Module Name | timer time |
| Blckly Function | Timer_time |
| Python code | rollereye.getTimerTime() |
| Function info | Get the total time elapsed from when the timer was started in milliseconds |
| Module Name | program runtime |
| Blckly Function | runtime |
| Python code | rollereye.getRunTime() |
| Function info | Get the total time elapsed from when the robot began running up to the current time in milliseconds |
| Module Name | current timestamp |
| Blckly Function | System_ctime |
| Python code | rollereye.getCurrentTime() |
| Function info | Get the system timestamp from 01/01/1970 00:00:00 in milliseconds |
| Module Name | program stop |
| Blckly Function | System_stop |
| Python code | rollereye.stop() |
| Function info | Stop the program |
Media
| Module Name | set media value (0:100) |
| Blckly Function | Media_soundvolume |
| Python code | rollereye.set_soundVolume(int value) |
| Function info | set media volume |
| Module Name | play sound effect |
| Blckly Function | Media_soundeffect |
| Python code | rollereye.play_sound(int effectID, boolean isFinished) |
| Function info | The robot emits a sound and executes the next command |
| Module Name | play sound effect until finished |
| Blckly Function | Media_soundeffect_1 |
| Python code | rollereye.play_sound(int effectID, boolean isFinished) |
| Function info | The next command is not executed until a specific sound is emitted |
| Module Name | take photo |
| Blckly Function | Media_takephoto |
| Python code | rollereye.capture() |
| Function info | take photo |
| Module Name | start / stop video recording |
| Blckly Function | Media_soundeffect_1 |
| Python code | rollereye.reocrd_start() / rollereye.record_stop() |
| Function info | start / stop recording |
Motion Control
| Module Name | set Scout translation speed to (0:1) m/s |
| Blckly Function | Motion_set_translation_speed |
| Python code | rollereye.set_translationSpeed(float speed) |
| Function info | set translation speed |
| Module Name | set Scout rotation speed to (0:1) m/s |
| Blckly Function | Motion_set_rotation_speed |
| Python code | rollereye.set_rotationSpeed(float speed) |
| Function info | set translation speed |
| Module Name | set wheel rotation speed(rpm) to front-left/front-right/rear-left/rear-right(-1000:1000) |
| Blckly Function | Motion_set_Mecanum_wheel(TBD) |
| Python code | rollereye.set_wheel(int front-left, int front-right, int rear-left, int rear-right) |
| Function info | The rotation speed of each wheel can be set independently |
| Module Name | set Scount to translate at (0:360) ° |
| Blckly Function | Motion_set_translate |
| Python code | rollereye.set_translate(int degree) |
| Function info | set the Scout to translate in a specified direction |
| Module Name | set Scount to translate at (0:360) °for (0:20) s |
| Blckly Function | Motion_set_translate_2 |
| Python code | rollereye.set_translate_2(int degree, int seconds) |
| Function info | set the duration the Scout to translate in a specified direction |
| Module Name | set Scount to translate at (0:360) °for (0:5) m |
| Blckly Function | Motion_set_translate_3 |
| Python code | rollereye.set_translate_3(int degree, int meters) |
| Function info | set the distance the Scout to translate in a specified direction |
| Module Name | set Scount to translate at (0:360) °for (0:1) m/s |
| Blckly Function | Motion_set_translate_4 |
| Python code | rollereye.set_translate_4(int degree, float speed) |
| Function info | set the Scout to translate in a specified direction and speed |
| Module Name | set Scount to rotate(left/right) |
| Blckly Function | Motion_set_rotate |
| Python code | rollereye.set_rotate(int direction) |
| Function info | set the Scout to rotate in a specified direction |
| Module Name | set Scount to rotate(left/right) for (0:20)s |
| Blckly Function | Motion_set_rotate_2 |
| Python code | rollereye.set_rotate_2(int direction, int seconds) |
| Function info | set the duration the Scout to rotate in a specified direction |
| Module Name | set Scount to rotate(left/right) for (0:360)° |
| Blckly Function | Motion_set_rotate_3 |
| Python code | rollereye.set_rotate_3(int direction, int degree) |
| Function info | set the angle and direction of the Scout rotation |
| Module Name | set Scount to translate towards front at (0:360)° and rotate (left/right) |
| Blckly Function | Motion_set_translate_rotate |
| Python code | rollereye.set_translate_rotate(int degree, int direction) |
| Function info | set the Scout to move in a specific direction while rotating simultaneously |
| Module Name | stop motion |
| Blckly Function | Motion_stop |
| Python code | rollereye.stop_move() |
| Function info | stop move |
AI Functions
| Module Name | enable/disable person/cat/dog/... Identification |
| Blckly Function | Smart_sw_reg |
| Python code | rollereye.enble_reg(reg.person/reg.cat/reg.dog) |
| Function info | enable or disable the Scout visual identification function for vision person, cat, dog |
| Module Name | when person/cat/dog/... identified |
| Blckly Function | Smart_when_reg |
| Python code | when (rollereye.recogResult() ==reg.person/reg.dog/reg.cat) pass |
| Function info | when specific information is identified, the corresponding block runs its internal program |
| Module Name | when person/cat/dog/... identified |
| Blckly Function | Smart_when_reg |
| Python code | when (rollereye.recogResult() ==reg.person/reg.dog/reg.cat) pass |
| Function info | when specific information is identified, the corresponding block runs its internal program |
| Module Name | person/cat/dog/... identified |
| Blckly Function | Smart_if_reg |
| Python code | rollereye.recResult(reg.person/reg.cat/reg.dog/...) |
| Function info | when the specific information(person/cat/dog, etc.)is identified, the condition is return True. Otherwise, it is returned False. |
| Module Name | wait until person/cat/dog/... identified |
| Blckly Function | Smart_wait_reg |
| Python code | rollereye.recWait(reg.person/reg.cat/reg.dog/...) |
| Function info | when specific information is identified, the Scout continues executing commands. Otherwise, it continues waiting |
| Module Name | enable/disable motion detect |
| Blckly Function | Smart_sw_detect |
| Python code | rollereye.enable_detection() / rollereye.disable_detection() |
| Function info | enable / disable motion detect |
| Module Name | when motion detected |
| Blckly Function | Smart_when_detect |
| Python code | when (rollereye.motionDetected()) pass |
| Function info | when detected motion, the corresponding block runs its internal program |
| Module Name | enable / disable motion follow |
| Blckly Function | Smart_sw_follow |
| Python code | rollereye.enable_follow() / rollereye.disable_follow() |
| Function info | enable / disable the Scout follow something moved |
Safety Instructions
READ AND SAVE THESE INSTRUCTIONS. This product is fully compliant with all relevant electromagnetic field standards and is when handled as described in this manual, safe to use. Therefore, always read the instructions in this manual carefully before using the device, and save it for later use.
- Scout is not a toy. Do not allow children to play with it without parental care. Age of 12+ is recommended.
- Keep this manual for future reference.
- Use of other 2.4GHz and 5GHz products, such as other wireless networks, Bluetooth systems, or microwave ovens may cause interference with this product. Keep Scout away from these types of products, or turn them off if they appear to be causing interference.
- Always ensure that you have a good Wi-Fi connection available.
- The unit's outer surface may become hot during use.
- Scout contains small parts that could become a choking hazard.
![burn hazard]() Charge the robot only with the charging station provided with your device. Keep the exposed charging pins on the charging station and the robot away from water and other conductive material. Using an improper charging method or shorting the charging pins may result in fire or explosion.
Charge the robot only with the charging station provided with your device. Keep the exposed charging pins on the charging station and the robot away from water and other conductive material. Using an improper charging method or shorting the charging pins may result in fire or explosion.- Always choose adapters with circuit breaker, fuse, or other short circuit protection.
- Do not disassemble, crush, open, puncture, shred the robot.
- Do not use your robot near heat sources, food, chemicals, or in strong sunlight.
 Charge the robot only with the charging station provided with your device. Keep the exposed charging pins on the charging station and the robot away from water and other conductive material. Using an improper charging method or shorting the charging pins may result in fire or explosion.
Contact us
If you need help, please don't hesitate to contact Moorebot Support customerservice@moorebot.com or call +1 (858) 832-2587.
Documents / Resources
References
Download manual
Here you can download full pdf version of manual, it may contain additional safety instructions, warranty information, FCC rules, etc.
Advertisement


Need help?
Do you have a question about the Scout and is the answer not in the manual?
Questions and answers