QiCYCLE Mini, QJCQBM1 - Portable Electric Air Compressor Manual
- Manual (122 pages)
Advertisement
- 1 Parts Description
- 2 Intended Use
- 3 How to Use
- 4 Care & Maintenance
- 5 Troubleshooting
- 6 Specifications
- 7 Safety Instructions
- 8 Documents / Resources
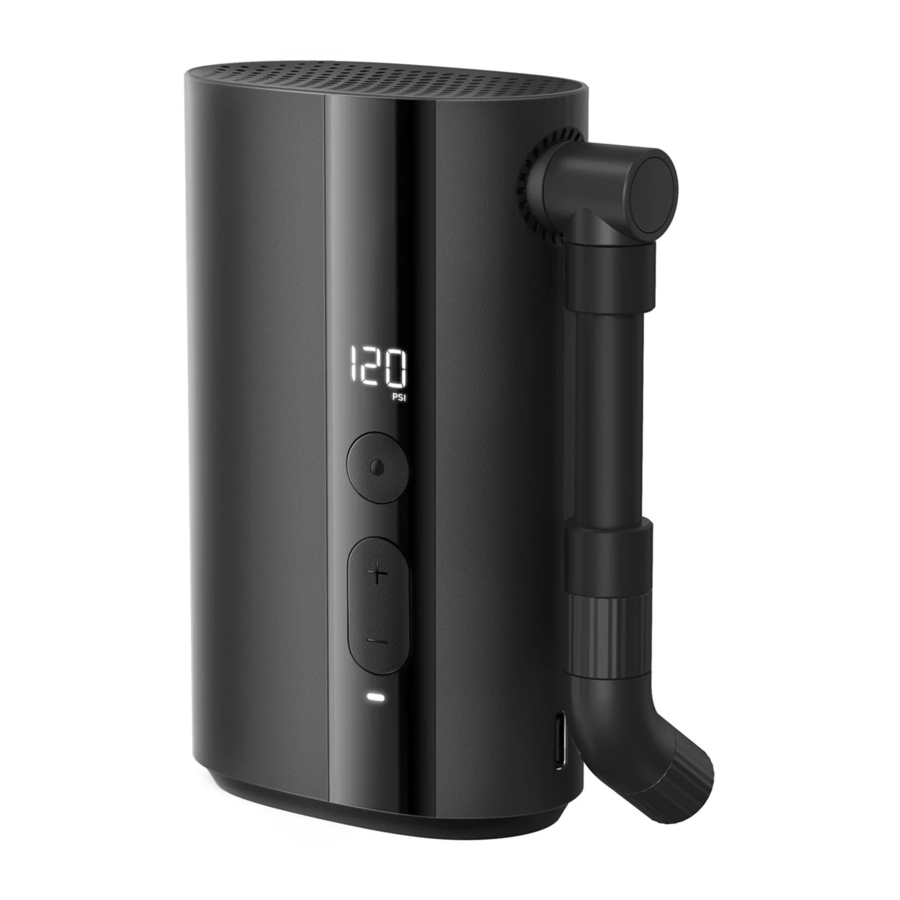
Parts Description

 Note: Illustrations of the product, its accessories, and its user interface in this user manual are provided for reference only. Due to updates and upgrades, the actual product may be slightly different from the schematic diagram. Please refer to the actual product.
Electric Air Compressor Safety Warnings
The battery charger can be used by children aged from 8 years and above and persons with reduced physical, sensory or mental capabilities or lack of experience and knowledge if they have been given supervision or instruction concerning use of the appliance in a safe way and understand the hazards involved. Children shall not play with the appliance. Cleaning and user maintenance shall not be made by children without supervision.
Risk of coke formation in the delivery piping causing a fire or explosion.
Safety Instructions
Please take appropriate precautions to protect your hearing. The air compressor and air hose can get very hot after running for a while. Do not touch hot surfaces until they have cooled down. This product is not a toy and should not be used by children.
Intended Use
The QiCYCLE Portable Electric Air Compressor Mini can inflate the tires of bicycles, electric bikes, certain motorcycles, scooters and so on. The tool is to be used only for its prescribed purpose. Any other use is deemed to be a case of misuse.
How to Use
Battery Level Indicator & Charging
Battery Level Indicator
The battery level indicator has different colors to indicate the air compressor's remaining battery level:
White: More than 50%
Orange: 20 to 50%
Red: Less than 20%, charge it as soon as possible.
Charging
Fully charge the air compressor before using it for the first time.
Connect the charging cable to a 5V USB power adapter to charge the air compressor.
Battery level indicator while charging:
Blinking White: Charging
White: Fully charged
Note:
The air compressor is turned off and cannot be used while charging. This product requires the use of a safety compliant adapter and charging cable, which are not included.
Turning on/off
Turning on:
Press and hold the ON/OFF button for about 2 seconds to turn on the air compressor.
Turning off:
In the power-on state, press and hold the ON/OFF button to turn off the air compressor. If the air compressor is not used for 3 minutes, it will automatically turn off.
Connecting the high-pressure air hose (with the valve adapter) to the tire valve
120° Schrader/Presta Valve
Rotate the Schrader valve adapter counterclockwise to unscrew the Schrader/Presta valve. Change the direction of rotation to screw back and switch the valve.

Note: The default ex-factory product configuration is the Presta valve with the adapter exposed.
Valve Type
Presta Valve Adapter
The Presta valve adapter is required to inflate the tires of road bicycles and some mountain bikes.
To inflate:
- Make sure the Presta valve adapter on the high-pressure air hose is exposed;
- Unscrew the tire's Presta valve;
- Connect the Presta valve adapter on the high-pressure air hose to the tire valve to inflate.
To deflate:
Loosen the screw on the tire valve, and press the valve to release air.
| Valve Type | Inflation Adapter |
 |  |
Schrader Valve Adapter
The Schrader valve adapter is required to inflate the tires of mountain bikes, electric bikes, and motorcycles.
To inflate:
- Change the Presta valve adapter on the high-pressure air hose to the Schrader valve adapter;
- Connect the Schrader valve adapter to the tire valve to inflate.
To deflate:
Use an appropriate tool (such as a 4mm Allen wrench) to press the needle inside the valve to release the air.
| Valve Type | Inflation Adapter |
 |  |
Detecting Air Pressure
The current air pressure will automatically be displayed after the high-pressure air hose is connected to an item while the air compressor is turned on. Mini offers a pressure measuring range of 3 to 200 psi.
Determining the Right Air Pressure
To ensure safety and to prevent injuries from explosions due to over-inflation, always refer to the instructions or relevant directions accompanying the item to be inflated before inflating it, in order to determine the correct air pressure.
Tires
The range of air pressure that the tires of bicycles, electric bikes, some motorcycles, and scooters can withstand is marked on the sidewall of the tire.

Inflation pressure is related to the weight of the load. For more details on the recommended air pressure, please refer to the corresponding product manual.
Air Pressure Reference Table
| Category | Type | Recommended Pressure Range |
| Bicycles | Mi Smart Electric Folding Bike tires 12-, 14-, & 16-inch bicycle tires 20-, 22-, & 24-inch bicycle tires Mi Electric Scooter tires 26-, 27.5-, & 29-inch mountain bike tires 700c road bike clincher tires 700c road bike tubular tires | 35–45 psi 30–50 psi 40–50 psi 45–50 psi 45–65 psi 100–130 psi 120–145 psi |
| Motorcycles | Motorcycle or electric scooter tires | 26–44 psi |
| Electric bikes | Electric bike tires | 26–44 psi |
Note: Pressure range values are for reference only. Always refer to the instructions or manual of the item being inflated for actual inflation pressure specifications. Unit conversion:
1 bar = 14.5 psi, 1 bar = 100 kPa, 1 psi = 1 lbs. (The data above is from the QiCYCLE lab.)
Pressure Presets
Inflation Pressure Range
The pressure value is in psi, with an adjustable range of 3–150 psi.
Adjusting Preset Values

The preset pressure can be adjusted before inflation. Press "+" or "-" to adjust the preset pressure value. Press and hold "+" or "-" to quickly adjust the pressure value.

When adjusting a preset pressure, the blinking value indicates the target pressure, and a non-blinking value indicates the real-time pressure. The numerical value can be stored in memory. The air pressure value set for the previous inflation will be displayed on startup.
Inflating
Start Inflating
Press the start/stop button to start inflating. The current pressure is displayed in real-time while inflating. During inflation, approximately 72dB of noise will be generated. Please take note to use some protection. After prolonged use, the high pressure air hose, air nozzle connector and the body will have a significant temperature increase, avoid touching it for a long time.
Stop Inflating
When the air pressure reaches the preset value, the inflator will automatically stop inflating. During inflation, you can briefly press the ON/OFF button to stop the inflation process.

The inflation pressure of products such as balloons, toy balls, swimming tubes, etc. is lower than the range of the portable inflator. It cannot automatically stop inflation through the preset pressure, so it needs to be used with caution.
Battery Information
Under the condition of full power and 25°C of ambient temperature, the continuous working time of the inflator without load is about 60 minutes. Increased pressure load and lower ambient temperature will cause a poor endurance.
Disconnecting the Air Hose
Once inflation is done, the temperature of the high-pressure air hose and valve adapter will be relatively high. Do be careful not to get scalded when disassembling the valve. There will be slight air leakage during disassembly, please operate quickly to reduce the leakage.
Residual risks
Even when the power tool is used as prescribed it is not possible to eliminate all residual risk factors. The following hazards may arise in connection with the power tool's construction and design:
- Damage to lungs if an effective dust mask is not worn.
- Damage to hearing if effective hearing protection is not worn.
- Damages to health resulting from vibration emission if the power tool is being used over longer period of time or not adequately managed and properly maintained.

This power tool produces an electromagnetic field during operation. This field may under some circumstances interfere with active or passive medical implants. To reduce the risk of serious or fatal injury, we recommend persons with medical implants to consult their physician and the medical implant manufacturer before operating this machine.
Care & Maintenance
- Regular cleaning, maintenance, method for keeping tools sharp, and lubrication, charge at least once every three months.
- Do not attempt to repair the product by yourself; only a qualified technician or the professional can repair it. Please contact customer service if needed.
- List of user-replaceable parts (120° Schrader/Presta Valve and Charging Cable).
- Special tools may be required, do not disassemble and repair by yourself.
Battery Safety
- Do not dismantle, open or shred cells. Batteries should be dismantled only by trained personnel. Multi-cell battery cases should be designed so that they can be opened only with the aid of a tool.
- Compartments should be designed to prevent easy access to the batteries by young children.
- Do not short-circuit a cell or battery. Do not store cells or batteries haphazardly in a box or drawer where they may short-circuit each other or be short-circuited by conductive materials.
- Do not remove a cell or battery from its original packaging until required for use.
- Do not expose cells or batteries to heat or fire. Avoid storage in direct sunlight.
- Do not subject cells or batteries to mechanical shock.
- In the event of a cell leaking, do not allow the liquid to come into contact with the skin or eyes. If contact has been made, wash the affected area with copious amounts of water and seek medical advice.
- Equipment should be designed to prohibit the incorrect insertion of cells or batteries and should have clear polarity marks. Always observe the polarity marks on the cell, battery and equipment and ensure correct use.
- Do not mix cells of different manufacture, capacity, size or type within a battery.
- Seek medical advice immediately if a cell or battery has been swallowed.
- Consult the cell or battery manufacturer on the maximum number of cells which may be assembled in a battery and on the safest way in which cells may be connected.
- A dedicated charger should be provided for each equipment. Complete charging instructions should be provided for all secondary cells and batteries offered for sale.
- Keep cells and batteries clean and dry.
- Wipe the cell or battery terminals with a clean dry cloth if they become dirty.
- Secondary cells and batteries need to be charged before use. Always refer to the cell or battery manufacturer's instructions and use the correct charging procedure.
- Do not maintain secondary cells and batteries on charge when not in use.
- After extended periods of storage, it may be necessary to charge and discharge the cells or batteries several times to obtain maximum performance.
- Retain the original cell and battery literature for future reference.
- When disposing of secondary cells or batteries, keep cells or batteries of different electrochemical systems separate from each other.
Troubleshooting
| Problem | Solution |
| Slow inflation speed |
|
| Air compressor turns on but does not inflate |
|
| Air compressor inflates normally but the displayed pressure is zero | Products such as balloons with low inflatable pressure are not within the range of this product. |
| Air compressor was already turned off after connecting the air hose to a valve | Press and hold the ON/OFF button to turn on the inflater again. |
| Air leaks out when connecting the air hose | Tighten the valve. |
| The color of the battery indicator in the inflated state is inconsistent with that in the standby state. | There is a significant voltage drop when the lithium battery is being discharged, which leads to color inconsistencies between the indicators in the inflated state and the standby state. This is not considered a fault. |
| Cannot be turned on | Make sure that the battery is sufficiently charged. |
| Cannot inflate or detect air pressure |
|
| Error codes E1, E2 | If the temperature exceeds the range, let the device cool at room temperature for one hour before use. |
| Error code E6 | When the air pressure exceeds the range, unscrew the valve to check if the pressure is restored. If the error code disappears, check if the pressure of the inflation target exceeds the range. |
Specifications
| Name | QiCYCLE Portable Electric Air Compressor Mini |
| Model | QJCQBM1 |
| Item Dimensions | 107 × 65 × 38 mm |
| Length of air hose | 98. 98.1 mm (120° Schrader/French Valve) |
| Inflation Pressure Range | 3-150 psi |
| Pressure range | 3-200 psi |
| Working Temperature | Charging: 5°C ~ 40°C Discharging: -10°C ~ 45°C |
| Storage Temperature | -10℃ ~ 45℃ |
| Battery Capacity | 5 5 Ah (18 Wh) |
| Screen size | 16. 16.25 × 14 mm |
| Input parameter | 5V  2A 2A |
| Charging Port | USB Type-C |
| Charging Time | Less than 4 hours |
| Sensor Accuracy | ±1 psi |
Noise Value and Vibration
Test result
| Noise emission values determined according to EN 62841 - 1: | |
| Sound Pressure Level | LpA = 70 dB (A) |
| Uncertainty | K= 3 dB |
| A-weighted Sound Power Level | LwA = 80dB (A) |
| Uncertainty | K= 3 dB |
| Declared A-weighted Sound Power Level (according to EN 1012-1) | 83 83 dB (A) |
| Vibration total values determined according to EN 62841-1: | |
| Vibration Emission Value | ah ≤ 2.5 m/s² |
| Uncertainty | K = 1.5 m/s² |
Wear hearing protection while operating the power tool.
The declared vibration total value(s) and the declared noise emission value(s) have been measured in accordance with a standard test method and may be used for comparing one tool with another.
The declared vibration total value(s) and the declared noise emission value(s) may also be used in a preliminary assessment of exposure.
- The vibration emission and noise emissions during actual use of the power tool can differ from the declared total value depending on the ways in which the tool is used.
- There is a need to identify safety measures to protect the operator that are based on an estimation of exposure in the actual conditions of use (taking account of all parts of the operating cycle such as the times when the tool is switched off and when it is running idle in addition to the trigger time).
Safety Instructions
General power tool safety warnings
Read all safety warnings, instructions, illustrations and specifications provided with this power tool. Failure to follow all instructions listed below may result in electric shock, fire and/ or serious injury.
Save all warnings and instructions for future reference. The term "power tool" in the warnings refers to your mains-operated (corded) power tool or battery-operated (cordless) power tool.
Work area safety
- Keep work area clean and well lit. Cluttered or dark areas invite accidents.
- Do not operate power tools in explosive atmospheres, such as in the presence of flammable liquids, gases or dust. Power tools create sparks which may ignite the dust or fumes.
- Keep children and bystanders away while operating a power tool. Distractions can cause you to lose control.
Electrical safety
- Power tool plugs must match the outlet. Never modify the plug in any way. Do not use any adapter plugs with earthed (grounded) power tools. Unmodified plugs and matching outlets will reduce risk of electric shock.
- Avoid body contact with earthed or grounded surfaces, such as pipes, radiators, ranges and refrigerators. There is an increased risk of electric shock if your body is earthed or grounded.
- Do not expose power tools to rain or wet conditions. Water entering a power tool will increase the risk of electric shock.
- Do not abuse the cord. Never use the cord for carrying, pulling or unplugging the power tool. Keep cord away from heat, oil, sharp edges or moving parts. Damaged or entangled cords increase the risk of electric shock.
- When operating a power tool outdoors, use an extension cord suitable for outdoor use. Use of a cord suitable for outdoor use reduces the risk of electric shock.
- If operating a power tool in a damp location is unavoidable, use a residual current device (RCD) protected supply. Use of an RCD reduces the risk of electric shock.
Personal safety
- Stay alert, watch what you are doing and use common sense when operating a power tool. Do not use a power tool while you are tired or under the influence of drugs, alcohol or medication. A moment of inattention while operating power tools may result in serious personal injury.
- Use personal protective equipment. Always wear eye protection. Protective equipment such as a dust mask, non-skid safety shoes, hard hat or hearing protection used for appropriate conditions will reduce personal injuries.
- Prevent unintentional starting. Ensure the switch is in the off-position before connecting to power source and/or battery pack, picking up or carrying the tool. Carrying power tools with your finger on the switch or energising power tools that have the switch on invites accidents.
- Remove any adjusting key or wrench before turning the power tool on. A wrench or a key left attached to a rotating part of the power tool may result in personal injury.
- Do not overreach. Keep proper footing and balance at all times. This enables better control of the power tool in unexpected situations.
- Dress properly. Do not wear loose clothing or jewellery. Keep your hair and clothing away from moving parts. Loose clothes, jewellery or long hair can be caught in moving parts.
- If devices are provided for the connection of dust extraction and collection facilities, ensure these are connected and properly used. Use of dust collection can reduce dustrelated hazards.
- Do not let familiarity gained from frequent use of tools allow you to become complacent and ignore tool safety principles. A careless action can cause severe injury within a fraction of a second.
Power tool use and care
- Do not force the power tool. Use the correct power tool for your application. The correct power tool will do the job better and safer at the rate for which it was designed.
- Do not use the power tool if the switch does not turn it on and off. Any power tool that cannot be controlled with the switch is dangerous and must be repaired.
- Disconnect the plug from the power source and/or remove the battery pack, if detachable, from the power tool before making any adjustments, changing accessories, or storing power tools. Such preventive safety measures reduce the risk of starting the power tool accidentally.
- Store idle power tools out of the reach of children and do not allow persons unfamiliar with the power tool or these instructions to operate the power tool. Power tools are dangerous in the hands of untrained users.
- Maintain power tools and accessories. Check for misalignment or binding of moving parts, breakage of parts and any other condition that may affect the power tool's operation. If damaged, have the power tool repaired before use. Many accidents are caused by poorly maintained power tools.
- Keep cutting tools sharp and clean. Properly maintained cutting tools with sharp cutting edges are less likely to bind and are easier to control.
- Use the power tool, accessories and tool bits etc. in accordance with these instructions, taking into account the working conditions and the work to be performed. Use of the power tool for operations different from those intended could result in a hazardous situation.
- Keep handles and grasping surfaces dry, clean and free from oil and grease. Slippery handles and grasping surfaces do not allow for safe handling and control of the tool in unexpected situations.
Battery tool use and care
- Recharge only with the charger specified by the manufacturer. A charger that is suitable for one type of battery pack may create a risk of fire when used with another battery pack.
- Use power tools only with specifically designated battery packs. Use of any other battery packs may create a risk of injury and fire.
- When battery pack is not in use, keep it away from other metal objects, like paper clips, coins, keys, nails, screws or other small metal objects, that can make a connection from one terminal to another. Shorting the battery terminals together may cause burns or a fire.
- Under abusive conditions, liquid may be ejected from the battery; avoid contact. If contact accidentally occurs, flush with water. If liquid contacts eyes, additionally seek medical help. Liquid ejected from the battery may cause irritation or burns.
- Do not use a battery pack or tool that is damaged or modified. Damaged or modified batteries may exhibit unpredictable behaviour resulting in fire, explosion or risk of injury.
- Do not expose a battery pack or tool to fire or excessive temperature. Exposure to fire or temperature above 130°C may cause explosion.
- Follow all charging instructions and do not charge the battery pack or tool outside the temperature range specified in the instructions. Charging improperly or at temperatures outside the specified range may damage the battery and increase the risk of fire.
Service
- Have your power tool serviced by a qualified repair person using only identical replacement parts. This will ensure that the safety of the power tool is maintained.
- Never service damaged battery packs. Service of battery packs should only be performed by the manufacturer or authorized service providers.
Precautions
- The air compressor has a built-in lithium battery and should never be exposed to fire or improperly disposed of. Do not expose the air compressor's battery to high temperature environments, such as leaving it in a car in direct sunlight. If the lithium battery is exposed to extreme heat, impact or water, there is a risk of fire, spontaneous combustion, and even explosion.
- The air compressor should not be stored at temperatures below -10°C or over 45°C. Exposure to extreme heat or cold will shorten the air compressor's service life and damage the built-in battery.
- Leaving the air compressor unused for long periods may harm the battery. It is recommended to charge the air compressor at least once every three months.
- The air compressor uses a built-in DC motor which may produce electrical sparks when running and should never be used in flammable or explosive environments.
- If the air compressor makes an unusual noise while running or starts to overheat, turn it off immediately.
- Always make sure the correct air pressure unit is selected before setting the air pressure to prevent accidents such as a burst tire. Common Unit Conversion: 1 bar = 14.5 psi, 1 bar = 100 kPa.
- Always monitor the air compressor during usage and never leave it unattended when using it without presetting a pressure to avoid over-inflating.
- Only use the air compressor in a clean, dry environment. Intrusion of dirt and dust may cause damage to the air compressor. The air compressor is not waterproof and should never be rinsed with water.
For further information, please go to www.qicycle.com
Documents / Resources
References
Download manual
Here you can download full pdf version of manual, it may contain additional safety instructions, warranty information, FCC rules, etc.
Download QiCYCLE Mini, QJCQBM1 - Portable Electric Air Compressor Manual
Advertisement

Need help?
Do you have a question about the Mini and is the answer not in the manual?
Questions and answers