Advertisement
- 1 Introduction
- 2 Cold, Sound, and Operational Safety
- 3 Assembly of the outrigger feet
- 4 Setup
- 5 Signal connections
- 6 Power connection
- 7 Wireless pairing with a preamp
- 8 Master-slave connection (Stereo pair)
- 9 Channel selection
- 10 Source selection and sensitivity
- 11 Factory reset
- 12 Nubert X-Remote App
- 13 Status-LED
- 14 Documents / Resources
Introduction
In this user manual, we explain the setup and connections as well as the initial operation of the system. Additionally, the complete range of functions and operations are described so that you can achieve the best sound quality and functionality, allowing you to fully enjoy your speakers.
Please be sure to also read the included safety instructions!
The Nubert team wishes you lots of enjoyment!
Cold, Sound, and Operational Safety
When speakers or other electronic devices are brought from a cold environment into a warm room, condensation can form inside, posing a risk of damage or electric shock! Additionally, low temperatures can affect the flexibility of internal parts, such as diaphragms. Wait at least 6 hours before turning on the device, allowing it to reach room temperature and dry out completely! Your new speaker will reward you with the superior sound quality you rightfully expect from Nubert.
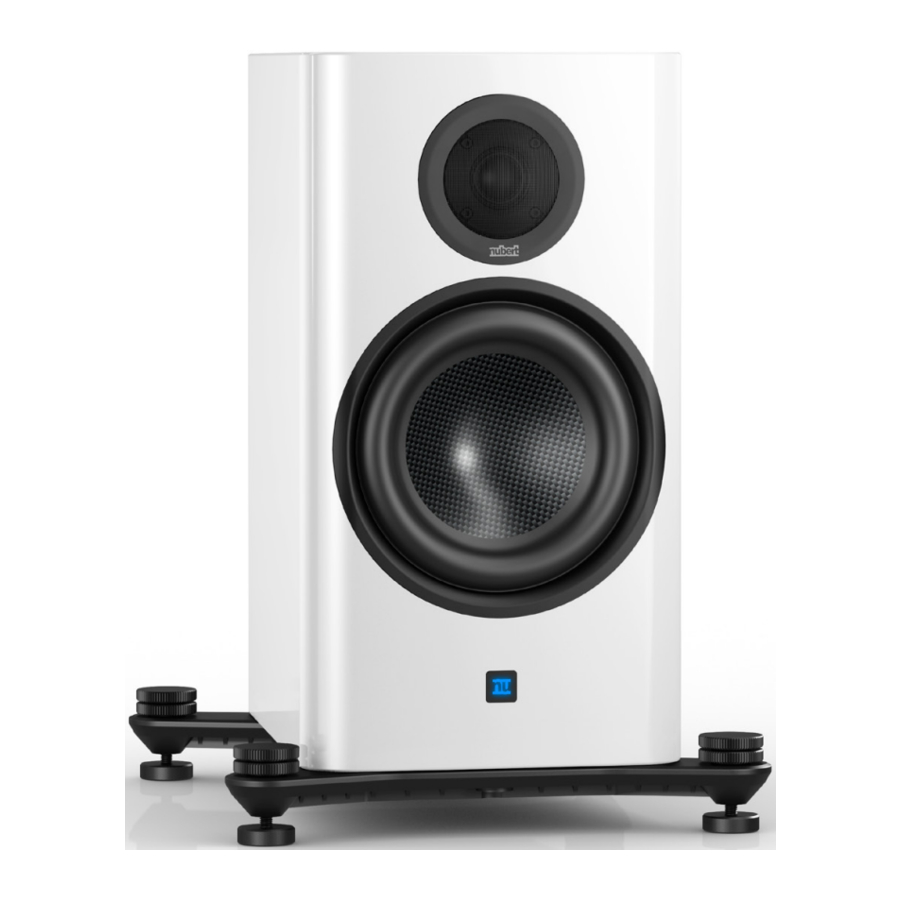
Assembly of the outrigger feet
For the nuZeo 4, 11, and 15 models, outrigger feet with adjustable height must be mounted before setting up the speakers! Place the speakers upside down on a soft surface. As shown in the illustrations, position the two outrigger feet over the threaded inserts and securely fasten the outrigger feet to the bottom using the supplied Allen screws and the appropriate Allen key. You can now turn the speaker over and place it on its feet.

Ensure not to scratch the speaker!
Do not let anything fall into the speaker through the bass reflex ports!
With the knurled screw, the height of each foot can be conveniently adjusted from above to compensate for unevenness in the surface. The screw can be secured against rotation by turning the lock nut down against the outrigger and tightening it slightly.
The cylindrical foot can be detached from the knurled screw to provide an alternative setup option. This can be particularly helpful on high-pile carpets.
Always ensure that no damage occurs to the floor or other components!

Setup
nuZeo speakers are high-quality, very neutral-sounding bass reflex active speakers. However, every speaker is exposed to the various influences of room acoustics. Therefore, please consider the following general setup guidelines:

- Rear bass reflex ports should have a few centimeters of distance from the wall or adjacent furniture fronts to avoid airflow noise. A generous distance from side and rear walls also helps to reduce bass and midrange exaggeration.
- You will achieve the most natural sound if the tweeter is approximate-ly at ear level. However, a homogeneous sound image is still achieved within 20 degrees above and below the tweeter axis. If your active speakers need to be placed higher or lower, they should be angled so that the tweeters are directed at the listening position.
- When placed on shelves, the best sound is achieved if the front edge of the speakers is either flush with the shelf or slightly protruding.
- The speakers of a stereo pair should be placed at an identical distance from the listening position. It is advisable to vary the distances between the speakers and to the listening position to find the setup that provides the best possible sound.
- Due to the excellent radiation behavior of the nuZeo speakers, the optimal sound image is achieved in many listening situations when they are aligned perpendicular to the rear wall. Optionally, you can experiment with turning the speakers slightly towards the listening position.
Sound Adjustment
To adjust the sound of the speakers to your living room or placement, various adjustments can be made using the Nubert X-Remote app. Connect the app to the speakers and navigate to the menu items depending on the desired setting:

- > advanced > system hp to reduce particularly low frequencies that tend to cause booming.
- > room calibration
to perform automatic calibration of the speaker to your listening position. - > sound to make general sound adjustments.
Signal connections
If the speaker is only to be supplied with audio signals wirelessly (X-Connect or X-Connect Surround), you can skip this step.
If your speakers are to be supplied with audio signals via cable, connect these cables first. The following options are available:

XLR (analog symmetrical)
Each speaker is directly supplied with the audio signal and controlled individually.
AUX (analog asymmetrical)
Option A: Each speaker is directly supplied with the audio signal and controlled individually. (Factory setting: Channel L_in is active)
Option B: Alternatively, both channels can be connected to one speaker of a stereo pair. This speaker then becomes the master speaker. The audio signal of the second channel can be passed on via digital coaxial cable or via X-Connect wireless connection.
AES / EBU (digital symmetrical)
SPDIF Coaxial 1 & 2 (digital asymmetrical)
The signal cable is connected to one speaker of a stereo pair. This speaker then becomes the master speaker. The audio signal of the second channel can be passed on via digital coaxial cable or via X-Connect wireless connection.
Make changes to the wiring of the speakers only when the device is turned off!
Power connection
The included power cable is connected to the power socket to establish a connection to the power supply. Now, turn on the speakers by switching the button located next to the power socket to the ON position.

Wireless pairing with a preamp
Excellent wireless stereo solutions can be set up with Nubert devices such as the high-end preamp nuControl X or integrated amplifiers like nuConnect ampX or ampXL. Traditional preamps can also be enhanced with a nuConnect trX wireless adapter to eliminate cable paths to the active speakers. Surround solutions can also be established with the nuZeo speakers. For this, the nuXinema preAV preamplifier is recommended.
Pairing Process Directly on the Speaker (Factory Settings)
Press and hold the button labeled PAIR for 3 seconds to start the pairing process.
")
Pairing process via X-Remote App
The pairing process can also be started via the X-Remote app. Connect the app to the respective speaker, navigate to the speaker's main menu, go to > setup, and select > wls slave.

In both cases, the speaker will now search for 2 minutes for a compatible wireless master (e.g., nuControl X, nuXinema preAV) and will indicate this by rapidly blinking the white LED. Now start the pairing process on the transmitter as well. This can usually be done by selecting the wls master option in its setup submenu. Refer to the transmitter's user manual if necessary. The two devices will connect, and a successful connection will be indicated by the LED glowing solid white.
Master-slave connection (Stereo pair)
This step is skipped in the following cases:
- You have paired your speakers directly with a preamp (Step 5).
- You have connected each speaker individually via XLR or AUX cable.
The speaker to which you have connected the sources is your master speaker.
It controls the second speaker of the stereo pair, the slave speaker, and also sends the appropriate audio track to it. The speakers need to be connected to each other for this, which can be done either via cable or wirelessly.
Option A – Cable-connected stereo pair
Connect the Link Out port on the master speaker to the SPDIF in Coaxial 1 port on the slave speaker using a coaxial cable.

Ensure that both speakers are in pairing mode by connecting the X-Remote app to each speaker and navigating to the speaker's main menu. Go to the entry > setup and select > pair.
Option B – Wireless connected stereo pair
If you do not wish to use a cable connection between the speakers or are unable to do so, a wireless connection is also possible.
Pairing process via X-Remote App
The pairing process is started on the master speaker using the X-Remote app. First, connect the app to the master speaker, navigate to the speaker's main menu, go to > setup, and select > wls master. Connect the app to the slave speaker, navigate to the speaker's main menu, go to > setup, and select > wls slave. The two devices will connect, and a successful connection will be indicated by the LED on the back of the device glowing solid white.

Pairing process directly on the Speaker (Factory settings)
You can also start the pairing process on the slave speaker without the app by pressing and holding the button labeled PAIR for 3 seconds.
")
Channel selection
Finally, the appropriate channels must be assigned to the speakers.

- Start the X-Remote app and connect it to the master speaker or transmitter.
Navigate to the main menu of the app and go to > channel config. Here you will get an overview of the speakers and can select the channels to be played for each speaker.
Note:
If you have connected the speakers via X-Connect to a preamp such as a nuControl X or a nuXinema preAV, the channel selection must be made on that device.
Source selection and sensitivity
The selection of input and sensitivity can be made directly using the rotary control on the back of the speaker.

Press
To switch between sensitivity and input, press the rotary control.
- Sensitivity LEDs light up green
- Input LEDs light up blue
Rotate
By rotating the control, the respective parameter can be adjusted. The adjustment range includes the following:
- Input: The 5 sources directly connected by cable are selected using the Example: Sensitivity +6 dB rotary control. The X-Connect wireless input is automatically selected by pairing the speaker.
- Sensitivity: −10 to +10 dB, in 1 dB steps
The currently selected value is indicated by the LEDs around the rotary control. The LED allows for the display of intermediate steps through two different brightness levels. If the LED lights up at full brightness, the exact value next to the LED is set. If the LED lights up at reduced brightness, the smaller intermediate value not listed in the labeling is set. Example: If the LED in the diagram to the right lights up only at reduced brightness, a sensitivity of −5 dB is set.
Factory reset
To reset the speaker to factory settings, first turn it off using the switch on the back of the device. Wait 10 seconds and turn it back on. Within 3 seconds of turning it on, press and hold both buttons on the back of the device (SOURCE/PAIR and the push/rotate control) for at least 8 seconds. All settings will now be restored to their factory defaults.
Alternatively, the factory reset can also be performed via the X-Connect app. Navigate to the menu entry
> advanced > default and confirm the security prompt.

Nubert X-Remote App
For control, you can use the Nubert X-Remote app, which you can download for free from the App Store or Play Store to your mobile device.


With the X-Remote app, you can conveniently make all settings from your listening position. The app provides additional options that cannot be set on the speaker itself. In addition to the functions already listed in the manual, the following are particularly noteworthy:
Password Assignment
If necessary, you will be prompted to enter a password when first connecting the app to a compatible device. The default password is 0000.
In the menu under
> settings > advanced > password you can set a different password to protect the device from unauthorized access.
If the device is reset to factory settings (default), the password will also be reset to 0000.

Room influences often cause disturbances such as booming or dropouts in the bass range. The X-Room Calibration enables optimization of the frequency response in the bass range, ensuring an optimal listening experience with powerful, dry, and precise bass. To make the most of this automatic calibration, connect the app to the device and perform the calibration process directly at your listening position. The speakers will play test noise, which is recorded by your smartphone's microphone. Based on these measurements, the app calculates a correction curve and sends it back to the speaker, which adjusts the frequency curve during playback to ensure you enjoy the optimal sound profile at your listening position.
Note: For Android devices, the use of the X-Room Calibration requires the USB measurement microphone „Nubert XRC Android Interface.
Status-LED
On the front of the speaker, there is a status LED. During operation, it indicates the selected input by its color. In standby mode, the LED glows with reduced brightness.

| Input: | Status LED Color: |
| Wireless |  Blue Blue |
| AUX |  Green Green |
| XLR |  White White |
| AES / EBU |  Yellow Yellow |
| COAX 1 |  Orange Orange |
| COAX 2 |  Red Red |
Note:
The behavior of the LED can be adjusted via the X-Remote app. To do this, navigate in the menu to > advanced > display > light
Documents / Resources
References
Download manual
Here you can download full pdf version of manual, it may contain additional safety instructions, warranty information, FCC rules, etc.
Advertisement


Need help?
Do you have a question about the nuZeo 4 and is the answer not in the manual?
Questions and answers