Jackery Explorer 1000 Plus (JE 1000C) - Power Station Manual
- User manual (48 pages) ,
- User manual (13 pages) ,
- User manual (52 pages)
Advertisement
- 1 TECHNICAL SPECIFICATIONS
- 2 PACKAGE LIST
- 3 GET TO KNOW YOUR GEAR
- 4 LCD DISPLAY
- 5 BASIC OPERATIONS
- 6 USE WITH BATTERY PACK (SOLD SEPARATELY)
- 7 APP CONNECTION
- 8 CHARGING YOUR JACKERY EXPLORER 1000 PLUS
- 9 IMPORTANT SAFETY INSTRUCTIONS
- 10 MOVING AND STORAGE INSTRUCTIONS
- 11 USER MAINTENANCE INSTRUCTIONS
- 12 Documents / Resources
TECHNICAL SPECIFICATIONS
| GENERAL INFO | |
| Product Name | Jackery Explorer 1000 Plus |
| Model No. | JE-1000C |
| Capacity | Lithium-ion 30.4Ah / 41.6V DC (1264.64Wh) |
| Weight | About 32 Ibs / 14.5 kg |
| Dimensions | 14 x 10.24 x 11.14 in / 35.6 x 26 x 28.3 cm |
| Cycle Life | 4000 cycles to 70%+ capacity |
| OUTPUT PORTS | |
| 3x AC Output | 120V~ 60Hz, 16.67A |
| AC Total Output | 2000W Rated, 4000W Surge peak |
| 2x USB-C Output | 100W Max, 5V ⎓ 3A, 9V ⎓ 3A, 12V ⎓ 3A, 15V ⎓ 3A, 20V ⎓ 5A |
| 2x USB-A Output | 18W Max, 5-6V ⎓ 3A, 6-9V ⎓ 2A, 9-12V ⎓ 1.5A |
| DC Expansion Port | 32.5V-46.8V ⎓ 68A Max |
| Car Port | 12V ⎓ 10A |
| INPUT PORTS | |
| DC Input | 2x DC 8mm Ports: 12-60V (Working Voltage) ⎓11A Max, Double to 22A/800W Max |
| Charge Mode AC Input | 100V-120V~60Hz, 15A Max |
| Bypass Mode AC nput/Output | 100V-120V~60Hz, 15A Max |
| ENVIRONMENTAL OPERATING TEMPERATURE | |
| Charge Temperature | 0~45°C (32~113°F) |
| Discharge Temperature | -10~45°C (14~113°F) |
MODIFICATION: Any changes or modifications not expressly approved by the grantee of this device could void the user's authority to operate the device.
PACKAGE LIST

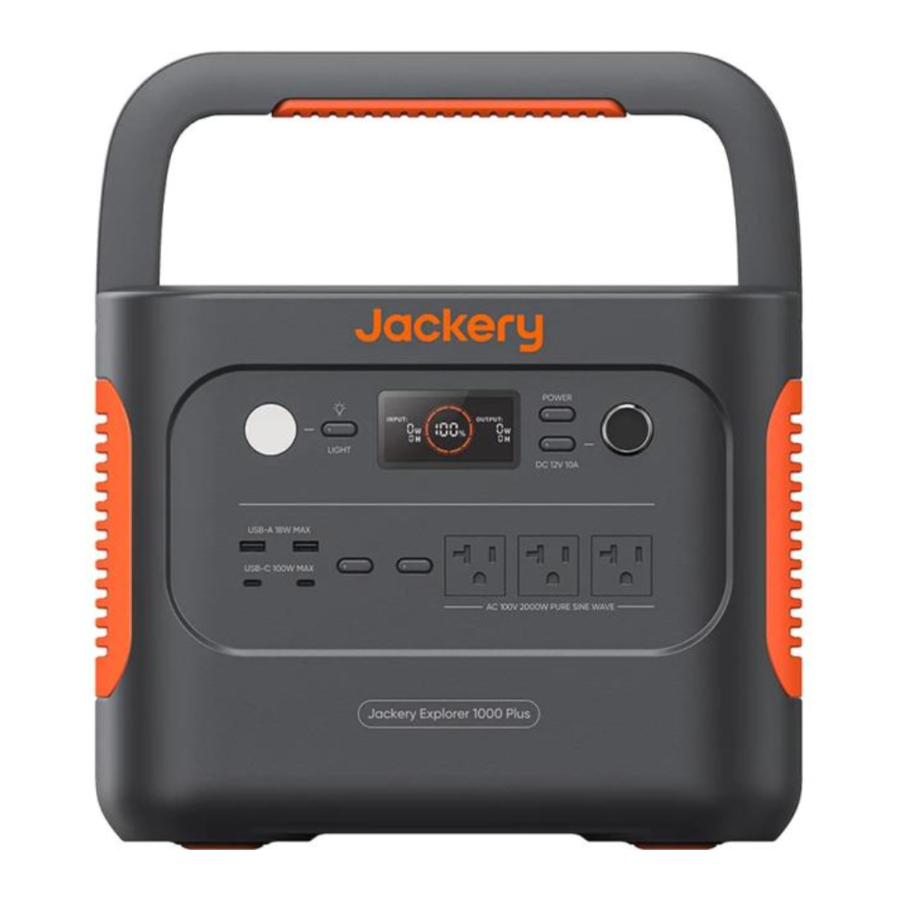
GET TO KNOW YOUR GEAR
Product Appearance

LCD DISPLAY

- WiFi
- Bluetooth
- Input Power
- Remaining Charge Time
- AC Wall Charging Indicator
- Car Charging Indicator
- Solar Charging Indicator
- Battery Pack Indicator and Connected Quantity
- Battery Power Indicator
- Low Battery Indicator
- Remaining Battery Percentage
- Error Code
- HighTemperature Warning
- Low Temperature Warning
- Energy Saving Mode
- AC Power Indicator
- Output Power
- Remaining Discharge Time

Battery Power Indicator
When the product is being charged, the orange circle around the battery percentage will light up in sequence. When charging other devices, the indicator will show the battery level.

Low Battery Indicator
When the battery is less than 20%, the Low Battery Indicator will stay on. When less than 5%, the Low Battery Indicator will flash. When it is being charged, the Indicator will be off.

Energy Saving Mode
To avoid forgetting to turn off the output which results in battery consumption, the product turns the Energy Saving Mode on by default. This occurs when no device is connected the connected device is less than or equal to a certain value. (Refer to the table below for more details), the device will automatically turn off al outputs after 12hours.
| Output | Output Power | Defaults |
| AC Output | ≤25W | All outputs turned off automatically after 12 hours |
| USB Output | ≤2W | |
| Car Output | ≤2W |
To turn off the Energy Saving Mode
Long press the AC Button and Main Power Button until the Energy Saving Mode icon disappears. In Non-Energy Saving Mode, please remember to turn off the products to avoid battery consumption.
To turn on the Energy Saving Mode
Long press the AC Button and Main Power Button until the Low Power Mode icon lights up on the screen.

Fault Code
In order to respond to the feedback quickly, we set up common fault codes FO-FE in the system: If the F8 code appears, please remove the load or unplug the charging plug, the product can restore by itself, if not, please contact after-sales service; If the F9 code appears, please remove the load and the product can recover by itself, if not, please contact after-sales service. In case of any other code appears, please contact our after-sales service.

High-temperature Warning
If it appears on the screen, do not worry, the battery will restore automatically after cooling.

Low-temperature Warning
If it is displayed on the screen, do not worry. It will automatically restore after the ambient temperature is restored.
BASIC OPERATIONS
Output On/Off
Main power on/off: Press the "Main Power Button" and the working indicator lights up and the LCD display is illuminated. When this product does not have any operation for 2 minutes, the product will enter the hibernation state and the display will turn off automatically. If you need to turn off the main power, please press and hold the "Main Power Button" until the working indicator turns off. The default standby time of this product is 2 hours. If the other power output switch is not turned on, or the product does not have any charging input, the product will automatically shut down after 2 hours. The automatic shutdown time can be set on the Jackery App.
AC Output On/Off: Ensure that the main power supply is turned on. Press the AC Button, the AC Output operation indicator lights up. Then you can connect the equipment that needs AC charging. Press the AC Button again to turn off the AC Output.
USB Output On/Off: Ensure that the main power supply is turned on. Press the DC Button, the DC Output operation indicator lights up. Then USB Output Ports can be connected to external load devices. Press the DC Button again to turn off the USB Output.
Car Port Output On/Off: Ensure that the main power supply is turned on. Press the DC Button, the DC Output operation indicator lights up. Then Car Port Output Port can be connected to external load devices. Press the DC Button again to turn off the Car Port Output.
LCD Screen On/Off
To turn on, press the Main Power Button or when there's a charging input, the screen display will light up automatically, To turn off, press the Main Power Button again and the screen display will turn off.
Or, if there is no operation in 2 minutes, the product will enter a sleep state and the screen display will automatically turn off.
To get the screen always-on (under charging or discharging state), follow these steps: After the display screen lights up, double-click the Main Power Button and the mode of Always-On Display will be on.
To turn off Always-On Display, follow these steps: Press the Main Power Button and the screen will be turned off in 2 minutes.
Tip: During Always-On mode, the screen automatically turns off after 2 hours without charging or discharging.
EPS: Emergency Power System.
Once you have connected the mains and the AC input port of the EPS via the AC charger cable, you can use the AC output port of the EPS to power your unit (at this point the AC power comes from the mains, not the EPS battery). In the event of a sudden loss of mains power, the EPS can automatically switch to battery mode within 20ms. Since this is a non-professional UPS function, it does not support Oms switching. Do not connect to equipment with high uninterruptible power requirements such as data servers and workstations. Please test several times to confirm compatibility before use and it is recommended to connect to only one device. Do not use more than one unit at a time to avoid triggering the overload protection. Failure to follow these instructions may result in equipment failure or loss of data for which we cannot be held responsible.
USE WITH BATTERY PACK (SOLD SEPARATELY)
This product can support up to 3 battery packs to meet the need for large power capacity. For details on how to use it, please refer to the Jackery Battery Pack 1000 Plus User Manual.
SAFETY PRECAUTIONS WHEN USING
When using the battery pack, please do not stack more than two battery packs on top of the Jackery Explorer 1000 Plus to prevent it from falling off and causing injury.
APP CONNECTION
This product supports the connection of Jackery App for intelligent control and operation. Users can download the Jackery App through App Store or Android application markets. Please refer to the User Manual for Jackery App for detailed connection instructions.


CHARGING YOUR JACKERY EXPLORER 1000 PLUS
Green energy first: We advocate to use the green energy first. This product supports two modes of charging at the same time: solar charging and AC wall charging.
When AC wall charging and solar charging are turned on at the same time, the product will give priority to solar charging and both methods will be used to charge the battery at the maximum permissible power.
Charging from the Wall
Please use the AC cable included in the package.

Solar Charging
Jackery SolarSaga 200 or 100 or 60 Solar Panel Connection Guide
If one or two solar panels are connected, you can directly connect the DC8020 port of the solar panel to the DC8020 port of Jackery Explorer 1000 Plus for charging. If three or four solar panels are connected, please refer to the method shown in the following figure to charge through the solar series connector. (Note: The solar series connector is not in standard configuration, so you need to purchase it separately. Please refer to the detailed operation instructions of the solar series connector before using it.)

Tip: Jackery Explorer 1000 Pro does not support three Jackery SolarSaga 200 or 100 or 60 solar panels in single input; otherwise, over-voltage protection will be triggered.

When the two inputs are used at the same time, please make sure to use the same type of solar panel and the number of solar panels in the two inputs must be the same to avoid damage or charging problems of the equipment due to inconsistent voltages of the two channels.
Jackery SolarSaga 80 Solar Panel Connection Guide
Users who have purchased Jackery SolarSaga 80 can charge the product by referring to the connection mode shown below. The Jackery SolarSaga 80 supports the parallel connection or the parallel and then series connections to charge the product. The single input port of the Jackery Explorer 1000 Plus supports the input of up to six pieces of SolarSaga 80 solar panels, and two input ports support the input to up to 12 pieces of SolarSaga 80 solar panels. (When the power is connected with six solar panels in a single input port, the solar panels shall be divided into two groups, and each group of three solar panels shall be self-connected in parallel and then connected to Jackery Explorer 1000 Plus through the solar series connector. The solar series connector needs to be purchased separately.)
For detailed operation instructions on the self-parallel connection of the Jackery SolarSaga 80 solar panel, please refer to the user manual.

Tip: Users can enter the number of solar panels in their own combination according to the number of solar panels they purchased. Currently, the product supports charging with 1, 2, 3, 4, 5, 6, 8, and 12 80W solar panels in combination.
DC7909 to DC8020 Adaptor Operation Guide
All of our solar panels on sale have been upgraded to include a DC7909 to DC8020 adapter. If you have purchased a Jackery solar panel without a DC7909 to DC8020 adapter, you can charge your Jackery Explorer 1000 Plus by following the connection instructions below.

Charging in the Car
This product can be charged with a 12 V car charger. Please start the vehicle before charging to prevent draining the car battery and prevent your vehicle from being unable to start.
Please also ensure that the car charger and the car cigarette lighter provide a good connection, and ensure that the car charger is fully inserted. In addition, if the vehicle is running on bumpy roads, it is forbidden to use the car charger in case it burns due to a poor connection. The Company will not be responsible for any loss caused by non-standard operation.

IMPORTANT SAFETY INSTRUCTIONS
INSTRUCTIONS PERTAINING TO RISK OF FIRE, ELECTRIC SHOCK, OR INJURY TO PERSONS

When using this product, basic precautions should always be followed, including the following:
- Read all the instructions before using the product.
- To reduce the risk of injury, close supervision is necessary when the product is used near children.
- Do not put fingers or hands into the product.
- Use of an attachment not recommended or sold by power pack manufacturer may result in a risk of fire, electric shock, or injury to persons.
- To reduce risk of damage to the electric plug and cord, pull the plug rather than the cord when disconnecting the power pack.
- Do not use a battery pack or appliance that is damaged or modified. Damaged or modified batteries may exhibit unpredictable behavior resulting in fire, explosion or risk of injury.
- Do not operate the power pack with a damaged cord or plug, or a damaged output cable.
- Do not disassemble the power pack, take it to a qualified service person when service or repair is required. Incorrect reassembly may result in a risk of fire or electric shock.
- To reduce the risk of electric shock, unplug the power pack form the outlet before attempting any instructed servicing.
- PERSONAL PRECAUTIONS
- Have plenty of fresh water and soap nearby in case battery acid contacts skin, clothing, or eyes.
- Wear complete eye protection and clothing protection. Avoid touching eyes while working near battery.
- If battery acid contacts skin or clothing, wash immediately with soap and water. If acid enters eye, immediately flood eye with running cold water for at least 10 minutes and get medical attention immediately.
- NEVER smoke or allow a spark or flame in vicinity of battery or engine.
- Be extra cautious to reduce risk of dropping a metal tool onto battery. It might spark or short-circuit battery or other electrical part that may cause explosion.
- When charging the internal battery, work in a well ventilated area and do not restrict ventilation in any way.
- Under abusive conditions, liquid may be ejected from the battery; avoid contact. If contact accidentally occurs, flush with water. If liquid contacts eyes, additionally seek medical help. Liquid ejected from the battery may cause irritation or burns.
- Do not expose a power pack to fire or excessive temperature. Exposure to fire or temperature above 130°C may cause explosion. The temperature of 130°C can be replaced by the temperature of 265°F.
- Have servicing performed by a qualified repair person using only identical replacement parts. This will ensure that the safety of the product is maintained.
SAVE THESE INSTRUCTIONS OPERATING INSTRUCTIONS
- Use and store the unit only in a clean and dry environment. DO NOT use and store in dusty and wet environment.
- Check the unit prior to every use. DO NOT use the unit if it is damaged, broken.
- If rust, peculiar odors, overheating or other abnormal circumstances are observed, stop using the unit immediately and contact the dealer or our customer service center.
- Make sure that the unit is properly secured when transporting it in a motor vehicle.
- Only charge the Explorer 1000 Plus within a ambient temperature 0~45°C (32~113°F), discharge temperature is -10~45°C (14~113°F) and Storage temperature is 1 year: 0~25°C (32~77°F).
- Switch the unit off immediately if it has accidentally fallen, was dropped or was exposed to vibrations.
- DO NOT use the unit if the power cord is damaged or broken.
- Keep the unit away from children. DO NOT let children use the power supply unit. Keep this product away from pets.
- DO NOT use the unit in an area or environment with high temperature.
- Should fluid from inside of the unit come in contact with your skin or clothing, wash the affected areas with tap water.
- In a storm, unplug the power cord from the socket.
- DO NOT place the unit on its side or upside down while in use or storage.
- DO NOT use accessories for other usage.
- Make sure that the device you are connecting is switched off before you connect it.
- DO NOT expose a power pack to fire or excessive temperature. Exposure to fire or temperature above 130°C may cause explosion.
- Solar charge times depend on weather conditions, place your solar panel where it will get as much direct sunlight as possible.
- DO NOT place the power pack on the floor, or at a height less than 457 mm (18 inches) above the floor, during use in a repair facility.
Do not remove the battery pack without permission, If you need to repair the battery pack contact your local manufacturer as soon as possible.

This device is for indoor use only (e.g. RV/tent/off-grid cabin, etc.). Do not use outdoors under any circumstances (e.g. where exposed to rain or snow or use it in wet environments by the sea or waterways).
MOVING AND STORAGE INSTRUCTIONS
- DO NOT move the unit if it is recharging or in use.
- DO NOT dispose the unit together with household waste.
- DO NOT place the unit close to or in a fire or expose it to heat. Keep out of direct sunlight.
- DO NOT store the unit in a bathroom or in an area exposed to rain or moisture.
- DO NOT disassemble the power pack, take it to a qualified service person when service or repair is required. Incorrect reassembly may result in a risk of fire or electric shock.
- DO NOT store the unit in an area or environment with high temperature.
USER MAINTENANCE INSTRUCTIONS
When using it for the first time, please fully charge the device before use. If this product is stored for a long period of time (3 months - 6 months) with the power depleted, its performance will deteriorate and may even become unchangeable. If this device is stored for a long time, please check the power regularly and charge it to about 60% to 80%.
Contact us:
hello@jackery.com
1-888-502-2236 (US)
Documents / Resources
References
Download manual
Here you can download full pdf version of manual, it may contain additional safety instructions, warranty information, FCC rules, etc.
Download Jackery Explorer 1000 Plus (JE 1000C) - Power Station Manual
Advertisement


Need help?
Do you have a question about the Explorer 1000 Plus and is the answer not in the manual?
Questions and answers