Zojirushi Micom NEURO FUZZY NS-ZCC10 / NS-ZCC18 - Rice Cooker Manual
- Operating instructions manual (27 pages) ,
- Operating instructions manual (26 pages) ,
- Operating instructions manual (27 pages)
Advertisement
- 1 PARTS NAMES AND FUNCTIONS
- 2 HOW TO SET THE CLOCK
- 3 BEFORE COOKING RICE
- 4 HOW TO COOK RICE
- 5 HOW TO COOK RICE (COOKING PRE-WASHED RICE)
- 6 KEEP WARM /TIPS AND HINTS
- 7 TIPS AND HINTS
- 8 CLEANING
- 9 HOW TO COOK TASTY RICE
-
10
TROUBLE SHOOTING GUIDE
- 10.1 Rice is too - hard
- 10.2 Rice is half - cooked (remaining hard)
- 10.3 Rice is too soft
- 10.4 Rice is scorched too much
- 10.5 Boiling over while cooking
- 10.6 The unit does not work
- 10.7 There was a power failure
- 10.8 The Reheat function does not work
- 10.9 The unit makes cluttering noises during cooking
- 11 SPECIFICATIONS
- 12 RECIPES
- 13 IMPORTANT SAFEGUARDS
- 14 Documents / Resources
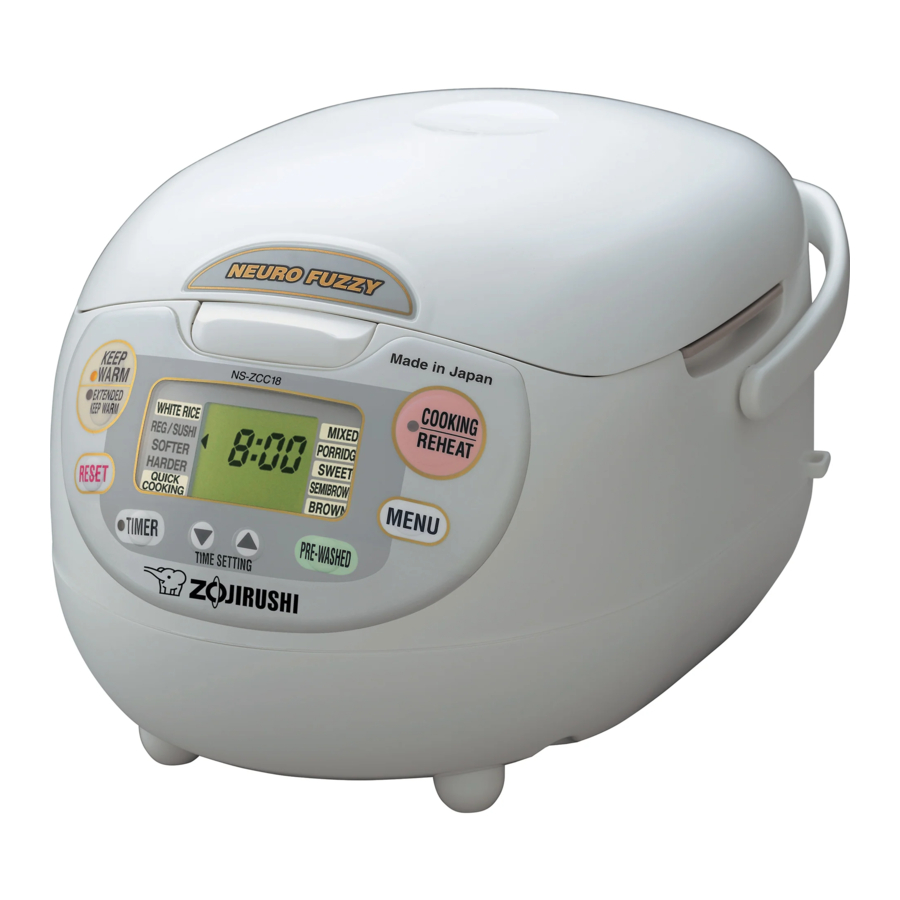
PARTS NAMES AND FUNCTIONS

How to attach or remove the Inner Lid
To attach: Insert the fixtures found on the both sides at the bottom of the Inner Lid into the Outer Lid and push it up until it is securely in place.

To remove: Pull the Inner Lid knobs found on the top towards you.

Attachments

Control Panel

- Press keys down till the melody/beep sound is heard.
- Do not touch the keys when opening or closing the lid.
- The raised dot and dash (
![]() ) beside the Cooking/Reheat and Reset Keys are provided for the use of persons with visual impairments.
) beside the Cooking/Reheat and Reset Keys are provided for the use of persons with visual impairments.

How to change the sound from a melody to a beep sound
Follow the below procedures for changing the sounds telling you when the Cooking key has been pressed and when cooking has completed. (The factory setting is at Melody.)
- Set the Inner Pan and insert the power cord to the outlet.
![]()
- Press the Timer Key for more than 3 seconds and the sound changes every time you press the key.
![]()
- Stop pressing the key when desired sound is chosen.


Altering sounds between Melody and Beep

- You can not alter the melody sound when you begin the Reheat Mode.
- Changes can be made while in the Cooking or Keep Warm Mode.
- When the change of the sound is not successful, try again from.
The type of melody and when it sounds:
- When the Cooking is started /When the Timer Cooking is set ► Twinkle, Twinkle, Little Star
- When the Cooking is completed /When the Reheat is completed ► Amaryllis
HOW TO SET THE CLOCK
It is important to first set the clock when cooking rice using the Timer. Although the clock is set before shipment from the factory, under certain conditions, such as fluctuating room temperatures, may cause it to display an inaccurate time. If the clock is not accurate, set the correct time as shown below.
<Example> When current time is 15:01, and the clock displays 14:58.
- Place the Inner Pan into the Main Body and insert the power cord.
![]()
- Press the Time Setting Key to flash the time display.

- Adjust the time by pressing the Time Setting Key.
![]() Key: Each press advances the time by 1 minute.
Key: Each press advances the time by 1 minute.
![]() Key: Each press moves the time backward by 1 minute.
Key: Each press moves the time backward by 1 minute.


 Key: Each press advances the time by 1 minute.
 Key: Each press moves the time backward by 1 minute.
- Keeping the key pressed will speed up the process by 10 minutes.
BEFORE COOKING RICE
How to wash rice (it is not necessary to wash Pre-Washed rice)
- The first wash should be done quickly with plenty of water, disposing of the water immediately afterwards. Then change the water and wash the rice 4 - 5 times to clean out the bran.
![]()

Alkaline ionic water
- Rice washed in water with a high alkaline content may seem yellow or glutinous when cooked.
Water adjustment
- Adjust the amount of water according to the type of rice you want to cook.
Type of rice Water measurement Softer White rice with germ Normal scale level New crop Decrease the scale level Old crop Harder Increase from the scale level
- Be sure the amount of water is ajusted for the amount of rice you cook. If the amount of water you prefer to put is slightly more than the standard, select Softer menu (to prevent water from boiling over).
Semibrown rice and White rice with germ
This cooker can cook Semibrown rice and White rice with germ. Below outlines what is considered as Semibrown rice and White rice with germ.

Choosing Pre-Washed rice (Musen mai)
With this product, you can select between two courses, one for cooking ordinary white rice which requires washing and the other for cooking Pre-Washed rice. When the rice you want to cook is Pre-Washed rice, select Pre-Washed rice course.

- If Pre-Washed rice course is not selected, the rice may not cook properly.
What is Pre-Washed rice(Musenmai)?
Pre-Washed rice(Musenmai) is a new type of rice that does not require washing. Present rice milling machines can not completely polish away bran and residues from the rice surface. For this reason, it is recommended to wash the rice before cooking. Recently, a new milling technology has been developed in Japan. This process eliminates the bran and residues from the rice without sacrificing the quality.
- Use the special measuring cup (green cup) provided when cooking Pre-Washed rice.
- If the measuring cup for Pre-Washed rice is missing, refer to "HOW TO COOK TASTY RICE"
- See cooking capacity of Pre-Washed rice.
Measuring cup for Pre-Washed rice

To select Pre-Washed Rice:
- Press the Pre-Washed rice Key.
![]()
- Pre-Washed rice can not be selected if you have chosen to cook the Sweet rice, Semibrown rice or Brown rice, (The alarm will sound 4 times (beep, beep, beep, beep.)
- "PRE-WASHED" will be indicated on the Display.
![]()
- Selection of Pre-Washed rice is complete.


To cancel Pre-Washed Rice:
- Press the Pre-Washed rice Key.
![]()
- "PRE-WASHED" will disappear from the Display.
![]()
- Cancellation of Pre-Washed rice is complete.


HOW TO COOK RICE
- Measure the rice accurately.
Measure the rice using the measuring cup provided and level it off for White rice (Semibrown rice, Brown rice, Sweet rice). Measuring cup for White rice (Semibrown rice, Brown rice, Sweet rice) (approx. 180ml)
![]() HOW TO COOK RICE (COOKING PRE- WASHED RICE).
HOW TO COOK RICE (COOKING PRE- WASHED RICE).
![]() Using anything other than the provided measuring cup to measure rice may produce slight variations in the finished cooked rice.
Using anything other than the provided measuring cup to measure rice may produce slight variations in the finished cooked rice.
![]()


- Wash rice, and adjust the amount of water.


- Adjust the amount of water by the level scales according to the menu you choose. See "HOW TO COOK TASTY RICE".
- Place the Inner Pan on a level surface for accurate measurement.
- Rice can be washed in the Inner Pan. eoo not use hot water to wash or cook rice.
- Place the Inner Pan in the Main Body, close the Outer Lid, and plug in.

- Make sure to wipe off water or residue on the outside, as well as the surface of the Heating Plate. Not doing so may cause corrosion as well as noise during cooking, preventing the rice from cooking properly.
- Pressing the Cooking / Reheat Key before placing the Inner Pan in the Main Body sounds the alarm (beep, beep, beep, beep) and displays H04 for 5 seconds. If this happens check to make sure that the Inner Pan is placed securely on the bottom.

- Select the texture of your rice using the Menu Key, and press the Cooking/ Reheat Key.
- You can start cooking rice as soon as the water is adjusted. Rice does not need to be soaked beforehand.
- Press the Cooking / Reheat Key after making sure that the Keep Warm Lamp is off. Reheat function sets in when the Keep Warm Lamp is on.
- Select the texture of your rice using the Menu Key.
![]()
- Each press changes the position of the ◄ .
(You can speed up the process by keeping the key pressed.)
![]()
- Each press changes the position of the ◄ .
- Press the Cooking / Reheat Key.
![]()
![]()
The remaining time till completion is displayed.
During the final steaming process, the remaining time is displayed.
![]()


Choices for cooking White rice
This product can change the texture of cooked White rice. Water should be set to the level for cooking White rice. Then, select REG/SUSHI, SOFTER or HARDER according to the MENU choices. Rice will cook according to the texture you choose.
SOFTER: Glutinous, soft and full, suitable for making rice croquettes, rice dumplings covered with bean jam, etc.
HARDER: Crisp elasticity, suitable for meals such as curry, etc.
Cooking Sushi rice
Adjust the amount of water according to the water level marks for sushi rice and begin cooking by selecting REG/SUSHI on the Menu Key.
Sushi rice: Crisp elasticity, suitable for meals such as Chirashi - Sushi etc.
Memory Menu:
The texture you choose when you decide how to cook the rice, REG/SUSHI, HARDER, SOFTER as well as SEMIBROWN and BROWN, will be retained in memory until the next time you change it.
Quick Cooking Menu:
Quick Cooking Menu can be used to shorten cooking time. The rice may be slightly harder than normal.
- Do not open the Outer Lid while cooking rice. Rice will not cook properly.
- If you prefer your rice softer than the SOFTER Menu, fill the water slightly higher than the marked line on the Inner Pan (within 1/2 of a scale) and cook with the SOFTER Menu. Please note however that if too much water is used it may boil over.
- Rice pre-soaked in water may turn out slightly softer.
- If cooking rice consecutively, do so after the Main Body, Outer Lid and Inner Lid have cooled down. (Hot parts may make it difficult to cook the rice properly.)
- Do not start the cooking process if the rice and water are not properly set in the Inner Pan. This may cause a mechanical breakdown.
- Rice is finished cooking when melody (beep) sounds.
Stir and loosen the rice.


NOTES &

- According to the cooking conditions, the rice on the bottom of the Inner Pan may be slightly browned.
- The center of the cooked rice may cave in. This is due to the way rice cooks from the outside in.
- Rice left in the Inner Pan without being stirred may not be fluffy or tasty.
- Any grains of rice which may fall into the back side of the push button should be removed. It may prevent the lid from opening.
- Press the Reset Key and unplug after using.
![]()

Standard rice cooking times
| Regular rice | Pre-Washed rice | ||||
| 1.0L size | 1.8L size | 1.0L size | 1.8L size | ||
| Choices in cooking white rice | Regular | 48~55 minutes | 47~56 minutes | 48~53 minutes | 48~60 minutes |
| Softer | 52~56 minutes | 51 ~60 minutes | 55~58 minutes | 53~65 minutes | |
| Harder | 37~44 minutes | 36~48 minutes | 41 ~48 minutes | 40~55 minutes | |
| Quick Cooking (white rice) | 36~42 minutes | 35~45 minutes | 37~43 minutes | 34~48 minutes | |
| Mixed rice | 57~61 minutes | 57~63 minutes | 56~62 minutes | 56~60 minutes | |
| Sushi rice | 48~55 minutes | 47~56 minutes | 48~53 minutes | 48~60 minutes | |
| Porridge | 56~64 minutes | 53~64 minutes | 55~62 minutes | 53~64 minutes | |
| Sweet rice | 45~46 minutes | 44~49 minutes | - | - | |
| Semibrown rice | 55~57 minutes | 53~59 minutes | - | - | |
| Brown rice | 84~107 minutes | 82~108 minutes | - | - | |
- The above table is based on 120 Voltage, water at a starting temperature of 64.4°F, and at a room temperature of 68°F.
- The time depends on the voltage, room temperature, season and amount of water.
- Mixed rice requires more cooking time till completion than White rice.(About 30 minutes of Pre-Heating time is required.)
HOW TO COOK RICE (COOKING PRE-WASHED RICE)
- Measure the rice accurately using the provided measuring cup for Pre-Washed rice.
 - Step 1")
- See cooking capacity of Pre-Washed rice.
 - Step 1")
- Put the rice and water in the Inner Pan, and stir gently a few times.
![]()
- Stirring the rice and water after it is in the Inner Pan allows each grain of rice to mix with the water. The water becomes white when stirring due to the rice starch, not from rice bran. If it appears too thick, change the water and rinse the rice . Cooking the rice in thick white water may cause rice to scorch.
- Adjusting the water without stirring may cause the finished rice to get hard or cause scorching.

- Adjust water.
This illustration shows the Inner Pan of 1.8 liter.
 - Step 2")
 - Step 2")
- Select Pre-Washed rice by pressing the Pre-Washed rice Key and choose the menu by pressing the Menu Key.
 - Step 3")
- Cooking Pre-Washed rice does not allow for selecting from Sweet rice, Semibrown rice or Brown rice.
See Pre-Washed rice choices.
*Rice may not cook properly if you do not choose Pre-Washed rice course.
- Cooking Pre-Washed rice does not allow for selecting from Sweet rice, Semibrown rice or Brown rice.
- Press Cooking/ Reheat Key.
 - Step 3")
KEEP WARM /TIPS AND HINTS
Regular Keep Warm / Extended Keep Warm
Keep Warm
Where to press the key
Press the respective place when using the Keep Warm Key and Extended Keep Warm Key.

Regular Keep Warm
(This illustration shows that 5 hours has elapsed in Keep Warm Mode)

- lf you want to know the current time during Keep Warm Mode, press the Time Setting Key. The display will switch to the current time. (If you want to display the Keep Warm Mode time the next time you cook rice, you need to press the Time Setting Key again.)
- When keeping warm a small amount of rice, to prevent rice from drying, gather the rice toward the center of the Inner Pan.
- Do not use the Keep Warm Mode in the following cases: Doing so may cause bad odors, drying out or discoloring.
- Do not keep rice warm for more than 12 hours.
- Do not keep rice which has already been cooled or add cold rice to warm rice.
- Do not keep food except white rice warm.
- Do not leave a spatula in the Inner Pan during keep warm.
- The cooked rice may get cold or alter in quality under the condition that the unit is unplugged and the rice is left in the Inner Pan.
- 1f you cancel the Keep Warm Mode, then re-set it to Keep Warm, the display will return to "o".
Extended Keep Warm
You can use this function during regular Keep Warm Mode. With extended keep warm function, the rice is kept at a slight lower temperature (approx 140°F) to reduce dryness, discoloration or odor.

- The Extended Keep Warm Mode can not be used if you have already been using the regular Keep Warm Mode for 12 hours or more.
- When more than 8 hours have elapsed in Extended Keep Warm Mode, it will automatically return to the regular Keep Warm Mode.
- If you cancel the Extended Keep Warm Mode after more than 4 hours, you will not be able to reset it to Extended Keep Warm. (The alarm (beep, beep, beep, beep) will sound and reject the mode when you try setting the Extended Keep Warm Mode again.)
- The Extended Keep Warm Mode can not be set if the temperature of Inner Pan is too low. (The alarm (beep, beep, beep, beep) will sound.)
- The Extended Keep Warm Mode can not be used for Mixed rice, Sweet rice, Porridge, Semibrown rice, Brown rice. (The alarm (beep, beep, beep, beep) will sound and reject the mode.)
Reheat Function
You can use this function during Regular Keep Warm Mode or Extended Keep Warm Mode. This Reheat function is for reheating the rice during keep warm to make the rice hotter. Particularly, when the rice is kept warm at a lower temperature (140°F) by the Extended Keep Warm function, the Reheat function will reheat the rice to the best temperature for eating.
- Loosen and level the surface of the kept warm rice.
![]()

- Be sure to loosen the rice to avoid scorching or rice becoming hard.
- When you want to reheat a small amount of rice, add 1 tablespoon of water per a bowl of rice (approx. 5.Soz.), loosen it, and gather the rice toward the center of the Inner Pan to avoid dryness.
- Press Cooking/Reheat Key.


- Make sure that the Keep Warm/Extended Keep Warm Lamp is on. If the Cooking/Reheat Key is pressed when the Keep Warm/Extended Keep Warm Lamp is off, the rice cooking function will start.
Standard times required for reheating
Reheat process may take about 5·7 min. for Regular Keep Warm setting, and 5-8 min. for Extended Keep Warm setting.
- The remaining time is displayed for the last 5 minutes till the reheating is complete.
- Loosen the rice.
- Loosen and level the surface of the rice, as the rice at the bottom may be harder.
To cancel the Reheat Mode. - Press the Reset Key.
To cancel the Reheat Mode and return to Keep Warm Mode. - Press the Keep Warm Key.
Do not reheat for the following cases. - Do not use the reheat function except for white rice because it may cause scorching or discoloring.
- Do not repeat the reheat function because it may cause scorching or dryness.
- Do not use the reheat function when the amount of rice is over WHITE RICE water level 3(for 1.0L size )or 6 (for 1.8L size) because the rice may not be warmed adequately.
- Do not use the reheat function when the rice is cold or the temperature of the Inner Pan is too low because it may cause scorching or oxidation.
- Loosen and level the surface of the rice, as the rice at the bottom may be harder.
TIPS AND HINTS
How to Set the Timer for Cooking rice
Cooking rice completes automatically at the time you want to eat.
The Timer setting memory function:
The Timer can be preset with two different time settings. Each press of the Timer Key alters the display of the time setting between 1 and 2.
Set the Time for when you want to eat Example: Finish cooking at 7:30
- Confirm the current time on the display is correct.
- If the current time is not correct, the rice will not finish cooking at the desired time.
- Press the Timer Key.
*The Timer is automatically set at 6:00 at the time of shipment from factory. (Pressing the Timer Key one more time displays the second pre-set time, 18:00.)
![]()
![]()


- Press the Menu Key to select either the texture of White rice, or Porridge, Semibrown rice or Brown rice.
*Ouick cooking/ Mixed rice/ Sweet rice can not be used with the Timer. - Press the Reset Key, and press CookingPress either the
![]() or
or ![]() Key to set the Time you want to eat.
Key to set the Time you want to eat.
![]() Key: Each press advances in increments of 10 minutes.
Key: Each press advances in increments of 10 minutes.
![]() Key: Each press moves the time backwards in units of 10 minutes. Keeping the key pressed speeds up the process in units of 10 minutes.
Key: Each press moves the time backwards in units of 10 minutes. Keeping the key pressed speeds up the process in units of 10 minutes. - Press the Cooking / Reheat Key.
*Melody (beep) Sounds. The Timer will not start working unless you press the Cooking / Reheat Key.
*With the above procedure, the preset time of TIMER [I]will be changed from 6:00 to 7:30.


Cooking Pre-Washed rice Using The Timer
The water may become white when you put Pre-Washed rice and water in the Inner Pan due to rice starch mixing with the water. Cooking the rice in the" water which becomes white may cause rice to scorch as the starch settles to the bottom. If you do not like it, change the water a couple of times and rinse the rice to remove the starch. Water temperature rises in the summer time. Pre-Washed rice soaked in water may degenerate quicker when the water temperature is more then 77°F. In this case, wash the rice well and avoid setting the, Timer for more than 8 hours.
Using the preset time (1 or 2) to cook
- Press the Timer Key.
To change the menu, press the Menu Key to select the menu of your choice.
![]()
- Press the Cooking/ Reheat Key.
Melody (beep) sounds.
The Timer will not start working unless you press the Cooking / Reheat Key.


Recommended time period for cooking rice when using the Timer
| Menu | Recommended time period for cooking rice when using the Timer | ||
| Regular rice | Pre-Washed rice | ||
| White rice | Regular / Sushi | 1 hour and 1 minute ~13 hours | 1 hour and 1 minute ~ 13 hours |
| Softer | 1 hour and 1 minute ~13 hours | 1 hour and 6 minutes ~ 13 hours | |
| Harder | 1 hour and 1 minute ~13 hours | 1 hour and 1 minute ~ 13 hours | |
| Porridge | 1 hour and 11 minutes ~13 hours | 1 hour and 11 minutes ~13 hours | |
| Semibrown rice | 1 hour and 1 minute ~13 hours | - | |
| Brown rice | 1 hour and 51 minutes ~13 hours | - | |
- If the time difference between the current time and the set time is less than the above recommended time period, the alarm sounds 4 times (beep, beep, beep, beep), and the cooking starts immediately.
*Rice may become softer when cooking with the Timer. - It is preferable to not set the timer for more than 13 hours in order to prevent degeneration of the rice due to excessive soaking. Please be mindful of this when the room temperature is high, as in the summer.
NOTE
- The remaining time will not be displayed.
- Press the Reset Key to cancel the Timer.
- The timer does not need to be set if you do not change the preset times.
- To display the current time, while the Timer is on, press
![]() or
or ![]() Key.
Key.
CLEANING
Cleaning Each Part
Unplug the cooker from the outlet and allow the unit to cool down before cleaning.
Inner Pan / Spatula / Inner lid/ Spatula Holder  | Soak in warm or cold water, and wash with a sponge. *The top portion of the Inner Pan may rust if soaked in water too long. * Inner Lid Gasket can not be removed. |
Power cord/ Appliance Plug | Wipe with a dry and soft cloth. |
Inside of the Outer Lid and Main Body | Wipe with a well-wrung damp cloth. (Wipe off any residue on the inside of the Outer Lid with holding the Outer Lid.) |
Surface of the Outer Lid and outside of the Main Body | Wipe with a cloth soaked in a liquid detergent and wrung well. But wipe the control panel clean with a dry and soft cloth. (Be sure to remove fresh rice or any residue if they go into the surroundings of the Hook Button.) |
Heating Plate / Center Sensor Heating Plate Center Sensor | Wipe off with a cloth soaked in lukewarm water and wrung well. (If grains of rice or any objects are stuck to the Heating Plate, lightly polish them off with Sand paper (of about #320) dipped in water. Then wipe with a damp cloth.) Remove grains of rice or any other objects with a bamboo spatula or chopstick. |
NOTE
- Do not clean with thinner, benzene, bleach, abrasive cleansers or anything that may damage the surface of the unit.
- When using a chemically treated cloth, do not scrub the unit strongly or allow the cloth to contact the unit for a long period of time.
- Do not use sandpaper on anything other than the Heating Plate or Center Sensor.
Nonstick Inner Pan:
The lnner Pan is coated with a nonstick surface for easy cleaning. To protect the nonstick surface, avoid the following:
Do not use the Inner Pan for dish washing.
Do not use vinegar in it.
Clean the Inner Pan immediately after using any seasonings.
Do not use brushes or abrasive cleansers to clean.
- Nonstick coating may discolor after long use. This will not affect the nonstick quality or sanitary properties.
- Contact our authorized service center or ZOJIRUSHI customer service when the Inner Pan or the Inner Lid is deformed or corroded.
HOW TO COOK TASTY RICE
- Measure rice using the measuring cup provided and level it off. For Regular rice: Use the measuring cup for White rice (Semibrown rice, Brown rice, Sweet rice) For Pre-Washed rice : Use the measuring cup for Pre-Washed rice (green cup)
- Water for both regular rice and Pre-Washed rice should be adjusted using the same water level scales.
[Pre-Washed rice]
- Select PRE-WASHED by pressing the Pre-Washed rice Key.
Rice:
Measure the rice using the measuring cup for Pre-Washed rice. For best results, cook less than 4 cups for a 1.0L size cooker, 8 cups for a 1.BL size cooker. Cooking more rice than this may not result in tasty rice.
Water adjustment:
White rice  Adjust the water at the water level scales for WHITE RICE.
Mixed rice Adjust the water at the water level scales for WHITE RICE.
Sushi rice Adjust the water according to the water level marks for SUSHI RICE.
Porridge Adjust the water at the water level scales for PORRIDGE.
Menu choice: Select from the following menu choices. (REG/SUSHI, SOFTER, HARDER, QUICK COOKING for WHITE RICE, MIXED, PORRIDGE)
- Quickly rinse the rice a few times before cooking.
- If you do not like scorching, rinse just before cooking.
- In case you have lost the measuring cup for Pre-Washed rice, use the measuring cup for white rice (Semibrown, Brown, Sweet rice), adjusting the amout of water by filling it slightly above the water level scale.
[Mixed rice cooked]
Rice: For best results, cook less than 4 cups for a 1.0L size cooker, 6 cups for a 1.BL size cooker. Cooking more rice than this may not result in tasty rice. The amount of rice should be no more than 4 cups for a 1.0L pot, 6 cups for a 1.BL size. If the amount of rice exceeds this, it may not cook properly. (may overflow)
Water adjustment: Adjust the water at the water level scales for WHITE RICE.
Ingredients: The appropriate amount of ingredients should be about 30~50% of the rice volume. Too much ingredients may cause the rice to not cook properly. (1 cup of rice = approx. 5.3oz.) Chop them into small pieces, and put them on top of rice without mixing them into the rice.
Menu choice: Select MIXED
[Sweet rice]
Rice: Wash and place in a bamboo basket for about 30 minutes to drain the water.
Water adjustment: Adjust to the water level scale for SWEET RICE.
When cooking only Sweet rice .... At the water level scale for Sweet rice.
When cooking Sweet rice mixed with White rice .... Slightly over the water level scale for Sweet rice.
Ingredients: Place them on top of rice after the water is adjusted.
Menu choice: Select SWEET
Mixed glutinous rice cooked with red beans....
Boil red beans, separate the beans from the boiling water, and use them after cooling down to room temperature. The remaining water from the beans should be used when you adjust the water for cooking.
[Porridge]
Rice (non-glutinous rice): Rice other than White rice can not be cooked properly.
Water adjustment: Adjust to the water level scale for PORRIDGE.
Ingredients: The appropriate amount of ingredients should be about 30~50% of the volume of rice. Chop them into small pieces and place them on top of rice without mixing them into the rice. Ingredients which do not cook easily should not be used in large amounts. Boil green vegetables separately and add them after the rice porridge is finished cooking.
Menu choice: Select PORRIDGE.
[Rice mixed with barley)
Water adjustment: Adjust to the water level scale for White rice.
Menu choice: Select SOFTER * The amount of barley mixed into White rice should be less than 20% of the whole amount. (It may not cook properly if there's too much barley.)
(Example) For cooking 1 cup of rice:
White rice: 0.8 cup Barley: 0.2 cup
[White rice with germ]
Water adjustment: Adjust to the water level scale for White rice.
Menu choice: Select REG /SUSHI or SOFTER.
- Wash the rice gently to not remove the germ. (Because germ is easily removed.)
[Semibrown rice]
Water adjustment:
Adjust to the water level scale for SEMI· BROWN RICE.
Menu choice: Select SEMIBROWN.
- Water can be adjusted according to your preference.
[Brown rice]
Water adjustment:
Adjust to the water level scale for BROWN RICE.
Menu choice: Select BROWN.
- Water can be adjusted according to your preference.
[Sushi rice]
Rice: Less than 8 cups for a 1.8L size cooker
Water adjustment: Adjust to the water level scale for SUSHI RICE.
Menu choice: Select REG/ SUSHI.
- Water can be adjusted according to your preference.
TROUBLE SHOOTING GUIDE
If the results of cooking are not satisfactory, please check the following points before calling for service.
| Problems /Cause (Points to check) | Rice and water were not measured correctly. | Cooked rice was not stirred and loosened. | Any objects are on the heating plate, center sensor or outside of the Inner Pan. | The Inner Pan or Inner Lid are deformed. | Rice was not washed thorough~ before cooking. (except Pre- Washed rice.) | Any objects are on the fringe of the Inner Pan or the Inner lid. | The Outer Lid was not closed firmly during cooking. | The Inner Lid is not attached proper~. | Rice was kept warm fornMlre than 12 hours (under the Regular Keep Warm process) or asmal amount of rice was kepi warm. | Cold rice was reheated ora spatula left in the Inner Pan during keep warm. | The unit was unplugged during cooking or the Reset Key was pressed. | Was the Inner Pan, Inner Lid or Outer lid deaned thoroughly? | The correct menu was not selected. |
Rice is too - hard |  | | | | | | | | | ||||
Rice is half - cooked (remaining hard) | | | | | | | | | | ||||
Rice is too soft | | | | | | | |||||||
Rice is scorched too much | | | | | | | |||||||
Boiling over while cooking | | | | | | | | | | ||||
| During Keep Warm, rice has an unusual odor, rice is discoloring, Rice is too dry or much dew on rice. | | | | | | | | | | | |
The unit does not work
(The keys will not work.)
- Was the Inner Pan correctly placed? - Place the Inner Pan correctly.
- Is the plug inserted properly?
- Is the Keep Warm Lamp on? - Press the Reset Key, and press Cooking / Reheat Key again.
There was a power failure
- If a power failure occurs for less than 10 minutes during cooking, the unit retains in memory its state before the power failure because of the lithium battery. As soon as power is restored to normal, the unit will continue cooking. (If the power failure has been for more than 10 minutes during cooking, the unit will go back to Reset Mode.)
The indications of the display appear incorrectly or the keys do not work.
- Unplug the unit from the outlet and insert it again. 7:00 starts blinking on the display. Reset the timer as well as the current time.
The Reheat function does not work
- Was the Keep Warm Mode cancelled?
The unit makes cluttering noises during cooking
- Heat adjustment by micro computer will cause this sound. It does not mean a malfunction.
The steam is leaking from the gap between the Outer Lid and the Main Body.
- Is the Inner Lid deformed, or is the Inner Lid gasket cut? Replace the Inner Lid or Inner Lid gasket. (Inquire at ZOJIRUSHl's customer service.)
- If the above-mentioned symptoms and solutions do not apply, please contact our authorized service center or ZOJIRUSHI customer service.
| Display Meanings | Symptom | Cause | Action |
| The beep sounds 4 times when the Cooking / Reheat Key is pressed, displaying either H01 or H02 on the Display Panel. (Only the Reset Key works.) | Interior High temperature | The lid sensor or central sensor temperature is too high. Wait till the unit cools down as the unit can not cook the rice properly in this condition. | |
| H04 is displayed on the Display Panel. | The Inner Pan is not placed into the Main Body. | Place the Inner Pan securely into the bottom of the Main Body. | |
| E01 or E02 is displayed on the Display Panel, and the keys do not work. | Breakdown | This is a breakdown. Contact our authorized service center or ZOJIRUSHI customer service. |
Changing the Lithium Battery
The lithium battery powers the clock and timer memory while the power cord is unplugged.
- Standard time period for changing batteries: Battery life is about 4 to 5 years at a room temperature of 68°F and when the unit is left unplugged.
- When the battery begins to weaken:
- The clock will show 7:00 and continue to blink when the unit is plugged into the outlet.
- The clock can be used normally if you reset the time. However, the indication on the display will disappear if you unplug the power cord.
- If this happens, contact our authorized service center or ZOJIRUSHI customer service.
NOTE
- To avoid causing damage or harm, do not attempt to replace the lithium battery by yourself.
SPECIFICATIONS
| Model No. | NS-ZCC10 | NS-ZCC18 | ||
| Rice Cooking Capacity | White rice / Quick Cooking (cups) | Regular rice | 0.18~1.0L (1~Approx. 5.5) | 0.18~1.BL (1~10) |
| Pre-Washed rice | 0.171~0.684L (1~4) | 0.171~1.368L (1~8) | ||
| Mixed rice (cups) | Regular rice | 0.18~0.72L (1~4) | 0.36~ 1.0BL (2~6) | |
| Pre-Washed rice | 0.171~0.684L (1~4) | 0.342~1.026L (2~6) | ||
| Sushi rice (cups) | Regular rice | 0.18~1.0L (1~Approx. 5.5) | 0.18~1.44L (1~8) | |
| Pre-Washed rice | 0.171~0.684L (1~4) | 0.171~1.368L (1~8) | ||
| Porridge (cups) | Regular rice | 0.09~0.27L (0.5~1.5) | 0.09~0.45L (0.5~2.5) | |
| Pre-Washed rice | 0.086~0.257L (0.5~ 1.5) | 0.086~0.428L (0.5~2.5) | ||
| Sweet rice (cups) | 0.18~0.72L (1~4) | 0.36~1.0BL (2~6) | ||
| Semibrown rice / Brown rice (cups) | 0.18~0.72L (1~4) | 0.36~1.44L (2~8) | ||
| Rating | 120V680W | 120V 1000W | ||
| Average Power Consumption during Keep warm | 37W | 47W | ||
| Rice Cooking System | Direct Heating | |||
| Power Cord | Lenath: 1.1m | |||
| External Dimensions (inches) Wx D x H | Approx.10XApprox.13XApprox.8.1 I | Approx.11XApprox.14.2XApprox.9.4 | ||
| Weiaht | Approx. 6.4Ibs. I | Approx. 8.2Ibs. | ||
- The average power consumption during the Keep Warm mode is the value of the maximum rice cooking capacity at a room temperature of 68°F.
- The external dimensions are indicated by width x depth x height.
- As this product may not operate properly at certain places such as, high elevation areas and severely cold areas, please avoid using this product in such areas.
RECIPES
When cooking Pre-Washed rice:
- Select "Pre-Washed rice" by pressing the Pre-Washed rice Key.
See Pre-Washed rice.
See Cooking Pre-Washed rice.
Measuring unit:
- Tbsp. = 15ml
- tsp. = 5ml
- Use the attached measuring cup to measure rice.
Regular rice![]() Use the measuring cup for White rice (Semibrown rice I Brown rice I Sweet rice) [1 cup= 180ml)
Use the measuring cup for White rice (Semibrown rice I Brown rice I Sweet rice) [1 cup= 180ml)
Pre-Washed rice![]() Use the measuring cup for Pre-Washed rice [1 cup = 171 ml)
Use the measuring cup for Pre-Washed rice [1 cup = 171 ml)
Mixed Rice
lngredients(4 ~ 5 servings)
Rice 3 cups
Chicken meat (or dried young sardines) 1.5oz.
"Age"(fried tofu) Half a piece
Carrot 1 oz.
Konnyaku 1 oz.
Gobo small size (half a piece)
Dried shiitake mushroom 2 ~ 3 pieces
- Light soy sauce 1-1/2Tbsp.
Mirin (sweet sake) 1-1/2Tbsp.
Salt 1 /2tsp.
Dashinomoto 1/2tsp.
Soup taken from soaking dried shiitake To taste
Kidney beans or stone parsley (boiled) To taste
How to cook
- Cut chicken in 0.5 inch cubes and 'Age' in strips. Put 'Age' in strainer, pour hot water and squeeze to drain excess oil. Soak chicken and 'Age' in soup stock (A) for 5 minutes.
- Cut carrot and 'Konnyaku' in small strips, pour hot water over carrot and 'Konnyaku ' and drain. Shred 'Gobo', soak in water to soften and drain. Soak 'Dried Shiitake' mushrooms in water to soften.remove hard tips and then cut into small strips.
- Wash rice well, pour in soup of step 1) as well as the water from the soaked 'Dried Shiitake' mushrooms into the Inner Pan and add water up to scale level 3 of 'WHITE RICE'. Then add the ingredients of step 1) and 2) into the Inner Pan.
- Place the Inner Pan in the Main Body, close the Outer Lid and plug in.
- Press the "MENU" Key, select "MIXED" and press the "COOKING/REHEAT" Key to start cooking.
- Upon completion of cooking and when the cooker has switched to the "KEEP-WARM" mode, mix and loosen the rice.
![]()
Do not stir once you have placed the ingredients on top of the rice or sweet rice. This may not produce the desired results. Take care as well not to put in too much rice or other ingredients as doing so may not produce the expected results. (See HOW TO COOK TASTY RICE.)
Short-necked Clam Rice
lngredients(4 ~ 5 servings)
Rice 3 cups
Short-necked clam (with shells) 1.5 ~ 21bs.
Wakame seaweed (soaked lightly in water) 0.5oz.
- Salt 1,2tsp.
Light soy sauce 1-1 /2Tbsp.
How to cook
- Clean the sand from the short-necked clams and place them into 3 cups of boiling water. Remove from heat when the shells open. Take the contents out of the shells.
- Cut the wakame into small pieces.
- Wash rice well, pour in the soup which was used to boil the short -neck clams(pour through a cloth to filter any remaining sand) and add (A). Then add water up to scale level 3 of "WHITE RICE" and mix well.
- Place the Inner Pan in the Main Body, close the Outer Lid and plug in.
- Press the "MENU" Key, select "MIXED" and press the "COOKING/REHEAT" Key to start cooking.
- Upon completion of cooking and when the cooker has switched to the "KEEP-WARM" mode, open the Outer Lid, add ingredients of step 1) and 2), mix them well with the rice.
Paella
lngredients(4 ~ 5 servings)
Rice 3 cups
Prawn 4 ~ 6 pieces
Hard clams (mull clams, if available) 4 ~ 6 pieces
Squid 5.5oz.
Green peppers 3pieces
Olive oil 2Tbsp.
Salt 1/2tsp.
- Consomme 1 cube
Saffron 1/2tsp.
(Tumeric can be substituted 1/2tsp.)
How to cook
- Peel off the shell of prawns and remove the entrails. Remove sand from the clams and wash. Cut squid into small pieces. Cut green peppers into small cubes.
- Stir fry ingredients of step 1) in olive oil, season with salt and cover with lid until the clam shells open up.
- Crush the consomme cube to powder.
- Wash rice well, mix and add (A) into the Inner Pan. Then add water up to scale level 3 of "WHITE RICE" and mix well.
- Place the Inner Pan in the Main Body, close the Outer Lid and plug in.
- Press the "MENU" Key, select "MIXED" and press the "COOKING/REHEAT" Key to start cooking.
- Upon completion of cooking and when the cooker has switched to the "KEEP-WARM" mode, open the Outer Lid, add ingredients of step 2) along with 2 Tbsp. of the broth, mix them well with the rice.
Sweet Rice Cooked with Red Beans
lngredients(4 ~ 5 servings)
Salt with parched sesame To taste
Sweet rice 3 cups
Red beans 1.5oz.
How to cook
- Wash the sweet rice and set in a strainer for more than 30 minutes to drain excess water thoroughly.
- Wash the red beans and place in another pot. Add 2 cups of water and bring to a boil for about 2 minutes until the water bubbles up. Add 3 cups of water, boil for about 20 minutes until beans are tender enough to crush when squeezed, but before the skins begin to crack open. Remove beans from the broth.
- Put the ingredients of step 1) into the Inner Pan, pour the broth of step 2), add water into the Inner Pan up to scale level 3 of "SWEET RICE" and add the red beans of step 2).
- Place the Inner Pan in the Main Body, close the Outer Lid and plug in.
- Press the "MENU" Key, select "SWEET" and press the "COOKING/REHEAT" Key to start cooking.
- Upon completion of cooking and when the cooker has switched to the "KEEP-WARM" mode, mix and loosen the rice well. Sprinkle roasted sesame seeds and salt on top of the rice before serving.
- If you mix sweet rice with white rice for cooking, add in enough water to go a little higher than the level scale 3 for Sweet rice.
- When using pre-washed rice, measure amount of ordinary rice (pre-washed rice) by measuring cup for pre-washed rice.
Rice Porridge with Seven Herbs
lngredients(4 ~ 5 servings)
Rice 1 cup ·
Green vegetables (the seven herbs of spring, if available, or other green vegetables as substitutes) 2.5oz.
Salt A little
How to cook
- Wash and boil the vegetables. Then soak in cold water, squeeze the water, and cut into small pieces.
- Wash rice well , add water into the Inner Pan up to scale level 1 of "PORRIDGE".
- Place the Inner Pan in the Main Body, close the Outer Lid and plug in.
- Press the "MENU" Key, select "PORRIDGE" and press the "COOKING/REHEAT" Key to start cooking.
- Upon completion of cooking and when the cooker has switched to the "KEEP-WARM" mode, open the Outer Lid, add ingredients of step 1 with a small amount of salt and stir well.
Seven herbs of spring : (Japanese parsley, shepherd's purse, cottonweed, chickweed, henbit, turnip, garden radish)
Be sure to select "PORRIDGE" Menu when cooking rice porridge. Contents may boil over if chosen other menus. When cooking rice porridge into which green vegetables such as the seven herbs of the spring are mixed, boil green vegetables beforehand and add them to rice porridge after it is cooked . Green vegetables may change their colors or plug up the steam vent if they are added before cooking, resulting in the rice not cooked so well.
Semibrown Rice
lngredients(3 ~ 4 servings)
Semibrown rice 3 cups
How to cook
-
Wash the rice well, add water into the Inner Pan up to scale level 3 of "SEMIBROWN RICE".
-
Place the Inner Pan in the Main Body, close the Outer Lid and plug in.
-
Press the "MENU" Key, select "SEMIBROWN" and press the "COOKING/REHEAT" Key to start cooking .
-
Upon completion of cooking and when the cooker has switched to the " KEEP-WARM" mode, and mix loosen the rice well.
Water can be adjusted according to your preference.
Brown Rice
lngredients(3 ~ 4 servings)
Brown rice 3 cups
How to cook
- Wash the rice well , add water into the Inner Pan up to scale level 3 of "BROWN RICE".
- Place the Inner Pan in the Main Body, close the Outer Lid and plug in.
- Press the "MENU" Key, select " BROWN" and press the "COOKING/REHEAT" Key to start cooking.
- Upon completion of cooking and when the cooker has switched to the "KEEP-WARM" mode, and mix loosen the rice well.
Water can be adjusted according to your preference.
Chirashi-sushi
lngredients(4 ~ 5 servings)
Rice 3 cups
Vinegar mix
Vinegar 4Tbsp.
Sugar 3Tbsp.
Salt 1 tsp.
Ingredients
Carrot 0.50z.
Gobo small size (half a piece)
Bamboo shoot 1 oz.
Raw shiitake mushroom· 2 pieces
Chikuwa (a fish paste) 1
- Soup stock 120mI
Sugar 2 Tbsp.
Soysauce 1 Tbsp.
Mirin (or sake) 1 Tbsp.
Large Egg 2 - Mirin 1 tsp.
Salt a pinch
Stone parsley (boiled) or pepper leaf-buds To taste
Lotus root (pickled in vinegar) / dried laver / pink ginger (pickled in vinegar) To taste
Shrimp/ squid/ kidney beans (boiled) To taste
How to cook
- Wash the rice well, add water into the Inner Pan up to scale level 3 of "SUSHI RICE".
- Place the Inner Pan in the Main Body, close the Outer Lid and plug in.
- Press the "MENU " Key, select "REG/SUSHI " and press the "COOKING/REHEAT" Key to start cooking.
- Place the cooked rice into a wooden bucket which has been wiped down with a wet cloth, sprinkle the vinegar immediately, mix it over, and stir the rice roundly while fanning it to cool.
- Cut the carrot into fine pieces, shred Gobo, cut the bamboo shoot in small strips, cut raw shiitake mushrooms in thin strips, and cut the chikuwa in lengthwise then cut into small pieces. Boil these ingredients in the soup stock (A) until the soup is gone.
- Mix the ingredients of (B) and fry in a thin crepe, and slice into a small thin strips.
- Mix the ingredients of step 5) with the Sushi rice of step 4), sprinkle on the mitsuba, thinly sliced fried egg, lotus root (pickled in vinegar) and nori (seaweed). Decorate with shrimps, squid, field peas and top with pink ginger.
IMPORTANT SAFEGUARDS
WHEN USING ELECTRICAL APPLIANCES, BASIC SAFETY PRECAUTIONS SHOULD ALWAYS BE FOLLOWED, INCLUDING THE FOLLOWING:
- Read all instructions carefully.
- Do not touch hot surfaces. Use handles or knobs. Do not close or clog the steam vent opening under any circumstance.
- To prevent electrical shock hazards, do not immerse cord, plugs, or rice cooker, except inside pan, in water or any other liquid.
- Close supervision is necessary when the appliance is used by or near children.
- Unplug from outlet when neither the cooker nor warmer is in use, or before cleaning. Allow to cool before putting on or taking off any parts, and before cleaning the appliance. Make sure appliance is OFF when not in use, before putting on or taking off parts, and before cleaning.
- Do not use or operate the appliance with a damaged cord or plug or after the appliance malfunctions or has been damaged in any manner. Return the appliance to the nearest authorized service facility or dealer for examination, repair, or adjustment.
- The use of accessories attachments not recommended by the appliance manufacturer may cause hazards.
- Do not use outdoors.
- Do not let the power supply cord hang over the edge of tables or counters, or touch hot surfaces.
- Do not place the appliance on or near heat sources such as hot gas or electric burners and stoves, or in a heated oven.
- Extreme caution must be used when moving the appliance containing hot contents or liquids.
- Plug the cord into a household electric outlet. To disconnect, turn any control to "off", then remove plug from wall outlet.
- Do not use the appliance for other than intended or specified purposes.
- To reduce the risk of electrical shock, cook only in removable container.
- The heating element surface is subject to residual heat after use.
SAVE THESE INSTRUCTIONS
THIS APPLIANCE IS FOR HOUSEHOLD USE ONLY.
This appliance is supplied with a short cord to reduce the risk of becoming entangled or tripping. Extension cords are available and may be used if care is exercised in their use. If extension cord is used, the marked electrical rating of the cord set should be at least as great as the electrical rating of the appliance, and the longer cord should be arranged so that it will not drape over the countertop or tabletop where it can be pulled on by children or tripped over unintentionally. "This appliance has a polarized plug (one blade is wider than the other). To reduce the risk of electric shock, this plug is intended to fit into a polarized outlet only one way. If the plug does not fit fully into the outlet, reverse the plug. If it still does not fit, contact a qualified electrician. Do not attempt to modify the plug in any way."
- Always follow basic safety precautions when using electrical appliances. Read all instructions carefully. Please keep this instruction book handy for easy reference.
Before use
- These WARNINGS and CAUTIONS are intended to protect you and other persons from injuries and damages. To ensure safe operation, please follow them carefully.
![]()
Indicates risk of serious injury.
![]()
Indicates risk of injury or property damage if mishandled.
About the symbols
 Indicates a warning or caution. The symbol inside the triangle specifies the nature of the warning or caution. The example below indicates an electrical shock warning. Indicates a warning or caution. The symbol inside the triangle specifies the nature of the warning or caution. The example below indicates an electrical shock warning. |  Indicates a prohibition. The symbol inside the circle specifies the nature of the prohibition. The example below indicates "Do not disassemble." Indicates a prohibition. The symbol inside the circle specifies the nature of the prohibition. The example below indicates "Do not disassemble." |  Indicates a requirement or instruction that must be followed. The symbol inside the circle specifies the nature of the requirement or instruction. The example below left indicates "unplug the unit"; the example below right indicates that the accompanying instruction must be followed. Indicates a requirement or instruction that must be followed. The symbol inside the circle specifies the nature of the requirement or instruction. The example below left indicates "unplug the unit"; the example below right indicates that the accompanying instruction must be followed. |
 |  |   |
- Please keep the Operating Instructions for future reference.

 Do not Disassemble |
|  |
|
 Do not |
| |
|
Wipe off the dust |
|  No Soaking |
|
Use an individual power outlet |
| |
|
|
|  Do not Touch |
|
Insert the plug all the way |
|  No Wet Hards |
|
|
| ||
|
| |
|
|
| |
|
 To prevent burns. Do not Touch |
|  Unplug |
|
Clean after it is cooled |
| |
|
|
| Hold the plug to unplug |
|
Grasp the plug |
| ||

- Do not cover the Rice Cooker especially the steam vent with a cloth. Doing so may cause discoloration and deformation of the Main Body and the Outer Lid of the Rice Cooker.
- Be careful about burns. Please be careful as inner pan handles can be hot.
- Do not cook rice if foreign matters are adhered to the outside of the Inner Pan or heating plate. It may cause imperfect cooking.
![]()

Documents / ResourcesDownload manual
Here you can download full pdf version of manual, it may contain additional safety instructions, warranty information, FCC rules, etc.
Download Zojirushi Micom NEURO FUZZY NS-ZCC10 / NS-ZCC18 - Rice Cooker Manual
Advertisement


Need help?
Do you have a question about the Micom NEURO FUZZY NS-ZCC10 and is the answer not in the manual?
Questions and answers