Advertisement
Product Introduction
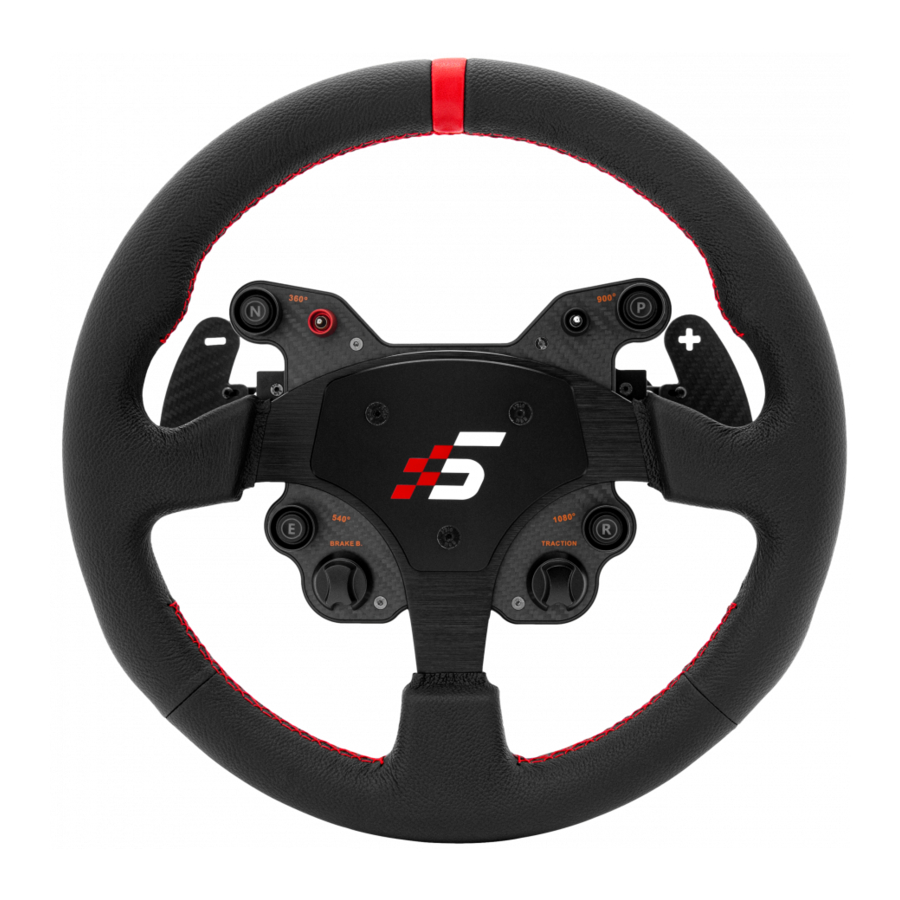
Overview
- The main body is made of high-strength aviation aluminum alloy by high-precision CNC machining.
- The surface has been sandblasted, oxidized and other processing procedures to improve the appearance touch texture, elegant black cold color shows the cold temperament;
- The unique hub appearance design, the YaHei metal texture panel and the self-designed racing flag integrate the track "s" logo, as well as the simagic initial logo horn cover decoration, giving a stronger racing element sense;
- Simagic independently designs magnetic light sensitive shift paddle, which has a very high real car simulation feel
- The outer layer of steering wheel is wrapped in comfortable fur.


Direct drive simulator GTI steering wheel independently designed magnetic optical shift paddle, lt has a very high real car simulation feel.

Before Use
- Before calibration, set the C key shift switch to C green (parameter setting calibration working mode)
- Long pull the V key lever down (do not release), while long dial, turn the dial ABCD in sequence once, repeatedly twice, release the V key.
- After completing the above operation, turn C green back to C Red (double clutch mode) or C blue (double axis mode).
- Complete the calibration.

* If the 13 and 14 keys on the calibration page of the control program will jump after calibration, the calibration will be conducted again.

*The color is for illustration only
Function Introduction
C KEY MODE FUNCTION
The C toggle switch is a three position lock switch, from top to bottom, green, red and blue; Represent different working modes of hub.

- Toggle switch at n (top): parameter setting calibration working mode.

- Toggle switch to C Red (middle): double clutch mode (only for Four paddle version, ABCD) The clutch paddle is in working and semi clutch mode, and the linear clutch paddle on either side is in semi clutch state, Pull the linear clutch paddle on the other side to the full clutch state. Other cases and knobs can be reflected into the game.
- Toggle switch to C blue (bottom): dual axis mode (only for Four paddle version, ABCD) The linear clutch paddles on both sides can work independently Two linear clutch paddles can be mapped into two input axis for separate use, and other buttons and knobs can be mapped into the game. *Double paddle AB models do not have clutch mode. Only gear shift.

LlGHT SETTINGS
The self center toggle switch is divided into upper and lower position for adjustment.

- Before adjusting the light, adjust the toggle switch of C key to C green (parameter setting calibration working mode)
- Light adjustment: flip the V key toggle switch upward to V blue to cycle through 4 different light modes
Light mode: always on, fast flash, slow flash, light off - After completing the above operations, turn C green back to C Red (dual clutch mode) or C blue (dual axis mode).


KNOB SETTING

- Before light adjustment and calibration, the Toggle switch C must be set to C green (parameter setting calibration working mode).
![]()
- The mechanical damping can be adjusted by turning knob 1 (Left knob), with each notch change by 10%T
![]()
- Knob 2 (right knob) can be rotated to adjust the force feedback size, with each notch change by 10%.
![]()
- Pull desired single side clutch paddle (C or D), press and rotate knob 2 to adjust the size of half clutch, with 1 / 32 change per cell.


Technical Introduction
 | New integrated design panel integrated featuring four LED buttons with switcnable light modes, two CNC aluminum knob and three position toggle switch mode that enable quick adjustments. |
 | True Quick Release steering wheel without requiring any tools. Fast yet secure using automotive grade QR system. |
 | True Wireless transmission. It is the first in the industry to build multiple wireless modules for data transmission, eliminating the complex integration of multiple connecting lines |
 | Instant real time mapping. The optical sensing module can quickly and accurately map the paddle shifting parameters of each moment to the control software parameter page while driving. |
 | Equipped witn self-developed control software, Race Manager has feature rich yet simple and user friendly functions that adjust data according to different personal needs. |
 | The program can be updated online and more functions of hub can be developed continuously. |
Package Contents

Quick Release
- Retract the red shell of the quick release toward the steering wheel (retract the shell when removing the quick release)
![]()
- After aligning the holes of the base, insert the steering wheel into the base
![]()
- If the quick release cannot be locked, it may be because the holes are not aligned. Rotate the steering wheel or remove it and insert it again.
![]()


 Note: SIMAGlC's customized quick release adopts a high-precision design with six beads on the top and four beads on the bottom. The steel ball holes must be aligned with the base to access the base.

Steering wheel upgrade, please protect Keep computer networking status.
- Check the version status. Simagic products will a new version Please pay attention to the official channel.
- Go to the Race Manager folder, Open the base upgrade program and prepare to upgrade


Note: Do not do any operation during the upgrade.
After the upgrade is successful Restart the base to complete the version upgrade, and it can be used normally.
Upgrade Guide
Update (step 1)
- USB cable to connect
- Wheel on the electricity
- Wait for the self-test to complete
- Open the WheelUpdateOnLine software
- Power on self-detection

- Manual testing

- Download operation

- Exit the software
- Restart the Wheel


Prompt processing:
- Exit the software
- Restart the Wheel
- Go back to step 1
- Equipment not found:
![]()
- Time Out:

- The current firmware is the latest firmware:
![]()
- Error 1 - Error 5:
![]()


Safety Instructions
Safe Operation
- Power-on instruction: before turning on the power, make sure that the power cord is connected to the wheelbase. Only unplug the power cord when the wheelbase is switched off.
- It is strictly forbidden to expose the device and its power supply to rain or humidity in order to avoid short circuit and electric shock that may cause device malfunction and fire
- Desired temperature of operation is 15ºC-35ºC.
- The recommended operation time of the wheel with continuous force feedback activity is 1 hour. Excessive use may cause health risks. We suggest taking a 5-minute break every 20 minutes. Do not drive for more than 2 hours a day.
- Although this product has force feedback configuration, children under 13 years old must be under parental supervision to complete the configuration. Parental guidance is required to monitor children's use of the device.
- This product contains small pieces and is not suitable for children under 13 years old to use alone.
- When you use it for the first time, please adjust the force feedback from minimum to a level you are accustomed to.
- In the game, if the Force Feedback previously set is beyond your control, please stop the game immediately and adjust the force feedback parameters.
- The wheelbase contains components that cannot be repaired by the user. Opening the casing is forbidden and may cause harm to people or property.
- Do not open the casing of the device, as it will void the warranty.
Electrical Safety
- Use only the power supply and power cord that came with your wheelbase, which is important to protect your safety, rights, and interests.
- Do not use a non-standard power supply and power cord.
- To ensure safety, replacements may only be issued from an authorized repair center.
- Do not use non-standard power sources, even if the voltage and frequency appear acceptable.
- To avoid product damage, use only AC power with a standard wall socket.
- Do not expose your wheelbase to sources of heat.
- Unplug the power cord of your wheelbase when unused for long periods of time.
- If the wheelbase is found to have any malfunctions, stop using it immediately and contact SIMAGIC Official or authorized center for help.
- Please subscribe to SIMAGIC official website and social platforms for any update regarding product information.
 This product is only limited to simulation driving related activities. Please distinguish simulation games from reality and drive safely!
For more information on after-sale or warranty service, please check out our Terms and Conditions at SIMAGIC.COM or contact us @simagicofficial via social media platforms like YouTube and Facebook.
Documents / Resources
References
Download manual
Here you can download full pdf version of manual, it may contain additional safety instructions, warranty information, FCC rules, etc.
Advertisement


Need help?
Do you have a question about the GT1 and is the answer not in the manual?
Questions and answers