Table of Contents
Advertisement
Quick Links
CL StageMix V6.1 User Guide
Welcome:
Thank you for downloading the "CL StageMix" iPad app for the Yamaha CL series
digital mixing consoles.
The latest firmware version for CL series can be downloaded from
www.yamahaproaudio.com
StageMix is an application for the Apple iPad that provides remote control of Yamaha
CL series digital mixing console functions via a simple, intuitive graphical interface
from anywhere within wireless range. The software has been specifically designed to
allow engineers to adjust monitor mixes from the performers' positions on stage,
directly controlling mix parameters via the iPad rather than having to rely on verbal
directions to a second engineer. The result is better mixes in less time; a huge
advantage during high-pressure pre-show setup. Although StageMix is focused on
the requirements for adjusting monitor mixes on stage, its range of features is
continually expanding, allowing it to be used for a wider variety of remote control
functions.
Note: iOS applications may not be supported in your area. Please check with your
Yamaha dealer.
Advertisement
Table of Contents

Subscribe to Our Youtube Channel
Related Manuals for Yamaha StageMix CL Series


Summary of Contents for Yamaha StageMix CL Series
- Page 1 CL StageMix V6.1 User Guide Welcome: Thank you for downloading the “CL StageMix” iPad app for the Yamaha CL series digital mixing consoles. The latest firmware version for CL series can be downloaded from www.yamahaproaudio.com StageMix is an application for the Apple iPad that provides remote control of Yamaha CL series digital mixing console functions via a simple, intuitive graphical interface from anywhere within wireless range.
-
Page 2: Table Of Contents
Yamaha Professional Audio CL StageMix V6.1 User Guide CONTENTS Page 1.0 System Requirements ..................7 2.0 Wi-Fi Settings ....................7 3.0 Getting Started ....................8 CL series Network Setup ................8 iPad Wi-Fi Settings ..................8 3.2.1 Using DHCP ..................... 8 3.2.2 Using a Static IP Address ................. - Page 3 Yamaha Professional Audio CL StageMix V6.1 User Guide 5.0 EQ / PAN / 5.1 / DYNAMICS ................30 EQ ......................30 5.1.1 EQ Curve in Mixer Window ..............30 5.1.2 Selecting PEQ or GEQ ................31 5.1.3 Accessing the EQ Editing Screens ............31 PARAMETRIC EQ EDITING ..............
- Page 4 Yamaha Professional Audio CL StageMix V6.1 User Guide 5.8.1 Default ....................47 5.8.2 Copy/Paste ..................... 47 5.8.3 Dynamics On ..................48 5.8.4 Dynamics Type ..................48 5.8.5 Threshold ....................48 5.8.6 Range and Ratio ..................48 5.8.7 Other Dynamics Parameters ..............48 5.8.8 Key In .....................
- Page 5 Yamaha Professional Audio CL StageMix V6.1 User Guide 8.1.8 Output Patch Assignments ..............63 EFFECT Rack .................... 63 8.2.1 Rack Slot Assignments ................63 8.2.2 Input Patch Assignments ................ 64 8.2.3 Accessing Effect, GEQ and 8-Band PEQ Editors ........64 8.2.4 Effect Bypass ..................
- Page 6 Yamaha Professional Audio CL StageMix V6.1 User Guide 10.5 Enable Phantom Power Switching ............. 82 10.6 Set EQ band to 0dB with Double-Tap ............82 10.7 Show dB Markings on Mixer ............... 82 10.8 Set DCA to 0dB with Double-Tap ............... 82 10.9 Cue Operation Mode ..................
-
Page 7: System Requirements
1.0 System Requirements • Apple iPad (any model using iOS 8 or higher) • Yamaha CL series digital mixing console with V3.0, V3.1 or V4.0 firmware • Wi-Fi access point (802.11g, n or ac) • CAT5 cable (to connect the console to a Wi-Fi access point) •... -
Page 8: Getting Started
Yamaha Professional Audio CL StageMix V6.1 User Guide 3.0 Getting Started CL series Network Setup Connect the Wi-Fi access point to the CL series console’s network port via a CAT5 cable. Make sure your Ethernet cable is connected to a LAN port on your Wi-Fi device and not the WAN port. -
Page 9: Using A Static Ip Address
Yamaha Professional Audio CL StageMix V6.1 User Guide d) Select [DHCP] and ensure that your iPad receives data for the IP Address, Subnet Mask, Router and DNS. e) Select [Renew Lease] if this data is not applied. If the settings are successfully applied, press the iPad’s Home button to exit the Settings menu. - Page 10 Yamaha Professional Audio CL StageMix V6.1 User Guide d) Select [Static] e) IP Address: enter an IP Address similar to the one for the CL series console, but with just the last number different. (For example, if CL series console is 192.168.0.128, give an address to the iPad such as 192.168.0.124).
-
Page 11: Stagemix Setup
Yamaha Professional Audio CL StageMix V6.1 User Guide StageMix Setup Launch the “CL StageMix” App The “Select Mixer” screen will appear. From this screen, you can do any of the following things: • Access the OFFLINE DEMO mode to explore the features and user interface of CL StageMix. -
Page 12: Select A Mixer
Yamaha Professional Audio CL StageMix V6.1 User Guide ii. Tap on the blank Name field and enter a name for your CL series console using the iPad’s onscreen keyboard. iii. Enter the CL series console’s IP address noted in 3.1. The default IP Address may not need to be changed but confirm this in the Network Setup screen of the CL series console (refer to 3.1). -
Page 13: Edit Mixer Configurations
Yamaha Professional Audio CL StageMix V6.1 User Guide If StageMix cannot connect with your console, refer to the Troubleshooting section (11.0) at the end of this document for possible solutions. 3.3.5 Edit Mixer Configurations The parameters of a saved Mixer Configuration can be viewed and edited by tapping the right arrow button next to a mixer’s name. -
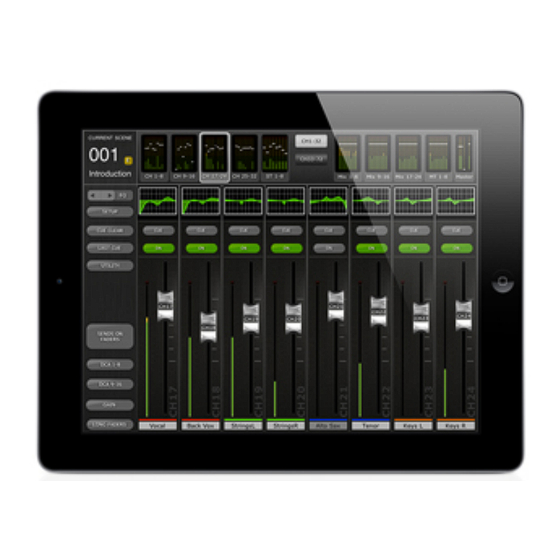
Page 14: Mixer Window
Yamaha Professional Audio CL StageMix V6.1 User Guide 4.0 Mixer Window The main page of the StageMix is called the “Mixer” window. It shows the EQ curves, Pan positions, Dynamics status, [CUE] and [ON] buttons, faders, level meters, and channel names and colors for eight adjacent channels. -
Page 15: Channel Names And Colors
Yamaha Professional Audio CL StageMix V6.1 User Guide Channel Names and Colors The name and color of each channel appears in StageMix as it does in the CL series console. The names are dimmed if the channel is switched off. -
Page 16: Channel On
Yamaha Professional Audio CL StageMix V6.1 User Guide Press the [LONG FADERS] button in the bottom-left corner again to return to the Mixer Overview. Channel ON Press [ON] to change the on/off status of the channel. The button is green when the channel is on. -
Page 17: Remote Mode
Yamaha Professional Audio CL StageMix V6.1 User Guide • [B] • [ALL] 4.7.3 Remote Mode In Remote mode, Cue functions in StageMix will exclusively control the Cue B Bus. If the [CUE CLEAR] button is pressed, the Cue B Bus will be cleared. -
Page 18: Master Bank
Yamaha Professional Audio CL StageMix V6.1 User Guide Master Bank Pressing the [Master] block in the “Navigation/Meter Bridge” will cause channels from the master section to appear in the fader strips. Included in this block are the Stereo Master channel, Mono Master channel and the Monitor Level and On control. -
Page 19: Gain
Yamaha Professional Audio CL StageMix V6.1 User Guide 4.10 GAIN The gain for each input channel can be controlled using the faders in StageMix. Press the [GAIN] button in the lower left area of the Mixer window to enter GAIN mode. -
Page 20: Gain Compensation Mode
Yamaha Professional Audio CL StageMix V6.1 User Guide 4.10.2 Gain Compensation Mode Gain Compensation can be activated for each input channel independently in CL series consoles. In Analog Gain mode, a [GC] button in each channel strip allows Gain Compensation to be turned On or Off from StageMix. -
Page 21: Phantom Power
Yamaha Professional Audio CL StageMix V6.1 User Guide 4.10.7 Phantom Power The 48V phantom power status for each input channel is also displayed at the top of each channel strip when GAIN mode is active. The 48V indicator will appear in red when phantom power is active. -
Page 22: Input Port Patching
Yamaha Professional Audio CL StageMix V6.1 User Guide receiver audio output is shown. Touch here to mute or un-mute the receiver output. Please note, when a Dante based Wireless Microphone is patched to the channel, there is no analog gain as it is replaced by the Receiver output gain control. - Page 23 Yamaha Professional Audio CL StageMix V6.1 User Guide The selected channel number and name is displayed in the top line of the window at the top of the view. Underneath this, is the currently applied input port. Select the port type from the bottom area of the view, and then select required input port to change the input patch for the selected channel.
-
Page 24: Input Port Patch Options
Yamaha Professional Audio CL StageMix V6.1 User Guide 4.10.11 Input Port Patch Options In the top-left of the Input Port Patch View, is the Patch [OPTIONS] menu. This contains numerous functions related to input patching – • HA INFO – FROM PORT/FROM CHANNEL. This mirrors the same function on the connected console. - Page 25 Yamaha Professional Audio CL StageMix V6.1 User Guide Mix or Matrix Bus. The fader level indicators in the “Navigation/Meter Bridge” will show the positions of all the Mix Send Levels if the appropriate Preference is On in the Setup screen (refer to 10.4).
-
Page 26: Mix Send Levels
Yamaha Professional Audio CL StageMix V6.1 User Guide Select the Target from Mix 1-24 and Matrix 1-8. The currently selected Mix will appear as a white button with a check mark. Stereo pairs appear as single large buttons. Notes: • When Surround Mode is active, Mix Busses 1-6 will not be available as they are assigned to function as the surround output busses. -
Page 27: Mix Sends On
Yamaha Professional Audio CL StageMix V6.1 User Guide 4.11.2 Mix Sends ON In “SENDS ON FADERS” mode, the [ON] button in each channel strip is used to turn On/Off the Mix Send from each channel to the currently selected target Mix or Matrix bus. - Page 28 Yamaha Professional Audio CL StageMix V6.1 User Guide The right side displays thumbnail views of the PEQ, Dynamics and Inserted processors, and these can be used to directly access those editors. To access Mix/Mtx Send Pan control for input channels for the selected send bus, use the arrow buttons of the control strip, above the [SETUP] button.
-
Page 29: Dca Faders
Yamaha Professional Audio CL StageMix V6.1 User Guide 4.12 DCA FADERS Press the [DCA 1-8] or [DCA 9-16] button to access the console’s 16 DCAs. A green LED will appear next to each DCA fader when it is set to exactly 0dB. -
Page 30: Eq / Pan / 5.1 / Dynamics
Yamaha Professional Audio CL StageMix V6.1 User Guide 5.0 EQ / PAN / 5.1 / DYNAMICS The thumbnail area at the top of each channel strip displays an EQ curve, the Pan position, the 5.1 Surround Pan position, or Dynamics status for that channel. -
Page 31: Selecting Peq Or Geq
Yamaha Professional Audio CL StageMix V6.1 User Guide In the example above: Mix Bus 1 has a GEQ in Insert 1, indicated by the blue dot in the center below the curve. The dedicated 4-Band PEQ is currently being displayed (the green dot is solid and the curve is green). -
Page 32: Parametric Eq Editing
Yamaha Professional Audio CL StageMix V6.1 User Guide PARAMETRIC EQ EDITING (The screenshot above shows the EQ Editor screen with V4 CL console firmware.) The current channel’s Name, Color, Fader, Level Meters, [ON] and [CUE] buttons are shown in the left column. At the bottom-left, there are “previous”... -
Page 33: Gain And Frequency Lock
Yamaha Professional Audio CL StageMix V6.1 User Guide One band of Parametric EQ can be adjusted at a time. Press one of the green circles to select the band, and it will be highlighted yellow. EQ bands in StageMix are labelled as follows:... -
Page 34: Eq Bands 1 & 4
Yamaha Professional Audio CL StageMix V6.1 User Guide The Slope of an Input Channel’s HPF can be adjusted between -6dB and -12dB per octave by pressing the buttons in the floating display above the HP dot. When an output channel is selected in the EQ Editing Screen, the [HPF] button will only appear if band 1 is assigned to the HPF function. -
Page 35: Eq Type
Yamaha Professional Audio CL StageMix V6.1 User Guide 5.2.6 EQ TYPE With V3 CL console firmware, the default EQ Type for every PEQ is Type I. This can be changed to Type II by pressing the [II] button at the top of the EQ editing screen. -
Page 36: Rta Hold
Yamaha Professional Audio CL StageMix V6.1 User Guide When the [RTA ON] button is highlighted with a green background, a 61-band or 121-band Real-Time Analyzer will be displayed as part of the EQ editing graph. The number of bands used for the RTA can be selected on the Setup screen (refer to 10.20). -
Page 37: Graphic Eq Editing
Yamaha Professional Audio CL StageMix V6.1 User Guide GRAPHIC EQ EDITING GEQ Overview In the upper portion of the GEQ Editing Screen, the complete GEQ curve is displayed along with the gain positions for all 31 bands. White dots represent the position for each of the 31 bands. -
Page 38: Geq Type
Yamaha Professional Audio CL StageMix V6.1 User Guide 5.3.3 GEQ Type Next to the Rack position, the type of GEQ is identified as either “31 Band” or “Flex 15”. In the case of a Flex 15 GEQ, a larger-sized number indicates the remaining number of available bands for that GEQ. -
Page 39: Editing Geq Bands
Yamaha Professional Audio CL StageMix V6.1 User Guide grey when GEQ is Off. When Off, the GEQ display curve will also turn light grey. 5.3.10 Editing GEQ Bands Sliders in the lower portion of the GEQ screen allow each band of EQ to be edited. -
Page 40: 8-Band Peq Editing
Yamaha Professional Audio CL StageMix V6.1 User Guide 8-BAND PEQ EDITING One band of 8-Band Parametric EQ can be adjusted at a time. Press one of the green circles to select the band, and it will be highlighted yellow. EQ bands are labelled as HP (High Pass Filter), 1-8 and LP (Low Pass Filter). -
Page 41: Hpf
Yamaha Professional Audio CL StageMix V6.1 User Guide 5.4.2 HPF An [HPF] button appears at the top of the EQ graph. Press this button to switch the HPF On/Off. When the button is green, the HPF is On. HPF has no Gain or Q parameter: only Frequency. -
Page 42: Rta On
Yamaha Professional Audio CL StageMix V6.1 User Guide 5.4.8 RTA ON A Real-Time Analyzer function is integrated into the 8-Band PEQ editing screen. The iPad’s built-in microphone is used as the input source for the RTA. Alternatively, an external mic connected to the headset jack can be used. -
Page 43: Pan To Stereo Busses
Yamaha Professional Audio CL StageMix V6.1 User Guide If you have accessed the 8-Band PEQ Editor from the Rack screen, press the [X] button in the upper right corner to return to the Rack screen. PAN TO STEREO BUSSES When PAN mode is selected using the buttons described in section 5.0, all 8 thumbnail images will display a slider showing the position of the Pan to the Stereo Busses for each channel. -
Page 44: Surround Pan
Yamaha Professional Audio CL StageMix V6.1 User Guide SURROUND PAN When Surround mode is active in the console, the thumbnail image for each channel will display the position of the channel’s signal within the surround field when 5.1 mode is selected in StageMix. -
Page 45: L/R And F/R Lock
Yamaha Professional Audio CL StageMix V6.1 User Guide 5.6.3 L/R and F/R Lock Buttons at the top of the Surround Pan Editing screen allow the L/R (Left/Right) or F/R (Front/Rear) panning to be locked. When the [L/R] button is red, the surround panning dot cannot be moved in the left or right directions. -
Page 46: Dynamics Processors
Yamaha Professional Audio CL StageMix V6.1 User Guide DYNAMICS PROCESSORS When DYN mode is selected using the buttons described in section 5.0, the status of both of the channel’s dynamics processors can be seen: Dynamics 1 is displayed at the top of the thumbnail with Dynamics 2 at the bottom. -
Page 47: Dynamics Processor Editing
Yamaha Professional Audio CL StageMix V6.1 User Guide DYNAMICS PROCESSOR EDITING Tap on any of the Dynamics thumbnails in the Mixer Window to access the Dynamics Editing screen. The left side of this screen (Channel Strip) is identical to the EQ Editing screen with channel fader, On button, Cue button, input and output meters, channel name, color and navigation buttons. -
Page 48: Dynamics On
Yamaha Professional Audio CL StageMix V6.1 User Guide assigned (e.g. a Gate cannot be assigned to Dynamics Processor 2). In this case, the [PASTE] button will be greyed out and inactive. 5.8.3 Dynamics On The [DYN ON] button turns the Dynamics On/Off. This button is purple when On and grey when it is Off. -
Page 49: Key In
Yamaha Professional Audio CL StageMix V6.1 User Guide 5.8.8 Key In The Key In source is displayed at the bottom of each Dynamics section. For Dynamics 1, a Key In Filter is available. Tap the [EDIT] button to edit the Key In Filter parameters. -
Page 50: Outports
Yamaha Professional Audio CL StageMix V6.1 User Guide 6.0 OUTPORTS The OUTPORTS button provides access to the following functions: • Output Port Delays • Output Port Phase • Output Port Gain Press the [OUTPORTS] button on the left side of the Mixer window to enter this mode. -
Page 51: Delay On
Yamaha Professional Audio CL StageMix V6.1 User Guide The Output Bus number (e.g. Matrix 1) assigned to each Output Port is displayed at the top of each channel strip. The name of each Output Bus is displayed below its number. -
Page 52: Delay Time Editor
Yamaha Professional Audio CL StageMix V6.1 User Guide Delay Time Editor Tap on any of the Delay Time Display buttons to access the Delay Time Editor. The button for the Output Port channel being edited will be highlighted in dark pink. -
Page 53: Nudge Delay Time Values
Yamaha Professional Audio CL StageMix V6.1 User Guide 6.7.3 Nudge Delay Time Values Tap the Up and Down arrow buttons to increase/decrease the currently selected Delay Time value by one unit at a time. Press and hold either of these buttons to continuously adjust these values. - Page 54 Yamaha Professional Audio CL StageMix V6.1 User Guide If there is a current assigned patch, this will be displayed in the patch view on the patch button grid, and shown in the top line of the small window at the centre-top of the patch view the second line will display the currently selected output port.
- Page 55 Yamaha Professional Audio CL StageMix V6.1 User Guide The grid displays each output channel with its type and number shown on each button. If a name has been assigned to the channel, it will also be displayed along with the channel color where valid. For Mix/Mtx/Mono/ST output bus type, output metering is shown to the left of each button.
-
Page 56: Utility
Yamaha Professional Audio CL StageMix V6.1 User Guide 7.0 UTILITY Press the [UTILITY] button on the left side of the Mixer window to enter this mode. Tabs at the bottom of the UTILITY screen provide access to the following functions: [MUTE/TAP] •... -
Page 57: Mute Group Dim Level
Yamaha Professional Audio CL StageMix V6.1 User Guide 7.1.1 Mute Group Dim Level Normally, when a channel is muted, its level is reduced to minus infinity. Alternatively, Mute Groups in CL series consoles can cause channels to have their levels dimmed rather than completely muted. -
Page 58: Tap Tempo
Yamaha Professional Audio CL StageMix V6.1 User Guide TAP TEMPO The Tap Tempo section in the UTILITY mode allows you to tap BPM values into effects in the console that include BPM parameters. Select the relevant effect from the list of 8 effects in the left side of this section. -
Page 59: Oscillator
Yamaha Professional Audio CL StageMix V6.1 User Guide OSCILLATOR The OSCILLATOR screen in the UTILITY mode allows you control all aspects of the Oscillator in the CL series console. 7.3.1 Oscillator Assign In the top part of the screen, an array of buttons allow you to assign the Oscillator output to any channel or bus in the console. -
Page 60: Oscillator Frequency
Yamaha Professional Audio CL StageMix V6.1 User Guide 7.3.4 Oscillator Frequency The horizontal FREQ slider allows the Oscillator’s frequency to be adjusted. Note: this parameter is only available when SINE mode is active. 7.3.5 Oscillator Mode Three buttons allow the Oscillator mode to be selected: •... -
Page 61: Title List
Yamaha Professional Audio CL StageMix V6.1 User Guide 7.4.1 Title List In the top part of the screen, songs available to be played from the USB memory device are displayed in a list. Tap on a title to select it, ready to be controlled from the transport section below. -
Page 62: Rack
Yamaha Professional Audio CL StageMix V6.1 User Guide 8.0 RACK Press the [RACK] button on the left side of the Mixer window to access editors for GEQs, 8-Band PEQs and EFFECT programs. Note: GEQs and 8-Band PEQs can also be accessed from channel strips as described in section 5. -
Page 63: Input Patch Assignments
Yamaha Professional Audio CL StageMix V6.1 User Guide Note: this information is display only. Modules cannot be mounted to the rack slots from StageMix. If an Automixer is assigned to any slot, it will appear blank in StageMix. 8.1.2 Input Patch Assignments To the left of GEQ or PEQ graphical displays, text labels indicate the input patch assignments for that rack slot. -
Page 64: Input Patch Assignments
Yamaha Professional Audio CL StageMix V6.1 User Guide • 31 Band GEQ • Flex 15 GEQ • Effect • 8 Band PEQ • Blank 8.2.2 Input Patch Assignments Text labels for each slot indicate the input patch assignments for that slot. -
Page 65: Effect Editing
Yamaha Professional Audio CL StageMix V6.1 User Guide EFFECT EDITING Parameters for all effect programs can be edited from StageMix. For some selected programs, a graphical editing interface is also provided. 8.3.1 Current Effect The Effect type icon for the currently selected rack slot is displayed in the upper left side of the Effect Editing screen. -
Page 66: Input And Output Patch Assignments
Yamaha Professional Audio CL StageMix V6.1 User Guide will appear requiring confirmation before the effect library program is recalled in the console. Effect Library Store: Tap on any Library memory that is not labelled as Read Only. Press [STORE] to save the currently selected effect program into the Library. -
Page 67: Multi-Segment Buttons
Yamaha Professional Audio CL StageMix V6.1 User Guide Tap the button to open the number keypad. Tap the Up/Down cursor buttons to adjust the parameter value one step at a time. The value will be sent to the console each time the cursor button is tapped. -
Page 68: Graphical Effect Editing
Yamaha Professional Audio CL StageMix V6.1 User Guide GRAPHICAL EFFECT EDITING For selected Effects, graphical user interface editing is also provided as an alternative to the slider-based editing. Press the [GUI] button above the parameter values to reveal the graphical editing interface. Graphical editing is provided for the following Effects Types: •... -
Page 69: Rev-X Time/Level Parameters
Yamaha Professional Audio CL StageMix V6.1 User Guide 8.4.1 REV-X Time/Level Parameters Tap the [TIME/LEVEL] tab at the bottom of the screen to access those parameters. Drag the following parameters horizontally to adjust their values: • Reverb Time • Initial Delay •... -
Page 70: Rev-X Space Parameters
Yamaha Professional Audio CL StageMix V6.1 User Guide 8.4.2 REV-X Space Parameters Tap the [SPACE] tab at the bottom of the screen to access those parameters. Drag the following parameters vertically or diagonally to adjust their values: • Room Size •... -
Page 71: Rev-X Filter Parameters
Yamaha Professional Audio CL StageMix V6.1 User Guide 8.4.3 REV-X Filter Parameters Tap the [FILTERS] tab at the bottom of the screen to access those parameters. Drag the following parameters to adjust their values: • HPF • LPF • Low Ratio •... -
Page 72: Reverb Time/Level Parameters
Yamaha Professional Audio CL StageMix V6.1 User Guide 8.4.4 REVERB Time/Level Parameters Tap the [TIME/LEVEL] tab at the bottom of the screen to access the following parameters: • Reverb Time • Initial Delay • E/R Delay • E/R Balance Page 72... -
Page 73: Reverb Space Parameters
Yamaha Professional Audio CL StageMix V6.1 User Guide 8.4.5 REVERB Space Parameters Tap the [SPACE] tab at the bottom of the screen to access the following parameters: • Density • Diffusion Page 73... -
Page 74: Reverb Filter Parameters
Yamaha Professional Audio CL StageMix V6.1 User Guide 8.4.6 REVERB Filter Parameters Tap the [FILTERS] tab to access the following parameters: • HPF • LPF • Low Ratio • High Ratio 8.4.7 REVERB Dynamics Parameters Tap the [DYNAMICS] tab to access the following parameters: •... -
Page 75: Mono/Stereo/Mod Delay Parameters
Yamaha Professional Audio CL StageMix V6.1 User Guide 8.4.9 MONO/STEREO/MOD DELAY Parameters Tap the [TIME/LEVEL] tab to access the following parameters: • Delay • Feedback Gain Tap the [FILTERS] tab to access the following parameters: • HPF • LPF • High Ratio... -
Page 76: Delay Lcr Parameters
Yamaha Professional Audio CL StageMix V6.1 User Guide 8.4.10 DELAY LCR Parameters There are 5 tabs at the bottom of the screen to provide access to parameters for the Delay LCR program. Tap the [L], [C] or [R] tabs to access the following parameters: •... -
Page 77: Scene Memory
Yamaha Professional Audio CL StageMix V6.1 User Guide 9.0 SCENE MEMORY The Current Scene Memory number and title (name) are displayed in the upper-left corner of the StageMix Mixer window. An “E” indicator will be displayed if the Scene has been edited since it was last stored or recalled. -
Page 78: Scene List
Yamaha Professional Audio CL StageMix V6.1 User Guide Current Scene is 005, pressing the [INC SCENE] button will recall Scene 006 in the console. However, if Scene 006 is empty, the next highest Scene containing data will be recalled. Note: the [DEC SCENE] and [INC SCENE] buttons will only appear in the Scene window if the related preference has been enabled in the Setup window (refer to 10.3). -
Page 79: Store Scene
Yamaha Professional Audio CL StageMix V6.1 User Guide SCENE TITLE The scene title can be edited by tapping on the title. The iPad’s keyboard will appear. Tap the X button next to the title to clear the current title before typing in a new title. -
Page 80: Undo Recall
Yamaha Professional Audio CL StageMix V6.1 User Guide UNDO RECALL Pressing the [UNDO RECALL] button will cause the most recent Scene Recall to be cancelled. StageMix will need to synchronize with the console after executing a Scene Recall UNDO. Press the [MIXER] button in the top-right corner of the Scene Memory window to return to the Mixer window. -
Page 81: Setup
Yamaha Professional Audio CL StageMix V6.1 User Guide 10.0 SETUP Press the [SETUP] button in the upper left area of the Mixer window to open a new window which allows user preferences to be selected. iPad Status Bar The iPad’s Status Bar is visible in this screen, allowing the Wi-Fi signal strength and the battery charge status to be viewed. -
Page 82: Show Send Levels In Meter Bridge
Yamaha Professional Audio CL StageMix V6.1 User Guide 10.4 Show Send Levels in Meter Bridge When this preference is ON, the send levels for the currently selected “MIX ON FADERS” will appear in the “Navigation/Meter Bridge” in “SENDS ON FADERS” mode. If this preference is OFF, the input levels will be displayed. -
Page 83: Channel Select - Stagemix Follows Console
Yamaha Professional Audio CL StageMix V6.1 User Guide 10.13 Channel Select – StageMix Follows Console When this preference is ON, the currently selected channel in the StageMix Parametric and Graphic EQ screens will follow the Selected Channel in the CL series console. -
Page 84: Rta Input Gain
Yamaha Professional Audio CL StageMix V6.1 User Guide 10.19 RTA Input Gain Input Gain or Attenuation can be applied to the RTA input signal in order to allow the range of the RTA to be more usefully displayed within the PEQ or GEQ editing screens. -
Page 85: Troubleshooting
Yamaha Professional Audio CL StageMix V6.1 User Guide 11.0 Troubleshooting 11.1 No Wi-Fi Available If this message appears after launching StageMix, this indicates that the iPad is not connected to a Wi-Fi access point or that Wi-Fi may be switched off in the iPad. -
Page 86: Connection Lost
Yamaha Professional Audio CL StageMix V6.1 User Guide 11.3 Connection Lost If StageMix loses its connection to the console, the following message will appear. Operation of StageMix is not possible while this message box is onscreen. StageMix will automatically attempt to reconnect to the console. -
Page 87: Redirect To Internet" Problem With Ios 6 Or Higher
Yamaha Professional Audio CL StageMix V6.1 User Guide 11.6 “Redirect to Internet” Problem with iOS 6 or higher Since the release of iOS 6 or higher, your iPad may try to access the Internet at the time of selecting a Wi-Fi network. Depending on the set-up or model of your Wi-Fi device (Router or Access Point), the message "cannot connect with... - Page 88 • Yamaha makes no representations or warranties with regard to the use of the software and documentation and cannot be held responsible for the results of the use of this manual and the software.
Need help?
Do you have a question about the StageMix CL Series and is the answer not in the manual?
Questions and answers