Table of Contents
Advertisement
Quick Links
ASTRONOMICAL TIME SWITCH - NFC
IT
Weekly - Menu-
driven
1-channel model 2-channel mode
NFC
Art. 1IO4091NFC
Series: V001
PERRY ELECTRIC Srl
Via Milanese, 11 - 22070 VENIANO (Como) ITALY
PE - DEIONN10
2
(EN) 0 /24
programming - Backlit display
-
s
Art. 1IO4291NFC
Series: V001
6
l
Perry Home
APP:
APP:
Installation instructions,
Installation instructions,
programming and use
programming and use
only from KEYBOARD
only from KEYBOARD
ASTRO
TIME
IMPORTANT:
IMPORTANT:
www.perry.it
ENGLISH
1
1
Advertisement
Table of Contents

Subscribe to Our Youtube Channel
Related Manuals for Perry Electric NFC


Summary of Contents for Perry Electric NFC
- Page 1 ASTRONOMICAL TIME SWITCH - NFC Weekly - Menu- driven programming - Backlit display ENGLISH 1-channel model 2-channel mode Perry Home APP: APP: ASTRO TIME IMPORTANT: IMPORTANT: Installation instructions, Installation instructions, programming and use programming and use only from KEYBOARD only from KEYBOARD Art.
- Page 2 Dear Customer, thank you for choosing our product. INDEX INFORMATION AND SAFETY 4.1. ) 1 «ASTRO / ASTRO» program type pag. 15 PRECAUTIONS pag. 3 1- Description of the unit pag. 4 4.1.2) TIME / TIME program type pag. 16 pag.
- Page 3 Any other use must beconsidered improper and dangerous. •The device is supplied with a CR2032 lithium battery, keep the battery out of the reach of children. NFC is a transceiver technology that provides short-range, two-way contactless wireless (RF) connectivity. DISPOSING OF OLD ELECTRICAL AND ELECTRONIC EQUIPMENT This symbol on the product or on its packaging indicates that this product cannot be treated as household waste.
-
Page 4: Description Of The Unit
Home» APP , it will be possible to carry out programming and settings directly on • Easy and intuitive programming and use via APP and NFC interface or via the keyboard on the front panel of the device (in questo caso scarcare le AS DESCRIBED BELOW IN your smartphone in an easy and intuitive way, and then transfer all the data to the THIS SPECIFIC MANUAL. - Page 5 1.2) FIRST BATTERY INSERTION Open the battery door to the left and insert the battery into its housing with the positive side facing up lose the battery compartment door properly to the right Connect and activate the 230V power mains (see paragraph 1.4). Set the required data as described in Chapter 2 - FIRST START-UP .
-
Page 6: Technical Specifications
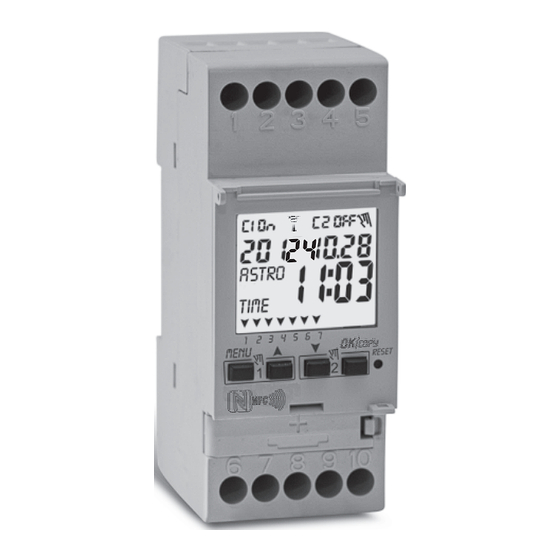
1.3) Technical specifications 1.4) Electrical connections Supply voltage 230 V c.a. +/- 10% Frequency 50 Hz 1-channel mod. Protection rating IP20 Output type Potential-free changeover contact relay; ontact range = 16(2)A / 250V~ 1 2 3 4 5 Type of action, disconnection 1 B S U / electronic and unit Section of the cables to the terminals 1...6mm... - Page 7 Day of the week field Time program setting (TIME) Astronomical program setting (ASTRO) Icona antenna: NFC attivo 1.6) KEYS Access / Exit the menus and sub-menus Scroll list upwards / increase the value Scroll list downwards / decrease the value Confirm setting / copy program Reset (no setting entered is deleted - para.
- Page 8 1.6.1) Specific key functions 1.6.2) Shortcut keys Any of the functions described below are carried out from the main screen Function Press key/s Function Press the key combination Immediate exit from the 2 sec. until the main menu or sub-menu 2 seconds Lock / unlock keys ( screen appears...
-
Page 9: First Start-Up
2 - FIRST START-UP (language selection, entry of current year, month, day, hour and minutes, summer/winter time setting) The unit is supplied with default settings. After inserting the battery (see paragraph 1.2) and connecting the power supply, the unit resets the display (lamp-test) and then proceed as follows: Select/set the data by pressing the keys and press the OK key to confirm and move on to the next field. - Page 10 Set the astronomical coordinates. • By setting them, you move on to enter the ASTRO ON astronomical coordinates (see the procedure in the next paragraph 2.1). By confirming «ASTRO OFF» with OK OKAY appears and it moves on to the next item (Enabling the twilight sensor).
- Page 11 2.1) Inserting the astronomical coordinates (ASTRO activation) for the ASTRO programs to work properly it is important for some information to be entered (ASTRONOMICAL PARAMETERS), which allow the device to identify the geographic area where it will be installed. The display of the digital switch shows ASTRO : select with the keys...
-
Page 12: Menu Overview
main screen 3 - MENU AND PROGRAMMING 3.1) Menu - overview 5 menus are listed in the sequence present in the unit: PROG (Programs) - Number of free programs Selection of no. of programs - Selection of channel (only dual-channel) - Selection of day - Selection of the (ASTRO or TIME) type of program (start-up) - Page 13 3.2) Forcing and program priority A priority is assigned for each type of program/function as shown below on the right. The output relay/s will be activated according to the set priorities. IMPORTANT: all programs (ASTRO-TIME) entered are simultaneously active regardless of their position; in the case of overlapping commands on the same output, this is activated or remains so if at least one program is commanding it (OR LOGIC).
-
Page 14: Creating A New Program
4 - «PROG» menu (Programs) This menu allows you to create, test, modify, copy and delete the programs (ASTRO / TIME). 4.1) CREATING A NEW PROGRAM Procedure valid for all types of programs. main screen Additional settings are described in the individual programs. (PROG Press the MENU... - Page 15 4.1.1) ASTRO / ASTRO program type Useful for the management of electric utilities in relation to sunset and sunrise in the set geographical area, without external sensors. After having selected the program number, the channel (only for the dual-channel model) and the day as described in para. 4.1: keys 1.Select the type of program with the...
- Page 16 4.1. ) TIME/TIME type of program Allows a load to start-up (time ON) and switch-off (time OFF) in a defined period of time. After having selected the program number, the channel (only for the dual-channel model) and the day as described in the procedure in paragraph 4.1: 1.
- Page 17 4.1. ) Combining ASTRO-TIME programs You can also set the combined programs according to the specific requirements, starting with a type of program (example: ASTRO) and ending with another type (example: TIME). - « standard » programs: ASTRO / ASTRO - TIME / TIME - «...
-
Page 18: Copying A Program
4.3) Copying a program Copy a saved program ASTRO / TIME / COMBINED) on other days of the week, as follows: If you are already in the programs menu and the saved program to load is displayed, proceed from point 3. 1. - Page 19 5 - «HOLIDAY» program menu This menu allows you to create, test, modify and delete the «HOLIDAY» programs. The holiday programs allow you to set different periods during the year when to suspend the on/off programs combined with channel 1 and/or 2 (dual-channel mod.), example for Christmas and summer shutdown of a public or sales department.
- Page 20 6. Use the keys to select the month when program suspension is to be terminated (ON) (the number of the month flashes). Confirm with 7. Use the keys to select the day when program suspension is to be terminated (ON) (the number of the day flashes).
- Page 21 6 - Deleting a program («ERASE PG» menu) MENU PROG SET 1. Press the key to access the first menu ( ERASE PG SET 2. Use the keys to select the menu. Confirm with ERASE PG SING 3. The display shows the screen to delete a single main screen ERASE PG ALL...
-
Page 22: Override» Menu
7 - «OVERRIDE» menu This menu allows you to manually force the status of the outputs/s (dual- Override Display Channel- Override function mode symbol channel mod.) regardless of the active programs. Generally used to test or Condition perform maintenance of the connected load. No override on the channel, auto program-controlled... -
Page 23: Option Menu
8 - «OPTION» menu The following is possible from this menu: - Language selection - ASTRO / TIME setting - Maintenance - Hour counter - LED light (backlighting) main screen - Warranty - Info MENU PROG SET 1. Press the key to access the first menu ( OPTION SET 2. - Page 24 8.2) SETUP SETUP SET 1. From the sub-menu confirm with ASTRO TIME 2. Use the keys to select between . Confirm with ASTRO SET 3. If you select you can activate/deactivate the astronomical function and enter and/or edit the coordinates. Proceed as described in paragraph 2.1. TIME SET 4.
-
Page 25: Hour Counter
8.3.a) Managing a maintenance operation - Once the operating hours set for one or both channels (dual-channel model) are reached, MAINTEN will appear on the main screen in cyclic repetition alternating with the current DATE (example in the figure at the side: channel 1 in Maintenance). - In this condition you can override the status of the outputs (from the MANUAL menu) and manage the maintenance intervention. -
Page 26: Warranty
8.5) BACKLIGHTING This function allows you to set the display backlighting in three modes: Timed = on for 6 seconds after a key is pressed. Fixed ON = always on (default) Fixed OFF = always off BACHLIT 1. From the sub-menu confirm with 2. - Page 27 8.7) INFO This feature allows you to view information about the version of software installed on the product. INFO SET 1. From the sub-menu confirm with 2. Information about the version of software is displayed. MENU 3. Exit and return to the home screen by pressing the key three times .
- Page 28 PERRY ELECTRIC Srl - Via Milanese, 11 - 22070 VENIANO (Como) ITALY & Recycling: PAPER. Check the regulations of your municipality...
Need help?
Do you have a question about the NFC and is the answer not in the manual?
Questions and answers