Advertisement
Advertisement
Table of Contents

Related Manuals for Kogan Fortis FFZTTTREDA


Summary of Contents for Kogan Fortis FFZTTTREDA
- Page 1 JOGGING TREADMILL (1-10KM/H) FFZTTTREDA...
-
Page 2: Table Of Contents
Safety & Warnings Components Assembly Operation Cleaning & Care Troubleshooting Notes... -
Page 3: Safety & Warnings
200cm from the rear. • I f the treadmill or its power cord is damaged, cease use immediately and contact help.Kogan.com for support. • D o not touch any moving parts with your hands. -
Page 4: Components
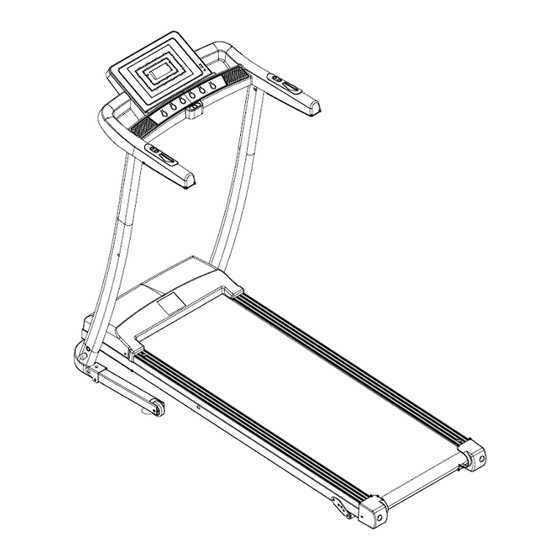
COMPONENTS 1 Main Frame 2 Display Board 3 Left Tube of Bottom Frame 4 Right Tube of Bottom 5 User Guide 6 Hardware Frame Hardware Safety key M8 hexagon lock nut (x4) 6mm Allen key Open end wrench Lubricating oil 5mm Allen key M8x16 half round head M8x50 half round head hexagonal... -
Page 5: Assembly
ASSEMBLY Note: The running belt on this treadmill has a visible joint mark. This is completely normal and will not affect the performance or operation of your treadmill. Step 1: Lift the main frame and the display board out of the box and open the binding belt of the frame. - Page 6 Step 3: • The Allen key (I) and Open spanner (H) are required to complete this step. • Turn the treadmill over in the direction of the arrow in the image below. • Insert the bottom edge tube into the bottom frame as shown and secure it in place using J (x4), G (x4), and E (x4).
- Page 7 Step 4: Insert K from the bottom of the column aligning it with the hole in the main frame as shown. Step 5: • Insert the display board in the direction shown. • Secure it in place using E (x4) and D (x4).
- Page 8 Step 6: At this point, the screen will be on, but the treadmill will only run after pressing the ‘Start’ button. Note: The safety lock must be positioned on the yellow label in the middle of the lower part of the display board for the treadmill to start normally. If the screen displays ‘E07,' it means the safety lock is either not placed or not properly positioned.
- Page 9 Folding When transporting or not using the treadmill for an extended period, fold it as shown in the following figure. Hold the rear end of the running platform with one hand and slowly lift it in the direction indicated by the arrow until the running platform is parallel to the pillar. Use the other hand to insert K from one side of the pillar, ensuring that the pin is inserted into the folding hole on the side of the running platform.
-
Page 10: Operation
OPERATION Powering the Treadmill Connect the power cord to an electrical out and turn it on. Place the power switch in the on position and wait for the display to illuminate and enter the starting interface. Safety Lock Place the safety lock completely in the designated area on the display board before the treadmill to operate the treadmill. - Page 11 System Operation Speed + Button Stop Button Program Button Mode Button Start Button Speed - Button Booting Up: Normal startup occurs after a 3 second countdown. Number of Programs: Three manual programs and 12 automatic programs. Button Functions Start button: When the treadmill is stopped, press the ‘Start’...
- Page 12 Mode button: • In standby mode, press the ‘Mode’ button to cycle through three different countdown modes: Time Counting mode, Distance Counting mode, and Calorie Counting mode. • Use the speed plus or minus button to set the relevant countdown value. •...
- Page 13 Automatic Programs Each program has 10 segments, and the running time of each program segment is equally distributed. Below is a diagram of the movements of the 12 programs. Set time/10 = run time of each time slot Program time slot Speed Speed Speed...
- Page 14 Exercise Guidelines • Consult your doctor before starting any exercise or training program. Follow your doctor's advice and instructions for training. Set realistic goals with your doctor before starting the training program. • Incorporate aerobic exercises into your routine, such as walking, jogging, swimming, dancing, or cycling.
- Page 15 Forward Bend: With knees slightly bent, slowly bend forward, allowing your back and shoulders to relax. Try to touch your toes. Hold for 10- 15 seconds and relax. Repeat 3 times. Hamstring Stretch: Sit on a clean surface, straighten one leg, and place the other leg inward so it fits snugly against the inside of the straight leg.
-
Page 16: Cleaning & Care
CLEANING & CARE Maintenance Guidelines • Warning: Unplug the treadmill before performing cleaning and maintenance. • Proper maintenance can keep your treadmill in the best condition. Incorrect maintenance can cause injury or shorten the treadmill's service life. • Regularly remove dust to keep the parts clean. •... - Page 17 Adjusting the Running Belt Tightness After a period of use, if the running belt slips or is not smooth, you can adjust its tightness. Insert the hexagonal wrench into the adjustment hole of the left foot guard and turn it 1/4 turn clockwise. Then, adjust the right foot guard similarly. Adjust the left and right sides synchronously to tighten the running belt and prevent deviation from the centre.
- Page 18 Lubricating Oil • The treadmill is lubricated when it leaves the factory, but regular lubrication checks will help maintain its condition. The treadmill must be lubricated after one year of use or 100 hours of operation. • After every 30 hours or 30 days of use, check the lubrication. Pull the starting belt from the side and touch the surface of the treadmill.
-
Page 19: Troubleshooting
High voltage fault. • T he motor may need to be replaced. Contact help.Kogan.com for support. • E nsure the motor line is connected and reconnect if necessary. • C heck the motor line for damage or No motor detected. - Page 20 • Ensure the motor line is connected circuitry damage. and reconnect if necessary. The motor may need to be replaced. Contact help.Kogan.com for support. Safety switch not Place the safety lock in the correct engaged. position.
-
Page 21: Notes
NOTES... - Page 24 Need more information? We hope that this user guide has given you the assistance needed for a simple set-up. For the most up-to-date guide for your product, as well as any additional assistance you may require, head online to help.kogan.com...
Need help?
Do you have a question about the Fortis FFZTTTREDA and is the answer not in the manual?
Questions and answers