
Related Manuals for Necchi C1200


Summary of Contents for Necchi C1200
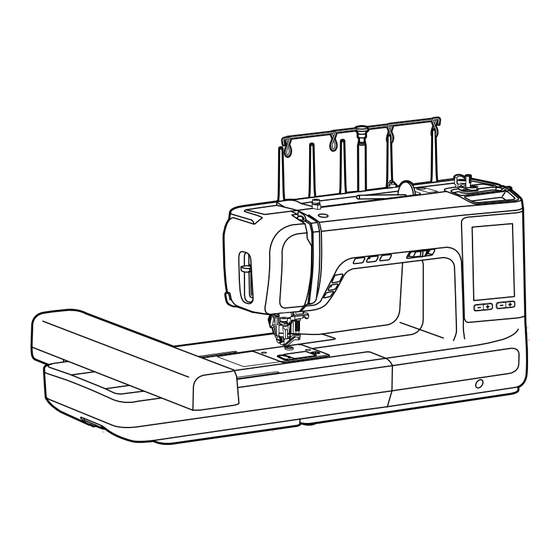
- Page 1 Instruction Manual SEWING+EMBROIDERY C1200 Enjoy your Necchi time! Artist Tool NecchiAIO...
-
Page 3: Important Safety Instructions
Important safety instructions When using an electrical appliance, basic safety should always be followed, including the following: Read all instructions before using this machine. DANGER - To reduce the risk of electric shock: 1. An appliance should never be left unattended when plugged in. 2. - Page 4 14. Never use the machine if the air vents are blocked, keep the air vents of the machine free from dust, fusel and leftovers. 15. The sound pressure level at normal operation is smaller than 80dB(A). 16. Do not dispose of electrical appliances as unsorted municipal waste, use separate collection facilities.
-
Page 5: Table Of Contents
Contents Machine Introduction Principal parts of the machine ....................2 Front overview ............................2 Top overview ............................3 Back overview ............................3 Embroidery unit overview ....................... 4 Accessories ..........................4 Connecting machine to power source ................... 5 Polarized plug information ........................5 Machine Setup Two-step presser foot lifter .................... - Page 6 Embroidery Process Preparation for embroidery ....................49 Install the embroidery hoop ....................50 Selecting embroidery pattern ....................51 Embroidery pattern types ........................51 Built-in embroidery pattern ........................52 Built-in embroidery letter ........................54 Built-in frame designs .......................... 56 Built-in monogram letters ........................57 Built-in stitches for decorative frame ....................
- Page 7 Move the patterns ..........................92 Enlarge stitch position .......................... 93 Adjust stitch position ..........................94 Search stitch position ........................... 94 Switch hoop position for threading....................... 95 Finish the embroidery ......................96 Remove embroidery hoop ........................96 Remove embroidery unit ........................96 Maintenance and Trouble Shooting Maintenance ...........................
-
Page 8: Machine Introduction
Machine Introduction... -
Page 9: Principal Parts Of The Machine
Principal parts of the machine Front overview ① Take-up lever ② Operation buttons ③ Automatic needle threader lever ④ Thread cutter ⑤ Sewing light ⑥ Speed adjustment slider ⑦ LCD screen (touch panel) ⑧ Needle plate ⑨ Needle clamp screw ⑩... -
Page 10: Top Overview
Top overview ① ⑥ Horizontal spool pin Bobbin winder seat ② ⑦ Upper thread guide Bobbin thread cutter ③ ⑧ Bobbin thread guide Magnet ④ Second spool pin hole ⑤ Bobbin winder switch Back overview ① Handwheel ② Stylus ③ Main power switch ④... -
Page 11: Embroidery Unit Overview
Embroidery unit overview ① Embroidery carriage ② Embroidery unit release button ③ Hoop-securing lever ④ Embroidery hoop holder ⑤ Embroidery unit detection device Accessories ① Embroidery foot ② Thread net ③ Stylus ④ Needle set (#75/11*2, #90/14*3) ⑤ Bobbin (3x) ⑥... -
Page 12: Connecting Machine To Power Source
Connecting machine to power source ⚠ Attention Always make sure that the machine is unplugged from power source and the main switch is off ("O"), when the machine is not in use and before inserting or removing parts. Before connecting the power supply, make sure that the voltage shown on the rating plate is conforming with your main power. -
Page 13: Machine Setup
Machine Setup... -
Page 14: Two-Step Presser Foot Lifter
Two-step presser foot lifter The presser foot lifter is to raise or lower your presser foot. When sewing multi-layers or thick fabrics, the presser foot can be further raised up manually to allow enough space for your sewing work. Note The needle must always be at the highest position. -
Page 15: Using The Thread Net
Using the thread net Note - In order to prevent tangling of the thread, please use a thread net. The net is especially useful when using large or loose wound spools. - Reduce the thread tension if necessary. When using special threads which spin quickly off the thread spool, attach a net to the spool before using. -
Page 16: Winding The Bobbin
Winding the bobbin It is important to carry out the threading correctly to get a quality sewing. Otherwise several problems will occur. 1. Place the thread and spool holder onto the spool pin. For better sewing quality, choose a proper size of the spool holder for the thread and attach it next to the spool. - Page 17 5. Wind the thread clockwise around the bobbin 5-6 rounds. 6. Wind the thread into the cutter of bobbin winder base and pull the thread to the right to cut. ① Bobbin winder seat ② Guide slit (with built-in cutter) 7.
-
Page 18: Inserting The Bobbin
Inserting the bobbin ⚠ Attention Turn the power switch to off ("O"). When inserting or removing the bobbin, the needle and the presser foot must be fully raised. Open the bobbin cover by pushing the release button to the right. ①... -
Page 19: Threading The Upper Thread
Threading the upper thread It is important to carry out the threading correctly to get a quality sewing. Otherwise several problems will occur. ⚠ Attention The needle threader can be with a 75/11 through 100/16 home sewing machine needle. 1. Turn the power switch to on ("I"), the needle, presser foot and take-up lever will automatically raise to the highest position. - Page 20 2. Place the thread and spool holder onto the spool pin. For better sewing quality, choose a proper size of the spool holder for the thread and attach it next to to the thread. ① Large spool holder ② Small spool holder In order to prevent tangling of the thread, please use a spool net.
- Page 21 7. Pull the thread to the top then pass the thread through the slotted eye of the take-up lever. Guide the thread down afterwards. 8. Pass the thread behind the flat, horizontal thread guide. Threading to the right side of the thread guide. 9.
- Page 22 11. Press down the automatic needle threader lever on the left side of face cover to the bottom, when you hear a "click" sound, it is the correct position and the hook pin passes through the needle eye. ① Lever 12.
-
Page 23: Replacing The Needle
Replacing the needle Change the needle regularly, especially when it shows signs of wear or if it causes problems. ⚠ Attention Turn the power switch to off ("O") when carrying out below operations! Turn the handwheel toward you to raise the needle then loosen the needle clamp screw to remove the needle. -
Page 24: Matching Needle/Fabric/Thread
Matching needle/fabric/thread Needle Size Fabrics 65/9 - 75/11 Lightweight fabrics- thin cottons, voile, serge, silk, muslin, Qiana, interlocks, cotton knits, tricot, jerseys, crepes, woven polyester, shirt & blouse fabrics. 80/12 Medium weight fabrics- cotton, satin, kettleclote, sailcloth, double knits, lightweight woolens. 90/14 Medium weight fabrics- cotton duck, woolen, heavier knits, terrycloth, denims. -
Page 25: How To Install Multiple-Spool Holder Stand
How to install multiple-spool holder stand The spool stand has room for up to 5 spools, enabling quick access to threads of different colors. Quick access to a wide range of spools of different colors is a real time saver when working on multicolored embroidery designs. -
Page 26: Spool Holder Stand Installation
Pull up the handle to fixed position ① Handle Align the three grooves of the spool base to the rear cover where the screw holders are attached. ① Screw holder ② Grooves of the spool base Insert from top to bottom on the screw holders. -
Page 27: Process Of Threading Using Spool Stand
Push to the right and spool holder stand will be fixed. ① Lock position Process of threading using spool stand Take out the cone holders from the accessory bag and insert it on the spool pin. ① Cone holders ② Spool pin There are 5 spool pins. -
Page 28: Remove Spool Holder Stand
Pass the thread through the thread guide on the spool base. Guide the thread forward and pass through upper thread guide. Guide the thread to the left and pass through the guide plate. Note For more information, please check "Threading the upper thread" chapter. Remove spool holder stand Push the spool holder stand to left and pull out. -
Page 29: Operation Buttons
Operation buttons ① Move to the center of embroidery hoop Press this button after installed the embroidery hoop, the hoop will move to the place where hoop center and needle point align with. ② Safety lock The machine waits for 30 minutes of inactivity or click the Safety lock button, machine will set to power save mode and locked the screen. -
Page 30: Start/Stop Button
③ Start/stop button Press the start/stop button to start machine running. Press the start/stop button again to stop machine. The LED light colors on the button will change according to its operation mode: Green light: the machine is ready or is embroidering Orange light: Not in conditions to embroidery... - Page 31 ⑥ Thread cutter button Press this button after finishing embroiderning and the machine will trim the thread. Note During embroiderning, can not use this button. ⑦ Speed adjustment slider The speed adjustment slider can control the embroiderning speed. To increase the speed, slide the lever to the right.
-
Page 32: Instruction
Instruction... -
Page 33: Lcd Screen
LCD screen ① Pop out and close the menu selection ② Home ③ Setting ④ Tutorial ⑤ Safety Note Use only your finger or the included stylus to tap the screen. Please do not use a sharp pencil, screwdriver, or other stiff, sharp objects. -
Page 34: Function Buttons And Icon
Function buttons and icon Icon Name Application Switch pages Switch pages up/down ① Turn on function Turn on/off switch ② Turn off function Back to default value Hold the slider to increase or reduce setting values Slider ① Default values ②... -
Page 35: Setting
Setting ① Embroidery setting ② Machine setting ③ Wi-Fi setting ④ Close setting page Embroidery setting Max. speed adjustment This function can adjust the embroidery speed. Upper thread tension adjustment Adjusting the upper thread tension in the Setting page will affect to all embroidery patterns. -
Page 36: Machine Setting
Trim thread The default setting of thread trim is on, the machine will stop after 7 stitches, the message will pop out and the user can trim the thread. When turning off this function, machine will not stop. Auto-lock setting The default setting of auto-lock is off in the embroidery mode. - Page 37 Hint sound To turn on/off the sound. Default setting is on. Display setting To adjust the light brightness on the working area and display brightness. Screen calibration Follow and click the number shown on the screen, clicked all 5 points to finish screen calibration.
- Page 38 Language To select different languages. Reset to default settings Restore factory settings. To remove all personal settings.
- Page 39 Machine information Firmware version: Display current software version. A ! icon indicates any new version is detected. Total stitches: Will display the total number of stitches have used after the machine left the factory. Total stitches after last maintenance: Will display the cumulative number of stitches after last maintenance.
- Page 40 Legal and licence Display related legal information. Warning messages Turn On/Off The partial warning messages can be turned on and off. The messages turned off will not display during the operation.
-
Page 41: Wi-Fi Setting
Wi-Fi setting Connect to Wi-Fi Turn on the Wi-Fi connection. WPS Connection Select WPS connection, and a prompt screen will appear. Press the WPS button on your home router to connect to the machine. When the connection is completed, the prompt screen will disappear;... - Page 42 Searching for internet Search Wi-Fi router and select Wi-Fi router. Note Adding a new network, please input the name and password then connect.
- Page 43 Note Change IP address and machine name manually is available. User account When Wi-Fi have successfully been connected, please input user account. Note Register the account on App, it can be downloaded by scanning the QR Code.
-
Page 44: Embroidery Preparation
Embroidery Preparation... -
Page 45: Important Embroidery Information
Important embroidery information Embroidery threads A good quality thread is essential for embroidery to avoid poor stitch formation, needle break, etc. Good embroidery performance will be effective by using 40wt glossy rayon or polyester embroidery threads as upper threads. They are available in a wide range of colors for beautiful embroidery. -
Page 46: Darning And Embroidery Thread
Darning and embroidery thread Fine mercerized cotton thread which is suitable for embroidering on cotton. Note In most cases, bobbin thread for embroidery is either white or black. Some special cases require the same for upper and bobbin thread. Stabilizer Tear-away stabilizers The excess is easily to tear away. -
Page 47: Adhesive Spray
Adhesive spray Avoid using spray adhesive next to your embroidery machine. Keep about 25-30 cm distance while using the spray. Use the spray carefully. Spray the stabilizer and adhere to back side of material carefully and iron to prevent wrinkles. Application: Keep stretch and knitted material in shape. -
Page 48: Iron-On Interfacing
Iron-on interfacing Iron-on interfacings are available in a variety of weights. Iron-on interfacings should be selected to suit the material being used. Use an iron-on interfacing which is easily removable from the material. Use the iron-on interfacing to the wrong side of material and press. Application: Please use an appropriate stabilizer and cut it in a bigger shape than your embroidery pattern. -
Page 49: Embroidery Unit Overview
Embroidery unit overview ① Embroidery carriage ② Embroidery unit release button ③ Hoop-securing lever ④ Embroidery hoop holder ⑤ Embroidery unit detection device Note - Do not touch the embroidery unit detection device. The connector could be damaged, and it may cause malfunctions. - Do not press or force on embroidery carriage, and do not lift it up. -
Page 50: Embroidery Hoop Overview
Embroidery hoop overview ① Inner hoop ② Center marks ③ Triangular mark ④ Outer hoop ⑤ Embroidery hoop connector ⑥ Hoop size marks ⑦ Fastening screw ⑧ Quick release device Preparing the embroidery hoop Attaching a stabilizer to the fabric ⚠... -
Page 51: Hooping The Fabric
If you are using adhesive stabilizers, place the adhesive surface of the stabilizer material against the wrong side of the fabric, and iron. ① Wrong side ② Stabilizer ③ Adhesive surface Hooping the fabric ⚠ Attention Thick layers of fabric and stabilizer may cause skipped stitches, or broken threads, needles and damage on embroidery hoops. -
Page 52: Use The Quick Release Device
Place the inner hoop on the fabric and press firmly until they are securely fit to outer hoop perfectly. If the inner hoop cannot fit properly, loosen the outer hoop's fastening screw and adjust until fitted. When the fabric and inner hoop are completely fit into the outer hoop, pull the fabric from the four sides marked with the arrows so that the fabric is stretched drum-... -
Page 53: Using Embroidery Sheet
Using embroidery sheet Make a mark with a chalk at the center of the position for the pattern to be embroidered. Loosen the fastening screw or open the quick release device (if same type of fabric is used for embroidery). Separate the inner hoop and outer hoop. - Page 54 Place the inner hoop on the fabric and press firmly until them are securely fit to outer hoop perfectly. If the inner hoop cannot fit properly, loosen the outer hoop's fastening screw and adjust until fitted. When the fabric and inner hoop are completely fit into the outer hoop, pull the fabric from the four sides marked with the arrows so that the fabric is stretched drum-...
-
Page 55: Embroidery Process
Embroidery Process... -
Page 56: Preparation For Embroidery
Preparation for embroidery Turn the power switch to on ("I"), the needle, presser foot will automatically raise to the highest position. Note Please check and make sure the presser foot is raised and remove embroidery hoop first before attaching embroidery unit onto the machine. -
Page 57: Install The Embroidery Hoop
Install the embroidery hoop After editing the embroidery image file, place the embroidery hoop with the corresponding size to perform the preparations for embroidering. ⚠ Attention Install or remove the embroidery hoop, please make sure the needle and presser foot are the highest position, so that can put in &... -
Page 58: Selecting Embroidery Pattern
Selecting embroidery pattern Embroidery pattern types Turn on the power and enter embroidery mode. ① Personal embroidery patterns ② USB flash drive ③ Frame ④ Cloud file ⑤ Built-in embroidery pattern ⑥ Text ⑦ Page switching ⑧ Monogram ⑨ Stitches for decorative frame ⑩... -
Page 59: Built-In Embroidery Pattern
Built-in embroidery pattern Click Built-in embroidery pattern icon and enter the category page. ① Built-in embroidery pattern There are multiple groups of built-in embroidery pattern, click Page switching icon to review the category and select the desired pattern. ① Select the pattern ②... - Page 60 Click Search icon to enter quick pattern search page. Click Return icon to the previous page. Click Close icon to go to edit page. ① Search ② Return ③ Close Refer the pattern number and key in to search. Click Confirm icon to display the desired pattern.
-
Page 61: Built-In Embroidery Letter
Built-in embroidery letter Click the Embroidery letter icon to enter selection screen. ① Text There are multiple fonts of built-in embroidery text, click Page switching icon to review the category and select the desired text. ① Page switching... - Page 62 Key in the desired letter to make a combination. Click Delete icon to delete last letter, long press delete icon to delete all letters. Click Cancel icon to return to the Text category page. ① Key in bar ② Delete ③...
-
Page 63: Built-In Frame Designs
Built-in frame designs Click the Frame designs icon to enter frame selection page. ① Frame Click the desired frame pattern and frame shape to combine. Click Switching icon to view other patterns and shapes. Click Next icon to enter in the embroidery editing page. ①... -
Page 64: Built-In Monogram Letters
Built-in monogram letters Click the Monogram letters icon to enter frame selection page. ① Monogram Click two letters or three letters and combine with the frame. Click Page switching icon to view other designs. Click Next icon to enter edit page. ①... -
Page 65: Built-In Stitches For Decorative Frame
Input the desired text to finish the monogram and it will display the preview on the screen. Click Delete icon to delete last letter, long press Delete icon to delete all letters. After finished the editing, click Next icon to enter in the embroidery editing page. - Page 66 There are 4 groups in different folders that can choose from, then select the preferred stitch pattern. Or click the Search icon and go to searching page. ① Stitch patterns folders ② Search icon Refer the stitch chart number and key in to search.
- Page 67 In the edit page, the default frame shape is round, it can be changed to preferred shape. When you select the arc shape, the frame size is 25*50mm. The default for other frames is 50*50mm. ① Preview screen ② Frame shape selection Click Zoom in/Zoom out icon can enlarge up to 1900%.
- Page 68 Click "+/-" for "Number of patterns" to increase or decrease the number of patterns. The default value is 4X, long press "+/-", the value will continuously increase or decrease. The maximum can add up to 50 patterns, the minimum is 1 pattern. Click "+/-"...
-
Page 69: Designs From Usb
Designs from USB The machine has a USB port for memory stick. Through a USB, you can import patterns from the computer to the machine. Note The USB storage device such as RAM disk is not included with the machine, but such kind of devices are easily available in computer shops and camera shops. - Page 70 Click USB flash drive file to enter the selection page. ① USB flash drive Select the desired pattern to enter edit page. Please refer to "Editing the embroidery pattern" chapter for more information.
-
Page 71: Editing The Embroidery Pattern
Editing the embroidery pattern When the embroidery pattern is selected, you can adjust the angle, size, position and color in your preference. ① Preview screen ② Toolbox ③ New file ④ Save file ⑤ Embroidery hoop list ⑥ Color setting ⑦... -
Page 72: Adding Embroidery Pattern
Adding embroidery pattern Select the pattern and enter edit page. Click Add new patterns icon to select the new patterns. The layer will be display in order by selecting sequence. Click Switching layers icon to display each layer. To create a new file, click New file icon. It will display the warning message then open a new layer. -
Page 73: Zoom In/Zoom Out Function
Click Move layer icon to display the multifunction list, the left and right arrow keys can move the selected layer up or down to edit. ① Multifunction list ② Move layer Note It also can use the physical buttons +/- to move the layers. -
Page 74: Select All Layers
Select all layers Click Select all layers icon to edit all layers at the same time. ① Select all layers Note Select all layers function works with two or more layers. Undo/Redo Click Undo icon to cancel or reverse the last steps. -
Page 75: Move The Embroidery Pattern
Move the embroidery pattern Move the embroidery pattern is a default function. Click Move the patterns icon to move the patterns in the preview screen. Under the preview screen, the left and right arrow shows the X-axis position and up and down arrow shows the Y-axis position. -
Page 76: Rotate The Embroidery Pattern
Rotate the embroidery pattern Click Rotate icon to rotate the patterns. It can set to rotate 1° or 15° each time. ① Rotate ② Rotate 1° ③ Rotate 15° Preview screen will display the rotated patterns. The default value is 0, click Angle icon to display multifunction list. -
Page 77: Mirror The Embroidery Pattern
Mirror the embroidery pattern Click Horizontal mirror function icon to flip or mirror a pattern in the horizontal direction. Click Vertical mirror function icon to flip or mirror a pattern in the vertical direction. ① Horizontal mirror function ② Vertical mirror function Preview screen will display the mirrored patterns. -
Page 78: Resize The Embroidery Pattern
Resize the embroidery pattern Click Lock aspect ratio icon to adjust the pattern size with the fixed proportion. ① Lock aspect ratio Preview screen will display the adjusted patterns. The default value is 100%. Click Lock aspect ratio icon to display multifunction list. -
Page 79: Duplicate The Embroidery Pattern
Click the Left and Right arrow icon to adjust 1% proportion each time. The scaling size range is 80%~120%. Click Lock aspect ratio value icon again to restore to default value. ① Multifunction list ② Lock aspect ratio value Note - It also can use the physical buttons +/- to adjust value. -
Page 80: Edit Text
Edit text Key in the text and click Text icon to enter edit page to adjust spacing or radian. ① Text ② Split text ③ Adjust stitch density ④ Adjust text spacing ⑤ Adjust radian ⑥ Close... -
Page 81: Split Text
Split text Click Split text icon to break up the text and the layer will split according to the letter numbers. ① Split text ② The currect selected layer ③ The current layer / Total layers Note Split text function works with two or more letters. -
Page 82: Stitch Density Adjustment
Stitch density adjustment Click the left and right arrow icon to adjust stitch density. The default value is 100%, the adjust range for each increment is 20%, the adjustment range is 60%~140%. Click Stitch density value to restore to default value. -
Page 83: Text Radian Adjustment
Text radian adjustment Click Adjust radian icon to display multifunction list. The left and right arrow icon can adjust the text radian. The default value is 0, and the adjust range for each click is 1, the adjustment range is -100~100. Click Adjust radian value icon to restore to default value 0. - Page 84 Use the center of the pattern as the alignment reference point. Accordingly to the selected icons, the embroidery hoop will move simultaneously to the position where your needle will align to: center, four corners of pattern, or encircle around the pattern. Click Close icon to save current setting and close multifunction list and return to the last edit page.
-
Page 85: Delete The Embroidery Pattern
Delete the embroidery pattern Select the desired embroidery pattern layer to delete, the layer will shown in the action color. Click Delete icon, the screen will display the warning message to confirm delete the selected layer. Long press Delete icon, the screen will display the warning message to confirm delete all layers. -
Page 86: Changing The Colors Of The Embroidery Motif
Changing the colors of the embroidery motif Click Color setting icon to enter edit page. ① Color setting Note The number means how many thread colors will be used in this layer. In the color setting edit page, you can change the embroidery thread color. -
Page 87: Change The Thread Brand
Change the thread brand Click Change the thread brand icon to display other brands selection. It will suggest the similar color's brands on the right side. The left and right arrow icon can switch and view the brand options and details. Select the desired thread brand to change and the preview screen will change to selected brand's correspond colors. -
Page 88: Search Color List Numbers
Search color list numbers Click Search color list numbers icon to enter the searching page. Input the numbers in color chart, can input up to 12 letters. After input two or more letters and click Confirm icon, the correspond colors will display on the right side. -
Page 89: Saving Embroidery Motifs
Saving embroidery motifs Save embroidery pattern Click Save icon to display the saving options. Click Machine icon to save the embroidery pattern in My favorite folder in the machine. ① Save ② Save patterns in My favorite folder Click Add icon to save the pattern, after saved the pattern, the screen will go back to the edit page. -
Page 90: Delete Saved Patterns
Delete saved patterns Click My favorite icon to enter saved patterns folder. Click Delete icon, saved pattern will be shown in action color, then select the desired pattern to delete. Confirm the waring message to delete the pattern. Click Return icon to back to My favorite folder. ①... -
Page 91: Save Embroidery Pattern In Usb Flash Drive
Save embroidery pattern in USB flash drive Click Save icon to display the saving options. Click USB flash drive icon to save the embroidery pattern in the USB flash drive. ① Save ② Save patterns in USB flash drive Click Add and save pattern icon to save the pattern, after the pattern saved, the screen will go back to the edit page. -
Page 92: Delete The Saved Pattern In Usb Flash Drive
Delete the saved pattern in USB flash drive Click USB flash drive icon to enter the folder. Click Delete icon, the saved patterns will shown in the action color. Select the desired pattern and confirm warning message to delete. Click Return icon to back to USB flash drive folder. -
Page 93: Edit Frame
Edit frame Move to the center of embroidery hoop Click the Hoop center icon, the embroidery hoop will move to the place where hoop center and needle point align with. ① Move to center of the hoop Grid Turning on the grid function can position the embroidery pattern more accurately. -
Page 94: Embroidery
Embroidery After finish editing the embroidery patterns, click Next icon to enter setting page. ① Next Note If click Next icon without saving patterns, it will pop out the warning message and enter the save pattern page. Prepare the embroidery thread, the required thread information will display on the edit page. - Page 95 Note Please refer to page "Threading the upper thread" chapter for more information. Lower the presser foot lifter and the status light will change from orange to green, which means that everything is ready. Press the start/stop button to start embroidering.
-
Page 96: Embroidery Setting Adjustment
Embroidery setting adjustment The embroidery setting can adjust with the following options: ① Thread color information ② Thread cutter ③ Single color / multiple colors ④ Basting stitch ⑤ Thread tension ⑥ Move the patterns ⑦ Enlarge stitch position ⑧ Switch hoop position for threading Thread color information Click Thread color information to display the... -
Page 97: Thread Cutter Setting
Thread cutter setting Click Thread cutter icon to display the setting. Click Spacing distance setting icon and the left and right arrow icon can adjust the spacing value. The default value is 2mm, and the adjust range for each click is 1mm, the adjustment range is 1mm~15mm. -
Page 98: Basting
Basting Click Basting icon to baste around the patterns. It can strengthen and fixed the fabric and the lining to prevent them from slipping or shifting. The square frame will display in the preview screen around the pattern. Baste stitches will not have auto lock stitches at the beginning and at the end. -
Page 99: Move The Patterns
The thread tension is correct when upper thread is just visible on back of the fabric. ① Upper thread ② Bobbin thread ③ Right side ④ Wrong side When the bobbin thread is visible on the front of the fabric, the thread tension is too tight for embroidering. -
Page 100: Enlarge Stitch Position
Click Direction icon to display the multifunction list. The default value is 0, The left and right or up and down arrow icon in the multifunction list can adjust the X-axis and Y-axis position. ① Direction icon ② X-axis value ③... -
Page 101: Adjust Stitch Position
Adjust stitch position Click Current stitch number/Total stitch numbers or Current stitch number of the layer/Total stitch numbers of all layers icon to display the needle position slider and multifunction list. Move the needle position slider or click the left and right arrow icon in the multifunction list to adjust the stitch position. -
Page 102: Switch Hoop Position For Threading
Switch hoop position for threading When the embroidery need to change the thread and the hoop is too close to the needle, use switch hoop position function to move the hoop and it's easier for threading. Click Switch hoop position for threading icon and it will display the warning message. -
Page 103: Finish The Embroidery
Finish the embroidery Remove embroidery hoop ⚠ Attention Install or remove the embroidery hoop, please make sure the needle and presser foot are the highest position, so that can put in & take out smoothly. Otherwise may damage the needle and presser foot. Press the hoop-securing lever to pull the embroidery hoop backward to remove the embroidery hoop. -
Page 104: Maintenance And Trouble Shooting Maintenance
Maintenance and Trouble Shooting... -
Page 105: Maintenance
Maintenance ⚠ Attention Disconnect the power cord from the wall socket before carrying out any maintenance, otherwise injury or electrical shock may result. Clean the machine surface If the surface of the sewing machine is dirty, lightly soak a cloth in mild detergent, squeeze it out firmly and then wipe the surface. -
Page 106: Warning Function
Warning Function Warning beeping sound Operate correctly: 1 beep. Operate incorrectly: 3-short beeps. When the machine is in trouble and can't sew: 1-long beep. It means that the thread may be twisted or jammed and the handwheel axle can't move. Please look through the "Trouble shooting guide"... -
Page 107: Trouble Shooting Guide
Trouble shooting guide Before calling for service, check below trouble shooting guides in advance, if problem still exist, please contact nearest dealer or local service center. Problem Cause Correction 1. The machine is not threaded 1. Rethread the upper thread. correctly. - Page 108 Problem Cause Correction 1. The machine is not correctly 1. Check the threading and rethread. threaded. 2. The bobbin case is not threaded 2. Thread the bobbin case as correctly. illustrated. Loose stitches 3. Needle/fabric/thread combination is 3. The needle size must suit the fabric wrong.
- Page 109 Problem Cause Correction 1. The thread is tangled and the 1. Remove the tangled thread. When bobbin case, etc., is plugged up. the bobbin case is plugged up, clean the race. 2. The thread tension is incorrect. 2. Adjust the tension of the upper thread.
- Page 110 Problem Cause Correction 1. The thread tension is not right. 1. Set a smaller thread tension. 2. Poor quality thread. 2. Select a better quality thread. The embroidery result is not good 3. The wrong size needle has been 3. Choose a needle size between 9-11 while sewing thin used.
- Page 111 Embroidery Pattern Chart...
-
Page 112: Embroidery Pattern Chart
Embroidery pattern chart 0101 0102 0103 0104 PF233 PF304 PF754 PF108 114.4 165.2 99.0 217.4 110.0 147.4 86.0 159.0 2878 6778 2378 4575 0105 0106 0107 0108 PF489 PF489 PF900 PF157 PF256 189.6 225.2 238.2 115.2 135.8 156.0 158.6 54.4 4543 5059 5493... - Page 113 0121 0122 0124 0123 PF229 PF647 PF216 PF143 PF595 PF195 PF254 PF276 PF523 PF135 PF155 PF244 PF184 PF524 PF688 PF132 PF190 PF245 PF186 PF662 PF138 PF194 PF147 PF641 PF133 PF143 PF190 PF523 PF208 PF593 PF256 137.4 154.2 108.0 255.8 141.0 102.8 108.6 85.6...
- Page 114 0205 0206 0207 0208 PF221 PF486 PF370 PF4574 PF356 PF4576 159.6 109.2 50.0 102.8 113.4 70.8 69.8 41.0 5584 3367 4393 5735 0209 0210 0211 0212 PF901 PF372 PF900 PF820 PF4895 PF3652 PF106 PF450 PF901 PF801 PF703 PF711 PF901 PF900 PF900 128.4 55.4...
- Page 115 0225 0226 0227 0228 PF778 PF778 PF255 PF438 PF560 PF7362 PF254 PF196 PF1128 PF900 PF4571 PF157 PF563 PF900 PF502 PF701 PF745 PF4611 PF192 PF565 PF767 PF2814 PF196 PF737 PF4323 PF7362 PF720 PF720 PF744 PF4324 PF730 PF502 PF256 PF820 PF4325 PF565 PF254 46.4 90.4...
- Page 116 0309 0310 0311 0312 PF7371 PF602 PF1123 PF1545 120.0 199.4 167.4 219.4 104.0 89.4 68.0 83.4 2257 12496 7206 14186 0313 0314 0315 0316 PF561 PF3214 PF192 PF140 PF140 157.2 220.0 259.4 28.8 55.6 76.4 31.8 114.0 6177 14225 4592 4426 0317 0318...
- Page 117 0329 0330 0331 0332 PF153 PF2042 PF255 PF646 PF153 PF2042 PF255 PF646 PF294 PF1123 PF201 162.6 19.0 46.6 32.2 43.4 119.8 131.2 87.8 3383 2435 8151 8066 0333 0334 0335 0336 PF135 PF141 PF700 PF523 PF2411 PF141 PF700 PF107 PF135 PF145 PF525 PF523...
- Page 118 0405 0406 0407 0408 PF303 PF754 PF800 PF245 PF720 PF188 PF305 PF784 PF483 PF733 PF900 PF301 PF753 PF4252 PF735 PF306 PF752 PF416 PF800 PF359 PF4613 PF900 PF4571 PF800 PF900 PF244 PF4574 48.0 75.6 60.6 47.0 101.8 74.4 79.6 94.8 9653 5020 10489 4046...
- Page 119 0601 0602 0603 0604 PF700 PF700 PF700 PF900 PF703 PF277 PF703 54.6 88.6 71.2 46.6 75.6 89.6 60.2 101.0 1439 6699 1567 5061 0605 0606 0607 0608 PF256 PF259 PF248 PF256 PF526 PF256 PF259 PF703 PF256 PF259 PF256 PF192 PF259 PF702 PF526 PF730...
- Page 120 0705 0706 0707 0708 PF548 PF172 PF565 PF1086 PF1086 PF703 PF228 PF152 PF1086 PF900 PF703 PF720 PF523 PF523 PF117 PF160 PF3432 75.2 93.8 98.2 30.8 102.2 70.0 56.8 140.8 7519 7558 6919 4266 0709 0710 0711 0712 PF779 PF779 PF643 PF105 PF743 PF4251...
- Page 121 0805 0806 0807 0808 PF309 PF592 PF521 PF501 PF304 PF4352 PF700 PF501 PF301 PF1084 PF106 PF155 PF370 PF523 PF170 PF501 60.2 51.0 62.8 142.2 43.8 47.4 50.0 26.8 3090 3310 3880 4038 0809 0810 0811 0812 PF145 PF486 PF900 PF5681 PF523 PF102 PF778...
- Page 122 0901 0902 0903 0904 PF751 PF540 PF801 PF1051 PF184 PF1051 PF522 PF334 PF392 PF512 PF393 PF801 PF751 PF801 PF900 PF801 PF900 PF522 PF900 96.6 96.6 91.4 86.6 46.2 71.2 65.6 70.2 6180 7633 8387 7196 0905 0906 0907 0908 PF227 PF801 PF801 PF801...
- Page 123 0921 0922 0923 0924 PF801 PF531 PF140 PF522 PF522 PF3543 PF371 PF1703 PF171 PF1083 PF2814 PF801 PF641 PF503 PF531 PF900 PF801 PF1512 PF900 PF171 99.4 85.6 95.2 91.4 75.6 61.6 100.6 99.8 10922 4877 12334 11879 0925 0926 0927 0928 PF900 PF900 PF801...
- Page 124 0941 0942 0943 0944 PF163 PF305 PF900 PF171 PF502 PF3543 PF522 PF522 PF3651 PF171 PF2042 PF255 PF371 PF801 PF522 PF801 PF502 PF900 PF2042 PF900 PF801 PF801 PF522 PF900 43.4 64.6 56.6 63.8 40.0 32.6 47.8 47.0 3122 3114 5166 4098 0945 0946 0947...
- Page 125 0961 0962 PF801 PF800 PF900 PF223 PF502 PF3877 PF3651 59.8 43.6 50.2 35.8 4054 4044...
- Page 130 017 018 026 027 028 029 030 031 032 033 034 035 040 041 042 049 050 051 052 053 059 060 061 062 067 068 069 070 071 072 075 076 078 079 080 081 082 083 084 085 086 087 091 092 093 095 096...
- Page 131 017 018 026 027 028 029 030 031 032 033 034 035 040 041 042 049 050 051 052 053 059 060 061 062 067 068 069 070 071 072 075 076 078 079 080 081 082 083 084 085 086 087 091 092 093 095 096...
- Page 132 017 018 026 027 028 029 030 031 032 033 034 035 040 041 042 049 050 051 052 053 059 060 061 062 067 068 069 070 071 072 075 076 078 079 080 081 082 083 084 085 086 087 091 092 093 095 096...
- Page 133 2001 2002 2003 2004 PF185 PF199 PF524 PF564 PF544 34.0 94.8 77.8 29.4 81.2 102.4 80.8 95.6 1346 3974 2929 1033 2005 2006 2007 2008 PF130 PF243 PF102 PF561 PF132 PF163 PF103 PF564 79.8 99.0 84.8 77.2 78.4 94.0 76.8 50.4 2729 7224...
- Page 134 3001 3002 3003 3004 PF512 PF200 PF601 PF332 40.2 69.0 113.4 111.0 70.0 110.2 113.6 88.4 3117 3652 7223 8162 3005 3006 3007 3008 PF305 PF103 PF147 PF564 PF310 PF737 PF525 PF544 94.0 105.0 128.0 103.0 41.2 93.6 90.4 104.2 1479 2478 5889...
-
Page 135: Creative Patterns
Creative Patterns... -
Page 136: Creative Patterns Chart
Creative patterns chart 1001 PF742 PF591 PF7785 PF522 PF3211 PF742 69.8mm 57.4mm 5036 1002 PF273 PF275 PF277 PF695 PF135 97.4mm 98.0mm 10509 1003 PF713 PF7367 PF355 PF1083 PF901 PF535 56.0mm 70.6mm 2453... - Page 137 1004 PF169 PF181 PF434 PF521 PF523 PF181 PF434 PF901 80.6mm 51.2mm 3407 1005 PF534 PF700 Add appliqué fabric PF3214 Trim appliqué fabric PF700 Add appliqué fabric PF3214 Trim appliqué fabric PF3651 PF534 PF900 83.4mm 83.2mm 4244 1006 PF700 Add appliqué fabric PF3214 Trim appliqué...
- Page 138 1007 PF133 PF135 79.8mm 80.2mm 12738 1008 PF206 PF720 Add EVA PF1085 PF544 99.9mm 53.5mm 3067 1009 PF522 PF142 PF1601 Add EVA PF184 Add EVA PF142 55.6mm 69.0mm 4192...
- Page 139 1010 PF1107 PF522 PF371 PF355 244.8mm 29.2mm 15234 1011 1012 PF782 PF782 PF754 PF754 PF754 Add pop up design (b) PF754 63.8mm 40.6mm 58.2mm 81.6mm 4093 2057...
- Page 140 1013 1014 1015 PF604 PF604 PF604 57.0mm 53.4mm 53.6mm 61.6mm 61.4mm 49.0mm 1218 1329 1016 1017 1018 PF604 PF604 PF604 53.4mm 36.8mm 18.6mm 46.2mm 42.4mm 18.4mm 1135 1019 1020 1021 PF218 PF218 PF218 27.2mm 23.0mm 31.8mm 28.2mm 38.0mm 29.4mm...
-
Page 141: Icon Illustrate
Icon illustrate Post-processing Additional processing is required to complete the project. Fringe embroidery Three processing choices available to complete the Fringe Embroidery. Method A: ① After finish the embroidering, turn the piece over to the backside. ② Cut the lower threads of embroidery patterns. -
Page 142: Brushed Embroidery
Brushed embroidery ① Change needle size to #16/100, use wool NO.16 embroidery thread and JX presser foot. ② Brush the thread by iron brush or velcro. ③ Completed. Appliqué ① Mark the patch position on the fabric first. ② Place the patch on the embroidery area and continue embroidery. -
Page 143: Freestanding
Freestanding ① Use water-soluble stabilizer. ② Finished the embroidery. ③ Soak the design until the water-soluble stabilizer has dissolved. ④ Completed. 3D foam embroidery ① Hooping the fabric firmly. ② Place EVA foam over the patterns where you want to embroidery. ③... -
Page 144: Post-Processing Tutorial - Butterfly
Post-processing tutorial - Butterfly It will need to use the embroidery pattern 1011~1012. Material preparation: ① Organza fabric ② Water-soluble stabilizer ③ Hand stitching needle and embroidery thread ④ Few pieces of sequins ⑤ Hair pin *1pc ⑥ Webbing 1*pc 6mm ⑦... - Page 145 Start Embroidery Finish embroidery pattern #1011. (Use the same bobbin color thread as upper thread) Finish the third layer embroidery, put above of #1012 pattern at the center place. Finish the fourth layer embroidery. (Fix the #1012 embroidery pattern) Cut out the shape. Dissolved the water-soluble stabilizer Soak the butterfly design until the water- soluble stabilizer has dissolved.
- Page 146 Sequins Place the sequins at the wings and sew (Use the same bobbin color thread as upper thread). Fixed hairpin Cut the webbing to hairpin length, then use a glue gun to stick the webbing on the hairpin. Use a glue gun to stick the butterfly on the webbing.
-
Page 147: Post-Processing Tutorial - Flower
Post-processing tutorial - Flower It will need to use the embroidery pattern 1013~1021. Material preparation: ① Organza (purple/green) ② Water-soluble stabilizer ③ Hand stitching needle and embroidery thread ④ Pearl *1pc ⑤ Clip *1pc ⑥ Non-woven fabric ⑦ Glue gun Hooping Place the two layers of water-soluble stabilizer underneath the purple organza,... - Page 148 Hooping Place the two layers of water-soluble stabilizer underneath the green organza, and hoop them firmly. Make sure it's tight with no wrinkles, to have a better embroidery performance. Start embroidery - leafs (1019-1021) Finish embroidery pattern of the leafs (Use the same bobbin color thread as upper thread).
- Page 149 Place a fabric in between and use flatiron to dry the design. Place petals in the proper order Stitch all pieces by hand to complete the project. Place petals in proper order and hand stitching petals along with a bead to fit it. Adhesive the clip Use the glue gun to adhesive the non-woven fabric behind the clip.
- Page 150 Use the glue gun to adhesive the non-woven fabric in the back of the leaves. Use the glue gun to adhesive the leaves in the back of the petals. Completed!
- Page 152 Do not dispose of electrical appliances as unsorted municipal waste, use separate collection facilities. Contact your local government for information regarding the collection systems available. If electrical appliances are disposed of in landfills or dumps, hazardous substances can leak into the groundwater and get into the food chain, damaging your health and well-being.
- Page 153 011CJA0104...
Need help?
Do you have a question about the C1200 and is the answer not in the manual?
Questions and answers