Table of Contents
Advertisement
Quick Links
Advertisement
Table of Contents

Related Manuals for KJK KJK229


Summary of Contents for KJK KJK229
- Page 1 KJK229 Trail Camera V24011001...
-
Page 2: Table Of Contents
TABLE OF CONTENT 1. IN THE BOX--------------------------------------------------------- 2. IMPORTANT NOTE------------------------------------------------ 2.1. Battery Requirements------------------------------------ 2.2. Battery Caution--------------------------------------------- 2.3. Battery Preservation-------------------------------------- 2.4. Memory Card Specification----------------------------- 2. 5 . Remove Protective Films-------------------------------- 2. 6 . On-Screen Information----------------------------------- 2. 7 REPLAY----------------------------------------------------- 3. INTRODUCTION---------------------------------------------------- 3.1. About the Camera----------------------------------------- 3.2. - Page 3 9. ADVANCED SETTINGS--------------------------------- 13-17 10. MOUNTING AND POSITIONING THE CAMERA---- 18-19 10.1. MOUNTING------------------------------------------ 20-21 10.2. SENSING ANGLEAND DISTANCE TES----- 10.3. SWITCHING ON THE CAMERA------------------- 21-22 11. REVIEW PHOTOS OR VIDEOS------------------------ 22-24 12. TECHNICAL SPECIFICATIONS----------------------- 13. FAQS--------------------------------------------------------------- 24-25 13.1. IMPORTANT NOTE------------------------------- 13.2.
- Page 4 Warranty for Trail Camera We offers a comprehensive warranty for our trail cameras. Weprovide a free replacement or refund policy, as well 90-day as a warranty. 2-year If you encounter any issues with your trail camera, such as unusual noises, erratic behavior, or if you simply have concerns, please provide a detailed description of the problem along with your order information to our customer service team.
-
Page 5: In The Box
1.IN THE BOX 1x Trail Camera, 1x Mounting Strap, 1x Base of Stand Set, 1x USB Cable, 1x User Manual, 1x Memory Card, 8x 1.5V AA Alkaline Batteries Note: A memory card has been inserted into the card slot. 2. IMPORTANT NOTE 2.1. -
Page 6: Remove Protective Films
1. IN TH 2.5. Remove Protective Films 1x Trail Ca Before using the camera, please ensure that you have Batteries, removed any protective films on the front of the camera. This 1x Instruct step is crucial to achieve the best performance. Note: 2.6. -
Page 7: Main Features
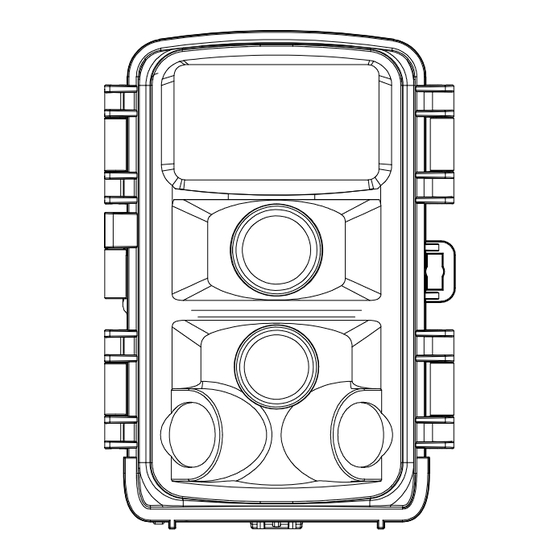
lution image quality. 3.2. Main Features • Captures high-quality media: 84MP still photos, 8K H.264 video clips with audio • Exceptional night vision with a 90ft flash range • Wide 130° view angle media review • User-friendly program with intuitive operation buttons and a built-in 2.0 inch color screen, simplifying programming and media review •... -
Page 8: Parts And Controls
keypad design for easy program and operation, 8 AA batteries supported (Figure 4). videos of wild animals in their natural environment. • Sports Camera: Perfect for activities like riding, driving, camping, or exploring, allowing you to capture your adventures. • Motion-Triggered Security Camera: Ideal for home, farm, office, and community surveillance, ensuring security and peace of mind. -
Page 9: Installing The Batteries And Sd Card
OFF, ON, and SETUP (Figure 5). A control key interface with eight keys is primarily used in SETUP Type-C Port DC 6V/1.5A mode to select operational functions and parameters. As shown in Plug 3.5x1.35mm Figure.5, the keys can also perform a second function (shortcut Tripod Base operations in SETUP mode) in addition to their main function. - Page 10 NOTE: If the battery charge drops to 1/3, the Night Vision function will automatically turn off. You can check the remaining power in the bottom right corner of the screen. Please be aware that during nighttime operation, the camera utilizes built-in IR LEDs, resulting in higher power consumption compared to daytime use.
-
Page 11: Loading Batteries
5. INSTALLING THE BATTERIES AND SD CARD Before you begin learning how to use your camera, you will first need to install a set of batteries and insert an SD card. Although that may only take you a minute, there are some important notes about both batteries and SD cards you should be aware of, so please take the time to read the following directions and cautions:... -
Page 12: Inserting The Sd Card
you have prepared your camera by properly installing batter- nd an micro SD card, you can simply take it outside, strap it to a • OFF mod or not, depending on your application scenario), switch it on, maximize battery life during night use, we recommend using •... - Page 13 way to insert cards. If the SD card is not installed correctly, the device will not display an SD card icon on the screen in TEST mode. Formatting Memory card by using the camera's "Format Memory Card" in the menu settings before using it for the first time is recommended, especially when a card has been used in other devices.
-
Page 14: Using The Camera
6. USING THE CAMERA Once you've prepared your camera with the correct installation of batteries and an SD card, you can simply take it outdoors and secure it to a tree (or based on your specific application scenario). Switch it ON and leave it to capture potential great photos that match your expectations. -
Page 15: Set Mode
the camera, you will switch it to OFF. Please note that in the OFF mode the camera consumes little power. It's a good idea to take the batteries out of the battery compartment if the camera will not be used for a long time. 7.2. -
Page 16: Shortcut Keys/Functions
ON mode. The camera will countdown 15 second delay and then be ready to capture images. Once in the ON mode, no manual controls are needed or possible (the control keys have no effect). The camera will take photos or videos automatically (according to its current parameter settings) You can either move the power switch directly from OFF to ON mode, or stop at the TEST position first to change one or more... -
Page 17: Advanced Settings
9. ADVANCED SETTINGS The trail camera comes with preset manufacturer settings. You can change the settings to meet your requirements. Please make sure that the camera is in the TEST mode. Once the camera screen is on, press M key to enter/exit the menu. - Page 18 Smart Best Select video resolution (pixels per Photo frame). Higher resolution produces 8K Lite Video 6K Lite better quality videos, but creates larger Resolution 4K Lite files that take more of the SD card capacity. 720P Videos are in AVI format that can be played back on most video players (VLC/KM etc.).
- Page 19 The"High" level will make the camera more sensitive to infrared (heat) and more easily triggered by motion, the "Low" level makes it less sensitive to heat and motion. The"Mid dle" is for average or moderate conditions. High Commonly, the"High" level is suitable when Middle Sensitivity the ambient temperature is warm and little...
- Page 20 animals like snakes, or the process of flower- ing etc. Note: Too small interval set in the Time Lapse Settings will enable to take more pictures, but can consume more battery power then reduce battery life accordingly. Note: this mode will disable motion detection. M-Month, D-Day, Y-Year hh-Hour, mm-Minute, ss-Second Press the M key to access the menu...
- Page 21 Select On to show date and time on each Time capture. Stamp Set a 4-digit password to protect your camera from unauthorized users.If the code is lost, turn Password the power switch to "OFF" at first. Then enter Protection the universal password "1111" to restore normal functionality.
-
Page 22: Mounting And Positioning The Camera
10. MOUNTING AND POSITIONING THE CAMERA 10.1. MOUNTING After you've set up the camera's parameters to your personal preferences at home, you're ready to take it outside and slide the power switch to "ON". When setting up the camera for scouting game or other outdoor applications, you must be sure to mount it in place correctly and securely. - Page 23 There are two ways to mount the camera: using the provided adjustable straps or the tripod stand. Using the adjustable strap: Illustrates using the strap on the camera. Push one end of the strap through the two brackets on the back of the camera. Thread the end of the strap through the buckle.
-
Page 24: Sensing Angleand Distance Tes
10.2. SENSING ANGLE AND DISTANCE TEST To test whether the camera can effectively monitor the area you choose, this test is recommended checking the sensing angle and monitoring distance of the camera. To perform the test: Switch the camera to the TEST mode. The camera will countdown a max 15-second delay and be ready to capture motions. -
Page 25: Switching On The Camera
size appropriately. In general, 3 to 6 feet is preferred. You can avoid potential false triggers due to temperature and motion disturbances in front of the camera by not aiming it at a heat source or nearby tree branches or brush (especially windy days). -
Page 26: Technical Specifications
players, such as KM, VLC etc. There are several different ways this can be done. To view photos or videos directly on the camera screen, simply tap the RIGHT button. Or in the TEST mode only, you can use the provided USB cable to download the files to a computer. - Page 27 PIR Sensing 100ft(-22° F to +158°F.) Distance PIR Sensing Total 13 0° Angle Approx. 0.05~0.5 second Detection Delay (0.05s while side motion sensors enabled) Dection Delay 5sec-30min, Programmable. Photo Series 10sec ~ 10min., Programmable Video Length (Note: Max 30 seconds at nighttime to conserve batteries lifetime) Operation Hours On /Off, Specific working period of time...
-
Page 28: Faqs
Mounting Strap, Tripod Base ( 1/4”-20) Waterproof IP67 Operation -22° F to +158°F. Temperature Operation 5% ~ 95% Humidity Certificate FCC & CE & RoHS & WEEE Product 5.43 x 15.08 x 4 inches/138 x 383 x 62mm Dimensions After-sales support@kjkcam.com 13. - Page 29 requires 1.5V for proper functioning. Low battery voltage can lead to improper operation. After the battery is depleted, the camera will only have a few hours of operation remaining (the camera will display a low battery warning). • When using the trail camera for the first time or if the camera cannot recognize the memory card, please format the memory card before use.
-
Page 30: Faqs
FAQ Catalog PART1: About Recording Issues ......... 27-28 PART2: About Batteries, Power Supply ......29-31 PART3: About Motion Detection Issues......31-33 PART4: About Video Sound............PART5: About SD Card............34-35 PART6: About Camera Screen..........PART7: About Turn On............35-36 PART8: Other Issues ............... support@kjkcam.com... -
Page 31: Part1: About Recording Issues
PART1: About Recording Issues Q: Can't recording video The following reasons may cause camera not recording properly: Low battery: The camera needs to turn on the IR LEDs when working at night, which consumes more power than working during the day. If the voltage is low, it will record shorter videos or not record videos. - Page 32 Also you can run a motion test: After configuring the device, switch it to "TEST" mode. Wait for approximately 15 seconds. Move to the front of the camera. If the motion indicator flashes "blue" , it confirms the proper functionality of the camera's infrared motion sensor ". Q: It looks overexposed or the background of the night picture is too dark The dark background of night images is usually caused by...
-
Page 33: Part2: About Batteries, Power Supply
PART2: About Batteries, Power Supply Q: Battery life is shorter than expected The following reasons may cause battery lifetime not asexpected: Battery quality and cold temperature will affect the battery lifetime. Too many unwanted false triggers causing the battery to drain quickly. - Page 34 batteries? Yes. Lithium batteries are better used in cold weather. We recommend using new eight 1.5-volt rechargeable lithium-ion batteries to get maximum batteries lifetime. They're generally marketed and sold in sets of four AA batteries plus a conve-nient 4-cell charger, all for usually about $25.00 - $ 30.00. NiMH rechargeable batteries cannot also be used.
-
Page 35: Part3: About Motion Detection Issues
supplied) and work with internal batteries at the same time. The camera will automatically use the higher voltage of the two as the input power source. When the external power supply is removed, the camera will automatically switch to use the internal battery. Please do not use an external power supply exceeding 6V. - Page 36 7. IMPORTANT: If you have used an SD card in another device before inserting it in your camera, you might want to try format- ting the card using the "Memory Card Format" menu option in TEST mode (make sure you have backed up any important files first, as formatting will erase all previous files).
- Page 37 branches creating motion in front of the camera or an area where there is high heat in the foreground and any motion from wind could set off the camera. Setting a camera up over water is also a potential cause for this issue. To remedy this situation: 1.
-
Page 38: Part4: About Video Sound
5. Remove any limbs which are right in front of the camera lens. 6. Don’t install the camera behind the window glass. PART4: About Video Sound Q: The video is very clear, but the sound is not good The video has humming sound. The issue might be caused by strong wind, electromagnetic interference from electronic equipment, noise from cars, etc. -
Page 39: Part6: About Camera Screen
reformat your SD card in your camera by "Memory Card Format" menu option, restart the camera after the SD card formatted. PART6: About Camera Screen Q: When I turn on the camera, the screen just contin- ually flashes white It may be due to poor batteries contact. It is recommended to remove the batteries, wipe both ends of the battery and the positive electrode (“flat”) of the battery compartment and the spring with a clean cloth before reinstalling. -
Page 40: Warranty
The worst case is that some batteries might not be power the camera up. PART8: Other Issues Q: What if I forget my camera password? Switch to "TEST" at first., then enter the universal password " 1111" to restore normal functionality Q: Why is there air in the trail camera? Is it a leak? The air inside the camera is currently at a normal humidity level. -
Page 41: Fcc Compliance Statementt
our authorized dealer network. To avail of warranty benefits, you'll need to provide proof of the original purchase date, such as a purchase receipt or order number. Any replacement product issued under this warranty will be covered for the remaining duration of the original product's warranty period. This warranty specifically addresses failures attributed to material or workmanship defects during normal usage and does not extend to regular wear and tear. - Page 42 and on, the user is encouraged to try to correct the interference by one or more of the following measures: • Reorient or relocate the receiving antenna. • Increase the separation between the equipment and the receiver. • Connect the equipment into an outlet on a circuit different from that to which the receiver is connected.
- Page 44 Contact Us...
Need help?
Do you have a question about the KJK229 and is the answer not in the manual?
Questions and answers
graag vertaling handleiding Nederlands