Table of Contents
Advertisement
Available languages
Available languages
Quick Links
Advertisement
Chapters
Table of Contents

Subscribe to Our Youtube Channel
Related Manuals for KJK KJK227


Summary of Contents for KJK KJK227
- Page 1 User Manual MODEL : KJK227/LK227 4K Full HD Video function...
-
Page 2: Table Of Contents
Contents 1 Operating Principle of Trail Camera -------------------------------------- 01 2 Package List -------------------------------------------------------------------- 01 3 Button Function Introduction---------------------------------------------- 02 4 Functions and buttons ------------------------------------------------------ 03 5 Quick Start Guides -------------------------------------------------------- 03-09 6 System Settings ------------------------------------------------------------ 09-14 7 Battery and Card Installation ------------------------------------------ 15-16 8 Installation and Positioning -------------------------------------------- 16-19 9 USB Connection -------------------------------------------------------------- 19 10 Specification Parameters -------------------------------------------- 20-22... - Page 3 ABOUT KJK KJK has been committed to the technical improvement and innovation of imaging products, serving 20 million users since its establishment 20 years ago, meeting the differentiated needs of users in various scenarios. We own a number of Chinese, American and European patents for product utility models and designs.
- Page 4 You can find a suitable one among the brand products. Thank you again for choosing KJK.Please note that items purchased from KJK have a 1-year warranty.Please contact our...
- Page 5 ENGLISH...
-
Page 6: Operating Principle Of Trail Camera
I. Operating Principle of Trail Camera • The operating principle of the trail camera is to trigger the infrared sensor to capture images based on changes in the ambient temperature when animals are moving. It detects the animals by sensing changes in infrared light, but can only capture the images when animals are within the infrared monitoring range of the trail camera. -
Page 7: Button Function Introduction
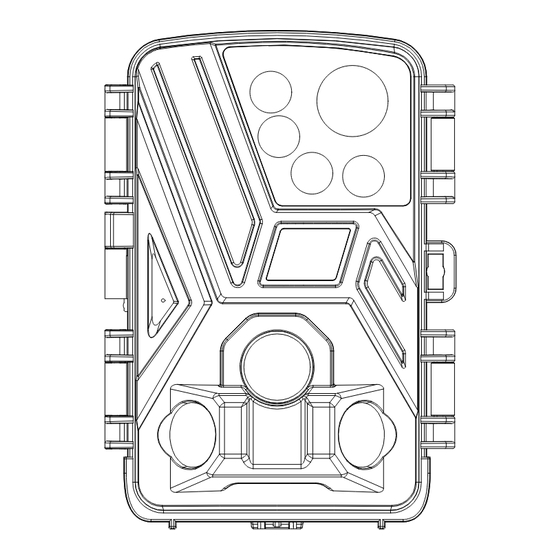
III. Button Function Introduction ON-SETUP-OFF 11 13 12 UP/Video RIGHT SHOT LEFT MENU REPLAY DOWN/Photo Card Slot AV in Micro USB Port (Data Transfer Only) Power Switch-SETUP Power Switch-ON Power Switch-OFF Infrared Leds Camera Lens PIR Sensor PIR Sensor PIR Sensor LCD Screen DC in (6V 1.5A) support@kjkcam.com... -
Page 8: Functions And Buttons
IIII. Functions and buttons MENU l. Keep a short press of the MENU button in SETUP preview mode to enter and exit the Setup Menu. REPLAY 1. Keep a short press of the REPLAY button in SETUP preview mode to preview images and video files, and then keep a short press of REPLAY again to exit the preview. - Page 9 3.2 Turn on the trail camera and install the memory card correctly according to the direction of the identification card symbol. 3.3 Switch the camera power to SETUP to turn on the camera. At this time, LCD will display a preview interface. ON-SETUP-OFF support@kjkcam.com...
- Page 10 3.4 Enter the menu, press the button to select "Format memory card", press the OK button to select "Yes" to confirm formatting the memory card. Settings Settings 4MP(2688 x 1512) Time & date Time and date Notification:All data 8MP(3840 x 2160) Photo stamp Photo tagging will be deleted...
- Page 11 Settings Settings 4MP(2688 x 1512) 4MP(2688 x 1512) Serial No. Serial No. Set time & date 8MP(3840 x 2160) 8MP(3840 x 2160) Photo tagging Photo tagging Time format 16MP(5376 x 3024) 16MP(5376 x 3024) Version Version Date format 2023 / 03 / 12 26MP(6912 x 3888) 26MP(6912 x 3888) Prompt tone...
- Page 12 3.9 After completing all the settings in test mode and determining the installation position, you can switch the trail camera to the "ON" mode. LCD on the camera prompts a 5S countdown, and then the trail camera will enter the working state. •...
- Page 13 mode and press the REPLAY button to view the captured images and videos. Photo Video 3.11 Press the REPLAY button to exit the replay setup on LCD and enter the preview interface. MENU SHOT REPLAY REPLAY Photo mode, photo resolution, remaining number of photos taken memory card Battery level support@kjkcam.com...
-
Page 14: System Settings
Record mode, recording resolution, remaining recording time memory card Battery level Date Time V. System Settings 1. Startup & shutdown / system settings • After inserting the battery, turn the mode switch to the "SETUP" for setting. In test mode, check the camera, manually take and view photos and videos, etc. - Page 15 2.1 Photo mode • Take photos (default): only take photos, not record videos. • Pixel resolutions of photos are: 1M, 3M, 5M, 8M, 12M, 20M, 24M, 32M. Note: the larger the size chosen is, the higher the image clarity will be, and the fewer the stored photos will be, and vice versa.
- Page 16 files and occupying memory capacity. For example, if the shooting delay is set to 1MIN, the time interval between the previous and next shots will be 1MIN, during which even if the animal continues to move within the detection area, the camera will not record anything. However, after the end of 1MIN, the camera will restart detecting motion and record the next shot.
- Page 17 If you want to observe the flowering process of a plant, the camera will take 24 photos within 24H to record the entire process of flowering. Note: When this mode is turned on, the monitoring function of the trail camera will fail, which will work normally after this mode is turned off.
- Page 18 9. Password protection • The setting steps of the camera's power-on password are as follows: open the menu, select Password Protection, and then press the OK button. Turn the switch to "ON" and set a combination of 4 digits between 0 and 9 and letters. If you forget the power-on password, when the camera is turned off, you can press and hold the MENU+REPLAY buttons while adjusting the MODE button to SETUP mode.
- Page 19 11.1 Delete current file • You can delete the selected images or videos from the camera's memory card using this function. In replay mode, press the MENU button, select "Delete Current File", and press the OK button to confirm. 11.2 Delete all files •...
-
Page 20: Battery And Card Installation
VI. Battery and Card Installation 6.1 Install the batteries • Open the buckle on the right side of the camera, then unfold the camera. Insert 8 AA batteries according to the positive and negative markings on the battery compartment. • This camera accepts 1.5V AA Alkaline batteries which must be installed for operating it. -
Page 21: Installation And Positioning
6.2 Install Card Before starting to operate the camera, please install a high-speed memor y card with Class10 or above (when the camera is not powered on). Do not install or uninstall the memory card when the camera is turned on or in SETUP mode. Note: If the memory card is not installed correctly or is not functioning properly, an X icon will appear in the upper right corner of the screen. - Page 22 7.2 To put the camera on a tree. • Thread the Installation Belt through the holder on the back of the camera. Tie it into a tree, and adjust the position of the camera. • To avoid the camera falling off, you can also use the fixing kit and Installation Belt together to ensure that the camera is firmly fixed in the correct position.
- Page 23 7.3 Calibrate camera • To verify whether the camera effectively monitors the selected area, turn the switch to the SETUP status and secure the camera. • Try walking repeatedly in front of the camera at different distances and angles within the desired monitoring area. If the LED indicator light of the camera flashes when you are moving, it indicates that you are within the monitoring range.
-
Page 24: Usb Connection
7.5 Night mode When the camera is working at night, the infrared light will automatically turn on, which can illuminate objects with a range of approximately 3-20 m. If the animal is too close to the camera, it may cause overexposure. VIII. -
Page 25: Specification Parameters
IX. Specification Parameters Image Sensor 5 megapixel CMOS image sensors Lens F1.8 Photo Resolution 32M, 24M, 20M, 12M, 8M,5 M,3 M, 1M Video Resolution 3840*2160.2688*1520.1920*1080.1280*720 720*480.640*480 Storage Medium Memory card (maximum support 128G) File Format JPEG, AVI USB 2.0 DC power supply An external DC power supply of 6V/1.5A or above (interface size: head diameter 3.5mm * needle core 1.35mm) can be connected... - Page 26 Important Note • Before inserting or removing the memory card, the camera must be turned off. • When the camera is checked in TEST mode, the ambient light source is unstable because you hold the camera by hand while moving. The motion sensor will be triggered to work, and you may hear a clicking sound accompanied by the screen flashing, which is normal.
-
Page 27: Faqs
rechargeable batteries, which will seriously damage the camera. • Please keep the camera lens and infrared window clean. If they are dirty, please clean them with soft glasses cloth. Do not scratch the LCD, camera lens, infrared sensor, and LED glasses with any sharp objects. - Page 28 C. If the camera still has this problem, it may be due to electronic components. In this case, please contact KJK customer service. D . P l ea s e c h e c k a n d co n fi r m w h et h e r y o u h a v e t u r n e d o n "Time-lapse Photography", and then turn it off.
- Page 29 In short, high trigger frequencies can reduce battery life. B: KJK recommends using the Eneraizer1.5V AA batteries in off-road cameras to achieve the longest battery life. Q(8) How to determine whether the camera's motion sensor is working properly? A: Please follow the instructions in the QUICKSTART GUIDE chapter to set up.
- Page 30 camera direction and angle D: The battery level is too low. Please replace it with a new high-qual- ity battery E: Please remove one layer of protective film from the lens and the sensor Q(12)The camera cannot take photos properly? A:Please check whether the PIR protective film is removed B:Please check the installation position of the camera,Whether the camera is installed within an effective range.
- Page 31 DEUTSCH...
- Page 32 Verzeichnis 1. Funktioniertes Prinzip ------------------------------------------------------ 26 2. Produkte in der Packung -------------------------------------------------- 26 3. Die Beschreibung derFunktion der Tasten ---------------------------- 27 4. Funktion und Taste ---------------------------------------------------------- 28 5. Anleitung des schnellen Start ---------------------------------------- 29-34 6.EinEinstellung des Systems -------------------------------------------- 35-41 7. Installierung der Batterien und Einlegen der SD-Karte -------- 41-43 8.
-
Page 33: Funktioniertes Prinzip
Kamera im Ruhezustand. Und wenn das Tier wieder den Überwachungsbereich der Kamera betreten, kann die Kamera wieder gestartet werden. II. Produkte in der Packung Benutzerhandbuch MODELL : KJK227/LK227 4K Full HD Video function 1 x Wildkamera 1 x Benutzerhandbuch 1 x USB-Kabel 1 x Ständer , 3 x Schrauben... -
Page 34: Die Beschreibung Derfunktion Der Tasten
III. Die Beschreibung derFunktion der Tasten ON-SETUP-OFF 11 13 12 Obene Taste Rechte Taste Verschluss-Taste OK-Taste Linke Taste Menü-Taste Review-Taste Untene Taste TF-Kartenschacht AV-Schnittstelle USB-Schnittstelle Einstellung Öffnung Schließung Infrarot-Lichtzone Objektiv Primärsensor Rechter Sensor Linker Sensor Bildschirm DC 6V 1.5A support@kjkcam.com... -
Page 35: Funktion Und Taste
IIII. Funktion und Taste l. Die Einstellung der Modell des Voransicht: Drücken Menü Sie kurz Menü-Taste, um das Menü der Einstellung öffnen und verlassen. 1. Die Einstellung der Modell des Voransicht: Drücken REPLAY Sie kurz REPLAY-Taste für Bilder und Videos der Voran- sicht. -
Page 36: Anleitung Des Schnellen Start
IV. Anleitung des schnellen Start 3.1 Öffnen Sie die Batterieabdeckung der Wildkamera und legen Sie bitte 8 x 1,5V AA-Alkaline-Batterien gemäß der Richtung des Plus- und Minuspols ein, um die längste Akkulaufzeit zu erzielen. Neue Batterien und alte Batterien sollte nicht gemischt werden. Die Akkulaufzeit wird wegen unterscheidlicher Leistung der Batterien eingeflüsst. - Page 37 ON-SETUP-OFF 3.4-Erst, drücken Sie erst das Menü. Zweite, drücken Sie bitte untene Taste und wählen „Speicherkarte formatieren“. Dritte, drücken Sie bitte die OK-Taste und wählen „Ja“. Vierte, bestätigen Sie die Formatierung der SD-Karte. Enstellungen Enstellungen 4MP(2688 x 1512) Akustisches Signal Akustisches Signal Hinweis:Alle Daten 8MP(3840 x 2160)
- Page 38 3.6-Nach dem drückEndeen Menü wählen Sie bitte mit untener Taste „Zeit&Datum“ aus. Sie können nach damaliger Zeit regulieren. Und drücken Sie bitte die OK-Taste und zeigt das Menü der regulierte Zeit. Jetzt können Sie obene Taste oder untene Taste drücken, um damlige Zeit auszuwählen.
- Page 39 .8-Drücken Sie die Menü-Taste, um auf LCD das EinEinstellungsmenü zu verlassen und Grenzfläche der Voransicht zu zeigen. MENU MENU SHOT REPLAY 3.9-Wenn Sie alle EinEinEinstellungen im Testmodell schaffen und Position der Installation bestätigung, können Sie der Gang der Wildkamera „ON“-Modell auslösen. LCD im Kamera zeigt einen 5-Sekunden-Countdown an, nach dem Ende die Wildkamera in Betrieb ist.
- Page 40 S c h l i e ß u n g ( O F F ) - W e n n d i e K a m e ra st ro m v e r s o rg u n g d e r Wildkamera voll geschlossen wird.
- Page 41 MENU SHOT REPLAY REPLAY Fotografie-Modell Auflösung der Fotografie verbleibEndee Zahl der Fotografie SD-Karte Leistung Video-Modell Auflösung des Video verbleibEndee Zahl des Video SD-Karte Leistung Datum Zeit support@kjkcam.com...
-
Page 42: Eineinstellung Des Systems
V. EinEinstellung des Systems 1.Die Kamera der Öffnung und der Schließung / EinEinstellung des Systems • Stellen Sie nach dem Einlegen der Batterien den Betriebsarten- schalter auf den Gang „Einstellung(SETUP) “ ein. Im Testmodell ist das IR-Licht ausgeschaltet. Sie können Parameter einstellen, die Kamera überprüfen, manuell Aufnahmen machen, Fotos und Videos ansehen usw. - Page 43 2.2 Video-Modell • Gewähltes Video: Es ist nur Videoaufnahme, keine Fotografie. • Die Pixelauflösung des Video ist: 3840x2160.2688x1520.1920X1080.1280X720.720X480.640X480。 Achtung: Je höher die gewählte Auflösung ist, desto klarer ist das Video und desto kürzer ist die gespeicherte Videodauer. Desto länger ist im Gegenteil die gespeicherte Videodauer. 2.3 Fotografie und Video-Modell •...
- Page 44 kapazität beanspruchen. Wenn beispielsweise die Aufnahmever- zögerung auf 1 Minute eingestellt ist, beträgt das Zeitintervall zwischen der letzten Aufnahme und der nächsten Aufnahme 1 Minute. WährEnde dieser einen Minute zeichnet die Kamera nichts auf, auch wenn sich das Tier innerhalb des Erfassungsbereichs bewegt.
- Page 45 Aufnahmen ein, dass der gesamte Blühprozess aufgezeichnet wird. Öffnen Sie die Einstellung der Menü-Taste und stellen Sie die Stund- en, Minuten und Sekunden ein, z. B. stellen Sie das Intervall auf 1 Stunde ein und die Kamera nimmt jede Stunde ein Foto oder Video auf ( je nach Arbeitsmodell bestätigen Sie, ob Sie ein Foto oder ein Video aufnehmen möchten).
- Page 46 Enstellungen Enstellungen 4MP(2688 x 1512) Sprache Serial No. 8MP(3840 x 2160) Zeit& Datum Photo tagging 16MP(5376 x 3024) Fotostempel Version / 03 / 2023 26MP(6912 x 3888) Passwortschutz Prompt tone 03 : 05 Akustisches Signal Format memory card Time and date Speicherkarte foratieren Zurück AuSW.
- Page 47 drücken Sie die OK-Taste, um Video zu starten. Und dann drücken Sie die OK-Taste, um die Wiedergabe zu beenden. Drücken Sie die Taste des Review, um in den Standby-Modell zurückzukehren. 11.1 Löschen Sie die aktuelle Dateien • Mit dieser Funktion können Sie das aktuell gewählte Bilder oder Videos von der Speicherkarte der Kamera löschen.
-
Page 48: Installierung Der Batterien Und Einlegen Der Sd-Karte
Löschen von den Dateien verhindert werden. • Wählen Sie „Aktuelle Dateien schreibgeschützt“, um zu verhindern, dass das aktuell eingestellte Dokument versehentlich gelöscht wird. • Wählen Sie „Alle Dateien schreibgeschützt “ , um zu verhindern, dass alle Dokumente auf der Speicherkarte versehentlich gelöscht werden. - Page 49 Achtung: Sie können keine wiederaufladbaren Batterien verwenden, da die niedrige Spannung von wiederaufladbaren B a t t e r i e n ( 1 . 2 V ) i s t u n d d i e L e b e n s d a u e r d e r K a m e r a beeinträchtigt.
-
Page 50: Installation Und Ortsbestimmung
ersten Mal verwenden. • Wenn Sie diese Karte verwenden, die bereits in einem anderen Pro- dukt verwendet wurde. Bitte formadas Tier Sie sie auf Ihrem Com- puter, bevor Sie sie in den Kartensteckplatz einsetzen, und wählen Sie FAT32. Ⅶ. Installation und Ortsbestimmung 7.1 Wenn Sie die Kamera an der Wand hängen möchten. - Page 51 7.2- Wenn Sie die Kamera anm Baum binden möchten. • Führen Sie den Trägeriemen durch die Halterung auf der Rückseite der Kamera. Binden Sie ihn am Baum. Regulieren Sie die Position der Kamera. • Wenn Sie sich sorgen, dass die Kamera abfallen könnte, können Sie auch die Befestigungsanlage zusammen mit dem Trägeriemen verwenden, um sicherzustellen, dass den Trägeriemen fest an richti- gem Platz bleiben.
- Page 52 7.3- Geeichte Kamera • Um Sie nachzuprüfen und zu bestätigen, ob die Kamera den aus- gewählten Bereich gültig überwacht, schalten Sie den Schalter in den Zustand „Einstellung “ und fixieren Sie die Kamera. • Innerhalb des zu Ihren erhofften überwachendensbereichs können Sie versuchen, dass wiederholt in verschiedenen Entfernungen und Winkeln vor die Kamera zu gehen.
-
Page 53: Usb-Anschluss
tisch aufgenommen werden. Wenn das Tier den vom Sensor beo- bachteten Bereich verlässt, wird sich die Kamera ausgeschaltet und in den Überwachungsmodus zurückgekehrt werden. 7.5-Abent Modus Wenn die Kamera nachts in Betrieb ist, schaltet sich das Infrarotlicht automatisch ein. Das Infrarotlicht beleuchtet Objekte in einem Bere- ich von ca. -
Page 54: Spezifikation Und Parameter
Ⅸ. Spezifikation und Parameter Bildsensor 500 Millionen-Pixelen CMOS-Bildsensor Objektiv F1.8 Fotoauflösung 32M、 24M、 20M、 12M、 8M、 5M、 3M、 1M Videoauflösung 3840x2160.2688x1520.1920X1080.1280X720 720X480.640X480 Speichermedien TF-Karte (nicht über 32GB) Dateiformat JPEG, avi USB 2.0 DC-Stromver- Externe DC-Stromversorgung ist mehr als sorgung 6V/1.5A (Größe der Schnittstelle: der Durch- messer des Kopfs 3.5mm* Nadelkern 1.35mm) Menüsprache Englisch, Französisch, Spanisch, Deutsch,... - Page 55 Wichtige Hinweise • Die Kamera muss ausgeschaltet werden, bevor Sie die SD-Karte einlegen oder entfernen. • Wenn Sie die Kamera im TEST-Modell überprüfen und die Umge- bungslichtquelle instabil ist. Weil Sie die Kamera mit der Hand in Bewegung halten, wird der Bewegungssensor ausgelöst, und sie hören möglicherweise ein klickendes Geräusch, begleitet von einem glimmernden Bildschirm, was normal ist.
-
Page 56: Faq
• Installation vor Ort: Achten Sie darauf, dass der Verschluss und der Gleichstromstecker an der Unterseite der Kamera versiegelt sind, da die Kamera sonst bei Regen beschädigt werden kann. • Das mitgelieferte Micro-USB-Kabel überträgt nur zum Übertragen von Dateien von der Kamera auf den Computer. Verwenden Sie bitte es nicht zum Aufladen der Kamera oder des Akkus, was die Kamera ernsthaft beschädigen würde. - Page 57 nung in der Nacht. Wenn die Batterieleistung schwach ist, nimmt im Foto- und Videomodell die Kamera keine Fotos oder Videos der Grauscheibe nicht auf. Q3. Wenn ich auf die Kamera zugehe, blinkt das rote Licht, aber die Kamera nimmt nichts auf? A: Für die automatische Erkennung und Protokollierung sollten Sie in den Öffnung-Modell wechseln.
- Page 58 C. Wenn die Kamera weiterhin Probleme anzeigt, liegt möglicher- weise ein Problem mit den elektronischen Komponenten vor. Wenn dies der Fall ist, wenden Sie sich bitte an den KJK-Kundendienst. D. Überprüfen und bestätigen Sie bitte, ob Sie „Zeitraffer “ öffnen und es ausschalten.
- Page 59 tion den Schalter in den Testmodell. Gehen Sie nach etwa 15 Sekun- den vorm Objektiv, und wenn ein blaues oder grünes Licht blinkt, funktioniert der Infrarot-Bewegungssensor der Kamera. Mit dieser Methode können Sie auch die Ausrichtung und den Winkel der Kamera regulieren, um festzustellen, ob sich die aktuelle Position innerhalb des Überwachungsbereichs der Kamera befindet.
- Page 60 neue hochwertige Batterie. E. Bitte entfernen Sie eine Schutzfolie auf dem Objektiv und dem Sensor des Produkts. Q12.Die Kamera kann keine Fotos aufnehmen? A:Bitte prüfen Sie, ob die PIR-Schutzfolie entfernt wurde. B:Bitte überprüfen Sie die Installationsposition der Kamera, ob die Kamera innerhalb eines wirksamen Bereichs installiert ist.
- Page 61 24 hours, please send us another email, which may have been undelivered WARRANTY KJK offers a 30-day free replace/refund and a one-year warranty Please remember or write down your order number or keep your other proof of purchase.
- Page 62 @kjkcam @kjkcam @kjkcam support@kjkcam.com...
Need help?
Do you have a question about the KJK227 and is the answer not in the manual?
Questions and answers