Table of Contents
Advertisement
Quick Links
6500W Heavy Electric Utility Heater
USER'S MANUAL AND OPERATION
INSTRUCTIONS
very carefully. This USER'S MANUAL has been designed to instruct
you as to the proper manner in which to assemble, maintain, store,
manner.
Thank you for ordering our product.
Should you have any uestions, please feel free
to contact us at (888) 680-2849
or email to inquiry@bilthardusa.com.
We alwaysfind ways to improve!
EGH-65K
USER'S MANUAL
Advertisement
Table of Contents

Related Manuals for BILT HARD EGH-65K


Summary of Contents for BILT HARD EGH-65K
- Page 1 EGH-65K 6500W Heavy Electric Utility Heater USER'S MANUAL AND OPERATION INSTRUCTIONS USER'S MANUAL very carefully. This USER’S MANUAL has been designed to instruct you as to the proper manner in which to assemble, maintain, store, manner. Thank you for ordering our product.
-
Page 2: Important Instructions
IMPORTANT INSTRUCTIONS When using electrical appliances, basic precautions should always be followed to reduce the risk of fire, electric shock, and injury to persons, including the following: 1. Read all instructions before installing or using this heater. 2. This heater is hot when in use. To avoid burns, do not let bare skin touch hot surfaces. -
Page 3: Table Of Contents
TABLE OF CONTENTS ITEM PAGE # SPECIFICATIONS ................SAFETY INFORMATION ..............LOCATING HEATER ............... PRE-INSTALLATION ............... INSTALLATION ................OPERATING INSTRUCTIONS ............MAINTENANCE ................TROUBLESHOOTING ..............CUSTOMER SUPPORT ..............SPECIFICATIONS SWITCH POSITION VOLTS PHASE AMPS BTU/HOUR WATTS 6500W 240V,60Hz 27.1 22184 4000W 240V,60Hz 16.7... -
Page 4: Safety Information
SAFETY INFORMATION 6. All electrical power must be disconnected at the main service box, which must be locked before connecting, inspecting, cleaning or servicing the heater. This is an important precaution to prevent serious electric shock. 7. This heater is not suitable for use in hazardous locations containing explosive liquids or vapours. -
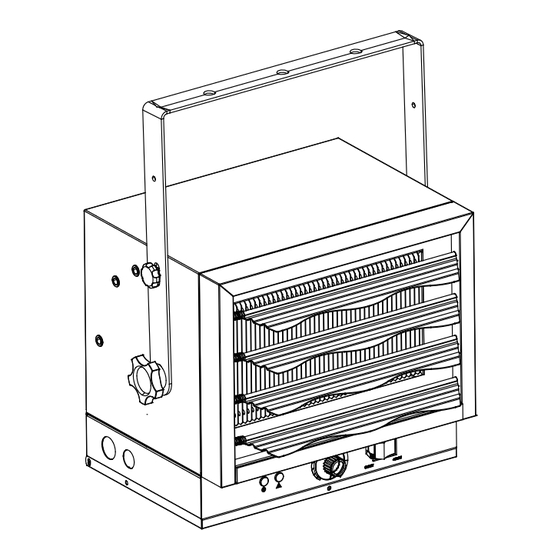
Page 5: Pre-Installation
LOCATING HEATER Figure 3 PRE-INSTALLATION Part Descrption Quantity Heater Mounting Bracket 3/8" Dia. Lag Bolt Washer M12... -
Page 6: Installation
INSTALLATION MOUNTING THE BRACKE (Refer to Figure 4a and 4b.) 1. Locate a stud in the ceiling joist. 2. Drill a ¼" pilot hole in ceiling joints. Place a washer on screws before thread through the mounting bracket, and screw tight into a ceiling joist. NOTE: If you want to swivel the heater either to the right or left, adding a washer to both sides of the bracket is recommended. - Page 7 INSTALLATION NOTE: For the heater to be tilted vertically, it must be mounted in bottom keyhole slots of mounting brackets to maintain adequate clearance and prevent possible overheating. 3. Adjust louvers to the desired position (see Fig. 6). NOTE: The louvers are designed so they cannot be completely closed.
-
Page 8: Connecting The Power
INSTALLATION CONNECTING THE POWER 1. Remove the screw from the front of the unit to connect the power to the heater. 2. Attach the cable connectors to the unit (See Figure 7) and slide the 10 gauge wire through the cable connector. NOTE: This appliance must be grounded. - Page 9 INSTALLATION CONNECTING THE POWER(CONT.) 3. Pull enough properly sized wire through cable connector and connect the wire to the power block located in the base of the heater (see Figure 8). BLACK WHITE GREEN (or bare copper) Figure 8 4. If an external external thermostat were preferred to use, please follow below diagram.
- Page 10 INSTALLATION CONNECTING THE POWER(cont.) 5. Turn on the power at the main service. WARNING High temperatures – risk of fire. Keep flammable materials, such as furniture, pillows, bedding, papers, clothes and curtains at least 3 ft. (0.9 m) from the front and top of the heater and keep them away from the sides and rear.
-
Page 11: Operating Instructions
OPERATING INSTRUCTIONS WARNING The heater must be properly installed before it is used. Control Panel External 6500W 4000W Caution Thermostat Built-in Gear Switch Power Indicator(Red) Select Switch Thermostat (4000W / 6500W) Indicator(Yellow) SETTING THE THERMOSTAT 1) Rotate thermostat knob clockwise to desired position, POWER INDICATOR will turn yellow. -
Page 12: Thermal Cut-Out
OPERATING INSTRUCTIONS THERMAL CUT-OUT The heater will automatically shut off when overheat. The heater will turn ON again when the abnormal temperature returns to normal levels. Should the unit overheat and cause the thermal cut-out to cycle, the cause of the overheating should be diagnosed and corrective action taken before further operation. -
Page 13: Troubleshooting
TROUBLESHOOTING PROBLEM ROOT CAUSE CORRECTIVE ACTION Inspect the garage heater and check that the air inlets and outlets are not The overheat protection has blocked as this may cause been activated. overheating. Switch off the circuit breaker to the garage heater for 30 minutes and allow it to cool down.
Need help?
Do you have a question about the EGH-65K and is the answer not in the manual?
Questions and answers