
Subscribe to Our Youtube Channel
Related Manuals for ECOWITT WS6210


Summary of Contents for ECOWITT WS6210
- Page 1 4G & Wi-Fi Weather Station Mobile Gateway Model: WS6210 https://s.ecowitt.com/D33XUA...
-
Page 2: Table Of Contents
4. First Use ....................10 4.1 Power on ..................10 4.2 Install the APP ................11 4.3 Working Mode ................12 4.4 How to delete and reset WS6210 ..........22 5. General Setting and Checkup ...............23 6. Sensor start up ..................27 7. Mounting ....................28 7.1 Solar Panel Size ................. - Page 3 8.4 Unit Settings ................35 8.5 Calibration ..................36 8.6 Rain Totals ................. 39 8.7 Sensors ID ..................42 8.8 Live Data ..................45 8.9 Modem Management ..............46 8.10 SD Card Management ..............53 8.11 Firmware updates ..............55 9. Product Features ...................56 10. Specifications ..................56 11.
- Page 4 16.1 After-sales Service ..............72 16.2 Stay in Touch ................72...
-
Page 5: Package
1.Package The following items comprise the WS6210 and its accessories. Item WS6210 (4G & Wi-Fi Weather Station Mobile Gateway) Hose Clamp (3 * Fits pipe diameter: 46-70mm & 3 * Fits pipe diameter: 21-38mm. Choose according to the need) Hose Clamp Brackets M5*8 Screws SD13 to USB power cable, length 50cm(19.7 inch) -
Page 6: Construction & Layout
2. Construction & Layout 2.1 Multiple Views and Size 1. WS6210 Size Figure 1... -
Page 7: Layout
2.2 Layout Inside... - Page 8 Outside 2G/4G Antenna Unable to open Pressure Balance Valve Power Port Left turn to unlock, right turn to lock Power Switch Press to power on/off Table 3...
-
Page 9: Light Indicators
2.3 Light Indicators Light Indicators Off: Locked – key operation is prohibited Unlock On: Unlocked – key operation is possible. lashes regularly: Sensor Learning Blinking Once : A successful reception of sensor signal. Continuous blinking: AP on. ... -
Page 10: Touch Button
2.4 Touch Button The device has two touch buttons: Reset and AP. Tap Reset & AP Button alternatively four times (tap interval < 1.5s) to unlock the WS6210. The below button works when in the unlocked state. Reset Button AP Button Press and hold the button for:... -
Page 11: Brief Introduction
3. Brief Introduction Thank you for purchasing the Ecowitt WS6210 weather station mobile receiver and transmitter. The WS6210 is a versatile wireless communication device supporting various wireless communication protocols. It is suitable for meteorological data collection and transmission. The product supports Wi-Fi and 4G connections for receiving and processing multiple sensor data types. - Page 12 4G to maintain continuous data flow. (This is a configuration option, see chapter 4.3) The WS6210 is technically speaking a gateway, a display-less console, which needs to be used with optional sensors to obtain weather or other environment related data and is not a standalone product.
- Page 13 (Americas), 868 (Europe), 433 (worldwide), 920 (Japan, Korea). 4G: A mobile data network standard (LTE): Long Term Evolution or 4th generation. WS6210 has a built-in 4G modem that can be configured to upload data via a 4G network. It needs a SIM card and the 4G service...
-
Page 14: First Use
3s when powered on successfull Figure 4 2、 When first used, please charge the WS6210 using the included USB cable. The batteries will be fully charged in 10 hours. Figure 5 Note: You can also use an external charger, Do not use normal, non-rechargeable... -
Page 15: Install The App
! This could result in battery leakage and will damage the device 4.2 Install the APP 1、Scan the QR code on the body of WS6210 to download the app. Assure you have the location and Wi-Fi service enabled for this Ecowitt APP. -
Page 16: Working Mode
1. Ecowitt SIM: The device comes with a SIM card pre-installed in the factory. You can use the SIM card to upload data. The default package includes a prepaid 90-day (300MB) service. - Page 17 service provider in your country. If the built-in SIM card is not supported in your region, replace the SIM card with yours. Refers to Section 4.3.2 Country/Region Operator Country/Region Operator Albania Vodafone Macau, China Celcom/Mi3G-U Australia Vodafone Malaysia Mobile Austria Malta Vodafone Brazil...
- Page 18 Vitenam Mobile Table 6 Regions where the built-in SIM card service is supported Tap on “menu” – “device” – “+add a new device”- choose the model of ws6210 from the product listing. Tap on the button marked with “Ecowitt SIM Card.”...
- Page 19 Figure 8 . Scan the QR code on the device and bind it simultaneously. Figure 9...
- Page 20 Select the country or region for the SIM card usage. (* Note : that it cannot be changed once activated ) Figure 10 Wait approximately 30-60 minutes for the data to upload. You can see the battery level on dashboard. Figure 11 Note: If there is no data for more than 60 minutes, go to the 8.9 interface...
- Page 21 for detailed analysis. 4.3.2 User’s SIM Card 4.3.2.1 . Replace the SlM Card (Note: Please refer to section11.1 for specific operations) Figure 12 4.3.2.2 . Tap on the cell marked with “User SIM Card” Figure 13 4.3.2.3 Fill out APN Settings and wait for the data to be uploaded.
- Page 22 4.3.3 Wi-Fi Provisioning Note1: Using Wi-Fi for data uploading consumes much power and requires the WS6210 console to be powered by connecting to a USB power socket instead of a solar panel Note2: Disabling your phone’s mobile data service will help avoid many...
- Page 23 Figure 15 4.3.3.1 Turn on the WS6210's AP Make sure WS6210 is unlocked. Holding the AP Button for 5 seconds will turn on WS6210’s Wi-Fi AP for 5 minutes Figure 16 4.3.3.2. AP: access point. The WS6210 has a built-in WiFi access point (SSID WS6210x-WIFInnnn) which can be used to access the device for configuration and data viewing (IP address 192.168.4.1).
- Page 24 AP is switched off. Figure 17 4.3.3.3. Tap on “menu”-“devie”-“+add a new device”-choose the model of WS6210 from the Product listing. Tap on the cell marked with “WIFI provisioning”. Figure 18...
- Page 25 4.3.3.4. Connect to WS6210's AP In the wireless network list of your device (PC, tablet, Smartphone) select the SSID of the WS6210 (WS6210x-WIFIxxxx). Keep the Wi-Fi connection even without an internet connection. Figure 19 4.3.3.5. Switch the cellphone's WIFI to the same one as the...
-
Page 26: How To Delete And Reset Ws6210
4.3.3.6. Wait for the data to be uploaded You can see the battery level on dashboard. Figure 21 4.4 How to delete and reset WS6210 Long press the WS6210 till the delete icon appears, press it, then choose Delete or Reset. -
Page 27: General Setting And Checkup
5. General Setting and Checkup After completing the Network configuration, you can set the device for its’ device name, location, Time zone, DST (Daylight Saving Time), and Data public settings. 1. Device Type and MAC cell cannot be edited. 2. Tap on Menu and then click on "My Devices". 3. - Page 28 Figure 22 Version: The current firmware version is displayed here. If an update is available, a “yellow arrow” will appear next to the version number. Tap on the version button to start the upgrade. Figure 23 Device Name: You can edit your device name here if the default name needs to be changed.
- Page 29 You can change its location by tapping the location cell to open the weather map. You can drag and drop your WS6210 gateway on the map; its coordinates will be updated automatically. Figure 24...
- Page 30 Note 1: After the above device setting is completed, return to the dashboard. If the network connection is successful, the dashboard will display as follows: Figure 25 Connection is Succeed Note 2: The above dashboard should appear immediately with a Wi-Fi connection, and a cellular connection will be activated within 60 minutes.
-
Page 31: Sensor Start Up
6. Sensor start up 1. Ensure the gateway is in sensor learning mode. Hold the Reset button for 3 seconds will turn on the receiver and will be in sensor learning mode. The RF LED will flash two times per second for 3 minutes until the learning process is completed. -
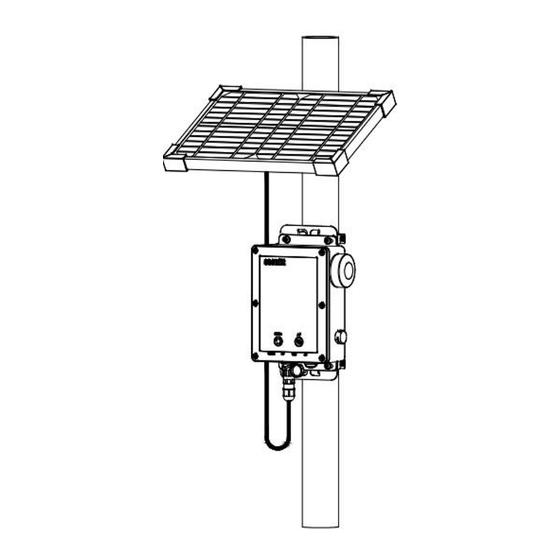
Page 32: Mounting
7. Mounting 7.1 Solar Panel Size Figure 27 7.2 Mounting Before installation, please ensure that the product has been set up correctly. You may skip this part until the setup is completed. The accessory supports two range of pole widths. Prepare a support pole with a diameter of 1.8-2.75 inches (46mm-70mm) or 0.83-1.50 inches in an open field with adequate lighting. - Page 33 2. Tighten the screws to secure the enclosure Figure 29 The enclosure is closed by default. If you need to replace the SD card or SIM card, you will need to open it. Otherwise, it should remain closed. 3. Mount the WS6210 onto the pole...
- Page 34 Figure 30 4. Mounting completed Figure 31...
-
Page 35: Web Ui On Ws6210
How to Access the Web UI: Make sure WS6210 is unlocked. Holding the AP Button for 5 seconds will turn on its Wi-Fi AP for 5 minutes. Connect to the WS6210's AP. Enter 192.168.4.1 in the browser. Log in with the default username and password, which are blank. -
Page 36: Weather Services
Figure 32 8.2 Weather Services After the Network configuration is successful, data can be uploaded to the following weather station servers: A. ecowitt.net (Default upload to this server) B. wunderground.com C. weathercloud.net D. wow.metoffice.gov.uk E. one Customized server of your choice... -
Page 37: Device Setting
Figure 33 8.3 Device Setting This page supports viewing or setting: (1) Device sensor reception frequency (view only) (2) Automatic Frequency Control (AFC): turn this option on when your location is busy on the sensor radio spectrum to improve signal reception. (3) Temperature Compensation: Turn on this option to minimize sun light influence on outdoor temperature measurement if the outdoor temperature and humidity sensor installation site is not ideal. - Page 38 (4) Auto Time zone: Your time zone setting on ecowitt.net will be applied here. (5) Automatic firmware upgrade (6) Device AP Auto OFF: Enabled by default, the AP automatically shuts down when no terminals are connected; disabling this option keeps the AP continuously running.
-
Page 39: Unit Settings
8.4 Unit Settings Supports the following unit settings: (1) Temperature: ℃,℉ (2) Pressure: hPa, inHg, mmHg (3) Wind: m/s, km/h, mph, knots Note: Lightning distance units are the same as wind speed units: Wind Speed Unit Lightning Distance Unit m/s, km/h, BFT(BFT can only be set in App/ website) knots mph, fpm(fpm can only be set in... -
Page 40: Calibration
Figure 35 8.5 Calibration This page supports the following data calibration: (1) Solar Irradiance (2) UV (3) Wind Speed (4) Indoor Temperature (5) Indoor Humidity (6) Absolute Pressure (7) Relative Pressure (8) Outdoor Temperature (9) Outdoor Humidity (10) Wind Direction... - Page 41 Figure 36 As well as: (11) Soil Moisture (12) Multi-Channel Temperature & Humidity (13) Multi-Channel Temperature...
- Page 42 Figure 37 Figure 38...
-
Page 43: Rain Totals
Figure 39 8.6 Rain Totals This page supports settings such as: (1) Choose traditional or piezoelectric rain gauge data to be uploaded to the WU server, as only one rain gauge data can be accepted when you have both our haptic rain gauge and tipping bucket type rain gauge. (2) Rainfall calibration (3) Rain reset time for Daily Rain/Weekly Rain/Rainfall Season (4) For Piezo Rain1~5 Gain calibration... - Page 44 can be measured by the piezoelectric rain gauge, but the raindrops landing may have two impacts on the monitoring panel so that the measured rainfall value is larger; for minimal rainfall intensity, due to the vertical momentum is too small, so that the measured rainfall value is small.
- Page 45 Figure 40...
-
Page 46: Sensors Id
8.7 Sensors ID (1) Supports viewing and registering sensor ID. (2) Viewing battery status and signal quality. (3) By entering the “Edit” sub-page of a particular sensor, you may register the sensor by entering the sensor ID so that this sensor can be mandatorily assigned. - Page 47 Figure 41...
- Page 48 Figure 42...
-
Page 49: Live Data
8.8 Live Data (1) Display connected sensor data. (2) Show WS6210’s battery voltage and solar charging power supply voltage. (3) You can edit the sensor name by clicking the pencil icon. This name is only reflected on this device, it will not update your dashboard tile name at ecowitt.net. -
Page 50: Modem Management
8.9 Modem Management 7.9.1 Management Page Description (1) Display basic information of the Modem: SIM Card: Inserted or Not Inserted RSSI: Signal strength, used to measure signal quality IMSI: International Mobile Subscriber Identity, used to identify a SIM card uniquely IMEI: International Mobile Equipment Identity, used to identify a 4G module uniquely ICCID: Integrated Circuit Card Identifier, a unique identifier for the... - Page 51 Figure 44 Check the top section to see if it was successful. Click "Download" to download the SIM card data log. The log file reveals the cellular network connection status in detail. It is useful when you need to investigate the connection in detail. Thus, downloading the log and sending it to customer support is quite useful when you seek help.
- Page 52 8.9.2 Troubleshooting Modem Issues (1) Communication Issue with 4G Module Symptom: On the Modem Management page of the WebUI, SIM Card status shows "Not Inserted" and the Log only displays "-> AT". Figure 45 Analysis: Failure in communication between the main control and the module.
- Page 53 (2) SIM Card Not Detected Symptom: On the Modem Management page of the WEB UI, SIM Card status shows "Not Inserted" and the Log shows "-> AT+CPIN?" followed by "<- +CME ERROR: 10". Figure 46 Analysis: Possible reasons include SIM card not inserted properly, loose SIM card, damaged SIM card, or faulty 4G module board.
- Page 54 (3) Poor Network Signal Strength Symptom: On the Modem Management page of the WEB UI, SIM Card status shows "Inserted" and the Log repeatedly shows "-> AT+CSQ" followed by "<- +CSQ: 99,99". Figure 47 Analysis: Repeated occurrences of "-> AT+CSQ" and "<- +CSQ: 99,99" indicate poor network signal quality.
- Page 55 Figure 48 Analysis: "<- +CREG: 0,5" and "<- +CREG: 0,1" indicate successful registration, while "<- +CGATT: 0" indicates failure to attach to the network. This could be due to SIM card being tied to a specific IMEI or running out of data. Solution: Check SIM card status (payment, validity) or replace SIM card if necessary.
- Page 56 Figure 49 Analysis: Indicates a problem with the SIM card. Solution: Check SIM card status (payment, validity) or replace SIM card if necessary.
-
Page 57: Sd Card Management
8.10 SD Card Management (1) SD card file system format: Only FAT32 is supported. For cards larger than 32GB, use the Rufus tool to format the SD card to FAT32. Download the tool from https://rufus.ie/en/. Tip: When replacing with a higher-capacity card, please be mindful of the memory card's maximum read/write cycles and lifespan. - Page 58 Figure 50...
-
Page 59: Firmware Updates
8.11 Firmware updates Firmware Automatic Upgrade: If automatic firmware update is enabled on the web interface and new firmware is detected, the product will enter OTA (over the air, here: WiFi or 4G) mode and automatically restart upon completion. (Automatic update check interval is 24 hours) Manual Upgrade: Access the local web page (either via the gateway AP 192.168.1.4 or via the local network http://IP-address-of-the-gateway, navigate to the device settings page, click on 'Check Version,' and if a new... -
Page 60: Product Features
Networking: Supports Wi-Fi and 4G, prioritizing Wi-Fi for data upload to the weather station server if available. Sensor Support: Receives data from almost all ecowitt sensors, viewable via a web interface and Ecowitt app. Web Functions: Supports web configuration, sensor data viewing, ... - Page 61 SD card 8G Micro SD Cellular and Support LTE 3GPP Rel.13 technology, support 4G network Wireless 4G LTE-FDD B1/B2/B3/B4/B5/B7/B8/B12/B13/B17/B18/B19/B20/B25/B Supported 26/B28/B66 Brand 4G LTE-TDD B34/B38/B39/B40/B41 2G GSM 850/900/1800/1900 RF Connection 920/915/868/433MHz (depending on local regulations) Frequency RF Wireless Over 100 meters (in open areas) Range WLAN 802.11 b/g/n 2.4 GHz (802.11n, Max 150 Mbps)
- Page 62 20 days (5-minute upload interval, AP off, not connected to IoT Sub device) Battery Life 10 days (5-minute upload interval, AP off, connected to IoT Sub device) 0.06W, 10mA (AP off, not connected to IoT) 0.12W, 20mA (AP off, connected to IoT) 0.9W, 150mA (AP on, connected to Wi-Fi, not connected to IoT) 0.96W, 160mA (AP on, connected to Wi-Fi, connected to...
-
Page 63: Miscellaneous
11. Miscellaneous 11.1 Replacing the SD/SIM Card 1. Locate the SD/SIM Card Slot Open the device casing with a Phillips screwdriver as per the manual’s instructions 2. Access the SD/SIM Card Press down on the cover and pry it open Slot gently, using a fingernail or a similar tool. -
Page 64: Manually Adding
11.2 Manually Adding For users who have already set up the network, follow these steps to manually add the WS6210 device. Instructions Illustration 1.Obtaining MAC Address *The MAC address can be found on the label of the device or via... - Page 65 2.Click on Other, and choose Manually Adding. 3.Manually Enter the Address. Then wait approximately 30-60 minutes for the data to upload when in 4G mode . Table 10...
-
Page 66: Sim Card Renewal
11.3 SIM Card Renewal Instructions Illustration 1.When the SIM card is about to expire, the interface will display a "subscribe" icon. Click on the “...”. 2.Select the appropriate plan and click "subscribe."... - Page 67 3.After successful payment, click "back." Please note that on ios, you cannot directly return to the Ecowitt app. 4.Once the renewal is successful, check if the validity period has been updated. Table 11...
-
Page 68: Optional Sensors
Notes: (1) The max QTY in the following table indicates the maximum number of the same sensor model or type that can be connected to the WS6210. (2) Theoretically all the different sensor arrays (WS68, 69, 80, 85, 90) could be connected to one gateway at the same time, but due to the sensor hierarchy (see above) this would only make sense in a few special cases (e.g. - Page 69 Sensor Model Picture Functions Outdoor temperature & WS90 humidity, light, UV, wind speed/direction, rainfall WS85 Wind speed/direction, rainfall Outdoor temperature & WS80 humidity, light, UV, wind speed/direction Outdoor temperature & WS69 humidity, light, UV, wind speed/direction, rainfall WS68 Light, UV, wind speed/ direction WH40 Rainfall Indoor temperature, humidity,...
- Page 70 WN31 Temperature and humidity WN30 Temperature WN36 Pool temperature WH57 Lightning detection WH41/WH43 PM2.5 WH55 Water leak detection WH51L Soil moisture WH51 Soil moisture WN34L/S/D Temperature WN35 Leaf wetness Table 12 Optional sensors Refers to the maximum number of sensors in this group. Any combin *—...
-
Page 71: Iot Device
12.3 IoT Device Sensor Model Max QTY Picture Functions WFC01 Smart water timer AC1100 Smart plug Table 13 IoT device See Above *—... -
Page 72: Warranty
13. Warranty We disclaim any responsibility for any technical error or printing error or the consequences thereof. All trademarks and patents are recognized. We provide a 1-year limited warranty on this product against manufacturing defects or defects in materials and workmanship. This limited warranty begins on the original date of purchase, is valid only on products purchased, and only to the original purchaser of this product. -
Page 73: Fcc
14. FCC This device complies with part 15 of the FCC Rules. Operation is subject to the condition that this device does not cause harmful interference (1) this device may not cause harmful interference, and (2) this device must accept any interference received, including interference that may cause undesired operation. - Page 74 To maintain compliance with RF Exposure guidelines, This equipment should be installed and operated with minimum distance between 20cm the radiator your body: Use only the supplied antenna. IC Caution: English: This device contains licence-exempt transmitter(s)/receiver(s) that comply with Innovation, Science and Economic Development Canada’s licence-exempt RSS(s).
-
Page 75: Care And Maintenance
15. Care and Maintenance When batteries of different brand or type are used together, or new and old batteries are used together, some batteries may be over-discharged due to a difference of voltage or capacity. This can result in venting, leakage, and rupture and may cause personal injury. -
Page 76: Contact Us
16. Contact Us 16.1 After-sales Service Order Issues: If you encounter any missing or incorrect shipments of Ecowitt products purchased, please reach out to the respective platform's customer service from the store where you bought the product for assistance. Usage Inquiries: Our product is continuously changing and improving, particularly online services and associated applications.
Need help?
Do you have a question about the WS6210 and is the answer not in the manual?
Questions and answers