
Related Manuals for ECOWITT GW1000


Summary of Contents for ECOWITT GW1000
- Page 1 Wi-Fi Gateway with Temperature, Humidity and Barometric Sensor Operation manual Model: GW1000 Note: The cable length is 1m/3ft...
- Page 2 Thanks for purchasing this Wi-Fi Gateway with Temperature, humidity and barometric sensor. This device is designed to access ecowitt sensor(s) data via the Internet or your local WLAN network. Sensors (sold separately) including following: multi-channel temperature and humidity, rain, wind, soil moisture, PM2.5 and there will be more sensors...
-
Page 3: Table Of Contents
Contents 1. Unpacking ............. 5 2. Overview ............... 6 2.1 Features ........... 8 3. Setup Guide ............9 3.1 Gateway Introduction ......10 3.1.1 LED Lights ....... 11 3.1.2 Button Function ....... 13 3.2 Publish to Internet Weather Services14 3.3 Wi-Fi Connection for the Gateway ..16 3.3.1 Download mobile application 18 3.3.2 Register a Personal Weather Station (PWS) with... - Page 4 4.2 Sensor Parameter information and adjustment ..........28 5.Registering with and using wunderground.com31 5.1 Viewing data on wunderground.com . 32 6.Specification ............38 7.Warranty Information ......... 39...
-
Page 5: Unpacking
Open your Wi-Fi gateway box and inspect that the contents are intact (nothing broken) and complete (nothing missing). Inside you should find the following: One GW1000 Wi-Fi Gateway One Cable Clip One User Manual If components are missing from the package, or broken, please contact customer service to resolve the issue. -
Page 6: Overview
2. Overview... - Page 7 Figure 1: Wi-Fi Gateway...
-
Page 8: Features
2.1 Features Streams data from ecowitt sensor(s) to your local WLAN network or Internet based weather services. Allows you to monitor environmental or atmosphere data with free WS View Mobile application by connecting with optional sensors(sold separately): multi-channel temperature and humidity, rain, wind, soil moisture, PM2.5 and so on. - Page 9 Small size and compact design. Powered by USB connection. Note: If you just purchased the GW1000 WIFI gateway, only the pressure data of the probe sensor can be uploaded to weather underground.
-
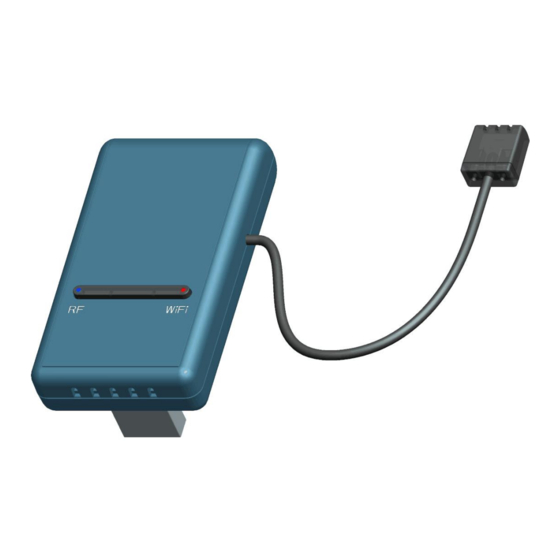
Page 10: Setup Guide
3. Setup Guide 3.1 Gateway Introduction See Figure 2 to help you identify elements of the gateway. Figure 2: Gateway Introduction... -
Page 11: Led Lights
1.WiFi Configure/Reset Button 2.RF Status Indicator Light 3.Wi-Fi Status Indicator Light 4.USB Connector for system power supply 5.Temperature, humidity and barometric 3-in-1 sensor Before configuring the gateway with your mobile, please read the introduction of the LED lights and button function for better understanding. 3.1.1 LED Lights RF (Blue): Indicates RF data receiving status ... - Page 12 Wi-Fi (Red ): Indicates Wi-Fi connection status Light on steady, indicates that Wi-Fi connected successfully; network communication normal and the data uploaded to the weather server successfully. Light off, indicates Wi-Fi connected failed. Slow Flashing(1HZ), indicates that wireless router (WIFI) has been successfully connected, but the data has not been successfully uploaded to the server.
-
Page 13: Button Function
3.1.2 Button Function The black button is used for the following two modes: Wi-Fi Configure Mode: press and hold the button for 5s till the Wi-Fi status indicator LED is fast flashing and the gateway is ready for the Wi-Fi configuration operation. Reset Mode: Press and hold the button for 10s will reset the gateway and clear the history data. -
Page 14: Publish To Internet Weather Services14
2. If you purchased optional sensor(s), you can power up the new sensor at anytime, and use WS View live data to confirm whether new sensor has been added successfully. 3.2 Publish to Internet Weather Services Your gateway can send your sensor data to WS View APP via local network or selected internet-based weather services. - Page 15 .com weather forecasts, weather reports, maps & tropical weather conditions for locations worldwide. A UK based wow.metoffice.gov. weather observation website. Ecowitt’ s new Ecowitt.net www.ecowitt.net weather server that can host a bunch of sensors that other servers don’t support now.
-
Page 16: Wi-Fi Connection For The Gateway
3.3 Wi-Fi Connection for the Gateway Note: During device setup, please always be noted that your mobile device is not talking to GW1000 directly. It is always work in this topology: GW1000 phone Your router So please follow the following procedure:... - Page 17 Check the data quality and make sure sensor(s) and GW1000 can find each other normally. With your obtained WU station ID or MAC address, register your GW1000 on the dedicated weather service you submitted.
-
Page 18: Download Mobile Application
3.3.1 Download mobile application Download “WS View” application from the Apple App Store or Google Play store, as appropriate for your device. 3.3.2 Register a Personal Weather Station (PWS) with wunderground.com If you are planning to use wunderground.com you must have an account and register a (new) personal weather station. -
Page 19: Activate Setup Application
3.3.3 Activate setup application activate application have downloaded on your mobile device. Android... - Page 20 APP during configuration process. Since your GW1000 has not be setup for weather server, during device configuration process, it will pop up weather server setting page automatically. If you have your server ID...
- Page 21 the live data page you can tap “Web Server” to complete weather server setting.
- Page 22 If a GW1000 has been successfully added to your router, then on your “Devices List” page of WS View APP, the newly added device will be listed. Tap the device it will display live data received.
-
Page 23: Wu Dashboard
4. WU Dashboard If you have GW1000 setup to push data to WU, then you can have WS View app used to view the current day weather data:... - Page 24 To enable this feature, please follow this: Press “setup” icon and choose “Manage WU stations”...
- Page 25 Press “ADD” and on the next page popped enter your WU station ID .
-
Page 26: Wu Dashboard And Live Data Difference
4.1 WU Dashboard and Live Data difference You might be confused with the data displayed. Here is a short explanation showing data difference:... - Page 27 Live Data is obtained by the APP when your APP running device and GW1000 are in the same network without the need of internet. It usually looks like this: Phone Router GW1000 WU Dashboard is used to display data obtained...
-
Page 28: Adjustment
4.2 Sensor Parameter information and adjustment When in LIVE DATA display mode, you can activate initial rain value or sensor calibration procedure. You can manually enter initial rain value for month, year or total in case you are migrate from another system and want to keep the data inherited. - Page 30 Rain start Value Sensor offset or gain set...
- Page 31 5. Registering with and using wunderground.com You can register an WU ID within WS View app:...
-
Page 32: Viewing Data On Wunderground.com
Fill up the form and apply “Register” button, it will respond immediately with a registered WU ID and password from WU. Please keep it in a safe place for your setting reference. 5.1 Viewing data on wunderground.com The most basic way to observe your weather station’s data is by using the wunderground.com... - Page 33 web site. You will use a URL like this one, where your station ID replaces the text “STATIONID”: http://www.wunderground.com/personal-weather -station/dashboard?ID=STATIONID It will show a page such as this, where you can look at today’s data and historical data as well:...
- Page 34 There are also some very useful mobile apps. The URLs provided here go to the Web version of the application pages. You can also find them directly from the iOS or Google Play stores: WunderStation: iPad application for viewing your station’s data and graphs https://itunes.apple.com/us/app/wunderstation-w eather-from-your-neighborhood/id906099986...
- Page 35 WU Storm: iPad and iPhone application for viewing radar images, animated wind, cloud coverage and detailed forecast, and PWS station data https://itunes.apple.com/us/app/wu-storm/id9 55957721...
- Page 36 Weather Underground: Forecast: iOS and Android application for forecasts https://itunes.apple.com/us/app/weather-unde rground-forecast/id486154808 https://play.google.com/store/apps/details?id =com.wunderground.android.weather&hl=en...
- Page 37 PWS Weather Station Monitor: View weather conditions in your neighborhood, or even right in your own backyard. Connects to wunderground.com https://itunes.apple.com/us/app/pws-weather- station-monitor/id713705929...
-
Page 38: Specification
6. Specification Power: DC 5V Base Station Size: 12x35x62mm Frequency: 915/868/433Mhz(optional) Temperature range: -10°C – 60°C (14°F - 140°F) Temperature resolution: 0.1°C, or 0.1°F Temperature accuracy: ± 1°C Humidity range: 10% ~ 99% Humidity resolution: 1% Humidity accuracy: ± 5% Barometric pressure range: 300 –... -
Page 39: Warranty Information
7. Warranty Information We disclaim any responsibility for any technical error or printing error, or the consequences thereof. All trademarks and patents are recognized. We provide a 1-year limited warranty on this product against manufacturing defects, defects in materials and workmanship. This limited warranty begins on the original date of purchase, is valid only on products purchased, and only to the original purchaser of this product. - Page 40 cost of installation or removal from a fixed installation, normal set-up or adjustments, or claims based on misrepresentation by the seller, performance variations resulting from installation-related circumstances.
Need help?
Do you have a question about the GW1000 and is the answer not in the manual?
Questions and answers
change ip address on ws2910
To change the IP address on the ECOWITT GW1000, follow these steps:
1. Access Your Router Settings: Log in to your router and navigate to the LAN or DHCP settings.
2. Find the GW1000’s IP Address: Locate the device in the DHCP client list.
3. Assign a Static IP: Set a fixed IP address for the GW1000 in the router’s DHCP settings.
4. Reset and Reconnect: Perform a reset on the GW1000, re-register it to your WiFi, and verify that it uses the assigned IP address.
This should help resolve connectivity issues.
This answer is automatically generated