Table of Contents
Advertisement
Quick Links
Advertisement
Table of Contents

Related Manuals for Fisher-Price POWER WHEELS XTREME MACHINE


Summary of Contents for Fisher-Price POWER WHEELS XTREME MACHINE
- Page 1 This Owner's Manual is provided and hosted by Appliance Factory Parts. FISHER PRICE 74790 Owner's Manual Shop genuine replacement parts for FISHER PRICE 74790 Find Your FISHER PRICE Ride On Parts - Select From 999 Models -------- Manual continues below --------...
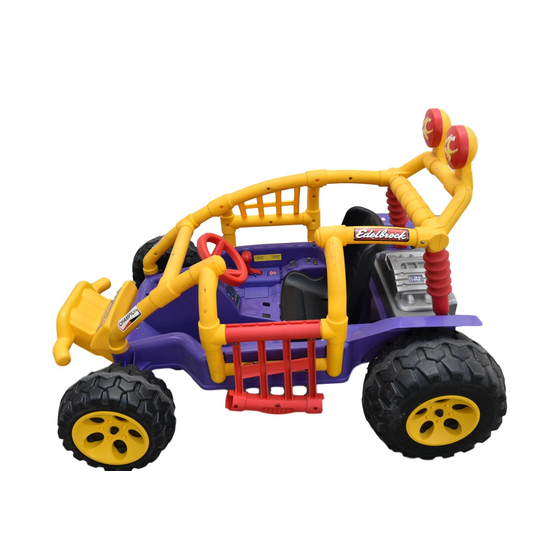
- Page 2 Product features may vary from the picture above. Owner’s Manual with Assembly Instructions Please read this manual and save it with your original sales receipt. For Model 74790 Tools needed for assembly: Phillips Screwdriver, Hammer, Pliers, and Safety Scissors (not included). Use only with a Power Wheels ®...
-
Page 3: Table Of Contents
Table of Contents Important Information ..............2 Warnings . -
Page 4: Warnings
Warnings WARNING • Children can be harmed by small parts, sharp edges and sharp points in the vehicle’s unassembled state, or by electrical items. Care should be taken in unpacking and assembly of the vehicle. Children should not handle parts, including the battery, or help in assembly of the vehicle. -
Page 5: Parts
Parts • If you experience a problem with this product, or are missing a part, please call us at 1-800-348-0751, rather than return this product to the store. • Please identify all parts before assembly and save all packaging material until assembly is complete to ensure that no parts are discarded. - Page 6 Parts Roll Cage - Right Side Roll Cage - Left Side Door Handle KC™ Light Cover - 2 Door Hinge Shock Set - 2 (Left and Right) Door Roll Cage Crossbar Battery Retainer Light Rack Steering Wheel Collar Steering Wheel Cap Brush Guard Steering Column Steering Wheel...
- Page 7 Parts Key Assembly "- 20 Lock Nut - 2 Radio Knob - 3 Small Parts Bag 12 Volt Charger Hex Bushing - 6 12 Volt Battery Not Shown: Label Sheet, Literature Bag #8 x " Screw - 27* #8 x "...
-
Page 8: Parts Diagram
Parts Diagram Steering Column/Brush Guard Assembly Vehicle Body Door Hinge Steering Linkage Bar Steering Column Door Handle Driver - 2 Front Wheel - 2 Roll Cage Crossbar Front Axle - 2 Light Rack .354 (Small Diameter) Cap Nut Rear Wheel - 2 Key Assembly Rear Axle Hubcap - 4... -
Page 9: Battery Charging
Battery Charging About Thermal Fuses Your Power Wheels ® 12 volt battery is equipped with a built-in thermal fuse. The thermal fuse is a self-resetting • The battery must be handled by adults safety device which automatically “trips” and shuts down operation of the vehicle if the vehicle is overloaded or the only. - Page 10 Battery Charging Important Notes • Your new battery must be charged for at least 18 hours before you use it in your vehicle for the first time. • You do not need to remove the battery from your vehicle to recharge it. Battery •...
-
Page 11: Assembly
Assembly Do not omit any steps. Please set aside at least 90 minutes for assembly. Assembly Handle Knob Knob Door Vehicle Body • Position the vehicle body on a flat surface. • Using safety scissors, separate the door and handle from •... - Page 12 Assembly Left Roll Cage Door Left Roll Cage Cross Support Door Hinge • Fit the slots on the door hinge onto the tabs on the bot- tom of the door. • Place the left side of the roll cage on a flat surface with the inside facing up.
- Page 13 Assembly Left Outer Shock Half Light Rack Left Inner Shock Right Roll Cage Half Light Bar Leg Front View "L" Marking • Place the right side of the roll cage on a flat surface with Please Note: The shock set halves and the light bar legs the inside facing up.
- Page 14 Assembly Light Rack Assembly Right Roll Cage Left Roll Cage Crossbar Roll Cage Crossbar • Insert four #8 x " screws into the roll cage. You may Please Note: It is easiest to assemble the roll cage by need to spin the crossbar to align the screw holes in the positioning the parts upside down as shown.
- Page 15 Assembly Roll Cage Assembly Vehicle Body • Insert four #8 x " screws through the vehicle body and into the roll cage. • Tighten the screws with a Phillips screwdriver. Do not Motors over-tighten. Important Notes: • The front axles have been placed in the motors for shipment.
- Page 16 Assembly Rear Rear (Large) (Large) Wheel Wheel Rear Axle Hex Bushing Rear Axle Hex Bushing Ring Side Hubcap .437 Driver Inside of Wheel • Slide the rear axle into the hole in the center of a driver, • Position a .437 cap nut on a flat surface and fit one end through the guides on the inside of the vehicle body and of the rear axle into it.
- Page 17 Assembly Steering Large Large Washer Washer Pivot Front Axle Pivot Bushing Large Steering Washer Hubcap Linkage Front Axle Front Axle • Position the steering linkage with the pivots on the bottom of the steering linkage. Make sure the pivots are positioned exactly as shown above.
-
Page 18: Bottom View
Assembly Light Covers Light Rack Brush Guard • Align the tabs on the insides of the KC™ light covers with the notches on the light rack housings and snap the light covers to the housings. • Hold the brush guard in place and position the vehicle body upright. - Page 19 Assembly Brushguard Hole Square Opening Lock Nut #8 x " screws Steering Linkage Assembly Lock Nut Steering Column Bottom View • Holding the brush guard and bolts in place, carefully Bottom View position the vehicle body on its side. • Hand-tighten a lock nut on the end of each bolt. •...
- Page 20 Assembly .354 Cap Nut Steering Steering Wheel Wheel Cap Steering Wheel Collar Steering Column • Fit the steering wheel cap into the center of the steering wheel. • Insert two #8 x " screws into the steering wheel cap. “UP” •...
- Page 21 Assembly Battery Battery Retainer Looped Arms Battery Compartment Slots • Once the battery is charged, it is ready to be assembled Slots in your vehicle. • Place the battery between the motors. Make sure that the battery connector extends toward the right side of the vehicle.
- Page 22 Assembly Seat Grooves Motor Harness Connector Top View • Plug the motor harness connector into the battery. Please Note: The seat can be assembled in any one of three positions for your child’s comfort. • Determine in which position to assemble the seat. •...
- Page 23 Assembly Slots Rear Press Here Rear Slot Decorative Front Tab Engine Slot Decorative Engine • With the decorative engine positioned as shown, fit the • Press down to fit the tabs on the rear of the decorative decorative engine over the batteries. engine into the slots in the back of the vehicle body.
-
Page 24: Label Decoration
Label Decoration Proper label application will help to keep the labels looking their best! When applying labels, keep the following guidelines in mind: • Wash your hands before applying the labels. • Before applying the labels, wipe the surface of the vehicle with a clean, dry cloth to remove any dust or oils. •... -
Page 25: Battery Care And Disposal
Battery Care and Disposal Care Disposal If a battery leak develops, avoid contact with the leaking • Your Power Wheels ® battery is a sealed lead-acid bat- acid and place the damaged battery in a plastic bag. See tery. It must be recycled or disposed of in an environ- information below for proper disposal. -
Page 26: Rules For Safe Driving
Rules for Safe Driving 4. Teach your child to avoid driving on steep inclines or slopes. Restrict your child’s driving to areas that are WARNING fairly level with gentle inclines or slopes of no more than 10°. • Adult supervision is required. Children •... -
Page 27: How To Operate Your Vehicle
How to Operate Your Vehicle Beginner Use - Low Speed Drive To Back Up As assembled, your vehicle is ready to roll in low speed mph, maximum). It has been pre-set so it will only operate in low speed. After your child has mastered the basic skills of driving and understands the rules for safe driving, it’s time to disconnect the high speed lock-out to allow the vehicle to operate in low or high speed. -
Page 28: Caring For Your Vehicle
Caring How to Operate Your Vehicle For Your Vehicle Advanced Use - High Speed Drive • Check all nuts, bolts, and their protective coverings regu- larly and tighten as required. Check plastic parts on a regular basis for cracks or broken pieces. •... -
Page 29: Problems And Solutions Guide
Problems and Solutions Guide IMPORTANT! If you experience a problem with your vehicle, first check the Problems and Solutions Guide below. If you still experience a problem, please contact Power Wheels ® Consumer Affairs, toll- free at 1-800-348-0751 between 8 AM and 5 PM (EST) Monday through Friday. Or, contact your local Power Wheels authorized service center. - Page 30 Problems and Solutions Guide Problem Possible Cause Solution Vehicle was running but Loose wire or loose connectors Check all wires and connectors. Make sure the motor sud- denly stopped harness connector is plugged into the battery, and that there are no loose wires around the motors. Tripped thermal fuse Each Power Wheels ®...
- Page 31 Problems and Solutions Guide Problem Possible Cause Solution Vehicle runs sluggishly Undercharged battery Charge the battery. A new battery should have been charged for at least 18 hours before using the vehicle for the first time. After first-time use, recharge the battery for at least 14 hours after each use.
- Page 32 Problems and Solutions Guide Problem Possible Cause Solution When the foot pedal is pressed, Loose wire or connector Check all wires around the motors and all connectors the vehicle won’t run without to make sure they are tight. a push “Dead Spot”...
-
Page 33: M Statement Of Limited Warranty
Bumper-to-Bumper* Limited Warranty and is intended to exclude, any liability on the part of Power *One year limited warranty from the date of Wheels , whether under this warranty or implied by law or ® purchase on the Power Wheels ®... - Page 34 Authorized Service Centers ALABAMA POMPANO BEACH - Authorized Appliance, 2171 North SAN JOSE - Ca. Electric Service Inc., 481 South Bascom Dixie Highway, 33060, (954) 941-2038 BIRMINGHAM - Frigid Appliance Center, 1861 Centerpoint Ave., 95128, (408) 295-1722 PORT ST. LUCIE - Hoppe’s Authorized Vac & Appliance, Rd., 35215, (205) 853-3952 SANTA ROSA - Hardisty’s Inc., 710 Farmers Lane, 95405, 6735 South Federal Hwy, 34952, (561) 464-0102...
- Page 35 Authorized Service Centers ALABAMA Tyndall Parkway, 32404, (850) 763-7443 PENSACOLA - Foster’s Appliance Repair, 3836 N. Davis BIRMINGHAM - Frigid Appliance Center, 1861 SAN JOSE - Ca. Electric Service Inc., 481 South Highway, 32503, (850) 432-8853 Centerpoint Rd., 35215, (205) 853-3952 Bascom Ave., 95128, (408) 295-1722 POMPANO BEACH - Authorized Appliance, 2171 North BIRMINGHAM - Frigid Appliance Center, 701 Graymont...
- Page 36 Authorized Service Centers ALABAMA SAN JOSE - Ca. Electric Service Inc., 481 South POMPANO BEACH - Authorized Appliance, 2171 North Bascom Ave., 95128, (408) 295-1722 Dixie Highway, 33060, (954) 941-2038 BIRMINGHAM - Frigid Appliance Center, 1861 SANTA ROSA - Hardisty’s Inc., 710 Farmers Lane, PORT ST.
- Page 37 Edelbrock trademark used under license from Edelbrock Corporation. Champion Trademark used under license from Champion Spark Plug Company. Fisher-Price, Inc., a subsidiary of Mattel, Inc., East Aurora, New York 14052 U.S.A. Printed in the U.S.A. ©1999 Mattel, Inc. All Rights Reserved Fisher-Price and Power Wheels are U.S.
Need help?
Do you have a question about the POWER WHEELS XTREME MACHINE and is the answer not in the manual?
Questions and answers