Table of Contents
Advertisement
Quick Links
Multi Functional Switcher / Wireless Multi Functional Switcher
MS-1/MS-1W
User's Manual (detailed)
Operating Guide
Thank you for purchasing this product.
WARNING
product. After reading them, store them in a safe place for future reference.
About this manual
Various symbols are used in this manual. The meanings of these symbols are
described below.
WARNING
CAUTION
NOTICE
NOTE
• The information in this manual is subject to change without notice.
• The illustrations in this manual are for illustrative purposes. They may differ
slightly from your product.
• The manufacturer assumes no responsibility for any errors that may appear in
this manual.
• The reproduction, transfer or copy of all or any part of this document is not
permitted without express written consent.
Trademark acknowledgment
®
• Mac
is a registered trademark of Apple Inc.
®
• Windows
, DirectDraw
in the U.S. and/or other countries.
• VESA and DDC are trademarks of the Video Electronics Standard Association.
• HDMI, the HDMI logo, and High-Definition Multimedia Interface are trademarks or registered
trademarks of HDMI Licensing LLC in the United States and other countries.
TM
• Blu-ray Disc
and Blu-ray
Association.
All other trademarks are the properties of their respective owners.
►Before using this product, please read all manuals for this
This symbol indicates information that, if ignored, could possibly
result in personal injury or even death due to incorrect handling.
This symbol indicates information that, if ignored, could possibly
result in personal injury or physical damage due to incorrect
handling.
This entry notices of fear of causing trouble.
Please refer to the pages written following this symbol.
®
and Direct3D
TM
are trademarks of Blu-ray Disc
®
are registered trademarks of Microsoft Corporation
1
Advertisement
Table of Contents

Subscribe to Our Youtube Channel
Related Manuals for Hitachi MS-1


Summary of Contents for Hitachi MS-1
- Page 1 Multi Functional Switcher / Wireless Multi Functional Switcher MS-1/MS-1W User's Manual (detailed) Operating Guide Thank you for purchasing this product. WARNING ►Before using this product, please read all manuals for this product. After reading them, store them in a safe place for future reference.
-
Page 2: Table Of Contents
Contents Introduction . . . . . . . . . . . . . . . 3 PICTURE menu . . . . . . . . . . . . 26 Features . -
Page 3: Introduction
Introduction Introduction Features This product has a variety of I/O ports that allow to connect with different kinds of equipments providing HDMI signal output. ü This product has 4 HDMI input ports and 3 USB TYPE A ports that enable it to connect with the image equipments with a wide range of digital outputs. -
Page 4: Part Names
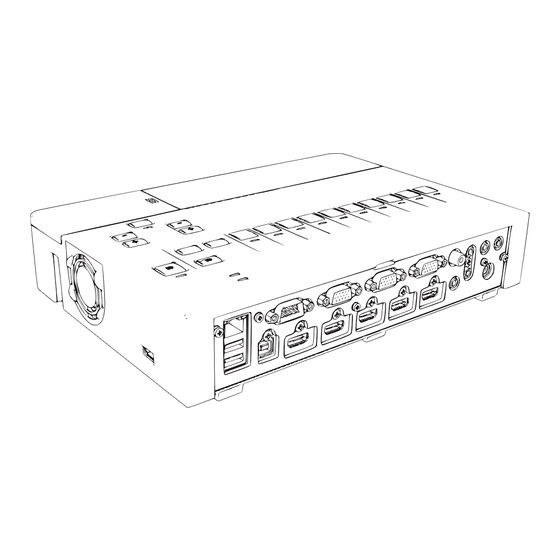
Introduction Part names Control panel Exhaust vents (MS-1W only Rear panel with cooling fan) NOTE (MS-1W only) Intake • Cooling fan vents may not operate depending on the settings, but this is not a malfunction. Security slot USB TYPE A port Security Menu cover... - Page 5 Introduction Part names (continued) Control panel HDMI OUTPUT WHDI STANDBY/ON PROJECTOR INPUT COMPUTER 1 COMPUTER 2 HDMI1 HDMI2 HDMI3 HDMI4 VIDEO USB-A USB-B BLANK FREEZE STANDBY/ON PROJECTOR INPUT HDMI3 HDMI4 USB-A USB-B VIDEO BLANK FREEZE MUTE PJ INPUT PJ MENU PJ INPUT PJ MENU MENU MENU ENTER ENTER HDMI...
- Page 6 Introduction Part names (continued) Rear and side panel (6) (7) (8) (9) AUDIO AUDIO CONTROL MONITOR OUT COMPUTER IN 2 COMPUTER IN 1 VIDEO IN 1 AUDIO REMOTE DC IN IN 2 USB TYPE A CONTROL USB TYPE B HDMI 3 HDMI 1 HDMI 2 HDMI 4...
-
Page 7: Setting Up
Setting up Setting up WARNING ►Install the product where you can access the power outlet easily. If an abnormality should occur, unplug the product urgently. Otherwise it could cause a fire or electric shock. ►Do not subject the product to unstable conditions. If the product falls or topples over, it could result in injury or damage to the product and the surrounding things. - Page 8 Setting up CAUTION ►Place the product in a cool place with sufficient ventilation. Using a damaged product could result in a fire and an electric shock. • Do not place the product in direct sunlight or near hot objects such as heaters. •...
-
Page 9: Connecting With Your Devices
Setting up Connecting with your devices Before connecting the product to a device, consult the manual of the device to confirm that the device is suitable for connecting with this product and prepare the required accessories, such as a cable in accord with the signal of the device. Consult your dealer when the required accessory did not come with the product or the accessory is damaged. - Page 10 Setting up Connecting with your devices (continued) About Plug-and-Play capability • Plug-and-Play is a system composed of a computer, its operating system and peripheral equipment (i.e. display devices). This product is VESA DDC 2B compatible. Plug-and-Play can be used by connecting this product to a computer that is VESA DDC (display data channel) compatible.
- Page 11 Setting up Connecting with your devices (continued) Computer AUDIO AUDIO CONTROL MONITOR OUT COMPUTER IN 1 COMPUTER IN 2 VIDEO IN 1 AUDIO REMOTE DC IN IN 2 USB TYPE A CONTROL USB TYPE B HDMI 3 HDMI 1 HDMI 2 HDMI 4 HDMI OUT DC5V 0.5A...
- Page 12 Setting up Connecting with your devices (continued) Computer External device Access point wireless adapter (optional) AUDIO AUDIO CONTROL MONITOR OUT COMPUTER IN 2 COMPUTER IN 1 VIDEO IN 1 AUDIO REMOTE DC IN IN 2 USB TYPE A CONTROL USB TYPE B HDMI 1 HDMI 2 HDMI 3...
- Page 13 Setting up Connecting with your devices (continued) VCR/DVD/Blu-ray Disc player AUDIO AUDIO CONTROL MONITOR OUT COMPUTER IN 1 COMPUTER IN 2 VIDEO IN 1 AUDIO REMOTE DC IN IN 2 USB TYPE A CONTROL USB TYPE B HDMI 1 HDMI 3 HDMI 4 HDMI OUT HDMI 2...
-
Page 14: Microphone Function
Setting up Connecting with your devices (continued) Remote Monitor control RGB IN AUDIO AUDIO CONTROL MONITOR OUT COMPUTER IN 1 COMPUTER IN 2 VIDEO IN 1 AUDIO REMOTE DC IN IN 2 USB TYPE A CONTROL USB TYPE B HDMI 3 HDMI 1 HDMI 2 HDMI 4... -
Page 15: Using The Security Bar And Slot
Setting up Using the security bar and slot A commercially available anti-theft chain or wire can be attached to the security bar on the product. Refer to the fi gure to choose an anti-theft chain or wire. Also this product has the security slot for the Kensington lock. For details, see the manual of the security tool. -
Page 16: Simple Steps For A Quick Start
Setting up Simple steps for a quick start Before turning on the power 1. Connect the output port of intended device to the input port of this product. 2. Connect the HDMI OUT port of this product to the HDMI input port of the intended projector. - Page 17 Setting up Simple steps for a quick start(continued) Device Step 4 HDMI OUT Step 1 Step 2 MS-1W only MS-1/MS-1W HDMI OUT Projector Projector HDMI 2 HDMI 2 MS-1W only...
- Page 18 Setting up Simple steps for a quick start(continued) NOTE • If the projector has multiple HDMI or DVI input ports, make sure to connect the HDMI OUT port of this product to the HDMI2 input port of the projector. And make sure to select HDMI2 input port of the projector. •...
-
Page 19: Settings Of Input Signals
Setting up Simple steps for a quick start(continued) Settings of Input signals 8. Press the INPUT button to choose the connected device. The indicator of the selected button lights in green. INPUT button PROJEC INPUT COMPUTER 2 HDMI3 HDMI4 USB-A USB-B COMPUTER 1 HDMI1 HDMI2... -
Page 20: Operating
Operating Operating STANDBY/ON PROJECTOR Adjusting the volume USB-A USB-B Use the VOLUME +/VOLUME - buttons to adjust the volume. BLANK FREEZE VOLUME +/- button MIC volume MUTE PJ INPUT PJ MENU MENU MUTE button MUTE indicator ENTER HDMI Temporarily muting the sound WHDI Press MUTE button on the product. -
Page 21: Selecting An Input Signal
Operating Selecting an input signal Press INPUT button on the product. INPUT button INPUT COMPUTER 2 HDMI3 HDMI4 USB-A USB-B COMPUTER 1 HDMI1 HDMI2 VIDEO BLANK PJ INPUT PJ ME ● It may take several seconds to project the images from the USB TYPE B port. HDMI WHDI... -
Page 22: Projector Control
STANDBY/ON Operating PROJECTOR Projector Control USB-A USB-B This product has the function to operate the projector with the buttons as the BLANK FREEZE fi gure shown below. NOTE • Some projectors are not supported with this function. Contact your dealer for more details. PROJECTOR button PJ MENU button PJ INPUT button... -
Page 23: Using As A Simple Pc Mouse And Keyboard
USB TYPE B port and the computer’s type A USB port are connected and MOUSE is selected for the USB TYPE B item in the OPTION menu (44). See Hitachi Tablet User’s Manual for more details. USB TYPE B USB TYPE B... -
Page 24: Using The Menu Function
STANDBY/ON PROJECTOR Operating USB-A USB-B BLANK FREEZE Using the menu function This product has the following menus: PICTURE, IMAGE, INPUT, SETUP, AUDIO, SCREEN, OPTION and NETWORK. Each of these menus is operated using the same methods. While the product is displaying any menu, the MENU button on the product works as the cursor buttons. - Page 25 Operating Using the menu function (continued) To close the MENU, select EXIT and press the ► cursor button or ENTER button. Even if you do not do anything, the dialog will automatically disappear after about 30 seconds. ● Some functions cannot be performed when a certain input port is selected, or when a certain input signal is displayed.
-
Page 26: Picture Menu
PICTURE menu PICTURE menu From the PICTURE menu, items shown in the table below can be performed. Item Description Using the ◄/► buttons adjusts the brightness. BRIGHTNESS Dark ó Light Using the ◄/► buttons adjusts the contrast. CONTRAST Weak ó Strong Using the ◄/►... - Page 27 PICTURE menu Item Description Using the ▲/▼ buttons switches the gamma mode. To adjust CUSTOM Selecting a mode whose name includes CUSTOM and then pressing the ► button or the ENTER button displays a dialog to aid you in adjusting the mode.This function is useful when you want to change the brightness of particular tones.
-
Page 28: Color Temp
PICTURE menu Item Description Using the ▲/▼ buttons switches the color temperature mode. To adjust CUSTOM Selecting a mode whose name includes CUSTOM and then pressing the ► button or the ENTER button displays a dialog to aid you in adjusting the OFFSET and GAIN of the selected mode. - Page 29 PICTURE menu Item Description Using the ◄/► buttons adjusts the sharpness. Weak ó Strong SHARPNESS • There may be some noise and/or the screen may flicker for a moment when an adjustment is made. This is not a malfunction. This product has 4 memories for adjustment data (for all the items of the PICTURE menu).
-
Page 30: Image Menu
IMAGE menu IMAGE menu From the IMAGE menu, items shown in the table below can be performed. Item Description Using the ▲/▼ buttons switches the mode for aspect ratio. NORMAL ó 4:3 ó 16:9 ó 16:10 ó 14:9 ó NATIVE ASPECT •... - Page 31 IMAGE menu Item Description Using the ◄/► buttons adjusts the vertical position. Down ó Up • Over-adjusting the vertical position may cause noise to appear on the screen. If this occurs, please reset the vertical position to the default setting. V POSITION •...
- Page 32 IMAGE menu Item Description Using the ◄/► buttons adjusts the horizontal size. Small ó Large • This item can be selected only for a computer signal. This function is unavailable for a signal from the LAN, USB TYPE A, USB TYPE H SIZE B or HDMI port.
-
Page 33: Input Menu
INPUT menu INPUT menu From the INPUT menu, items shown in the table below can be performed. Item Description Using the ▲/▼ buttons switches the progress mode. TV ó FILM ó OFF • This function works only for a video signal, component video signal (of 480i@60 or 576i@50 or 1080i@50/60) and an HDMI signal (of PROGRESSIVE... - Page 34 INPUT menu Item Description The video format for VIDEO port can be set. (1) Use the ▲/▼ buttons to select the input port. (2) Using the ◄/► buttons switches the mode for video format. VIDEO FORMAT AUTO ó NTSC ó PAL ó SECAM N-PAL ó...
-
Page 35: Frame Lock
INPUT menu Item Description The computer input signal type for COMPUTER IN1 and IN2 ports can be set. (1) Use the ▲/▼ buttons to select the COMPUTER IN port to be set. (2) Use the ◄/► buttons to select the computer input signal type. AUTO ó... - Page 36 INPUT menu Item Description The resolution for the COMPUTER IN1 and COMPUTER IN2 input signals can be set on this product. (1) In the INPUT menu select the RESOLUTION using the ▲/▼ buttons and press the ► button. The RESOLUTION menu will be displayed.
-
Page 37: Setup Menu
SETUP menu SETUP menu From the SETUP menu, items shown in the table below can be performed. Item Description Select one of the COMPUTER IN ports using ◄/► buttons. Select OFF to disable the MONITOR OUT MONITOR OUT port for the input port. •... -
Page 38: Audio Menu
AUDIO menu AUDIO menu From the AUDIO menu, items shown in the table below can be performed. Item Description VOLUME Using the ◄/► buttons adjusts the volume. Low ó High While the image signal from the input port chosen in step (1) is projected, the audio signal from the input port selected in step (2) is output to both the AUDIO OUT port . -
Page 39: Screen Menu
SCREEN menu SCREEN menu From the SCREEN menu, items shown in the table below can be performed. Item Description Using the ▲/▼ buttons switches the OSD (On Screen Display) language. LANGUAGE ENGLISH ó FRANÇAIS ó DEUTSCH ó ESPAÑOL (shown in the LANGUAGE dialog) MENU POSITION Using the ▲/▼/◄/►... -
Page 40: Source Name
SCREEN menu Item Description Each input port for this product can have a name applied to it. (1) Use the ▲/▼ buttons on the SCREEN menu to select SOURCE NAME and press the ► or ENTER button. The SOURCE NAME menu will be displayed. (2) Use the ▲/▼... - Page 41 SCREEN menu Item Description (6) The current name will be displayed on the first line. Use the ▲/▼/◄/► buttons and the ENTER button to select and enter characters. To erase 1 character at one time, press WHDI button. Also if you move the cursor to DELETE or ALL CLEAR on screen and press the ENTER button, 1 character or...
- Page 42 SCREEN menu Item Description The C.C. is the function that displays a transcript or dialog of the audio portion of a video, files or other presentation or other relevant sounds. It is required to have NTSC format video or 480i@60 format component video source supporting C.C.
-
Page 43: Output Resolution
SCREEN menu Item Description CHANNEL Select Closed Caption CHANNEL from following options using ▲/▼ buttons. 1 ó 2 ó 3 ó 4 C.C. 1: Channel 1, primary channel / language (Closed Caption) 2: Channel 2 3: Channel 3 4: Channel 4 The channel data may vary, depending on the content. -
Page 44: Option Menu
OPTION menu OPTION menu From the OPTION menu, items shown in the table below can be performed. Item Description Using the ▲/▼ buttons selects the function of USB TYPE B port. To use this function, you need to connect the USB TYPE B port of the product and the type A USB port of a computer. -
Page 45: Auto Adjust
OPTION menu Item Description Selecting this item displays the SERVICE menu. AUTO ADJUST Using the ▲/▼ buttons to select one of the mode. When the DISABLE is selected, the automatic adjustment feature is disabled. FINE ó FAST ó DISABLE FINE: Finer tuning including H.SIZE adjustment. FAST: Faster tuning, setting H.SIZE to prearranged data for the input signal. - Page 46 OPTION menu Item Description COMMUNICATION TYPE Select the communication type for transmission via the CONTROL port. NETWORK BRIDGE: Select this type, if it is required to control an external device as a network terminal, via this product from the computer. The CONTROL port doesn't accept RS-232C commands (Network Bridge Function in the Network Guide)
- Page 47 OPTION menu Item Description RESPONSE LIMIT TIME Select the time period to wait for receiving response data from other device communicating by the NETWORK BRIDGE and the HALF-DUPLEX through the CONTROL port. OFF ó 1s ó 2s ó 3s OFF: Select this mode if it is not required to check the responses from the device that the product sends data to.
-
Page 48: Control Panel
OPTION menu Item Description CONTROL PANEL Use the ▲/▼ buttons to select the direction of the cursor buttons. down PJ MENU MENU PJ MENU MENU PJ MENU MENU PJ MENU MENU ENTER ENTER ENTER ENTER right left right left down SERVICE (continued) N O R M A L... -
Page 49: Network Menu
NETWORK menu NETWORK menu Remember that incorrect network settings on this product may cause trouble on the network. Be sure to consult with your network administrator before connecting to an existing access point on your network. Select “NETWORK” from the main menu to access the following functions. -
Page 50: Subnet Mask
NETWORK menu Item Description Use the ▲/▼ buttons to turn DHCP on/off. ON ó OFF Select OFF when the network does not have DHCP DHCP enabled. To save the setting, press the ► button. (Dynamic Host • When the “DHCP” setting changes to “ON”, it Configuration takes a little time to obtain IP address from DHCP Protocol) -
Page 51: Date And Time
NETWORK menu Item Description Use the ▲/▼/◄/► buttons to enter the Year (last two digits), Month, Date, Hour and Minute. • When this item is set, the same item in the WIRED SETUP menu is overwritten with the same DATE AND setting (55). - Page 52 NETWORK menu Item Description Use the ▲/▼ buttons to select the SSID to display the SSID menu. #1 DEFAULT ó #2 DEFAULT ó #3 CUSTOM Select one of the DEFAULT (#1~#2) and press ► or ENTER button. To adjust CUSTOM Press the ►...
-
Page 53: Wireless Information
NETWORK menu Item Description "Selecting this item displays the WIRELESS_INFORMATION dialog for viewing the wireless LAN settings." Use the ▲/▼ buttons to switch the page. The first page shows the wireless LAN settings. The third and subsequent pages display the signal information of wireless LAN connection devices. - Page 54 NETWORK menu Item Description Selecting this item displays the WIRED SETUP menu for the wired LAN. Use the ▲/▼ buttons to turn DHCP on/off. ON ó OFF Select OFF when the network does not have DHCP enabled. To save the setting, press the ► DHCP button.
-
Page 55: Wired Setup
NETWORK menu Item Description Use the ▲/▼ buttons to enter the TIME DIFFERENCE. Set the same TIME DIFFERENCE as the one set on your computer. If unsure, consult your IT manager. TIME Use the ► button to return to the menu after DIFFERENCE setting the TIME DIFFERENCE. - Page 56 NETWORK menu Item Description (1) The current SWITCHER NAME will be displayed on the first 3 lines. Particular switcher name is pre-assigned by default. If you move the cursor to DELETE or ALL CLEAR on screen and push the ENTER, 1 character or all characters will be erased.The SWITCHER NAME can be input up to 64 characters.
- Page 57 Use the application to transfer the im- age data. It can be downloaded from the Hitachi web site. Use the ▲/▼ buttons to select an item which is a still image by the MY IMAGE (My Image Function in the Network Guide) and the ►...
- Page 58 It can be installed from the bundled application CD. You can also download the latest version and relevant information from the Hitachi website (http://www.hitachi-america.us/projectors or http:// www.hitachidigitalmedia.com).For details of Network Presentation and instructions to install the "LiveViewer", refer to the manual for "LiveViewer".
- Page 59 NETWORK menu Item Description The display mode is changed. • For details on how to switch the display mode to Multi PC mode on your computer, refer to the manual for “LiveViewer”. • The Presenter mode setting of the selected MULTI PC computer becomes valid when the display mode is MODE...
-
Page 60: Presentation Tools
Presentation tools Presentation tools The product has the following convenient tools that enable on-screen presentations easily and quickly: - PC-LESS Presentation (below) - Drawing function Drawing function enables you to draw on the product's screen with USB mouse or tablets connected to the USB TYPE A ports. For details, refer to the manual for peripheral equipment. -
Page 61: Thumbnail Mode
Presentation tools PC-LESS Presentation (continued) [Supported file format and its extension] • JPEG (.jpeg, .jpg) * Progressive is not supported. • Bitmap (.bmp) * 16bit mode and compressed bitmap is not supported. • PNG (.png) * Interlace PNG is not supported. •... - Page 62 Presentation tools PC-LESS Presentation (continued) Operating by buttons or keys The following functions can be supported while the Thumbnail is displayed. Button operation Functions Web Remote Control panel Control ▲/▼/◄/► [▲]/[▼]/[◄]/[►] Move cursor [PAGE UP] Switches pages [PAGE DOWN] • Displays the selected image on the Full Screen mode when a cursor is on a thumbnail image.
-
Page 63: Slide Show
Presentation tools PC-LESS Presentation (continued) Operating by the menu on the Thumbnail screen You can also control the images by using the menu on the Thumbnail screen. Item Functions Moves to an upper folder. SORT Allows you to sort files and folders as following. Press the ►... - Page 64 Presentation tools PC-LESS Presentation (continued) NOTE • These operations are not accessible while the product OSD is displayed. • The Thumbnail mode is able to display up to 20 files in one page. • The image quality may deteriorate when playing back audio data included in a movie.
-
Page 65: Full Screen Mode
Presentation tools PC-LESS Presentation (continued) Full Screen Mode The Full Screen mode shows a full display image. To display in Full Screen mode, select an image in the Thumbnail screen. Full screen display Operations for still images The following operations are enabled in the Full Screen mode while a still image is displayed. - Page 66 Presentation tools PC-LESS Presentation (continued) Operations for movie A remote control icon and a progress bar are displayed when one of the cursor buttons, ENTER button on the control panel or Web Remote Control is pressed or clicked while a movie is playing in the Full Screen mode. The following operations are enabled while the remote control icon and progress bar are displayed.
-
Page 67: Slide Show Mode
Presentation tools PC-LESS Presentation (continued) Slideshow mode The Slideshow mode displays images in full screen and switches the images at intervals set in INTERVAL on the Thumbnail screen menu (63). You can start this function from the Slideshow menu. While the Slideshow is displayed, the following button operations are enabled when still images are displayed, and the same button operations in the Full Screen mode are enabled when movies are displayed. - Page 68 Presentation tools PC-LESS Presentation (continued) You can play the Slideshow at your desired configuration. Configure the Slideshow items in the Thumbnail. 1) RETURN : Returns to the thumbnail mode. 2) PLAY : Play the Slideshow. 3) START : Set the beginning number of the Slideshow.
- Page 69 Presentation tools PC-LESS Presentation (continued) Playlist The Playlist is a DOS format text file, which decides the order of displayed still image files in the Thumbnail or Slideshow. The playlist file name is “playlist.txt” and it can be edited on a computer. It is created in the folder that contains the selected image files when the PC-LESS Presentation is started or the Slideshow is configured.
-
Page 70: Usb Display(Windows Computer)
Presentation tools USB Display(Windows computer) The product can display images transferred from a computer via an USB cable (12). Hardware and software requirement for computer • OS: One of the following. ® Windows XP Home Edition /Professional Edition ® Windows Vista Home Basic /Home Premium /Business /Ultimate /Enterprise ®... - Page 71 Presentation tools USB Display(Windows computer) (continued) This application will appear in the Windows notification area once it starts. You can quit the application from your computer by selecting “Quit” on the menu. NOTE • The “LiveViewer” (refer to the Network Guide) and this application cannot be used at the same time.
-
Page 72: Right-Click Menu
Presentation tools USB Display(Windows computer) (continued) Right-Click menu The menu shown in the right will be displayed when you right-click the application icon in the Windows notification area. Display : The Floating menu is displayed, and the icon disappears from the Windows notification area. -
Page 73: Options Window
Presentation tools USB Display(Windows computer) (continued) Options window If you select the Option button on the Floating menu, the Options window is displayed. Optimize Performance The “LiveViewer Lite for USB” captures screenshots in JPEG data and sends them to the product. The “LiveViewer Lite for USB” has two options that have different compression rate of JPEG data. -
Page 74: Maintenance
Maintenance Maintenance Inside of the product In order to ensure the safe use of your product, please have it cleaned and inspected by your dealer about once every year. WARNING ►Before caring, make sure the power cord is not plugged in, and then allow the product to cool sufficiently. -
Page 75: Troubleshooting
Troubleshooting Troubleshooting If an abnormal operation should occur, stop using the product immediately. WARNING ►Never use the product if abnormal operations such as smoke, Troubleshooting strange odor, excessive sound, damaged casing or elements or cables, penetration of liquids or foreign matter, etc. should occur. In such cases, immediately disconnect the power plug from the power outlet. -
Page 76: Regarding The Indicator Lamps
Troubleshooting Regarding the indicator lamps When operation of the POWER, HDMI and WHDI indicators differs from usual, check and cope with it according to the following table. POWER HDMI WHDI Description indicator indicator indicator The product is in standby state. Lighting Please refer to the section “Simple steps for quick Orange... -
Page 77: Resetting All Settings
Troubleshooting Resetting all settings When it is hard to correct some wrong settings, the FACTORY RESET function of SERVICE item in OPTION menu (48) can reset all settings (except settings such as LANGUAGE and NETWORK) to the factory default. Phenomena that may be easy to be mistaken for machine defects About the phenomenon confused with a machine defect, check and cope with it according to the following table. - Page 78 Troubleshooting Phenomena that may be easy to be mistaken for machine defects (continued) Reference Phenomenon Cases not involving a machine defect page The signal cables are not correctly connected. 11 ~ 14 Correctly connect the audio cables. The MUTE function is working. Press MUTE button.
- Page 79 Troubleshooting Phenomena that may be easy to be mistaken for machine defects (continued) Reference Phenomenon Cases not involving a machine defect page "Waiting for connection." remains displayed even though the USB TYPE B port is selected. Remove the USB cable and reconnect after a while. The product does not recognize the USB storage No pictures device inserted into USB TYPE A port.
- Page 80 Troubleshooting Phenomena that may be easy to be mistaken for machine defects (continued) Reference Phenomenon Cases not involving a machine defect page Some kind The OVER SCAN ratio is too big. of image Adjust OVER SCAN in the IMAGE menu smaller. degradation Excessive VIDEO NR.
- Page 81 Troubleshooting Phenomena that may be easy to be mistaken for machine defects (continued) Reference Phenomenon Cases not involving a machine defect page Disconnect the LAN cable and check that the product is working properly. If this phenomenon occurs after connecting to the network, there may be a loop between two Ethernet switching hubs within the network, as explained below.
-
Page 82: Specifications
Specifications Specifications Please see the Specifications in the User’s Manual (concise) which is a book. End User License Agreement for the Product Software • Software in the product consists of the plural number of independent software modules and there exist our copyright or/and third party copyrights for each of such software modules.
Need help?
Do you have a question about the MS-1 and is the answer not in the manual?
Questions and answers