Table of Contents
Advertisement
Available languages
Available languages
Quick Links
Advertisement
Chapters
Table of Contents

Related Manuals for Sage Smart Oven Air Fryer XL


Summary of Contents for Sage Smart Oven Air Fryer XL
- Page 1 User Guide Smart Oven Air Fryer XL ™ B###### / S###### BOV905 / SOV905 USER GUIDE HANDBUCH GUIDE UTILISATEUR HANDLEIDING MANUALE UTENTE GUÍA DEL USUARIO MANUAL DO UTILIZADOR INSTRUKCJA OBSŁUGI...
-
Page 2: Table Of Contents
SAFETY FIRST the power outlet and switching on the appliance. Ensure the At Sage we are very safety ® appliance inlet is completely dry conscious. We design and before inserting the connector end of the power cord. - Page 3 If you are unsure the power authorised Sage Service Centre outlets are properly grounded, for examination, replacement or please consult an electrician. repair.
- Page 4 unless they are older than 8 and roasting pan, that contain hot oil supervised. Keep the appliance or other hot liquids. and its cord out of reach of • Do not lay cooking utensils, children. roasting pans, or dishes on the •...
- Page 5 - Remove the crumb tray and with the appliance; the use clean with warm soapy water. of attachments not sold or - Dry the tray completely before recommended by Sage may inserting it securely back in cause fire, electric shock, or place. injury.
-
Page 6: Warning Hot Surface
• Do not look directly at a The symbol shown glowing bulb. indicates that this appliance should not be • Do not remain in the light if disposed of in normal skin feels warm. household waste. It should be • Keep bulb away from taken to a local authority waste materials that may burn. -
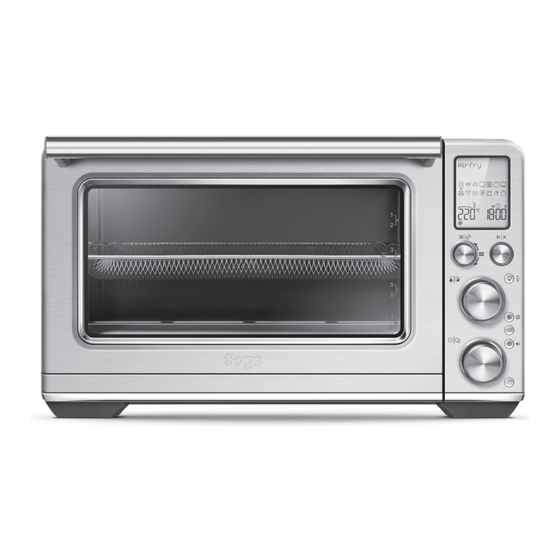
Page 7: Components
COMPONENTS Oven Accessories F. Door handle A. 30 cm (12 in) non-stick pizza pan G. Oven light B. Grilling rack H. Crumb tray C. 28 x 33.5cm enamel roasting pan D. Air fry basket I. Ventilation slots J. Removable power cord E. -
Page 8: Control Panel
CONTROL PANEL 1. LCD screen Function Dial / Rotate Remind / Confirm Button temperature / Darkness Dial Time / Slices Dial Start / Stop Button Oven Light / temperature Conversion Button Convection / Language Button Phase Cook Button Frozen / Adjust Volume Button A Bit More Button... -
Page 9: Functions
ELEMENT IQ 3. Place the oven on a flat, dry surface. Ensure ™ there is a minimum distance of 10cm of space The Sage Smart Oven Air Fryer XL features ™ on both sides of the appliance and 15cm above. -
Page 10: Oven Functions Overview
OVEN FUNCTIONS OVERVIEW SUGGESTED FUNCTION PRESETS PREHEAT RANGE RACK POSITION Darkness = 4 Darkness = 1 to 7 TOAST Slices = 4 Slices = 1 to 9 Darkness = 4 Darkness = 1 to 7 BAGEL Slices = 4 Bagels = 1 to 9 Darkness = 3 Darkness = 1 to 7 CRUMPET... -
Page 11: Quick Start Guide
QUICK START GUIDE OPERATING YOUR SAGE OVEN TEMPERATURE DIAL 1. Insert the wire rack into the desired rack position. The rack positions are conveniently printed on the right-hand side of the oven door window. There are four groove positions. The rack can be inserted either facing upwards... - Page 12 DOOR SENSOR pan, grilling rack and/or roasting pan. Ensure the food is centred in the oven for the most If the door is opened during cooking, the timer will even cooking. pause and the light will turn on. b) Close the oven door. When the door is closed, the timer will resume c) The timer will continue to count down.
- Page 13 PRESET FUNCTIONS: NOTE TOAST FUNCTION When cooking food on baking pans or other The Toast function browns and crisps the outside cooking vessels on multiple wire racks, it is of your bread while keeping the inside soft and suggested to leave enough room between racks moist.
-
Page 14: Bagel Function
6. Press the start/stop button to start the Toast function. The button backlight will illuminate red, the oven alert will sound, and the LCD screen will illuminate orange. 7. The timer will be displayed and automatically begin to count down. The time can be adjusted during the toasting cycle by turning the time dial. -
Page 15: Crumpet Function
8. At the end of the bagel cycle, the oven alert will increase it. The triangle above the circles will sound. The start/stop button backlight will move to indicate the selected setting. go out and the LCD screen will illuminate white. AS A GENERAL GUIDE: NOTE Desired toast colour... -
Page 16: Bake Function
9. At the end of the bake cycle, the oven alert will BAKE FUNCTION sound. The start/stop button backlight will The Bake function cooks food evenly throughout. go out and the LCD screen will illuminate white. This function is ideal for baking cakes, muffins, brownies and pastries. -
Page 17: Grill Function
5. Press the start/stop button to activate the Roast function. The button backlight will illuminate red, the oven alert will sound, and the LCD screen will illuminate orange. The LCD screen will indicate ‘PREHEATING’. 6. Once the oven has finished preheating, an alert will sound, and food can be inserted into the oven. - Page 18 the wire rack so air will flow around all sides of BOTTOM BAKE FUNCTION the food. Close the oven door. The Bottom Bake function emits heat from below, 8. After the PREHEATING, the timer will that ensures the base is cooked through. This automatically begin to count down.
-
Page 19: Pizza Function
150 °C to a maximum You can fit a total of 4 air frying/dehydrating of 250 °C. baskets in this oven. Visit www.sage.com for more information on purchasing additional air fry/ b) Turn the time dial to select the cooking dehydrate baskets. - Page 20 adjusted during the pizza cycle by turning the PROOF FUNCTION corresponding temperature and time The Proof function is designed to precisely hold dial. The cycle can be stopped at any time by low temperatures, providing an ideal environment pressing the start/stop button.
-
Page 21: Reheat Function
8. At the end of the reheat cycle, the oven alert will REHEAT FUNCTION sound. The start/stop button backlight will The Reheat function is ideal for gently reheating go out and the LCD screen will illuminate white. leftovers without browning or drying them out. 1. - Page 22 6. Press the start/stop button to activate b) The time is displayed as the bottom figure the Warm function. The button backlight will on the LCD screen. Turn the time dial to illuminate red, the oven alert will sound, and the adjust the time up to 72 hours.
- Page 23 can be stopped at any time by pressing the SLOW COOK FUNCTION start/stop button. The Slow Cook function has cooking profiles 8. At the end of the slow cook cycle, the oven will designed for long cook times at low temperatures. automatically switch to the Warm function.
-
Page 24: Replacing The Oven Light
The top of the oven is very hot during and after operation. As a result, storing items on top of the oven is not recommended. The only exception is the optional Sage Bamboo Cutting Board and Serving Tray that fits in the ribbed section on top of the oven. Visit www.Sage.com for more information. -
Page 25: Care And Cleaning
Do not use any type of cleanser or cleaning agents. anything on top. The only exception is the Do not use any standard oven cleaner to clean optional Sage Bamboo Cutting Board and the interior of the oven as this will deteriorate the Serving Tray. -
Page 26: Troubleshooting
TROUBLESHOOTING POSSIBLE PROBLEM EASY SOLUTION Oven will not switch "ON" • Check that the power plug is securely inserted into the outlet. • Insert the power plug into an independent outlet. • Insert the power plug into a different outlet. •... - Page 27 • The LCD screen will display ‘E01’ when there is a non-resettable ‘E01’ issue with the appliance. Should this occur, immediately remove the power cord from the power outlet and call Sage Consumer Support. The LCD screen displays • The LCD screen will display ‘E02’ when there is a non-resettable ‘E02’...
-
Page 28: Guarantee
2 years from the date of purchase against defects caused by faulty workmanship and materials. During this guarantee period Sage Appliances will repair, replace, or refund any defective product (at the sole discretion of Sage Appliances). All legal warranty rights under applicable national legislation will be respected and will not be impaired by our guarantee. - Page 29 User Guide Smart Oven Air Fryer XL ™ B###### / S###### BOV905 / SOV905 HANDBUCH...
-
Page 30: Wichtige Vorsichtsmassnahmen
WICHTIGE INHALT VORSICHTSMASS- NAHMEN 30 Bei Sage steht Sicherheit Bitte alle Anweisungen an erster Stelle vor Gebrauch lesen 36 Komponenten und zum späteren 37 Bedienfeld 38 Funktionen Nachschlagen 40 Schnellstartanleitung aufbewahren. 56 Pflege und Reinigung • Entfernen und entsorgen 58 Störungsbehebung Sie sämtliches Verpa ckungs-... - Page 31 Verbindung mit einem Sie es nicht und senden Sie Verlängerungskabel oder es an das nächstgelegene Adapter verwenden. autorisierte Sage Service • Wenden Sie sich an Centre zur Überprüfung, zur einen qualifizierten Reparatur oder um einen Ersatz Elektriker, wenn Sie zu erhalten.
- Page 32 wie einem Elektrobrenner, • Lassen Sie das Gerät während des Gebrauchs nicht einem beheizten Ofen oder unbeaufsichtigt. Bewegen Sie einem Gasherd. das Gerät nicht, während es in • Sollte der Ofen während Betrieb ist. Inbetriebnahme mit • Kinder sind zu beaufsichtigen, entflammbaren Materialien um sicherzustellen, dass sie wie Vorhängen, Stoffen,...
- Page 33 • Lassen Sie die Tür nicht enthaltenen Zubehörteile. Die über einen längeren Verwendung von Zubehörteilen, Zeitraum geöffnet. die nicht von Sage verkauft oder empfohlen werden, kann • Legen Sie keine Gegenstände zu Bränden, Stromschlag oder auf den Ofen, wenn er in Verletzungen führen.
- Page 34 Reparaturen sind WARNUNG von einem autorisierten Sage Service Centre MINIMIEREN SIE DAS vorzunehmen. RISIKO VON FEUER, STROMSCHLÄGEN, • Bei Schäden, die durch EXTREMER UV-STRAHLUNG unsachgemäßen Gebrauch, UND VERLETZUNGEN: falsche Bedienung oder nicht fachmännische Reparaturen • Wir empfehlen, den verursacht werden, erlischt Ofen an einer getrennten jeglicher Garantieanspruch.
- Page 35 • Halten Sie die Glühbirne von Dieses Symbol bedeutet, brennbarem Material fern. dass das Gerät nicht im gewöhnlichen • Die Glühbirne wird schnell heiß. Haushaltsmüll entsorgt Verwenden Sie immer nur den werden darf. Stattdessen sollte es Lichtschalter, um das Licht bei einem entsprechenden einzuschalten.
-
Page 36: Komponenten
KOMPONENTEN A. Antihaftbeschichtete Pizzablech mit Ø 30 cm G. Ofenlicht B. Grillrost H. Krümelschublade C. Emaille-Bratform mit 28 x 33,5 cm I. Belüftungsschlitze D. Heißluft-Frittiergitter J. Abnehmbares Netzkabel E. Ofengestell (2x) F. Türgriff Leistungsinformationen 220–240V ~ 50Hz–60Hz 2000–2400W... -
Page 37: Bedienfeld
BEDIENFELD 1. LCD-Anzeige „Function“-Drehregler / Rotieren / Bestätigen Drehregler Temperatur / Bräunungsgrad Drehregler Zeit / Scheiben Taste Start / Stop Taste Ofenlicht / Temperaturumrechnung Taste Umluft / Sprache Taste Kocheinstellungen Taste Gefroren / Lautstärke anpassen Taste A Bit More... -
Page 38: Funktionen
FUNKTIONEN VORBEREITUNG DES OFENS Vor dem ersten Gebrauch sollten Sie den 8. Drücken Sie die Taste „Start / Stop“. Ofen 16 Minuten lang leer laufen lassen, Die Hintergrundbeleuchtung der Taste wird nun um Schutzstoffe von den Heizelementen zu rot, das LCD-Display orange und der Ofenalarm entfernen. - Page 39 ÜBERSICHT DER OFENFUNKTIONEN EMPFOH LENE VOREINSTEL- FUNKTION VORHEIZEN BEREICH ROSTPOSITION LUNGEN Bräunungsgrad = 4 Bräunungsgrad = 1 bis 7 Nein TOAST Scheiben = 4 Scheiben = 1 bis 9 Bräunungsgrad = 4 Bräunungsgrad = 1 bis 7 Nein BAGEL Scheiben = 4 Scheiben = 1 bis 9 Bräunungsgrad = 3 Bräunungsgrad = 1 bis 7...
-
Page 40: Schnellstartanleitung
SCHNELLSTAR- TANLEITUNG VERWENDUNG IHRES SAGE OFENS TEMPERATURE DIAL 1. Setzen Sie den Drahtgitterrost in die gewünschte Rostpositionierung ein. Die Rostpositionierungen sind auf der rechten Seite des Fensters der Ofentür aufgedruckt. Es gibt vier mögliche Positionen. Das Gestell kann ROTATE entweder nach oben oder nach unten gerichtet eingesetzt werden, sodass für jeden Einschub... - Page 41 a) Wenn der Ofen betriebsbereit ist, erlischt Falls die ausgewählte Sprache geändert werden die Meldung „VORHEIZEN“, ein Tonsignal muss, halten Sie die Umluft Taste 3 Sekunden ist zu hören und der Timer beginnt mit lang gedrückt. Auf dem LCD-Bedienfeld wird dem Countdown.
-
Page 42: A Bit More
ERINNERUNG ZUM WENDEN A BIT MORE™ Wenn Sie Kochgut gleichzeitig auf mehreren Verwenden Sie A BIT MORE™, wenn der Gestellen garen, verwenden Sie die Garvorgang beendet ist und Ihr Kochgut noch Erinnerungsfunktion zum Wenden, um daran nicht ganz durchgegart oder heiß genug ist. erinnert zu werden, die Position des Kochguts im Zum Beispiel: Funktion "Bagel"... - Page 43 VOREINGESTELLTE FUNKTIONEN: ALS ALLGEMEINER RICHTWERT: Gewünschte Toastfarbe Einstellung FUNKTION "TOAST" Hell 1 oder 2 Die Funktion "Toast" bräunt und röstet die Außenseite Ihres Brotes, während die Innenseite Mittel 3, 4 oder 5 weich und saftig bleibt. Diese Funktion ist auch Dunkel 6 oder 7 ideal für englische Muffins und gefrorene Waffeln.
- Page 44 Die Anzahl der Bagelhälften wird als untere Zahl FUNKTION "BAGEL" auf dem LCD-Bedienfeld angezeigt. Drehen Sie Die Funktion "Bagel" röstet das Innere des den Zeit Drehregler nach links, um die Anzahl geschnittenen Bagels, während die Außenseite der Bagelhälften zu reduzieren, oder nach rechts, nur leicht getoastet wird.
- Page 45 ALS ALLGEMEINER RICHTWERT: FUNKTION "CRUMPET" Die Funktion "Crumpet" richtet mehr Hitze auf Gewünschte Toastfarbe Einstellung die oberen Elemente, um eine Seite stärker zu Hell 1 oder 2 bräunen und knuspriger zu machen als die andere. Die Oberseite des Crumpets kann nach oben oder Mittel 3, 4, oder 5 nach unten zeigen, je nachdem, welche Seite...
- Page 46 8. Nachdem das VORHEIZEN-Tonsignal erklingt, FUNKTION "BACKEN" beginnt der Timer automatisch mit dem Mit der Funktion „Backen“ wird Kochgut Countdown. Die Temperatur und Zeit gleichmäßig durchgegart. Diese Funktion ist ideal kann während des Backvorgangs durch zum Backen von Kuchen, Muffins, Brownies und Drehen des entsprechenden Temperatur- Gebäck.
- Page 47 b) Drehen Sie den Zeit Drehregler, um die FUNKTION "GRILLEN" Garzeit auszuwählen. Maximale Garzeiten Die Funktion "Grillen" ist ideal zum Garen von können wie folgt eingestellt werden: belegten Sandwiches, dünnen Fleischstücken, Geflügel und Fisch, Würsten und Gemüse. Grillen >200 °C Bis zu 4 Std.
- Page 48 7. Der Timer wird angezeigt und beginnt b) Drehen Sie den Zeit Drehregler, um die automatisch mit dem Countdown. Die Garzeit auszuwählen. Maximale Garzeiten Leistungsstufe und die Zeit können können wie folgt eingestellt werden: während des Grillvorgangs durch Drehen >200 °C Bis zu 4 Std.
- Page 49 HINWEIS 4. Die Temperatur- und Zeiteinstellungen für In diesen Ofen passen insgesamt 4 Heißluftfrittier-/ das Heißluftfrittieren können vor oder während Abtropfkörbe. Besuchen Sie www.sage.com für des Heißluftfrittiervorgangs angepasst werden. weitere Informationen zum Kauf zusätzlicher a) Die Heißluftfrittiertemperatur wird als obere Heißluftfrittier-/Abtropfkörbe.
- Page 50 7. Legen Sie das Kochgut auf der mitgelieferten FUNKTION "PIZZA" Pizzapfanne in die Mitte des Drahtgitterrosts, Die Funktion "Pizza" schmilzt und bräunt Käse und sodass die Luft von allen Seiten um das Belag, während die Pizzakruste knusprig wird. Kochgut zirkulieren kann. Schließen Sie die Ofentür.
- Page 51 6. Sobald der Ofen mit dem Vorheizen fertig ist, 5. Die Einstellungen für Gärtemperatur, ist ein Tonsignal zu hören. Zeit und Umluft können vor oder während des Gärvorgangs angepasst werden. 7. Nachdem das VORHEIZEN-Tonsignal erklingt, beginnt der Timer automatisch a) Die Gärtemperatur wird als obere Zahl auf mit dem Countdown.
- Page 52 FUNKTION "WARMHALTEN" Die Funktion "Warmhalten" hält Kochgut auf der empfohlenen Temperatur von 70 °C oder mehr, um Bakterienwachstum zu verhindern. 1. Setzen Sie den Drahtgitterrost in die Rostpositionierung ein, die am besten für die Art des warmzuhaltenden Kochguts geeignet ist. 2.
- Page 53 6. Drücken Sie die Start-/Stop Taste, 4. Die Dörrtemperatur, Zeit und Umlufteinstellung um die Funktion "Warmhalten" zu aktivieren. können vor oder während des Dörrvorgangs Die Hintergrundbeleuchtung der Taste angepasst werden. leuchtet rot, ein Tonsignal ist zu hören und a) Die Dörrtemperatur wird als obere Zahl auf das LCD-Bedienfeld leuchtet orange.
- Page 54 7. Nachdem das VORHEIZEN-Tonsignal FUNKTION "SCHONGAREN" erklingt, beginnt der Timer automatisch mit Die Funktion "Schongaren" verfügt über dem Countdown. Die Temperatur und die Zeit kann während des Vorgangs durch Drehen Kochprogramme, die für lange Garzeiten bei des entsprechenden Temperatur bzw. niedrigen Temperaturen ausgelegt sind.
- Page 55 Betrieb sehr heiß. Daher ist es nicht empfehlenswert, Gegenstände auf dem Ofen zu lagern. Die einzigen Ausnahmen sind das zusätzlich erhältliche Bambus-Schneidebrett von Sage und das Serviertablett, das auf den geriffelten Bereich oben auf den Ofen passt. Weitere Informationen finden Sie auf www.sageappliances.com.
-
Page 56: Pflege Und Reinigung
PFLEGE UND REINIGUNG REINIGEN DES INNENRAUMS Vergewissern Sie sich vor der Reinigung, dass der Ofen ausgeschaltet ist, indem Sie den Stecker aus Die Wände auf der Innenseite des Ofens sind zur der Steckdose ziehen. Lassen Sie den Ofen und einfachen Reinigung mit einer Antihaftbeschich- sämtliches Zubehör komplett auskühlen, bevor Sie tung versehen. - Page 57 6. Bewahren Sie das Gerät in einer aufrechten Position auf. Stellen Sie sicher, dass die vier Stützbeine gleichmäßig den Boden berühren. Stellen Sie keine Gegenstände auf das Gerät. Einzig das zusätzlich erhältliche Sage Schneidebrett aus Bambus und das Serviertablett sind davon ausgenommen.
-
Page 58: Störungsbehebung
STÖRUNGSBEHEBUNG MÖGLICHES EINFACHE LÖSUNG PROBLEM Der Ofen lässt sich nicht • Überprüfen Sie, ob der Netzstecker richtig an der Steckdose einschalten angeschlossen ist. • Schließen Sie den Netzstecker an einer separaten Steckdose an. • Schließen Sie den Netzstecker an einer anderen Steckdose an. •... - Page 59 über dem eingestellten Maximalwert liegt. Entfernen Sie in diesem Fall den Netzstecker aus der Steckdose und lassen Sie den Ofen 15 Minuten lang auskühlen, bevor Sie ihn erneut einstecken. • Wenden Sie sich an den Sage-Kundenservice, wenn die Meldung „E03“ weiterhin angezeigt wird. Das LCD-Display zeigt •...
-
Page 60: Garantie
GARANTIE 2 JAHRE BESCHRÄNKTE GARANTIE Sage Appliances bietet für dieses Produkt für den häuslichen Gebrauch in bestimmten Bereichen ab Kaufdatum eine 2-jährige Garantie gegen Mängel, die durch fehlerhafte Verarbeitung und Materialien verursacht wurden. Während dieser Garantiezeit repariert, ersetzt oder erstattet Sage Appliances ein defektes Produkt (nach eigenem Ermessen von Sage Appliances). - Page 61 User Guide Smart Oven Air Fryer XL ™ B###### / S###### BOV905 / SOV905 GUIDE UTILISATEUR...
-
Page 62: Consignes De Sécurité Importantes
CONSIGNES TABLE DE SÉCURITÉ DES MATIÈRES IMPORTANTES 62 Sage recommande la sécurité Lisez toutes les avant tout instructions avant 67 Composants utilisation et conservez 68 Panneau de commande 69 Fonctions le manuel pour référence 71 Guide de démarrage rapide ultérieure. - Page 63 électricien. l'appareil et renvoyez-le au • Ne coupez ou n'enlevez en centre de réparation Sage agréé aucun cas la broche de la fiche. le plus proche pour qu'il soit N'utilisez pas de rallonge ou vérifié, remplacé...
- Page 64 physiques, sensorielles lorsque l'appareil fonctionne. ou mentales réduites, Ne touchez pas les surfaces ou un manque d'expérience chaudes. Pour éviter les brûlures, tenir hors de portée et de connaissances, à moins des enfants. Gardez toujours le qu'elles ne soient sous cordon d'alimentation de ce four surveillance ou qu'elles n'aient et celui des autres appareils à...
- Page 65 ; l'utilisation débranchez le cordon d'accessoires non vendus de la prise. ou recommandés par Sage peut - Retirez le tiroir ramasse- provoquer un incendie, un choc miettes et nettoyez-le avec électrique ou des blessures. de l'eau tiède savonneuse.
- Page 66 • L'ampoule chauffe rapidement. AVERTISSEMENT Utilisez le bouton d'éclairage pour allumer la lampe AFIN DE RÉDUIRE LES uniquement. RISQUES D'INCENDIE, • N'utilisez pas la lampe si le DE CHOC ÉLECTRIQUE, boîtier de l'ampoule, le couvercle D'EXPOSITION EXCESSIVE en verre, le filtre UV ou le boîtier À...
- Page 67 COMPOSANTS A. Plat à pizza antiadhésif 30 cm G. Lampe du four B. Grille de cuisson H. Tiroir ramasse-miettes C. Plat à rôtir en émail 28 x 33,5 cm I. Grille de ventilation D. Panier pour friture à l’air chaud J.
-
Page 68: Panneau De Commande
PANNEAU DE COMMANDE 1. Écran LCD Bouton FONCTION / Rappel de rotation / Bouton de confirmation Cadran de température et d’intensité Molette de réglage de temps et de tranches Bouton Démarrer/Arrêter Lampe de four et bouton de conversion de température Bouton de convection et de langue Bouton de cuisson par phases Bouton Décongélation / Réglage du volume... -
Page 69: Préparation Du Four
3. Placez le four sur une surface plane et sèche. Respectez une distance minimale de 10 cm ELEMENT IQ ™ de chaque côté de l'appareil et de 15 cm Le four Sage Smart Oven Air Fryer est doté ™ au-dessus. de la technologie de cuisson Element IQ , qui crée... - Page 70 APERÇU DES FONCTIONS DU FOUR POSITION PRÉCHAUF- FONCTION DE LA GRILLE PRÉRÉGLAGES PLAGE FAGE CONSEILLÉE Brunissage = 4 Brunissage = 1 bis 7 TOAST Tranches = 4 Tranches = 1 à 9 Brunissage = 4 Brunissage = 1 bis 7 PETIT PAIN Tranches = 4 Tranches = 1 à...
-
Page 71: Guide De Démarrage Rapide
GUIDE DE DÉMARRAGE RAPIDE FONCTIONNEMENT DE VOTRE TEMPERATURE FOUR SAGE DIAL 1. Insérez la grille dans la position de grille souhaitée. Les positions des grilles sont imprimées sur le côté droit de la fenêtre de la porte du four. Il existe quatre positions de ROTATE rainure. -
Page 72: Sélection De La Langue
SÉLECTION DE LA LANGUE a) Lorsque le four est prêt à être utilisé, le « PRÉCHAUFFAGE » disparaîtra, Par ailleurs, lors de la première utilisation l'alerte du four retentira et le compte du four, il vous permettra de sélectionner à rebours commencera. Placez les aliments la langue souhaitée. -
Page 73: Volume De La Sonnerie
VOLUME DE LA SONNERIE UN PEU PLUS™ Appuyez et maintenez enfoncé le bouton Utilisez la fonction UN PEU PLUS™ lorsque congelé pendant 3 secondes pour activer la cuisson est terminée et que vos aliments ne sont la sélection du volume. Utilisez l'un des cadrans pas assez cuits ou assez chauds. -
Page 74: Fonction Toast
FONCTIONS PRÉRÉGLÉES : Le nombre de tranches est affiché comme chiffre du bas sur l’écran LCD. Tournez le cadran de l’heure vers la gauche pour réduire le nombre FONCTION TOAST de tranches, ou vers la droite pour l’augmenter. La fonction Toast dore et rend croustillant l'extérieur Le nombre de tranches varie de «... -
Page 75: Fonction Bagel
Le nombre de moitiés de bagel est affiché comme FONCTION BAGEL chiffre du bas sur l’écran LCD. Tournez le cadran La fonction Bagel rend l'intérieur de votre du temps vers la gauche pour réduire le bagel coupé croustillant tout en ne grillant nombre de moitiés de bagel ou vers la droite pour que légèrement l'extérieur. - Page 76 b) Le nombre de moitiés de crumpet est FONCTION CRUMPET affiché comme chiffre du bas sur l'écran La fonction Crumpet dirige plus de chaleur sur LCD. Tournez le cadran du temps les éléments supérieurs afin de dorer et de rendre vers la gauche pour réduire le nombre de croustillant un côté...
-
Page 77: Fonction De Cuisson
8. Après que l'alerte de PRÉCHAUFFAGE ait FONCTION DE CUISSON retenti, la minuterie lancera automatiquement La fonction de cuisson (Bake) cuit les aliments le compte à rebours. La température uniformément. Cette fonction est idéale pour le temps peuvent être ajustés pendant la cuisson de gâteaux, muffins, brownies et le cycle de cuisson en tournant le cadran pâtisseries. -
Page 78: Fonction Gril
b) Tournez le bouton de l'heure pour FONCTION GRIL sélectionner le temps de cuisson. Les temps La fonction Grill est idéale pour cuire des de cuisson maximum peuvent être définis sandwichs ouverts, des coupes fines de viande, comme suit : de volaille et de poisson, des saucisses et des légumes. - Page 79 7. La minuterie s'affichera et commencera b) Tournez le bouton de l'heure pour automatiquement le compte à rebours. sélectionner le temps de cuisson. Les temps Le niveau de puissance et la durée peuvent de cuisson maximum peuvent être définis être ajustés pendant le cycle de grillage en comme suit : tournant le cadran de la température >200 °C...
- Page 80 Vous pouvez installer un total de 4 paniers de avant ou pendant le cycle. friture/déshydratation à air dans ce four. Visitez www.sage.com pour plus d’informations sur a) La température de Friture à l'air est affichée l’achat de paniers de friture/déshydratation comme chiffre supérieur sur l’écran LCD.
-
Page 81: Fonction Pizza
8. Après que l'alerte de PRÉCHAUFFAGE ait retenti, FONCTION PIZZA la minuterie lancera automatiquement le compte La fonction Pizza fait fondre et dore le fromage et à rebours. La température et la durée peuvent être les garnitures, tout en rendant la croûte de la pizza ajustées pendant le cycle de pizza en tournant la croustillante. - Page 82 8. À la fin du cycle d'étuvage, l'alerte du four FONCTION DE PREUVE retentit. Le rétroéclairage du bouton marche/ La fonction Proof est conçue pour maintenir avec arrêt s'éteindra et l'écran LCD s'allumera précision les basses températures, offrant ainsi un en blanc.
- Page 83 6. Appuyez sur le bouton marche/arrêt pour 5. Les réglages de température, de temps et activer la fonction Réchauffer. Le rétroéclairage de convection peuvent être ajustés avant du bouton s'allumera en rouge, l'alerte du four ou pendant le cycle de réchauffement. retentira et l'écran LCD s'allumera en orange.
-
Page 84: Fonction De Cuisson Lente
correspondante . Le cycle peut être arrêté FONCTION DÉSHYDRATATION à tout moment en appuyant sur la touche La fonction DÉSHYDRATATION combine une marche/arrêt chaleur faible et stable avec un flux d'air maximisé 7. À la fin du cycle de déshydratation, l'alerte pour sécher uniformément les aliments sans cuisson du four retentit. - Page 85 4. La température et la durée de cuisson lente CONSEILS peuvent être ajustées avant ou pendant le cycle de cuisson lente. a) La température est affichée comme chiffre CONSEILS POUR UNE CUISSON LENTE supérieur sur l'écran LCD. Tournez le 1. Assurez-vous que les ustensiles de cuisine cadran de la température pour régler la vont au four et ne dépassent pas 13 livres...
-
Page 86: Remplacement De La Lampe Du Four
REMPLACEMENT DE LA LAMPE DU FOUR AVERTISSEMENT Débranchez toujours le four et laissez-le refroidir avant de remplacer l'ampoule. Utilisez unique- ment une ampoule de four de type G9 25 Watts, 220 - 240 Volts. 1. Retirez la grille du four avant de remplacer 5. -
Page 87: Entretien Et Nettoyage
ENTRETIEN ET NETTOYAGE Avant le nettoyage, assurez-vous que le four AVERTISSEMENT est éteint en débranchant le cordon d'alimentation de la prise électrique. Laissez le four et tous les accessoires refroidir complètement avant Soyez extrêmement prudent lors du nettoyage de les démonter et de les nettoyer. des éléments chauffants en quartz. - Page 88 2. Pour prolonger la durée de vie de vos accessoires, nous vous déconseillons l'usage du lave-vaisselle. RANGEMENT 1. Assurez-vous que le four est éteint en débran- chant le cordon d'alimentation de la prise électrique. 2. Laissez le four et tous les accessoires refroidir complètement avant de les démonter et de les nettoyer.
-
Page 89: Dépannage
DÉPANNAGE PROBLÈME SOLUTION FACILE POSSIBLE Le four ne s'allume pas • Vérifiez que le cordon d'alimentation est bien inséré dans la prise. • Insérez le cordon d'alimentation dans une prise indépendante. • Insérez le cordon d'alimentation dans une autre prise. •... - Page 90 à la limite maximale définie. Débranchez le cordon de la prise électrique, laissez le four refroidir pendant 15 minutes, puis rebranchez-le. • Appelez le service client Sage si le message « E03 » continue à s'afficher. L'écran LCD affiche « E05 »...
-
Page 91: Garantie Limitée De 2 Ans
GARANTIE GARANTIE LIMITÉE DE 2 ANS Sage Appliances garantit ce produit pour un usage domestique sur les territoires spécifiés pendant 2 ans à compter de la date d'achat, contre les défauts de fabrication et de matériaux. Au cours de cette période de garantie, Sage Appliances s'engage à... - Page 92 Déclaration à l'intention du consommateur SAGE FRANCE - GARANTIE LIMITÉE Sage Appliances garantit ce produit pour un usage Article L. 217-4 du Code de la consommation : domestique sur les territoires spécifiés pendant 2 « Le vendeur livre un bien conforme au contrat et ans à...
- Page 93 User Guide Smart Oven Air Fryer XL ™ B###### / S###### BOV905 / SOV905 HANDLEIDING...
-
Page 94: Veiligheid Voorop
BELANGRIJKE INHOUD VEILIGHEIDS- MAATREGELEN 94 Sage stelt veiligheid voorop Lees alle instructies vóór 99 Onderdelen het gebruik en bewaar 100 Bedieningspaneel 101 Functies deze voor toekomstige 103 Snelstartgids naslag. 118 Onderhoud en reiniging • Verwijder het verpakkingsma- 119 Probleemoplossing teriaal vóór gebruik en gooi het 121 Garantie veilig weg. - Page 95 • Je mag in geen enkel geval het naar het dichtstbijzijnde, het aardcontact van de stekker erkende Sage -servicecentrum ™ afsnijden of verwijderen. Gebruik voor onderzoek, vervanging of geen verlengsnoer of adaper.
- Page 96 ze toezicht hebben gekregen om brandwonden en brandwon- of instructies hebben gekre- den te voorkomen. Houd het net- gen over het gebruik van het snoer van deze oven, en dat van apparaat door een persoon die andere apparaten in de buurt van verantwoordelijk is voor hun de oven, altijd uit de buurt van de veiligheid.
- Page 97 - Trek de kruimellade uit zijn geleverd; het gebruik van de oven en was deze af hulpstukken die niet door Sage met warm zeepsop. worden verkocht of aanbevolen, - Droog de lade grondig kan brand, elektrische schokken af voordat je deze of letsel veroorzaken.
- Page 98 • Haal altijd de stekker uit het WAARSCHUWING stopcontact en laat alle onderde- HEET OPPERVLAK len (inclusief de lamphouder, de glazen afdekking en de behui- Het symbool geef aan dat sommi- zing) volledig afkoelen voordat je ge gemakkelijk bereikbare opper- de lamp vervangt.
- Page 99 ONDERDELEN A. Pizzapan van 30 cm met antiaanbaklaag G. Ovenlamp B. Grillrooster H. Kruimellade C. Emaillen braadpan van 28 x 33,5 cm I. Ventilatieopeningen D. Airfry-mandje J. Afneembaar netsnoer E. Ovenrooster (2x) F. Handgreep Classificatiegegevens 220–240V ~ 50Hz–60Hz 2000–2400W...
- Page 100 BEDIENINGSPANEEL 1. LCD-scherm Draaiknop Function / Draaiherinnering / Knop Bevestigen Temperatuur-/Donkerwijzerplaat Tijd-/Plakkenknop Start-/Stopknop Knop voor conversie van ovenlicht/ temperatuur Knop Convectie/Taal Knop Fasekoken Knop Bevroren/Volume aanpassen A Bit More-knop...
- Page 101 3. Plaats de oven op een vlak, droog oppervlak. ELEMENT IQ ™ Houd minimaal 10 cm ruimte vrij aan De Sage Smart Oven Air Fryer is uitgerust met ™ weerszijden van het apparaat en 15 cm boven Element IQ , een bereidingstechnologie waarmee ™...
- Page 102 OVERZICHT VAN OVENFUNCTIES VOORGESTELDE VOORIN- VOORVER- FUNCTIE BEREIK ROOSTE RPOSITIE STELLINGEN WARMEN Kleuring = 4 Kleuring = 1 tot 7 TOAST Sneetjes = 4 Sneetjes = 1 tot 9 Kleuring = 4 Kleuring = 1 tot 7 BAGEL Sneetjes = 4 Sneetjes = 1 tot 9 Kleuring = 3 Kleuring = 1 tot 7...
- Page 103 SNELSTARTGIDS UW SAGE-OVEN GEBRUIKEN TEMPERATURE DIAL 1. Plaats het rooster in de gewenste roosterpositie. De roosterposities zijn handig afgedrukt aan de rechterkant van het venster van de ovendeur. Er zijn vier groefposities. Het rooster kan zowel naar boven als naar beneden...
- Page 104 DEUR-SENSOR a) Wanneer de oven klaar is voor gebruik verdwijnt de melding 'VOORVERWARMEN', Als de deur tijdens het koken wordt geopend, klinkt het ovenalarm en begint de timer af pauzeert de timer en gaat het licht aan. te tellen. Plaats het voedsel direct op het Wanneer de deur gesloten is, gaat de timer verder rooster, of op de meegeleverde airfrymand, met aftellen en blijft het licht 30 seconden branden...
-
Page 105: Vooraf Ingestelde Functies
VOORAF INGESTELDE FUNCTIES: OPMERKING TOAST-FUNCTIE Wanneer u voedsel bereidt op bakpannen of Met de toastfunctie wordt de buitenkant van uw andere kookpannen op meerdere roosters, brood bruin en knapperig, terwijl de binnenkant wordt aangeraden voldoende ruimte tussen de zacht en vochtig blijft. Deze functie is ook ideaal roosters te laten en het gebruik van de bovenste voor Engelse muffins en diepvrieswafels. - Page 106 Het aantal plakjes wordt weergegeven als BAGEL-FUNCTIE het onderste cijfer op het LCD-scherm. Draai De bagel-functie maakt de binnenkant van uw de tijd knop naar links om het aantal gesneden bagel krokant, terwijl de buitenkant plakjes te verminderen, of naar rechts om ze slechts licht wordt geroosterd.
- Page 107 6. Druk op start/stop knop om de bagelfunctie 4. Draai aan de Functie / Bevestigs knop te starten. De achtergrondverlichting van de totdat de indicator op het LCD-scherm de knop licht rood op, het ovenalarm klinkt en het Crumpet functie bereikt. Het LCD-scherm LCD-scherm licht oranje op.
- Page 108 7. De timer wordt weergegeven en begint 4. De baktemperatuur, tijd en convectie- automatisch af te tellen. De tijd kan tijdens de instellingen kunnen voor of tijdens de bakcyclus crumpetcyclus worden aangepast door aan worden aangepast. de tijd knop te draaien. De cyclus kan a) De baktemperatuur wordt weergegeven op elk moment worden gestopt door op als het bovenste cijfer op het LCD-scherm.
- Page 109 5. Druk op start/stop knop om de braadfunctie BRAAD-FUNCTIE te activeren. De achtergrondverlichting van De BRAAD-functie is ideaal voor het bereiden van de knop licht rood op, het ovenalarm klinkt een verscheidenheid aan vlees en gevogelte. Het en het LCD-scherm licht oranje op. Op het eten zal mals en sappig zijn aan de binnenkant en LCD-scherm wordt 'VOORVERWARMEN' tot in de perfectie geroosterd aan de buitenkant.
- Page 110 6. Druk op de start/stop knop GRILLFUNCTIE om de grillfunctie te activeren. De De grillfunctie is ideaal voor het bereiden van open achtergrondverlichting van de knop licht rood sandwiches, dunne stukken vlees, gevogelte en op, het ovenalarm klinkt en het LCD-scherm vis, worstjes en groenten.
- Page 111 4. De baktemperatuur, tijd en convectie- AIR FRY-FUNCTIE instellingen kunnen voor of tijdens de bakcyclus De Air Fry-functie combineert intense hitte en worden aangepast. maximale luchtstroom om voedsel knapperig a) Draai de temperatuur knop om de en bruin te bereiden. baktemperatuur aan te passen van 50 °C 1.
- Page 112 In deze oven passen in totaal 4 air fry-/h. Bezoek a) De pizzatemperatuur wordt www.sage.com voor meer informatie over het weergegeven als het bovenste cijfer op het kopen van extra airfry-/dehydratiemanden. LCD-scherm. Draai de temperatuur knop om de temperatuur van minimaal 150 °C...
- Page 113 8. Nadat het VOORVERWARMINGS-alarm 10. Selecteer de gewenste pizzatemperatuur, tijd, klinkt, begint de timer automatisch af te convectie en vers/diepvriesinstellingen en druk tellen. De temperatuur en tijd kunnen tijdens op de start/stop knop om de pizzacyclus de pizzacyclus worden aangepast door te opnieuw te starten.
- Page 114 7. De timer wordt weergegeven en begint af te b) De opwarmtijd wordt weergegeven als het tellen. De temperatuur en tijd kunnen tijdens de onderste cijfer op het LCD-scherm. Draai de rijscyclus worden aangepast door te draaien tijd knop om de tijd in te stellen tot 2 uur aan de bijbehorende temperatuur en tijd voor temperaturen van 70 °C –...
- Page 115 DEHYDRAATFUNCTIE De DEHYDRAAT-functie combineert lage en stabiele hitte met een maximale luchtstroom om voedsel gelijkmatig uit te drogen zonder te koken of oververhit te raken. 1. Verdeel het voedsel gelijkmatig over de meegeleverde air fry/dehydrateermandje. Voor het beste resultaat plaatst u het voedsel in één enkele laag en laat u ruimte tussen de stukken.
- Page 116 6. De timer wordt weergegeven en begint af te 4. De langzame kooktemperatuur en -tijd tellen. De temperatuur en tijd kunnen tijdens kunnen vóór of tijdens de langzame de dehydrateercyclus worden aangepast door kookcyclus worden aangepast. te draaien aan de bijbehorende temperatuur a) De temperatuur wordt weergegeven als het en tijd knop.
-
Page 117: Ovenlamp Vervangen
De enige uitzonderingen zijn de afzonderlijk 3. Verwijder de gebruikte lamp door deze direct uit verkrijgbare Sage Bamboo Cutting Board de houder te trekken. en Serving Tray die in het geribbelde gedeelte bovenop de oven passen. Ga naar... -
Page 118: Onderhoud En Reiniging
Wees uiterst voorzichtig wanneer u de verwar- het apparaat. De enige uitzonderingen zijn mingselementen van kwarts schoonmaakt. Laat de de afzonderlijk verkrijgbare Sage Bamboo oven volledig afkoelen en wrijf voorzichtig met een Cutting Board en Serving Tray. zachte, vochtige spons of doek langs het verwar-... - Page 119 PROBLEEMOPLOSSING MOGELIJK EENVOUDIGE OPLOSSING PROBLEEM De oven gaat niet aan • Controleer of de stekker goed in het stopcontact zit. • Steek de stekker in een apart stopcontact. • Steek de stekker in een ander stopcontact. • Stel de stroomonderbreker indien nodig opnieuw in. De verlichting op het •...
- Page 120 Haal de stekker uit het stopcontact, laat de oven 15 minuten afkoelen en sluit deze vervolgens weer aan. • Bel de klantenservice van Sage als E03 nog steeds wordt weergegeven. Op het lcd-scherm wordt •...
- Page 121 GARANTIE BEPERKTE GARANTIE VAN 2 JAAR Sage Appliances biedt een garantie op dit product voor huishoudelijk gebruik in genoemde gebieden gedurende 2 jaar vanaf de datum van aankoop voor defecten veroorzaakt door gebrekkige afwerking en materialen. Gedurende deze garantieperiode zal Sage Appliances...
- Page 122 OPMERKINGEN...
- Page 123 User Guide Smart Oven Air Fryer XL ™ B###### / S###### BOV905 / SOV905 MANUALE UTENTE...
-
Page 124: Norme Di Sicurezza Importanti
NORME SOMMARIO DI SICUREZZA IMPORTANTI 124 Sage consiglia: la sicurezza Leggere tutte le istruzioni prima di tutto prima dell'uso e conservarle 130 Componenti per consultarle in futuro. 131 Pannello di controllo • Rimuovere e smaltire in 132 Funzioni 134 Guida rapida... - Page 125 Non usare l'apparecchio e portarlo utilizzare prolunghe o adattatori. al centro assistenza Sage • Consultare un elettricista autorizzato più vicino affinché qualificato se le istruzioni di venga esaminato, sostituito messa a terra non sono capite o riparato.
- Page 126 per elettrodomestici ristretto. • È necessaria un'attenta supervisione quando Assicurarsi di lasciare uno l'apparecchio viene utilizzato spazio adeguato attorno al forno: si consiglia uno spazio da o vicino a bambini. minimo di 10 cm su entrambi • Questo apparecchio non è i lati del forno e uno spazio destinato all'uso da parte di minimo di 15 cm dalla parte...
- Page 127 Sage può causare incendi, senza una causa apparente. scariche elettriche o infortuni. • Questo apparecchio è destinato • Non lasciare lo sportello aperto esclusivamente all'uso per lunghi periodi di tempo. domestico. Non utilizzare • Non collocare nessun oggetto...
- Page 128 - Rimuovere il vassoio • Non guardare direttamente raccoglibriciole e lavarlo la lampadina incandescente. con acqua calda e sapone. • Non continuare a esporre - Asciugare completamente la pelle alla luce se si il vassoio prima di reinserirlo avverte calore. saldamente in posizione.
- Page 129 Questo simbolo indica che l'apparecchio non può essere smaltito con i rifiuti domestici comuni. Deve essere conferito presso un centro di smaltimento locale specializzato o presso un rivenditore che fornisce questo servizio. Per ulteriori informazioni, contattare l'ufficio comunale locale. ATTENZIONE Non immergere in acqua o in altro liquido.
-
Page 130: Componenti
COMPONENTI A. Teglia antiaderente per pizza da 30 cm G. Luce del forno B. Grill da forno H. Vassoio raccoglibriciole C. Teglia smaltata 28 x 33,5 cm I. Prese di ventilazione D. Cestino per la frittura ad aria J. Cavo di alimentazione staccabile E. -
Page 131: Pannello Di Controllo
PANNELLO DI CONTROLLO 1. Display LCD Manopola Funzione / Promemoria per girare / Pulsante di conferma Manopola Temperatura/Imbrunimento Manopola Tempo/Fette Pulsante Avvio/Arresto Tasto conversione Luce/Temperatura forno Pulsante Convezione/Lingua Pulsante Fasi di cottura Pulsante Surgelato/Regola volume Pulsante Un po’ di più... -
Page 132: Funzioni
ELEMENT IQ ™ minima di 10 cm di spazio su entrambi i lati Il forno Smart Oven Air Fryer di Sage presenta dell'apparecchio e di 15 cm al di sopra di esso. ™ Element IQ , una tecnologia di cottura che crea ™... - Page 133 PANORAMICA DELLE FUNZIONI DEL FORNO POSIZIONE PRE- CONSIGLIATA PRE- FUNZIONE RISCALDA- INTERVALLO PER LA IMPOSTAZIONI MENTO GRIGLIA Doratura = 4 Doratura = 1 a 7 TOAST Fette = 4 Fette = 1 a 9 (TOSTATURA) Doratura = 4 Doratura = 1 a 7 BAGEL Fette = 4 Fette = 1 a 9...
-
Page 134: Guida Rapida
GUIDA RAPIDA UTILIZZO DEL FORNO SAGE TEMPERATURE DIAL 1. Inserire la griglia metallica nella posizione desiderata. Le posizioni della griglia sono convenientemente stampate sul lato destro del finestrino dello sportello del forno. Sono disponibili quattro posizioni scanalate. La griglia ROTATE può... - Page 135 a) Quando il forno è pronto per l'uso, la scritta avvio/arresto per confermare la selezione. 'PRERISCALDAMENTO' scomparirà, si Se la lingua desiderata non viene confermata attiverà l'allarme del forno e il timer inizierà entro 5 minuti il forno tornerà automaticamente il conto alla rovescia.
-
Page 136: A Bit More
4. Quando sarà il momento di cambiare A BIT MORE™ posizione alla griglia, suonerà l'avviso di Usare A BIT MORE™ quando la cottura promemoria della rotazione e ‘ ’ lampeggerà è terminata e il cibo non è abbastanza cotto sullo schermo. L'avviso di promemoria della o abbastanza caldo. -
Page 137: Funzioni Preimpostate
FUNZIONI PREIMPOSTATE: COME GUIDA GENERALE: Colore di tostatura Impostazione FUNZIONE TOSTATURA desiderato La funzione Toostatura dora e rende croccante Chiaro 1 o 2 la parte esterna del pane mantenendo l'interno morbido e umido. Questa funzione è ideale anche Medio 3, 4 o 5 per muffin inglesi e wafer surgelati. - Page 138 Il numero di mezzi bagel viene visualizzato FUNZIONE BAGEL come cifra in basso sullo schermo LCD. Ruotare La funzione Bagel rende croccante l'interno del la manopola del tempo verso sinistra per bagel tagliato e tosta solo leggermente l'esterno. ridurre il numero di mezzi bagel o verso destra Questa funzione è...
- Page 139 COME GUIDA GENERALE: FUNZIONE FOCACCINA La funzione Focaccina dirige più calore sugli Colore desiderato Impostazione elementi superiori in modo da dorare e rendere per la tostatura croccante un lato più dell'altro. La parte superiore Chiaro 1 o 2 della focaccina può essere posizionata rivolta verso l'alto o verso il basso, a seconda del lato che si Medio 3, 4, o 5...
- Page 140 può essere interrotto in qualsiasi momento FUNZIONE COTTURA premendo il pulsante start/stop La funzione Bake cuoce il cibo in modo uniforme. 9. Al termine del ciclo di cottura, suonerà l'allarme Questa funzione è ideale per cuocere torte, muffin, del forno. La retroilluminazione del pulsante brownies e pasticcini.
-
Page 141: Funzione Grill
5. Premere il pulsante di avvio/arresto per avviare la funzione Arrostimento. La retroilluminazione del pulsante si illuminerà di rosso, si attiverà l'allarme del forno e lo schermo LCD si illuminerà di arancione. Lo schermo LCD indicherà "PRERISCALDAMENTO". 6. Una volta terminato il preriscaldamento del forno, verrà... - Page 142 6. Una volta terminato il preriscaldamento FUNZIONE COTTURA DEL FONDO del forno è possibile inserire gli alimenti. La funzione Cottura del fondo emette calore dal 7. Posizionare il cibo sulla teglia inclusa o su basso, e garantisce la cottura completa della un'altra pirofila al centro della griglia, in modo base.
- Page 143 In questo forno è possibile inserire un totale di 4 illuminerà di rosso, si attiverà l'allarme cestelli per frittura ad aria/disidratazione. Visitare del forno e lo schermo LCD si illuminerà di arancione. Lo schermo LCD indicherà www.sage.com per ulteriori informazioni sull'acquisto di cestelli aggiuntivi per friggere ad aria/disidratare. "PRERISCALDAMENTO".
- Page 144 6. Una volta che il forno ha raggiunto la temperatura 8. Alla fine del ciclo suonerà l'allarme del forno. impostata, suonerà l'avviso di temperatura. La retroilluminazione del pulsante di avvio/ arresto si spegnerà e lo schermo LCD si 7. Posizionare il cibo, adagiato sulla teglia per pizza illuminerà...
- Page 145 b) Il tempo di lievitazione viene visualizzato 5. La temperatura di riscaldamento, nella parte inferiore dello schermo LCD. il tempo, la convezione e le impostazioni Ruotare la manopola del tempo di congelamento possono essere regolate regolare il tempo fino a 24 HR/MIN. prima o durante il ciclo di riscaldamento.
- Page 146 6. Premere il pulsante di avvio/arresto FUNZIONE CALDO attivare la funzione Caldo. La retroilluminazione La funzione Caldo mantiene gli alimenti caldi alla del pulsante si illuminerà di rosso, si attiverà temperatura consigliata per prevenire la crescita l'allarme del forno e lo schermo LCD si batterica, cioè...
- Page 147 4. Le impostazioni di temperatura, tempo FUNZIONE COTTURA LENTA e convezione di disidratazione possono essere regolate prima o durante il ciclo La funzione Cottura Lenta dispone di pirofile di disidratazione. di cottura pensate per lunghi tempi di cottura a basse temperature. a) La temperatura di disidratazione viene visualizzata nella parte superiore dello 1.
- Page 148 7. Dopo che è suonato l'avviso di PRERISCALDAMENTO, il timer inizierà automaticamente il conto alla rovescia. La temperatura e il tempo possono essere regolati durante il ciclo di arrostimento ruotando le corrispondenti manopole. Il ciclo può essere interrotto in qualsiasi momento premendo il pulsante start/stop 8.
- Page 149 L'unica eccezione è costituita dagli accessori opzionali Bamboo Cutting Board e da Serving Tray di Sage che si inserisce nella sezione dedicata sopra il forno. Per ulteriori informazioni visitare il sito www.sageappliances.com.
-
Page 150: Manutenzione E Pulizia
MANUTENZIONE E PULIZIA Prima di eseguire la pulizia, assicurarsi che il forno ATTENZIONE sia spento staccando la spina dalla presa di alimentazione. Lasciare raffreddare completamente Usare estrema cautela durante la pulizia degli il forno e tutti gli accessori prima di smontarli e pulirli. elementi riscaldanti al quarzo. - Page 151 5. Assicurarsi che lo sportello sia chiuso. 6. Conservare l'elettrodomestico in posizione verticale e piana sulle gambe di supporto. Non riporre nulla sopra l'apparecchio. L'unica eccezione è costituita dagli accessori opzionali Bamboo Cutting Board e Serving Tray di Sage.
-
Page 152: Risoluzione Dei Problemi
RISOLUZIONE DEI PROBLEMI POSSIBILE SOLUZIONE SEMPLICE PROBLEMA Il forno non si accende • Verificare che la spina sia inserita correttamente nella presa di alimentazione. • Inserire la spina di alimentazione in una presa di corrente indipendente. • Inserire la spina di alimentazione in una presa di corrente diversa. •... - Page 153 In questo caso, scollegare subito il cavo di alimentazione dalla presa di corrente e contattare il servizio di assistenza Sage. Il display LCD mostra "E02" • Il display LCD mostrerà "E02" quando l'apparecchio rileva un errore non ripristinabile. In questo caso, scollegare subito il cavo di alimentazione dalla presa di corrente e contattare il servizio di assistenza Sage.
-
Page 154: Garanzia
Durante il periodo coperto dalla garanzia, Sage Appliances sarà tenuta a riparare o sostituire i prodotti difettosi o a rimborsare l'importo a essi corrispondente (a sola discrezione di Sage Appliances). Tutti i diritti di garanzia previsti dalla legislazione... - Page 155 User Guide Smart Oven Air Fryer XL ™ B###### / S###### BOV905 / SOV905 GUÍA DEL USUARIO...
-
Page 156: Medidas De Seguridad Importantes
MEDIDAS ÍNDICE DE SEGURIDAD IMPORTANTES Lee todas las 156 Sage recomienda seguridad ante todo instrucciones antes 161 Componentes de usar el aparato por 162 Panel de control primera vez y guárdalas. 163 Funciones 165 Guía de inicio rápido • Retira y desecha cualquier... - Page 157 • Jamás debes cortar o extraer la y devuélvelo al Centro de ser- clavija con conexión a tierra del vicio autorizado de Sage más cable de alimentación. No uses cercano para que lo examinen, un alargador ni un adaptador.
- Page 158 • Este dispositivo no está diseña- cm desde la parte superior del do para que lo utilicen personas horno. (incluyendo niños) con capa- • La temperatura de las superficies cidades físicas, sensoriales o cercanas pueden ser alta cuando mentales reducidas, o con falta el dispositivo está...
- Page 159 • No cubras la bandeja recogemi- de servicio autorizado de Sage. gas ni ninguna parte del horno con papel de aluminio. Esto haría • En caso de uso inapropiado, que el horno se sobrecaliente.
- Page 160 rizado y calificado si no estás ADVERTENCIA seguro. SUPERFICIE CALIENTE • Enchufa siempre el horno y deja Este símbolo indica que la tempe- que todas las piezas (incluida la ratura de las superficies accesibles carcasa de la bombilla, la cu- puede ser alta cuando el aparato bierta de vidrio y la carcasa) se está...
- Page 161 COMPONENTES A. Bandeja para pizza antiadherente de 30 cm G. Luz del horno B. Rejilla para fuente H. Bandeja recogemigas C. Fuente para horno esmaltada de 28 × 33,5 cm I. Ranuras de ventilación D. Bandeja para fritura por aire J.
-
Page 162: Panel De Control
PANEL DE CONTROL 1. Pantalla LCD Dial Función / Recordatorio de rotación / Botón de confirmación Perilla de Temperatura / Intensidad Perilla de Tiempo / Porciones Botón de Inicio / Parar Botón de Conversión de Temperatura / Luz del horno Botón de Convección / Idioma Botón de Fases de Cocción Botón de Congelado / Ajuste de Volumen... -
Page 163: Preparación Del Horno
Asegúrate de que haya una distancia ELEMENT IQ ™ mínima de 10 cm de espacio a ambos lados del The Sage Smart Oven Air Fryer cuenta con ™ aparato y de 15 cm por encima. tecnología Element IQ , un sistema que crea ™... - Page 164 RESUMEN DE LAS FUNCIONES DEL HORNO POSICIÓN DE OPCIONES PRECA- FUNCIÓN REJILLA SUGE- PREPRO GRA- GAMA DE OPCIONES LENTADO RIDA MADAS Tostado nivel = 4 Tostado niveles = entre 1 y 7 TOSTADA Rebanadas = 4 Rebanadas = entre 1 y 9 Tostado nivel = 4 Tostado niveles = entre 1 y 7 BAGEL...
-
Page 165: Guía De Inicio Rápido
GUÍA DE INICIO RÁPIDO CÓMO USAR TU HORNO SAGE TEMPERATURE DIAL 1. Inserta la rejilla en la posición deseada. Las posiciones de las rejillas están convenientemente impresas en el lado derecho de la ventana de la puerta del horno. Existen cuatro posiciones de ranura. -
Page 166: Selección De Idioma
a) Cuando el horno esté listo para usar, seleccionar el idioma deseado, luego presiona el mensaje 'PRECALENTAMIENTO' el botón de inicio/parada para confirmar tu desaparecerá, sonará la alerta del horno selección. Si no se confirma el idioma deseado y el temporizador comenzará la cuenta en 5 minutos, el horno volverá... -
Page 167: A Bit More
CONFIGURACIONES 4. Cuando llegue el momento de cambiar las posiciones de las rejillas, sonará la alerta de PREESTABLECIDAS: recordatorio de rotación y ‘ ’ parpadeará en la pantalla. La alerta de recordatorio de rotación FUNCIÓN TOSTAR seguirá sonando cada 30 segundos hasta que se abra la puerta o se presione el dial La función Tostar dora y deja crujiente el exterior de confirmación para desactivar la función. - Page 168 El número de rebanadas se muestra en la FUNCIÓN ROSCA cifra inferior de la pantalla LCD. Gira el dial de La función Rosca deja crujiente el interior de la tiempo hacia la izquierda para reducir el rosca cortada y tuesta solo ligeramente el exterior. número de rebanadas o hacia la derecha para Esta función también es ideal para tostar bollos aumentarlo.
- Page 169 El número de mitades de rosca se muestra en FUNCIÓN BOLLO la cifra inferior de la pantalla LCD. Gira el dial La función Bollo dirige más calor a los elementos de tiempo hacia la izquierda para reducir la superiores para dorar y dejar crujiente un lado más cantidad de mitades de rosca o hacia la derecha que el otro.
- Page 170 b) El número de mitades de bollos se muestra 2. Cierra la puerta del horno. en la cifra inferior de la pantalla LCD. 3. Gira el dial de Función / Confirmar Gira el dial de tiempo hacia la izquierda hasta que el indicador en la pantalla LCD para reducir el número de mitades de llegue a la función Hornear .
-
Page 171: Función Grill
6. Una vez que el horno haya terminado de FUNCIÓN ASAR precalentarse, sonará una alerta y se podrán La función ASAR es ideal para cocinar una gran colocar los alimentos en el horno. variedad de carnes y aves. La comida quedará 7. - Page 172 5. El nivel de potencia y el tiempo de grill se FUNCIÓN HORNEADO INFERIOR pueden ajustar antes o durante el ciclo La función Horneado inferior emite calor desde de cocción. abajo, lo que garantiza que la base esté bien a) El nivel de potencia de grill se muestra como cocida.
- Page 173 NOTA Puedes colocar un total de 4 canastas para freír/deshidratar por aire en este horno. Visita www.sage.com para obtener más información sobre la compra de canastas adicionales para 4. Las configuraciones de temperatura y tiempo freír/deshidratar. de Freír por aire se pueden ajustar antes...
-
Page 174: Función Pizza
7. Coloca los alimentos, colocados en el molde FUNCIÓN PIZZA para pizza incluido, si los usas, en el centro de La función Pizza derrite y dora el queso y los la rejilla para que el aire fluya por todos lados. aderezos, mientras deja crujiente la masa de Cierra la puerta del horno. - Page 175 8. Al final del ciclo, sonará la alerta del horno. 6. Presiona el botón de inicio/parada para La luz de fondo del botón inicio/parada activar la función Reposar. La luz de fondo se apagará y la pantalla LCD se iluminará en del botón se iluminará...
- Page 176 5. Las configuraciones de temperatura, tiempo, convección y congelación de recalentamiento se pueden ajustar antes o durante el ciclo de recalentamiento. a) La temperatura de recalentamiento se muestra como la cifra superior en la pantalla LCD. Gira el dial de temperatura para ajustar la temperatura desde 70 °C hasta un máximo de 250 °C.
-
Page 177: Función De Cocción Lenta
6. Se mostrará el temporizador y comenzará FUNCIÓN DESHIDRATAR la cuenta regresiva. La temperatura y el La función DESHIDRATAR combina calor bajo y tiempo se pueden ajustar durante el ciclo de estable con un flujo de aire maximizado para secar deshidratación girando el dial de temperatura los alimentos de manera uniforme sin cocinarlos ni y de tiempo... -
Page 178: Consejos Para La Cocción Lenta
4. La temperatura y el tiempo de cocción lenta CONSEJOS se pueden ajustar antes o durante el ciclo de cocción lenta. a) La temperatura se muestra como la cifra CONSEJOS PARA LA COCCIÓN LENTA superior en la pantalla LCD. Gira el dial de 1. - Page 179 Por lo tanto, no se recomienda almacenar artículos sobre el horno. La única excepción es la tabla de cortar y bandeja de bambú Sage (opcional) que cabe en la sección acanalada sobre el horno. Puedes consultar información adicional en www.sageappliances.com.
-
Page 180: Cuidado Y Limpieza
CUIDADO Y LIMPIEZA Antes de limpiar, desenchufa el horno para ADVERTENCIA asegurarte de que esté apagado. Deja que el horno y todos los accesorios se enfríen Ten mucho cuidado al limpiar las resistencias completamente antes de desmontarlos y limpiarlos. de cuarzo. Deja que el horno se enfríe LIMPIEZA DEL EXTERIOR Y LA PUERTA completamente, luego frota suavemente una 1. - Page 181 5. Asegúrate de que la puerta esté cerrada. 6. Guarda el aparato en posición vertical, apoyado en sus patas de apoyo. No coloques nada encima. La única excepción es la tabla de cortar de bambú Sage y la bandeja de servir.
-
Page 182: Resolución De Problemas
RESOLUCIÓN DE PROBLEMAS POSIBLE PROBLEMA SOLUCIÓN FÁCIL El horno no se enciende. • Comprueba que el enchufe esté bien insertado en la toma de corriente. • Inserta el enchufe en una toma de corriente independiente. • Inserta el enchufe en una toma de corriente diferente. •... - Page 183 15 minutos y luego vuelve a enchufarlo. • Llama al servicio de atención al cliente de Sage si el mensaje de error “E03” sigue apareciendo. La pantalla LCD muestra •...
-
Page 184: Garantía Limitada De 2 Años
GARANTÍA GARANTÍA LIMITADA DE 2 AÑOS La garantía de Sage Appliances cubre este producto para uso doméstico en territorios específicos durante 2 años a partir de la fecha de compra contra fallos causados por mano de obra y materiales defectuosos. Durante el plazo de la garantía, Sage Appliances reparará,... - Page 185 User Guide Smart Oven Air Fryer XL ™ B###### / S###### BOV905 / SOV905 MANUAL DO UTILIZADOR...
-
Page 186: Cuidados Importantes
CUIDADOS ÍNDICE IMPORTANTES Leia todas as instruções antes de utilizar e guarde-as 186 A Sage recomenda a para consulta futura. segurança como máxima prioridade • Remova e elimine todos os 192 Componentes materiais da embalagem em 193 Painel de controlo segurança, antes da utilização. - Page 187 Centro de forem completamente assistência autorizado da Sage compreendidas, ou se houver mais próximo para inspeção, dúvidas sobre se o aparelho substituição ou reparação. está devidamente aterrado.
- Page 188 cortinas, reposteiros, paredes • As crianças devem ser supervisionadas para e semelhante, durante assegurar que não brincam a utilização. com o aparelho. • O forno não é adequado • É necessária uma vigilância para ser utilizado num rigorosa quando o aparelho compartimento para é...
- Page 189 Sage pode • Não deixe a porta aberta provocar incêndios, choques durante longos períodos elétricos ou ferimentos.
- Page 190 • Limpe regularmente o tabuleiro • Utilize sempre um pano macio de migalhas. Para limpar o quando manusear a lâmpada tabuleiro de migalhas: e não toque diretamente na superfície porque o óleo da sua - Desligue o forno. pele pode danificar a lâmpada. - Deixe arrefecer o forno •...
- Page 191 O símbolo apresentado indica que este aparelho não deve ser eliminado juntamente com os resíduos domésticos normais. Deve ser encaminhado para um centro de recolha de resíduos da autoridade local designado para este fim ou um revendedor que forneça este serviço. Contacte a Câmara Municipal para obter mais informações.
- Page 192 COMPONENTES A. Tabuleiro antiaderente F. Pega da porta de 30 cm para pizza G. Luz do forno B. Grelhador H. Tabuleiro de migalhas C. Tabuleiro esmaltado de I. Ranhuras de ventilação 28 x 33,5 cm para assar J. Cabo de alimentação destacável D.
-
Page 193: Painel De Controlo
PAINEL DE CONTROLO 1. Ecrã LCD Botão de função / Aviso para virar / Botão de confirmação Indicador de temperatura/escuridão Indicador de tempo/fatias Botão Iniciar/Parar Botão de conversão de luz / temperatura do forno Botão de conveção / idioma Botão de cozimento de fase Botão Congelar/Ajustar Volume Botão Um Pouco Mais... - Page 194 Certifique-se de que existe uma distância ™ Sage inclui a tecnologia Element IQ™, que cria mínima de 10 cm de espaço em ambos os o ambiente ideal para os alimentos que está lados do aparelho e 15 cm acima do aparelho.
- Page 195 DESCRIÇÃO GERAL DAS FUNÇÕES DO FORNO POSIÇÃO PRÉ- FUNÇÃO SUGERIDA DA PREDEFINIÇÕES INTERVALO AQUECER GRELHA Tostagem = 4 Tostagem = 1 até 7 Não TORRADA Fatias = 4 Fatias = 1 até 9 Tostagem = 4 Tostagem = 1 até 7 Não BAGEL Fatias = 4...
-
Page 196: Manual De Início Rápido
MANUAL DE INÍCIO RÁPIDO UTILIZAR O FORNO SAGE TEMPERATURE DIAL 1. Introduza a grelha na posição de grelha pretendida. As posições das grelhas estão convenientemente impressas no lado direito do vidro da porta do forno. Existem quatro posições de ranhura. A grelha pode ser... -
Page 197: Seleção De Idioma
a) Quando o forno estiver pronto a ser utilizado, Caso seja necessário alterar o idioma selecionado, a indicação "PRÉ-AQUECIMENTO" prima o botão de convecção durante desaparece, o alarme do forno soa e o 3 segundos. O ecrã LCD apresenta a seleção temporizador inicia a contagem decrescente. -
Page 198: A Bit More
LEMBRETE DE ROTAÇÃO A BIT MORE™ Quando cozinhar alimentos em várias Utilize A BIT MORE™ quando a cozedura estiver grelhas em simultâneo, utilize a função de terminada e os alimentos não estiverem bem lembrete de rotação para o lembrar de mudar cozinhados ou suficientemente quentes. - Page 199 FUNÇÕES PRÉ-DEFINIDAS: O número de fatias é apresentado como a figura inferior no ecrã LCD. Rode o botão do tempo para a esquerda para reduzir o número de fatias, FUNÇÃO DE TORRADA ou para a direita para o aumentar. O número de A função Torrada tosta e estala o exterior fatias varia entre "1"...
- Page 200 O número de metades de bagels é apresentado FUNÇÃO BAGEL como a figura inferior no ecrã LCD. Rode o botão A função Bagel tosta o interior do seu bagel do tempo para a esquerda para reduzir o cortado enquanto tosta apenas ligeiramente número de metades de bagels, ou para a direita o exterior.
- Page 201 b) O número de metades de panquecas FUNÇÃO PANQUECAS é apresentado como a figura inferior no A função Panquecas direciona mais calor para os ecrã LCD. Rode o botão do tempo elementos superiores, de modo a dourar e tornar para a esquerda para reduzir o número de mais estaladiço um lado do que o outro.
- Page 202 tempo correspondentes. O ciclo pode ser FUNÇÃO COZER interrompido em qualquer altura, premindo A função Cozer cozinha os alimentos de forma o botão de iniciar/parar homogénea. Esta função é ideal para cozer bolos, 9. No final do ciclo de cozedura, soa o alarme muffins, brownies e pastelaria.
- Page 203 5. Prima o botão iniciar/parar para ativar a função Torrefação. A luz de fundo do botão acende-se a vermelho, o alarme do forno soa e o ecrã LCD acende-se a laranja. O ecrã LCD indicará "PRÉ-AQUECIMENTO". 6. Quando o forno tiver terminado o pré- aquecimento, soa um alarme e os alimentos podem ser introduzidos no forno.
- Page 204 6. Quando o forno tiver terminado o pré- FUNÇÃO DE COZIMENTO INFERIOR aquecimento, os alimentos podem ser A função Cozimento Inferior emite calor a introduzidos no forno. partir de baixo, o que garante que a base 7. Coloque os alimentos, posicionados na fica bem cozinhada.
-
Page 205: Função Pizza
Este forno permite colocar um total de 4 cestos grelha de modo a que o ar circule por todos os de fritura/desidratação. Visite www.sage.com para lados dos alimentos. Feche a porta do forno. obter mais informações sobre a compra de cestos... - Page 206 8. Depois de soar o alarme de PRÉ- 10. Selecione a temperatura desejada para a AQUECIMENTO, o temporizador pizza, o tempo, a convecção e as definições começa automaticamente a contagem de fresco/congelado e prima o botão decrescente. A temperatura e o tempo iniciar/parar para reiniciar o ciclo da pizza.
- Page 207 7. O temporizador é apresentado e começa a 5. As definições de temperatura de contagem decrescente. A temperatura e o reaquecimento, tempo, convecção e tempo podem ser ajustados durante o ciclo de congelação podem ser ajustadas antes ou levedura, rodando o botão da temperatura e do durante o ciclo de reaquecimento.
- Page 208 FUNÇÃO DESIDRATAR A função DESIDRATAR combina um calor baixo e estável com um fluxo de ar maximizado para secar uniformemente os alimentos sem os cozinhar ou sobreaquecer. 1. Disponha os alimentos uniformemente no cesto para fritar/desidratar incluído. Para obter melhores resultados, coloque os alimentos numa única camada e deixe espaço entre os pedaços.
- Page 209 6. O temporizador é apresentado e começa a 4. A temperatura e o tempo de cozedura lenta contagem decrescente. A temperatura e o podem ser ajustados antes ou durante o tempo podem ser ajustados durante o ciclo de ciclo de cozedura lenta. desidratação, rodando o botão da temperatura a) A temperatura é...
- Page 210 SUGESTÕES DICAS PARA COZINHAR LENTAMENTE 1. Certifique-se de que os utensílios de cozinha são resistentes ao forno e não excedem 13 libras quando vazios. 2. Encha os utensílios de cozinha com um mínimo de ½ e um máximo de ¾ de capacidade para evitar que cozinhem demasiado ou menos.
-
Page 211: Substituir A Lâmpada Do Forno
SUBSTITUIR A LÂMPADA DO FORNO AVISO Desligue a ficha da tomada e deixe arrefecer o forno antes de substituir a lâmpada. Utilize apenas uma lâmpada para forno de 25 Watts, 220-240 V, tipo G9. 1. Retire a grelha do forno antes de substituir 5. -
Page 212: Cuidados E Limpeza
CUIDADOS E LIMPEZA Antes de limpar, certifique-se de que o forno AVISO está desligado removendo a ficha do cabo de alimentação da tomada elétrica. Aguarde até Tenha o máximo cuidado quando limpar os que o forno e todos os acessórios arrefeçam elementos de aquecimento de quartzo. - Page 213 2. Não recomendamos a colocação dos acessórios na máquina de lavar louça para prolongar a vida útil dos mesmos. ARMAZENAMENTO 1. Certifique-se de que o forno está desligado removendo a ficha do cabo de alimentação da tomada elétrica. 2. Aguarde até que o forno e todos os acessórios arrefeçam na totalidade antes de os desmontar e limpar.
-
Page 214: Resolução De Problemas
RESOLUÇÃO DE PROBLEMAS POSSÍVEL SOLUÇÃO FÁCIL PROBLEMA • Verifique se a ficha do cabo de alimentação está corretamente O forno não liga inserida na tomada. • Insira a ficha do cabo de alimentação numa tomada independente. • Insira a ficha do cabo de alimentação numa tomada diferente. •... - Page 215 Retire a ficha da tomada elétrica, deixe o forno arrefecer durante 15 minutos e ligue-o novamente. • Contacte o suporte ao cliente da Sage se a mensagem "E03" persistir. • O ecrã LCD apresenta "E05" quando ocorre um problema que não O ecrã...
- Page 216 GARANTIA GARANTIA LIMITADA DE 2 ANOS A Sage Appliances fornece uma garantia para este produto para uso doméstico nos territórios especificados de 2 anos a partir da data de compra contra avarias provocadas por defeitos na mão-de-obra e nos materiais. Durante este período da garantia, a Sage Appliances...
- Page 217 User Guide Smart Oven Air Fryer XL ™ B###### / S###### BOV905 / SOV905 INSTRUKCJA OBSŁUGI...
-
Page 218: Ważne Informacje Dotyczące Bezpieczeństwa
WAŻNE INFORMA- SPIS TREŚCI CJE DOTYCZĄCE BEZPIECZEŃSTWA 218 Sage stawia na Przed użyciem bezpieczeństwo przeczytaj wszystkie 224 Części 225 Panel sterowania instrukcje i zachowaj 228 Obsługa Twojego nowego je na przyszłość. urządzenia • Przed użyciem urządzenia usuń 228 Skrócona instrukcja obsługi materiały, które posłużyły do... - Page 219 Centrum serwisowego Sage urządzenia, skonsultuj się z w celu przeprowadzenia wykwalifikowanym elektrykiem. kontroli, dokonania wymiany lub • Kiedy urządzenie jest naprawy.
- Page 220 • Może dojść do pożaru, jeśli • Nie pozostawiaj urządzenia bez nadzoru podczas użytkowania. podczas pracy piec jest Nie przenoś ani nie przesuwaj przykryty lub dotyka materiałów łatwopalnych, takich jak firanki, urządzenia podczas jego pracy. zasłony, ściany itp. • Należy pilnować, aby dzieci nie bawiły się...
- Page 221 Sage, może • Nie pozostawiaj drzwiczek spowodować pożar, porażenie otwartych przez dłuższy czas. prądem lub inne obrażenia.
- Page 222 • Do czyszczenia nie używaj • Przed wymianą żarówki zawsze metalowych zmywaków. odłączaj piec od zasilania Ich kawałki mogą odłamywać i pozwól, aby wszystkie części się i stykać z elementami (w tym gniazdo żarówki, szklana elektrycznymi, powodując osłona i obudowa) całkowicie zagrożenie porażenia prądem.
- Page 223 OSTRZEŻENIE GORĄCA POWIERZCHNIA Ten symbol wskazuje, że temperatura powierzchni może być wysoka podczas pracy urządzenia i przez pewien czas po jego użyciu. Aby uniknąć pożaru lub porażenia prądem elektrycznym, nie zanurzaj przewodu zasilania, wtyczki zasilającej ani urządzenia w wodzie bądź innych cieczach. Przedstawiony symbol oznacza, że tego urządzenia nie wolno...
- Page 224 CZĘŚCI A. Nieprzywierająca patelnia do pizzy o średnicy F. Uchwyt drzwi 30 cm G. Oświetlenie piekarnika B. Ruszt do grillowania H. Tacka na okruchy C. Emaliowana brytfanna o wymiarach 28 x I. Otwory wentylacyjne 33,5 cm J. Odłączany przewód zasilający D.
-
Page 225: Panel Sterowania
PANEL STEROWANIA 1. Wyświetlacz LCD Obrotowy regulator wyboru funkcji / Przypomnienie o obracaniu / Przycisk potwierdzenia Pokrętło temperatury/stopnia opiekania Pokrętło czasu/plastrów Przycisk Start/Stop Przycisk zmiany oświetlenia piekarnika/ temperatury Przycisk Konwekcja/Język Przycisk gotowania fazowego Przycisk Mrożonki/Dostosowanie głośności Przycisk „Jeszcze chwilę”. - Page 226 12. Piekarnik jest teraz gotowy do użycia. ilości płynu do mycia naczyń, wypłucz i wytrzyj do sucha. ELEMENT IQ ™ 3. Postaw piekarnik na równej i suchej Piekarnik Sage Smart Oven Air Fryer ™ powierzchni. Zapewnij wolną przestrzeń jest wyposażony w funkcję Element IQ ™...
-
Page 227: Przegląd Funkcji
PRZEGLĄD FUNKCJI SUGEROWANE WSTĘPNIE PODGRZEWANIE UMIESZCZENIE USTAWIONE ZAKRES FUNKCJE WSTĘPNE RUSZTU WARTOŚCI Intensywność opiekania = 4 Intensywność opiekania = 1 to 7 TOST Ilość kromek = 4 Ilość kromek = 1 to 9 Intensywność opiekania = 4 Intensywność opiekania = 1 bis 7 BAJGL Tranches = 4 Ilość... -
Page 228: Obsługa Piekarnika
SKRÓCONA INSTRUKCJA OBSŁUGI OBSŁUGA PIEKARNIKA TEMPERATURE DIAL 1. Włóż ruszt w żądane miejsce. Pozycje rusztów są wygodnie wydrukowane po prawej stronie szyby drzwi piekarnika. Dostępne są cztery pozycje rowków. Ruszt może być włożony zarówno do góry, jak i do dołu, aby zapewnić ROTATE dwie pozycje rusztu dla każdego rowka. -
Page 229: Wybór Języka
a) Gdy piekarnik będzie gotowy do W przypadku konieczności zmiany wybranego użycia, komunikat „PREHEATING” języka należy przytrzymać przycisk konwencji (NAGRZEWANIE) zniknie, włączy się przez 3 sekundy. Na wyświetlaczu LCD zostanie alarm piekarnika, a zegar zacznie odliczać wyświetlony wybór języków. Obróć pokrętła czas. - Page 230 PRZYPOMNIENIE O OBRACANIU A BIT MORE™ Podczas gotowania potraw na kilku rusztach Użyj A BIT MORE™ po zakończeniu gotowania, jednocześnie należy użyć funkcji przypomnienia a jedzenie nie jest całkowicie ugotowane lub o obrocie , aby przypomnieć o zmianie wystarczająco gorące. pozycji potrawy w piekarniku w celu uzyskania Na przykład: Funkcja bajgla najbardziej równomiernych i spójnych rezultatów.
- Page 231 USTAWIONE FUNKCJE: Liczba plasterków jest wyświetlana w dolnej części wyświetlacza LCD. Obróć pokrętło czasu w lewo, aby zmniejszyć liczbę plasterków lub w FUNKCJA OPIEKANIA prawo, aby ją zwiększyć. Liczba plasterków waha Funkcja opiekania, przyrumienia i nadaje się od „1” do „9”. chrupkość...
- Page 232 Liczba połówek bajgla jest wyświetlana w dolnej FUNKCJA BAJGLI części wyświetlacza LCD. Obróć pokrętło czasu Funkcja bajgli powoduje chrupiące wnętrze w lewo, aby zmniejszyć liczbę połówek bajgli pokrojonego bajgla i lekkie przypiekanie jego lub w prawo, aby ją zwiększyć. Liczba połówek zewnętrznej strony.
- Page 233 b) Liczba połówek racuchów jest wyświetlana FUNKCJA RACUCHÓW w dolnej części wyświetlacza LCD. Obróć Funkcja Racuchów (opiekanie z jednej strony), pokrętło czasu w lewo, aby zmniejszyć kieruje więcej ciepła na górne elementy, dzięki liczbę połówek racuchów lub w prawo, aby czemu jedna strona jest bardziej rumiana i ją...
- Page 234 8. Po włączeniu się ostrzeżenia PREHEATING FUNKCJA PIECZENIA (NAGRZEWANIE), zegar automatycznie Funkcja pieczenia równomiernie gotuje potrawę. rozpocznie odliczanie. Temperaturę Funkcja ta jest idealna do pieczenia ciast, i czas można regulować podczas cyklu muffinów, brownie i ciastek. Funkcja PIECZENIA pieczenia, obracając odpowiednie pokrętło idealnie nadaje się...
- Page 235 b) Obróć pokrętło czasu , aby wybrać czas FUNKCJA GRILLOWANIA gotowania. Maksymalny czas gotowania Funkcja grillowania jest idealna do przyrządzania można ustawić w następujący sposób: kanapek, cienkich kawałków mięsa, drobiu i ryb, kiełbasek i warzyw. Grillowanie można wykorzystać >200 °C do 4 godzin także do przyrumienienia wierzchu zapiekanek i 150 °C - 200 °C...
- Page 236 7. Zostanie wyświetlony zegar i automatycznie >200 °C do 4 godzin rozpocznie się odliczanie. Poziom mocy 150 °C - 200 °C do 8 godzin i czas można regulować podczas cyklu grillowania, obracając odpowiednie pokrętło 100 °C - 150 °C do 12 godzin temperatury i czasu .
- Page 237 Temperatura smażenia w trybie Air Fry jest wyświetlana jako górna wartość na wyświetlaczu LCD. Obróć pokrętło temperatury , aby ustawić...
- Page 238 7. Umieść potrawę, umieszczoną na dołączonej FUNKCJA PIZZY patelni do pizzy, jeśli jej używasz, na środku Funkcja pizzy topi i przyrumienia ser oraz dodatki, rusztu, tak aby powietrze przepływało jednocześnie nadając chrupkości skórce pizzy. ze wszystkich stron potrawy. Zamknij drzwi piekarnika. 1.
- Page 239 7. Po włączeniu się ostrzeżenia PREHEATING b) Czas wyrastania jest wyświetlany w (NAGRZEWANIE), zegar automatycznie dolnej części wyświetlacza LCD. Obróć rozpocznie odliczanie. pokrętło czasu , aby ustawić czas do 24:00 GODZ./MIN. 8. Po zakończeniu cyklu rozlegnie się sygnał ostrzegawczy piekarnika. Podświetlenie 6.
- Page 240 5. Temperaturę odgrzewania, czas, konwekcję i ustawienia zamrażania można regulować przed lub w trakcie cyklu. a) Temperatura odgrzewania jest wyświetlana jako górna wartość na wyświetlaczu LCD. Obróć pokrętło temperatury , aby ustawić temperaturę w zakresie od 70°C do maksymalnie 250°C. b) Czas odgrzewania jest wyświetlany w dolnej części wyświetlacza LCD.
- Page 241 odpowiednie pokrętło temperatury i czasu. FUNKCJA SUSZENIA Cykl można zatrzymać w dowolnym momencie, Funkcja SZUSZENIA łączy niskie i stabilne ciepło naciskając przycisk start/stop z maksymalnym przepływem powietrza, aby 7. Po zakończeniu cyklu suszenia rozlegnie się równomiernie wysuszyć żywność bez gotowania sygnał...
- Page 242 4. Temperaturę i czas gotowania na wolnym UWAGA ogniu można regulować przed cyklem lub w jego trakcie. Podczas wkładania lub wyjmowania naczyń z a) emperatura jest wyświetlana jako górna piekarnika nie należy wyciągać rusztu dalej niż wartość na wyświetlaczu LCD. Obróć do połowy.
- Page 243 Dlatego nie zaleca się przechowywania żadnych przedmiotów na górnej części piekarnika. Jedynymi wyjątkami są bambusowa deseczka Sage i taca, które pasują do wycięć w górnej części piekarnika. Więcej informacji znajdziesz na stronie www.sageappliances.cz 4. Przy pomocy ściereczki włóż nową...
-
Page 244: Konserwacja I Czyszczenie
KONSERWACJA I CZYSZCZENIE CZYSZCZENIE WNĘTRZA Przed czyszczeniem upewnij się, że piekarnik jest wyłączony i że wtyczka kabla zasilającego Ścianki wewnętrzne piekarnika są pokryte jest odłączona od gniazdka sieciowego. Przed nieprzywierającą warstwą ułatwiającą demontażem i czyszczeniem odstaw piekarnik czyszczenie. Aby usunąć ewentualne i jego wyposażenie do ostygnięcia. - Page 245 CZYSZCZENIE RUSZTU, RUSZT DO GRILLOWANIA, BLACHY DO PIECZENIA, KOSZA DO SMAŻENIA I BLACHY DO PIZZY 1. Umyj wszystkie akcesoria miękką gąbką w ciepłej wodzie z odrobiną płynu do mycia naczyń. Opłucz je i dokładnie wysusz. Do usuwania zabrudzeń nie używaj rysujących środków czyszczących, myjek drucianych lub innych metalowych przyborów, które mogłoby porysować...
-
Page 246: Rozwiązywanie Problemów
ROZWIĄZYWANIE PROBLEMÓW PROBLEM SZYBKIE ROZWIĄZANIE Piekarnik się nie włączył. • Sprawdź, czy prawidłowo podłączono wtyczkę kabla zasilającego do gniazdka. • Włóż wtyczkę czajnika do osobnego gniazdka. • Włóż wtyczkę czajnika do innego gniazdka. • W razie potrzeby zresetuj bezpiecznik elektryczny. Zgasło podświetlenie •... - Page 247 „E01”. nie można rozwiązać poprzez zresetowanie urządzenia. Niezwłocznie wyjmij wtyczkę kabla zasilającego z gniazdka i skontaktuj się z centrum obsługi klienta marki Sage. Na wyświetlaczu pojawił • Komunikat o błędzie „E02” na wyświetlaczu oznacza problem, się komunikat którego o błędzie „E02”.
- Page 248 15 minut. Po tym czasie ponownie podłącz go sieci. • Jeżeli komunikat o błędzie „E03” nie zniknie, skontaktuj się z centrum obsługi klienta marki Sage. • Komunikat o błędzie „E05” na wyświetlaczu oznacza problem, Na wyświetlaczu pojawił się komunikat którego...
- Page 249 Gwarancja obowiązuje w ciągu dwóch lat od zakupu i w określonych regionach. W czasie okresu gwarancji firma Sage Appliances naprawi lub wymieni wadliwe produkty lub zwróci ich koszt (decyzja należy wyłącznie do firmy Sage Appliances).
- Page 250 Deutschland: 0800 505 3104 Österreich: 0800 80 2551 Portugal Sweden 0800 180 243 0200 123 797 Sage Appliances France SAS Siège social: 66 avenue des Champs Elysées – 75008 Paris Poland Finland 879 449 866 RCS Paris 00800 121 8713...
Need help?
Do you have a question about the Smart Oven Air Fryer XL and is the answer not in the manual?
Questions and answers