
Related Manuals for NCR VOYIX XL55P


Summary of Contents for NCR VOYIX XL55P
- Page 1 NCR XL55P Payment Display User Guide 1607 BCC5-0000-5560 Issue C Confidential and proprietary information of NCR Voyix Corporation. Unauthorized use, reproduction and/or distribution is strictly prohibited...
-
Page 2: Copyright
NCR Voyix, therefore, reserves the right to change specifications without prior notice. All features, functions, and operations described herein may not be marketed by NCR Voyix in all parts of the world. In some instances, photographs are of equipment prototypes. Therefore, before using this document, consult with your NCR Voyix representative or NCR Voyix office for information that is applicable and current. -
Page 3: Safety Requirements
This book is written for hardware installer/service personnel, system integrators, and field engineers. Note This document is NCR Voyix proprietary information and is not to be disclosed or reproduced without consent. Safety Requirements The NCR XL55P Payment Display (1607) conforms to all applicable legal requirements. To... -
Page 4: Grounding Instructions
Grounding Instructions In the event of a malfunction or breakdown, grounding provides a path of least resistance for electric current to reduce the risk of electric shock. This product is equipped with an electric cord having an equipment-grounding conductor and a grounding plug. The plug must be plugged into a matching outlet that is properly installed and grounded in accordance with all local codes and ordinances. - Page 5 If you do not have access to a computer, you may leave a voice message at: 1-800-528- 8658 (USA), or (International) +1-770-623-7400. When leaving a message, please provide a phone number and/or an email address so NCR Voyix can contact you if additional details are needed.
-
Page 6: Warranty
Improper or insufficient maintenance Improper use or unauthorized modifications of the product. Inadequate location or surroundings. Site installation must conform to guidelines listed in the NCR XL55P Payment Display (1607) Site Preparation Guide (BCC5- 0000-5561) and the NCR Workstation and Peripheral AC Wiring Guide (BST0- 2115-53). -
Page 7: Table Of Contents
XL55P Payment Display Moby 5500M Hardware Installation Installation Restrictions Ergonomic Workplace Installing the XL55P Payment Display Replacing the Moby 5500M on an XL55P Payment Display Release 1.0 Removing the Moby 5500M Installing the Moby 5500M Release 2.0 Removing the Moby 5500M... - Page 8 Operation and Cleaning Projected Capacitive (PCAP) Touchscreen Using the PCAP Touchscreen Cleaning the Touchscreen Cleaning the Cabinet NCR Software OSD Utility Supported Features Installing the Utility Running the Utility (GUI Version) Main Menu Monitors Detected Panel Center Panel Control Buttons Display Adjustment Procedures Resetting Factory Defaults Running the Utility (Console Version) Confidential and proprietary information of NCR Voyix Corporation.
-
Page 9: Revision Record
Revision Record Issue Date Remarks Jul 2022 First issue. Mar 2024 Release 2.0 Changed to Voyix template May 2024 Changed NCR to NCR Voyix Confidential and proprietary information of NCR Voyix Corporation. Unauthorized use, reproduction and/or distribution is strictly prohibited. -
Page 10: Product Overview
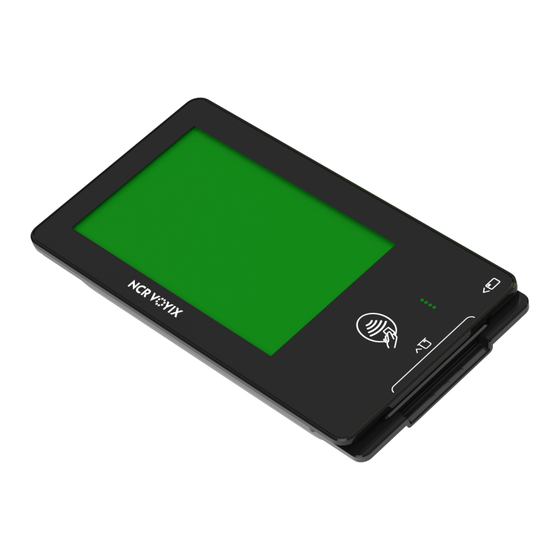
Product Overview The NCR XL55P Payment Display (1607) is a compact guest-facing order confirmation and payment device. The XL55P leverages a 7-inch PCAP display and an integrated Moby 5500M payment device supporting dip, tap, and swipe payment methods. The XL55P connects to select NCR Voyix terminals via a custom USB type-C cable. -
Page 11: Base Models
Base Model Description 1607-5300-0001 XL55P Payment Display, 7” Display Only, PCAP, USB*, without Moby 5500M 1607-5310-0002 XL55P Payment Display, All Glass, 7” Display Only, PCAP, USB*, without Moby 5500M Note * indicates USB cable connectors compatible with type C connectors. Specifications Feature... - Page 12 Feature Specifications Native Resolution 1024x600 (16:9) / 16.7 colors Additional Resolutions Supported Dependent on graphics driver capability User Adjustable OSD Controls Allows for adjustments through software OSD Viewing Direction 12 o'clock Audio No audio support Payment Device Moby 5500M Power Latching USB 12V Power consumption Without Moby 5500M –...
-
Page 13: Moby 5500M
Moby 5500M The Moby 5500M payment device accepts swipe, EMV Chip, and contactless payments in a single device. It is a bi-directional card reader with long guide length ensuring maximum read performance. It has LED and beep indicators for battery and reader status. Confidential and proprietary information of NCR Voyix Corporation. -
Page 14: Xl55P Payment Display Mount
XL55P Payment Display Mount The NCR XL55P Payment Display (1607) VESA mounting pattern is 75 mm by 50 mm. 1607 Tabletop Bracket (1607-K001) The XL55P Payment Display can be mounted on a tabletop using the 1607 Tabletop Bracket kit (1607-K001). Confidential and proprietary information of NCR Voyix Corporation. -
Page 15: Label Locations
Label Locations XL55P Payment Display Moby 5500M Confidential and proprietary information of NCR Voyix Corporation. Unauthorized use, reproduction and/or distribution is strictly prohibited. -
Page 16: Hardware Installation
NCR Workstation and Peripherals AC Wiring Guide (BST0-2115-53). Ergonomic Workplace Due to the high brightness LCD of the NCR XL55P Payment Display (1607), refer to the following recommendations for an ergonomic workstation: Avoid direct–glaring and reflective–glaring light. When installed next to windows, position the device so it does not reflect the outside light. - Page 17 2. Do the following: a. Fully insert the USB male connector. b. Tighten the thumbscrew leaving no gap between the silver thumbscrew and black plastic overmold. Note Avoid excessive tightening of the thumbscrew. There should be no looseness in the overmold once the thumbscrew is properly tightened.
- Page 18 3. Route the Cable along the appropriate Cable Routing Channel. The Cable can be routed towards the front or towards the back of the XL55P Payment Display. Confidential and proprietary information of NCR Voyix Corporation. Unauthorized use, reproduction and/or distribution is strictly prohibited.
- Page 19 4. Connect the other end of the Cable to the USB port of the Host Terminal. Confidential and proprietary information of NCR Voyix Corporation. Unauthorized use, reproduction and/or distribution is strictly prohibited.
-
Page 20: Replacing The Moby 5500M On An Xl55P Payment Display
Replacing the Moby 5500M on an XL55P Payment Display Release 1.0 Removing the Moby 5500M on the next page Installing the Moby 5500M on page 22 Release 2.0 Removing the Moby 5500M on page 23 Installing the Moby 5500M on page 25 Confidential and proprietary information of NCR Voyix Corporation. -
Page 21: Release 1.0
Release 1.0 Removing the Moby 5500M 1. Remove the two (2) screws that secure the Moby 5500M to the XL55P Payment Display. 2. Gently pull the Moby 5500M upwards to remove it from the XL55P Payment Display. Confidential and proprietary information of NCR Voyix Corporation. -
Page 22: Installing The Moby 5500M
Installing the Moby 5500M 1. Connect the Moby 5500M to the XL55P Payment Display. Ensure the pins of the Moby 5500M line up with the POGO pins. 2. Secure the Moby 5500M with two (2) screws. Confidential and proprietary information of NCR Voyix Corporation. -
Page 23: Release 2.0
2. Remove the four (4) screws that secure the touchscreen bezel to the chassis. 3. Remove the two (2) screws that secure the Moby 5500M to the XL55P Payment Display. 4. Set the XL55P upright. - Page 24 5. Lift the touchscreen bezel as shown. 6. Gently pull the Moby 5500M upwards to remove it from the XL55P Payment Display. Confidential and proprietary information of NCR Voyix Corporation. Unauthorized use, reproduction and/or distribution is strictly prohibited.
-
Page 25: Installing The Moby 5500M
Installing the Moby 5500M 1. Lay the XL55P face down on a flat surface. Note Always use a soft material (cloth, foam) to protect the display screen when placing the terminal face down. 2. Remove the four (4) screws that secure the touchscreen bezel to the chassis. - Page 26 5. Connect the Moby 5500M to the XL55P Payment Display. Ensure the pins of the Moby 5500M line up with the POGO pins. 6. Secure the Moby 5500M with two (2) screws. Confidential and proprietary information of NCR Voyix Corporation. Unauthorized use, reproduction and/or distribution is strictly prohibited.
- Page 27 7. Reinstall the touchscreen bezel (4 screws). Confidential and proprietary information of NCR Voyix Corporation. Unauthorized use, reproduction and/or distribution is strictly prohibited.
-
Page 28: Servicing The Xl55P Payment Display
Servicing the XL55P Payment Display The NCR XL55P Payment Display (1607) is serviced as a whole unit. Should the unit require service, contact the NCR Voyix Customer Care Center at 1-800-262-7782 and have the following information available when you place the call:... -
Page 29: Operation And Cleaning
In addition, the active surface of PCAP touchscreens is not directly touched and does not wear off by normal use because it is located on the back side of the touchscreen, instead of the front side. Therefore, the NCR XL55P Payment Display (1607) can be installed in public spaces even in severe environmental conditions. -
Page 30: Cleaning The Touchscreen
Cleaning the Touchscreen Touchscreens can be effectively cleaned with water or up to 70% isopropyl alcohol solution. Follow these steps to avoid damage to the touchscreen: Warning Do not use sharp objects to clean around the edges of the touchscreen. Do not use abrasive cleaners (powders) or abrasive cleaning materials (scrub brush, scouring pad). -
Page 31: Cleaning The Cabinet
Cleaning the Cabinet To clean the cabinet of the NCR XL55P Payment Display (1607), follow these steps: 1. Disconnect the unit from the AC outlet. Warning Do not use alcohol (methyl, ethyl, or isopropyl) or any strong dissolvent. Do not use thinner or benzene, abrasive cleaners (powders), abrasive cleaning materials (scrub brush, scouring pad), or compressed air. -
Page 32: Ncr Software Osd Utility
NCR Software OSD Utility The NCR Software OSD is an application that is used to adjust display settings, such as brightness, contrast, and color. It also provides monitor identification information, such as the name, serial number, and manufacturer. Supported Features Note Not all features are supported on every monitor. -
Page 33: Installing The Utility
Installing the Utility To install the OSD Utility, follow these steps: 1. Download the OSD Utility from the NCR Voyix website: https://www.ncrvoyix.com/company/support a. Under Retail and hospitality information products, select Drivers and Patches. b. Select Retail Support Files→ NCR RealPOS and SelfServ Peripherals→... -
Page 34: Running The Utility (Gui Version)
Running the Utility (GUI Version) To run the GUI Version of the Utility, follow these steps: 1. Unzip the application to a preferred folder in the target system. 2. In the unzipped folder, navigate to the OSD executable. Example (32-Bit version) NCR_Software_OSD_GUI_x86_V2.2.23.5 >>... -
Page 35: Main Menu
Main Menu Monitors Detected Panel The Monitors Detected Panel lists all the monitors connected to the system. If more than one monitor is connected, the first monitor is selected by default. Center Panel The Center Panel displays information pertaining the selected control. Confidential and proprietary information of NCR Voyix Corporation. -
Page 36: Control Buttons
Control Buttons The Control Buttons show the available features that can be modified. Unavailable features are grayed out. Control Button Description Refresh Button Refreshes data in the Monitors Detected panel (OSD does not auto detect). Use this button after connecting a new monitor to refresh the data. About Button Displays a brief description of the utility. - Page 37 Control Button Description Size Provides tools for increasing or decreasing the height and width of the image on the Display. Phase Provides tools for increasing or decreasing the phase shift of the sampling clock. Clock Provides tools for increasing or decreasing the video sampling clock frequency. Colour Provides tools for adjusting Display color settings.
-
Page 38: Display Adjustment Procedures
Display Adjustment Procedures The adjustment procedures are similar for most features. The color adjustment shown below is an example. 1. Select the Colour button. The default Colour Settings menu has the 6500K radio button selected. 2. Select the User1 radio button to activate the color slides. 3. -
Page 39: Resetting Factory Defaults
Resetting Factory Defaults To reset display settings to the factory defaults, follow these steps: 1. Select the Restore button. 2. Select a button in the Restore window. Note All settings or just specific groups can be reset. Auto Setup—resets the window position to the center of the display Factory Defaults—resets everything to the factory defaults Brightness/Contrast—resets the brightness and contrast settings only Color Settings—resets the color settings only... -
Page 40: Running The Utility (Console Version)
A list of the available script command options are displayed, followed by several example scripts. If you need further assistance with creating scripts, please contact your NCR Voyix representative for help. Confidential and proprietary information of NCR Voyix Corporation. Unauthorized use, reproduction and/or distribution is strictly prohibited.
Need help?
Do you have a question about the XL55P and is the answer not in the manual?
Questions and answers