Table of Contents
Advertisement
Quick Links
Technical Support and E-Warranty Certificate www.vevor.com/support
MICROSCOPE
MODEL:XSP-36 XSP-36TV
We continue to be committed to provide you tools with competitive price.
"Save Half", "Half Price" or any other similar expressions used by us only represents an
estimate of savings you might benefit from buying certain tools with us compared to the major
top brands and doses not necessarily mean to cover all categories of tools offered by us. You
are kindly reminded to verify carefully when you are placing an order with us if you are
actually saving half in comparison with the top major brands.
Advertisement
Table of Contents

Related Manuals for VEVOR XSP-36


Summary of Contents for VEVOR XSP-36
- Page 1 Technical Support and E-Warranty Certificate www.vevor.com/support MICROSCOPE MODEL:XSP-36 XSP-36TV We continue to be committed to provide you tools with competitive price. "Save Half", "Half Price" or any other similar expressions used by us only represents an estimate of savings you might benefit from buying certain tools with us compared to the major top brands and doses not necessarily mean to cover all categories of tools offered by us.
- Page 2 This is the original instruction, please read all manual instructions carefully before operating. VEVOR reserves a clear interpretation of our user manual. The appearance of the product shall be subject to the product you received. Please forgive us that we won't inform you again if...
-
Page 3: Safety Tips
INSTRUCTIONS Thank you very much for choosing this product. Please read all of the instructions before using it.The information will help you achieve the best possible results. SAFETY TIPS 1. This microscope only uses for micro observation, it can't be for other use, or the instrument will be damaged. - Page 4 use and contact the nearest sale agent. 7.When moving the stage, the rack of the stage will extend out, and be careful not to hurt your hands or other body parts with the rack when operating the microscope. 8.This microscope is a precision optical instrument, if used or kept improperly, it will cause damage to the instrument or adversely affect its accuracy.
-
Page 5: Technical Parameters
TECHNICAL PARAMETERS Technical Specification Total 40X ~ 2500X(XSP-36) , 40X ~ Main Magnification 5000X(XSP-36TV) Parameter... -
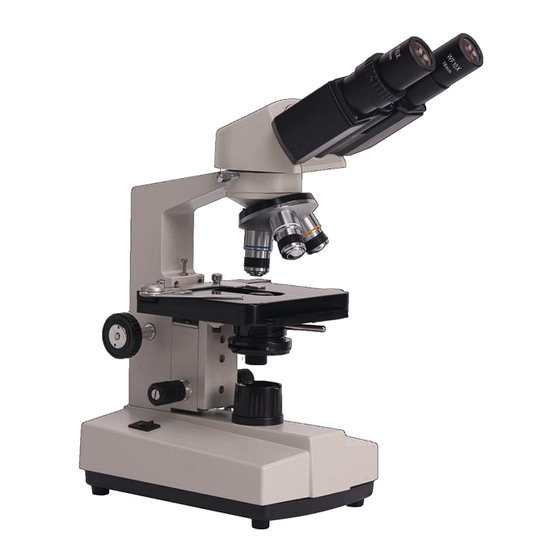
Page 6: Parts List
Focusing Coarse and fine tuning are not coaxial system Coarse range:14mm,Fine range:1.3mm Double layer mechanical stage: Stage size:115mm×125mm,Moving rang: 72mm*30mm High brightness Illumination 20mA/3.0V LED cold light source Input AC100-240V Light source Output DC 5V/2A PARTS LIST 2.Microscope Structure and Characteristics 1. - Page 7 3. Converter: Select the wanted objective(sound location) 4. Objective: primary magnify of the specimen; 5. Clips: fixed the specimens; 6. Stage: place the specimens; 7. Condenser diaphragm lever: adjust the size of the condenser diaphragm hole; 8. Collecting: gather light to illuminate the specimen; 9.
-
Page 8: Installation And Use
INSTALLATION AND USE 3.Instrument Installation 3.1 The microscope is placed on a stable workbench. When moving the instrument, especially the optical parts, should avoid touching the lens' surface with your hands or objects with oil stains. Finger marks or oil stains on the surface of the lens will affect the imaging quality. -
Page 9: Operation
OPERATION 4.Operation 4.1 Electric illumination 4.1.1 Turn on the power switch (flip the switch to ".") to make the bulb lighting 4.1.2 Rotate the brightness adjustment wheel to adjust the field of view brightness. 4.2 Install the specimen 4.2.1 Open the section holder gently with your finger, place the specimen in, cover the glass, release your finger and secure the section. - Page 10 face of the objective. *Since the working distance is farther for the 10X and 4X objectives, as long as it is used the standard thickness of the slide and cover glass(the standard thickness of the slide and cover glass is 1.2mm and0.17mm, respectively), even if the stage is moved to the highest position, the objective lens will not touch the specimen.
-
Page 11: Installation And Use Of Accessories
INSTALLATION AND USE OF ACCESSORIES 5 Installation and use of accessories (optional) 5.1 Installed external CCD camera accessories ATTENTION: For the parameters and usage of the CCD camera and digital viewer, please refer to the instruction manual contained in the CDROM supplied with the CCD camera or digital viewer. - Page 12 5.2 The installation of frosted glass When using the LED lighting, it is necessary to add frosted glass, first turn out the ground glass bracket, put the frosted glass smoothly into the bracket slot, and then turn the frosted glass bracket back to the original position.(see picture 6) Picture 6 ATTENTION...
-
Page 13: Maintenance
MAINTENANCE 6. Maitenance 6.1 lf the light source blinks or goes out when use the battery power, please recharge it in time with the power adapter. 6.2 When the microscope is observed or suspended, press the switch 0 to cut off the power supply, to avoid the electrical components in the instrument are still in the working state. - Page 14 TOUBLESHOOTING SCHEDULE 7. Toubleshooting schedule Common fault Reason Treatment method Rotate the objective The converter is not converter until positioned correctly (the accurate positioning objective is not coaxial with (moving the objective The field of view the optical path) into the light is blurred or the path correctly) brightness of the...
- Page 15 Lens surface is not clean (objective/eyepiece/condens Wipe clean er/collector) Aperture is too small Proper opening Rotate the objective Objective converter is not converter until positioned correctly accurate positioning Unilateral Specimens should darkening Specimen is higher than the be firmly clamped to stage the platform w section clips...
-
Page 16: Warranty Policy
rechargeable battery is low. Plug in the power Procedure adapter to charge Bulb poor contact Plug in the light bulb Light source Check that the flicker Luminance socket poor contact socket connection is instability reliable WARRANTY POLICY 8.Warranty policy 8.1 Warranty period From the date of purchase, the company provides one-year warranty service for the host 8.2 Non-warranty policy... - Page 17 Item Production Number Fault phenomeno Buying date Contact Contact address Remark:This form is a return copy of the warranty card. Please cut out this form and send it to the seller or manufacturer whose address is on the "back cover". The Company reserves the right to make certain improvements to the design as it deems necessary.
-
Page 18: After Sales Service
AFTER-SALES SERVICE 1. If the product you received has other problems such as usage problems, please feel free to contact us and reply to online customer service within 24 hours to serve you. 2. Our products support 90 days for no reason to return or exchange. 3. - Page 19 Technical Support and E-Warranty Certificate www.vevor.com/support...
Need help?
Do you have a question about the XSP-36 and is the answer not in the manual?
Questions and answers