Table of Contents
Advertisement
Quick Links
Advertisement
Table of Contents

Related Manuals for Dash MultiMaker Flex Press


Summary of Contents for Dash MultiMaker Flex Press
- Page 1 # DIG024 flex press grill system With 4 Removable Nonstick Plates...
- Page 2 Welcome to the Foodie Family love We hope you products as much as our team does.
-
Page 3: Table Of Contents
multimaker ™ flex press grill system Important Safeguards ..............4-7 Parts & Features ................8-9 Before First Use ................11 Inserting Removable Plates ............12 Setting Up the Flex Press Grill ............13 Using the Flex Press Grill ............14-15 Removing Plates ................16 Cleaning &... -
Page 4: Important Safeguards
IMPORTANT SAFEGUARDS IMPORTANT SAFEGUARDS: PLEASE READ AND SAVE THIS INSTRUCTION AND CARE MANUAL. When using electrical appliances, basic safety precautions should always be followed, including: Read all instructions before use. Warning: Hot surfaces! Never touch the • • Cooking Surfaces or Grill casing while Remove all bags and packaging from •... - Page 5 IMPORTANT SAFEGUARDS The Removable Plates are dishwasher This appliance has a polarized plug (one blade • • safe on the top rack, but hand washing is is wider than the other). To reduce the risk of recommended to preserve the life of the electric shock, this plug will fit in a polarized product.
-
Page 6: Garanties Importantes
garanties importantes GARANTIES IMPORTANTES: VEUILLEZ LIRE ET CONSERVER CE MODE D’EMPLOI ET D’ENTRETIEN Lors de l’utilisation d’appareils électriques, il faut toujours respecter les précautions de sécurité de base, notamment: Lisez toutes les instructions avant utilisation. Ne laissez pas d’enfants utiliser •... - Page 7 garanties importantes Évitez d’utiliser des accessoires qui ne Les plaques amovibles peuvent être lavées • • sont pas recommandés par le fabricant de au lave-vaisselle dans le panier supérieur, l’appareil, car ils pourraient entraîner un feu, mais nous recommandons de les laver à une électrocution ou un dommage corporel.
-
Page 8: Parts & Features
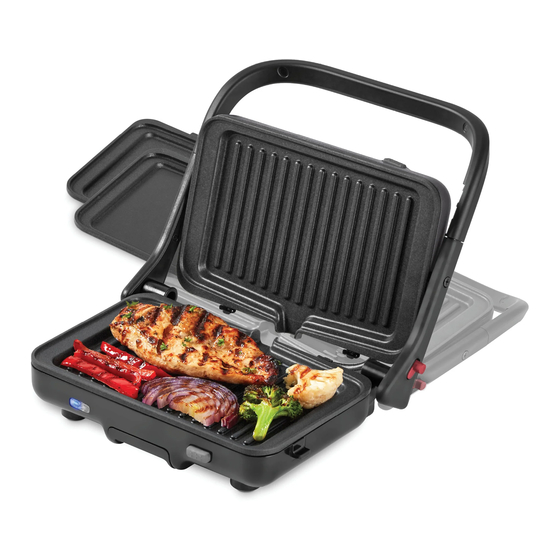
parts & Features Lid Handle Top Plate Release Tab Plate Insertion Grooves Hinge Release Button Indicator Light Storage Lock Drip Tray Bottom Plate Release Tab ∙ 8 ∙... - Page 9 parts & Features COOKING SURFACES Cooking Surfaces REMOVABLE PLATES Grill Plate Grill Plate Griddle Plate Griddle Plate ∙ 9 ∙...
- Page 10 ∙ 10 ∙...
-
Page 11: Before First Use
Before First Use Before first use, remove all packaging materials and thoroughly clean the MultiMaker Flex Press Grill System. ™ WARNING: Never touch the Removable Plates or Grill casing while appliance is in use. Use only the Lid Handle to open and close the Grill. -
Page 12: Inserting Removable Plates
Inserting Removable Plates Choose two Removable Plates for cooking. Each Plate has two metal tabs that jut out from one side. Each half of the Grill has two Plate Insertion Grooves located near the hinge of the Grill. To install a Removable Plate, position it with the metal tabs pointed toward the hinge of the Grill and find the Plate Insertion Grooves (photo... -
Page 13: Setting Up The Flex Press Grill
Setting Up the Flex Press Grill Closed-Grill Cooking including pressing paninis, place the Grill on a stable and dry surface. Use the Lid Handle to open and close the Grill. Open-Faced Flattop Grilling, place the Grill on a stable and dry surface and open the Grill using the Lid Handle. -
Page 14: Using The Flex Press Grill
Using the Flex Press Grill After setting up for either Closed-Grill Cooking or Open-Face Flattop Grilling, make sure the Drip Tray is inserted into the front of the Grill prior (photo A). Then plug the cord into a power outlet. The blue to plugging in Indicator Light will illuminate (photo... - Page 15 using the flex press grill Carefully lift the Grill by the Lid Handle and lightly grease both Removable Plates with a small amount of cooking oil (photo To begin cooking, add ingredients to greased cooking surface(s). For waffles, pour batter onto bottom cooking surface as per recipe instructions.
-
Page 16: Removing Plates
Removing The Plates To remove Removable Plates once cooled, press the Plate Release Tabs. The Plates will pop up and can then be fully removed by angling the plate and pulling it such that the metal tabs become free from the Plate Insertion Grooves (photo CAUTION:... -
Page 17: Cleaning & Maintenance
CLEANING & MAINTENANCE Always allow the Removable Plates to cool completely before handling or • removing them. Always allow the Grill to cool completely before moving, cleaning, or storing. Do not submerge appliance in water or any other liquids. Never use abrasive cleaning agents to clean the appliance as this may damage the Grill. -
Page 18: Troubleshooting
While Dash products are durable, you may encounter one or more of the problems listed below. If the issue is either not solved by the solutions recommended below or not included on this page, please contact our Customer Support Team at 1-800-898-6970 or support@bydash.com. - Page 19 troubleshooting ISSUE SOLUTION There is probably a build-up of burnt food residue on the Removable Plates. This is normal, especially when After using the Grill a few cooking with sugar. Allow the appliance to cool fully. times, food is starting to stick Then, use a damp, soapy cloth to wipe down the Plates.
-
Page 21: Recipe Guide
RECIPE GUIDE Follow us! @bydash | recipes, videos, & inspiration @unprocessyourfood | veg & vegan-friendly meals... - Page 22 Using the Grill Plates Chicken, Mozzarella, & Kale Pesto Panini Prep Time: 10-12 minutes • Cook Time: 7-10 minutes • Serves: 1-2 Ingredients: 1 bunch kale, leaves stripped and blanched Salt, to taste 1 cup fresh basil 1 loaf ciabatta or sourdough bread, sliced ½...
- Page 23 Using the Grill Plates Crispy Hashbrowns with Peppers & Onions Prep Time: 5-10 minutes • Cook Time: 7-10 minutes • Serves: 3-4 Ingredients: 1-2 tablespoons cooking oil 1 sweet onion, peeled and diced 1-2 russet potatoes, peeled and shredded 1 teaspoon garlic powder 1 bell pepper, diced Salt &...
- Page 24 Using the Grill Plates Maple Glazed Teriyaki Salmon Prep Time: 30-35 minutes • Cook Time: 8-10 minutes • Serves: 3-4 Ingredients: Teriyaki Glaze: ½ cup soy sauce or tamari 2-4 tablespoons honey or maple syrup ½ cup of reserved marinade ¼...
- Page 25 Directions: Begin by preparing the salmon marinade. In a medium bowl, combine soy sauce, water, honey, rice vinegar, sesame oil, minced garlic, ginger, and pepper. Mix and transfer ½ cup of prepared marinade to a small saucepan to use for glaze later. Place salmon into a shallow bowl, add remaining marinade, and coat evenly.
- Page 26 Using the Grill Plates Grilled Peach, Honey, & Brie Crostini Prep Time: 5-7 minutes • Cook Time: 8-10 minutes • Serves: 2-4 Ingredients: 4 pieces sourdough bread, 3-4 tablespoons honey sliced ½- to ¾-inch thick Fresh mint, minced, to garnish 1 large peach, pitted and halved Olive oil 1 8-ounce brie wedge, thinly sliced...
- Page 27 Using the Grill Plates Caramelized Onion, Goat Cheese, & Apple Sandwich Prep Time: 15-20 minutes • Cook Time: 10-12 minutes • Serves: 4 sandwiches Ingredients: 2 tablespoons olive oil, plus more as ½ teaspoon red-pepper flakes needed for frying ½ cup soft goat cheese (about 4 ounces) 1½...
- Page 28 Using Grill & Griddle Plates Turkey Burger with Caramelized Onions Prep Time: 10-12 minutes • Cook Time: 20-25 minutes • Serves: 4-5 Ingredients: 1¼ pounds ground turkey breast ½ large onion, grated or minced small 1 jalapeño pepper, seeded and minced, optional 2 tablespoons barbeque sauce 2 tablespoons Worcestershire sauce ¼...
- Page 29 Directions: Mix ground turkey, grated onion, jalapeño, barbeque sauce, Worcestershire sauce, liquid smoke, steak seasoning, and mesquite seasoning in a large bowl. Form into five patties. Insert Griddle Plates into the Flex Press Grill and recline the Grill so that it opens 180° for flattop grill cooking.
- Page 30 Using the Griddle Plates chicken quesadilla Prep Time: 8-12 minutes • Cook Time: 20-25 minutes • Serves: 4-6 Ingredients: 6 flour tortillas ½ yellow onion, diced 2 cups Mexican cheese 1 tablespoon taco seasoning 1 pound chicken breast cut into small pieces Sour cream, optional 1 tablespoon oil Salsa, optional...
- Page 31 Using the Griddle Plates blt grilled sandwich Prep Time: 5-10 minutes • Cook Time: 5-7 minutes • Serves: 1-2 Ingredients: 8 slices of bacon 4 slices of bread 4 slices of ripened tomato 4 leaves iceberg lettuce, full and fresh 1-2 tablespoons mayonnaise Salt &...
- Page 32 Using the Griddle Plates chicken or beef fajitas Prep Time: 20-25 minutes • Cook Time: 10-15 minutes • Serves: 4-5 Ingredients: Meat & Marinade: Peppers & Onions: 1-pound boneless skinless chicken breasts 1 tablespoon olive oil or beef skirt or flank steak, sliced thin 1 red bell pepper, thinly sliced 2 tablespoons cilantro or parsley 1 yellow bell pepper, thinly sliced...
- Page 33 15-30 minutes. Insert Griddle Plates into the Flex Press Grill and recline the Grill so that it opens 180° for flattop grill cooking. Begin to preheat the Grill and add a dash of cooking oil to both surfaces.
- Page 34 Using the Griddle Plates Philly Cheesesteak Prep Time: 20-25 minutes • Cook Time: 10-15 minutes • Serves: 4-5 Ingredients: 2 boneless ribeye steaks, thinly sliced 2 green bell peppers, sliced into strips 1 yellow or sweet onion, sliced into strips 4 tablespoons butter 1 tablespoon steak rub or equal parts salt, pepper, and garlic powder 8 slices provolone cheese...
- Page 35 On one side of the Grill, melt the remaining butter on the Griddle and place the sliced ribeye into the melted butter. Season with 1-2 tablespoons of preferred seasoning, using tongs to mix around until well distributed. On the other side of the Grill, add veggies and a small amount of cooking oil. After 3-5 minutes, flip the steaks and stir the veggies.
-
Page 36: Stuffed French Toast
Using the Griddle Plates Stuffed French Toast Prep Time: 12-15 minutes • Cook Time: 10-12 minutes • Serves: 3-4 Ingredients: 8 slices bread 4 ounces cream cheese, softened Optional Toppings: ½ cup of preferred jam Powdered sugar 5 eggs, beaten Fresh berries ¼... - Page 37 Using the Griddle Plates Cinnamon Roll French Toast Prep Time: 10-12 minutes • Cook Time: 8-10 minutes • Serves: 3-4 Ingredients: 1 12.4 ounce can of refrigerated cinnamon ½ cup milk roll dough (8 count) 2 tablespoons maple syrup 2 eggs 1 teaspoon vanilla Directions: Use oven to cook cinnamon rolls according to packaging instructions.
- Page 38 Using the Griddle Plates EGGS ANY STYLE Directions For All: Insert Griddle Plates into the Flex Press Grill and recline the Grill so that it opens 180° for flattop grill cooking. Begin to preheat the Grill. Grease both cooking surfaces with a small amount of cooking oil. simple scrambled Ingredients:...
- Page 39 Using the Griddle Plates sunnyside up Ingredients: 2-4 eggs Salt & fresh ground black pepper to taste Chives, chopped, optional Directions: Crack eggs onto Griddle Plates and cook until desired doneness, about 2-3 minutes. Season with salt and pepper and top with fresh chives for even more flavor to savor.
- Page 40 Using the Griddle Plates eggs over-easy Ingredients: 2-4 eggs Salt & fresh ground black pepper, to taste Directions: Crack eggs onto Griddle Plates and allow to cook for 2-3 minutes. Flip eggs over gently to continue cooking on the other side for another minute or two, careful not to break yolk or cook yolk to firmness.
- Page 41 Using the Griddle Plates Fried Egg Sandwich Ingredients: 2-4 eggs 1 tablespoon oil 2 slices of bread or 2 bagels Salt & fresh ground black pepper, to taste Hot sauce, optional Directions: Crack eggs onto Griddle Plates and cook until desired doneness, about 2-3 minutes. Toast bread while eggs are cooking.
-
Page 42: Customer Support
We want you to Feel Good about your Dash products! Sign up for our Feel Good Rewards program at feel good bydash.com/feelgood to DOUBLE your warranty, part of our guarantee ™ commitment to quality and customer satisfaction. We're here to help! Our customer support teams in the US and Canada are at your service Monday - Friday. -
Page 43: Warranty
Refurbished items or items not purchased through an authorized retailer are not eligible for warranty claims. REPAIRS DANGER! Risk of electric shock! The Dash MultiMaker Flex Press Grill System is an electrical appliance. Do not attempt to repair the appliance yourself under any circumstances. - Page 44 1-800-898-6970 | @bydash | bydash.com...
Need help?
Do you have a question about the MultiMaker Flex Press and is the answer not in the manual?
Questions and answers