Table of Contents
Advertisement
Available languages
Available languages
Quick Links
UTILITECH and logo design are
trademarks or registered trademarks
of LF, LLC. All rights reserved.
Serial Number
Purchase Date
Thank you for purchasing this UTILITECH product.
Questions, problems or missing parts?
Before returning, contact us on:
866-994-4148, 8 a.m. - 8 p.m., EST, Monday - Sunday or ascs@lowes.com.
SG24396
OUTDOOR HEATER
1
ITEM #5228423
MODEL #HT8006
6-FT INDOOR &
Español p.13
Advertisement
Chapters
Table of Contents

Related Manuals for LF Utilitech HT8006


Summary of Contents for LF Utilitech HT8006
- Page 1 6-FT INDOOR & UTILITECH and logo design are OUTDOOR HEATER trademarks or registered trademarks Español p.13 of LF, LLC. All rights reserved. Serial Number Purchase Date Thank you for purchasing this UTILITECH product. Questions, problems or missing parts? Before returning, contact us on: 866-994-4148, 8 a.m.
-
Page 2: Table Of Contents
TABLE OF CONTENTS Package Contents............................ 2 Safety Information............................ 3 Frequently Asked Questions........................4 Preparation..............................6 Assembly Instructions..........................6 Control Panel............................8 Remote Control............................9 Operating Instructions..........................9 Care and Maintenance........................... 11 Troubleshooting............................11 One-Year Limited Warranty........................12 Replacement Parts List.......................... 12 PACKAGE CONTENTS P ART DESCRIPTION... -
Page 3: Safety Information
SAFETY INFORMATION Please read and understand this entire manual before attempting to assemble, operate, or install the product. IMPORTANT SAFETY INSTRUCTIONS WARNING: POTENTIAL ELECTRICAL HAZARD IF NOT ADHERED TO. When using electrical appliances, basic precautions should always be followed to reduce the risk of fire, electric shock, and injury to persons, including the following: •... -
Page 4: Frequently Asked Questions
SAFETY INFORMATION Child Lock Safety Feature Press and hold the child lock button located on the control panel for 5 seconds or remote control for 3 seconds. Locking is confirmed when a buzzer rings and the control panel displays “CL”. When locked, the control panel and remote control (if provided) will not function. To unlock the control panel or remote (if provided), repeat this procedure. - Page 5 FREQUENTLY ASKED QUESTIONS Q. If my heater runs on its max wattage setting, how many BTUs is that? A. This heater is intended to be used as supplemental heat in areas most needed. It may take several minutes to several hours to heat your area, depending on various factors. The below chart provides BTU translations for different wattages.
-
Page 6: Preparation
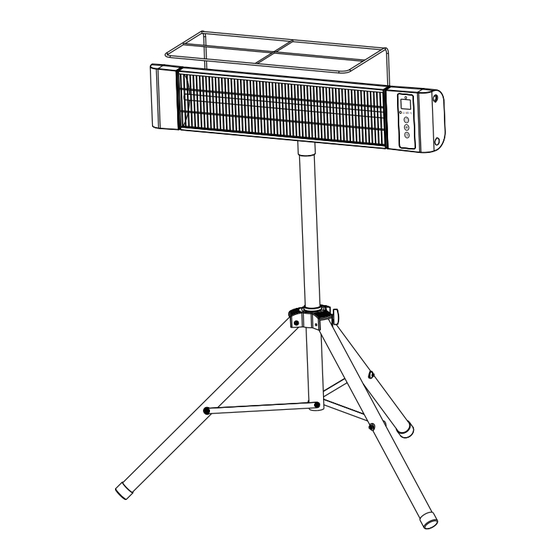
PREPARATION Before beginning assembly of product, make sure all parts are present. Compare parts with package contents list and hardware contents list. lf any part is missing or damaged, do not attempt to assemble- he product. Estimated Assembly Time: 30 minutes... - Page 7 ASSEMBLY INSTRUCTIONS 2. Move the four bolts on the back of the unit to the center, then align the holes on bracket A ③ with the bolts and screw 4 nuts ④ with socket wrench ⑨. 3. Insert the latch to secure the metal rod. Align the holes on bracket A ③, bracket B ⑤ and the tripod, then insert the bolt pin ⑥...
-
Page 8: Control Panel
ASSEMBLY INSTRUCTIONS 4. Align bracket A ③ and bracket B ⑤, insert the bolt pin ⑥ and screw the nut ⑦. Then the whole indoor heater is completely assembled. Note: The heater must be installed at least 1.8 m above the floor. Please keep the heater vertical after installation and do not install it on the ceiling. -
Page 9: Remote Control
REM OTE CONTROL P ART NAME DESCRIPTION Safety Lock Button Hold to Lock/Unlock heater's control panel Mode Button Toggles between LO/MED/HI mode Timer Button Engages the on/off timer Power Button Powers the heater on or off OPERATING INSTRUCTIONS 1. Turn the heater on or off by pressing the Power button on the control panel (C) or by pressing the ON/OFF button on the remote control (B). - Page 10 OPERATING INSTRUCTIONS To set the timer to power off the heater, start the unit and press the Timer button on the control panel (C) or remote control (B). Note: The timer-power-off function can only be set when the heater is in power-on mode. The digital display on the control panel (C)changes from the set temperature readout to a time value for the timer.
-
Page 11: Care And Maintenance
CARE AND MAINTENANCE WARNING: Before performing any maintenance task, turn off the unit, unplug the unit, and allow it to cool completely. To keep the heater clean, clean the outer shell with a soft, damp cloth. Use a mild detergent if necessary. -
Page 12: One-Year Limited Warranty
ONE-YEAR LIMITED WARRANTY You should first read all instructions before attempting to use this product. This unit is guaranteed to the original retail purchaser against defects in quality or workmanship for a period of one year from the date of original purchase. If this unit fails because of a manufacturing defect, contact the customers service for technical support, or return it to the place of purchase for repair or replacement. - Page 13 UTILITECH y el diseño del logotipo son PARAINTERIORES Y marcas comerciales o marcas registradas EXTERIORES DE 1.82 M de LF, LLC. Todos los derechos reservados. Número de serie Fecha de compra Gracias por comprar este producto UTILITECH. ¿Preguntas, problemas o piezas faltantes? Antes de regresar, contáctenos en:...
-
Page 14: Contenido Del Paquete
ÍNDICE Contenido del paquete........................... 14 Información de seguridad........................15 Preguntas frecuentes..........................16 Preparación.............................. 18 Instrucciones de montaje........................18 Panel de control............................20 Control remoto............................21 Instrucciones de funcionamiento......................21 Cuidado y mantenimiento........................23 Solución de problemas........................... 23 Un año de garantía limitada........................24 Lista de piezas de repuesto........................ -
Page 15: Información De Seguridad
INFORMACIÓN DE SEGURIDAD Lea y comprenda completamente este manual antes de intentar ensamblar, usar o instalar el producto. INSTRUCCIONES IMPORTANTES DE SEGURIDAD ADVERTENCIA: POSIBILIDAD DE RIESGO ELÉCTRICO SI NO SE CUMPLEN LAS ADVERTENCIAS. Cuando utilice electrodomésticos, siempre tome medidas de precaución básicas para reducir el riesgo de incendios, descargas eléctricas y lesiones personales, incluidas las siguientes: •... -
Page 16: Preguntas Frecuentes
INFORMACIÓN DE SEGURIDAD Característica de bloqueo de seguridad infantil Mantenga presionado durante 5 segundos el botón del dispositivo de bloqueo para niños, ubicado en el panel de control, o el control remoto durante 3 segundos. El bloqueo se confirma cuando se produce un zumbido y el panel de control muestra "CL". Una vez bloqueado, el panel de control y el control remoto (si se incluye) no funcionarán. - Page 17 PREGUNTAS FRECUENTES P. Si el calentador funciona con la configuración de vataje máximo, ¿a cuántas BTU equivale? R. Este calentador está diseñado para usarse como calefacción suplementaria en las áreas más necesar- ias. Podría tardar de varios minutos a varias horas calentar el área, dependiendo de varios factores. En la siguiente tabla, se proporcionan traducciones de unidades térmicas británicas (BTU, por sus siglas en inglés) para diferentes vatajes.
-
Page 18: Preparación
PREPARACIÓN Antes de comenzar a trabajar juntos de productos, haga que todas las partes estén presentes. Comparar partes con paquetes; Lista de contenidos y lista de contenidos duros. Si any parts se pierde o damaged, no se hace a tiempo para assemblehe product. Tiempo estimado de reunión: 30 minutos Herramientas necesarias para la Asamblea (no incluidas): INSTRUCCIONES DE MONTAJE... - Page 19 INSTRUCCIONES DE MONTAJE 2.Mueva los cuatro pernos en la parte posterior de la unidad hacia el centro, luego alinee los orificios en el soporte A ③ con los pernos y atornille las 4 tuercas ④ con la llave de tubo ⑨. 3.
-
Page 20: Panel De Control
INSTRUCCIONES DE MONTAJE 4. Alinee el soporte A ③ y el soporte B ⑤, inserte el pasador del perno ⑥ y enrosque la tuerca ⑦. Luego, el calentador para interiores está completamente ensamblado. Nota: el calefactor debe instalarse al menos a 1.8 m del suelo. Mantenga el calefactor en posición vertical después de la instalación y no lo instale en el techo. -
Page 21: Control Remoto
CONTROL REMOTO PIEZA NOMBRE DESCRIPCIÓN Botón de bloqueo de Mantenga presionado para bloquear o desbloquear el panel de seguridad control del calentador Botón de modo Alterna entre los modos LO/MED/HI Botón del Enciende o apaga el temporizador temporizador Botón de encendido Enciende o apaga el calentador INSTRUCCIONES DE FUNCIONAMIENTO 1. - Page 22 INSTRUCCIONES DE FUNCIONAMIENTO Para establecer que el temporizador apague el calentador, presione el botón "Timer" en el panel de control (C) o en el control remoto (B). Nota: la función de apagado con temporizador solo puede configurarse cuando el calentador está encendido. La pantalla digital en el panel de control (C) cambia de la lectura de la temperatura configurada al valor de hora del temporizador.
-
Page 23: Cuidado Y Mantenimiento
CUIDADO Y MANTENIMIENTO ADVERTENCIA: antes de realizar cualquier tarea de mantenimiento, apague la unidad, desenchufe la unidad y permita que se enfríe por completo. Para mantener limpio el calentador, limpie la cubierta exterior con un paño suave humedecido. Utilice un detergente suave si es necesario. Después de limpiar la unidad, séquela con un paño suave. PRECAUCIÓN: NO permita que ingrese líquido al calentador. -
Page 24: Un Año De Garantía Limitada
UN AÑO DE GARANTÍA LIMITADA Antes de intentar usar este producto, debe leer todas las instrucciones. Dentro de un año a partir de la fecha de compra inicial, el dispositivo garantiza que no habrá defectos de calidad o proceso. Si el dispositivo falla debido a un defecto de fabricación, Póngase en contacto con el servicio al cliente para obtener soporte técnico o devolverlo al lugar de compra para su reparación o reemplazo.
Need help?
Do you have a question about the Utilitech HT8006 and is the answer not in the manual?
Questions and answers
I’m looking for a new element for this heater
Replacement heating elements for the LF Utilitech HT8006 heater can be obtained from the manufacturer. All parts may be purchased through the manufacturer, especially if the product is out of warranty.
This answer is automatically generated