
Related Manuals for Kogan SMARTERHOME KASMGPH15YA


Summary of Contents for Kogan SMARTERHOME KASMGPH15YA
- Page 1 KOGAN SMARTERHOME PREMIUM GLASS PANEL HEATER 1.5KW, 2.0KW & 2.4KW KASMGPH15YA, KASMGPH15YB, KASMGPH20YA, KASMGPH20YB, KASMGPH24YA & KASMGPH24YB...
-
Page 2: Table Of Contents
Safety & Warnings Overview Installation Connect to SmarterHome Google Home Control Amazon Alexa Control Operation Cleaning & Care Specifications Notes... -
Page 3: Safety & Warnings
SAFETY & WARNINGS • : • • • • • • • • • • • • • • • • • •... - Page 4 • • • • • • • • • • • • • • • • • •...
-
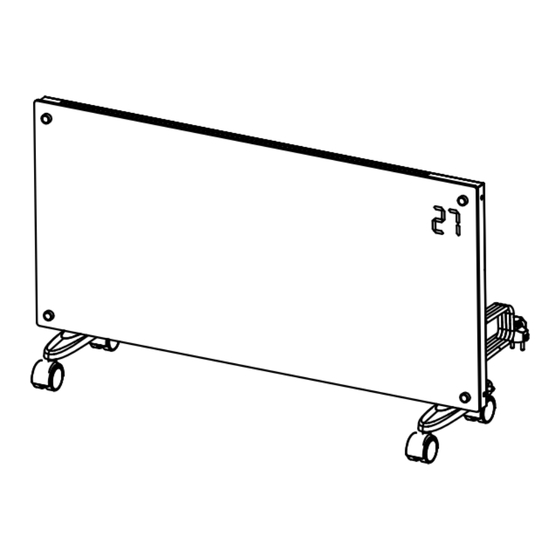
Page 5: Overview
OVERVIEW Air Outlet Control Panel Switch Legs... - Page 6 Control panel LED number display Wi-Fi indicator High heating indicator Heating element working indicator. Low heating indicator Timer indicator Setting Power Down button button button button Low/high heating selection Power button Setting button Up button Down button ECO mode button...
-
Page 7: Installation
INSTALLATION Wall mounting Model L(mm) KASMGPH15YA & KASMGPH15YB KASMGPH20YA & KASMGPH20YB KASMGPH24YA & KASMGPH24YB... - Page 8 Insert the wall bracket into the hole, align the bracket with screw holes and tighten the screws. Insert the spacer support part into the hole in the rear of the heater and push down. Screw Wall bracket Spacer support...
- Page 9 Drill two holes 250mm (L1) apart, ensuring they are straight using a spirit level, then insert the wall anchors. Ensuring the holes are aligned, attach the heater to the wall with 35mm self-tapping screws. Removing the Heater To remove the heater from the wall, pull the heater 5mm outward and then move it 10mm to the left.
- Page 10 Leg Installation Attach the legs into the hole in the underside of the heater and push it upwards. Align the legs with the screw hole and secure them in place using the supplied screw. To remove the legs, perform the above steps in reverse order. Screw Screw...
-
Page 11: Connect To Smarterhome App
CONNECT TO SMARTERHOME To register: The system will automatically recognise your country. If needed, you can manually select your country from the drop-down box. Enter your email address and tap Get Verification Code to continue. A 6-digit code will be sent to the submitted email address. Enter this code before the one-minute timer expires. - Page 12 When the device is first turned on, it may automatically enter pairing mode (Wi-Fi indicator will be flashing rapidly). Once registered, tap Add Device , or the + the upper right corner, to add a new device through the network. Select the product type from the list of options in the app (Heating &...
- Page 13 Ensure that the device is in pairing mode, with the Wi-Fi indicator flashing rapidly, The device will commence the pairing process and connect to the app. Ensure your Wi-Fi router, mobile phone, and the SmarterHome device are kept close until connection is complete. After successfully being added, you will have the option to rename the device and listing to enter its control page.
-
Page 14: Google Home Control
GOOGLE HOME CONTROL (top left corner, see arrow in the below screenshot) select Works with Google... - Page 15 SmarterHome service. From here, you will be prompted to sign into your SmarterHome account using either your email or mobile phone number, depending on which method you used to register your account.
- Page 16 app and your devices. Once connected, the app will display any compatible devices linked to your SmarterHome account. From here you can assign them to rooms and set up any routines. Tap on any of the devices to view a list of available commands.
-
Page 17: Amazon Alexa Control
AMAZON ALEXA CONTROL bottom-right and select Skills & Games from the sidebar. SmarterHome skill. - Page 18 skill to Alexa. From here, you will be prompted to sign into your SmarterHome account using either your email or mobile phone number, depending on which method you used to register your account.
- Page 19 Once connected, the app will perform a search and display the devices linked to your SmarterHome account. When your devices have successfully connected to the Alexa app, you will be able to control your Kogan SmarterHome devices via...
-
Page 20: Operation
OPERATION Turn the Heater On/Off Connect the heater to a power socket and turn on the main switch: the heater will be in standby (setting, up, down and power buttons illuminate). Press the power button to begin heating operation: the display will show the current ambient temperature. - Page 21 Model Mode Power Description The heater's power consumption will be Low (50%) 1000W reduced, but it will require a longer time to reach the desired temperature. KASMGPH20YA & In high power mode, the heater will KASMGPH20YB consume more power, allowing it to High (100%) 2000W reach the desired temperature more...
- Page 22 Wi-Fi Reset During operation, press and hold the setting button for 5 seconds. Wi-Fi will now be reset, and the Wi-Fi indicator light will be flashing rapidly. Connect the heater to the Kogan SmarterHome app following the steps from Tip-over switch Auto turn off function: The product is equipped with tip-over switch, if the heater falls over, place it back upright and restart.
- Page 23 Using the App Heating level Set temp. Ambient temp. Heating Increase temp. Decrease temp. Open window detection Child lock °C/°F Schedule • When device is online, it can be controlled. •...
-
Page 24: Cleaning & Care
• Ensure the heater is dry before connecting back into the power supply. Power Cord If the power cord is damaged must be replaced. Cease use immediately and contact help.Kogan.com for support. Storage If you do not plan to use the heater for extended periods of time, it is recommended that the... -
Page 25: Specifications
SPECIFICATIONS KASMGPH15YA & KASMGPH20YA & KASMGPH24YA & Model KASMGPH15YB KASMGPH20YB KASMGPH24YB Rated Power 1500W 2000W 2000-2400W Rated 220-240V~50Hz Voltage Dimensions 597 x 70 x 400 832 x 70 x 400 952 x 70 x 400 (mm) Disposal This marking indicates that this appliance should not be disposed with other household wastes. -
Page 26: Notes
NOTES... - Page 28 Need more information?
Need help?
Do you have a question about the SMARTERHOME KASMGPH15YA and is the answer not in the manual?
Questions and answers