Advertisement
Quick Links
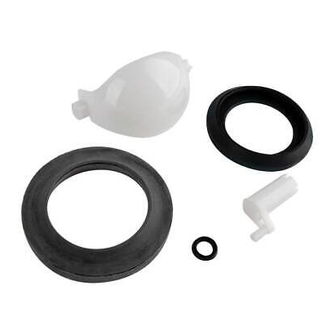
Kit Contents: K1, K2, K3, K4
K1
New
Ref
Description
K1
K1/ K1-1
Waste Ball Assembly / "U" Cup Seal
K2
K2
Closet Flange Seal
K3
K3
Waste Ball Seal
K4
K4 / K4-1
Waste Ball Drive Arm / Screw
Tools Needed:
■ Towel(s)
■ Plastic trash bag
■ Pliers
■ Needle nose pliers
■ Phillips head screwdriver
■ Flat head screwdriver
■ 1/2" Wrench
■ 3/8" Socket and wrench
■ Silicone-based lubricant
Wear protective gloves and eye wear when
AVISO
AVIS
!
NOTICE
CAUTION
you touch material that has been in contact
with human waste.
Disinfect your tools and work surface after you
complete this replacement procedure.
REDUCE HOLDING TANK ODOR: Rinse the
NOTICE
toilet with water, drain the holding tank, and
add Thetford Holding Tank Deodorant.
Warranty:
Review the one-page warranty statement included in the informa-
tion packet.
Printed in U.S.A.
P.O. Box 1285
Ann Arbor, MI 48106
www.thetford.com
Aqua-Magic® Style II
Waste Ball and Drive Arm Kit
K2
Fig. 1
K1-1
Questions? 1-800-543-1219
Part No.
K3
1
42209
Made in the U.S.A.
K4
K4-1
Part No. 42208 Rev. A 08.15.2018
Advertisement

Related Manuals for Thetford 42209


Summary of Contents for Thetford 42209
- Page 1 Disinfect your tools and work surface after you complete this replacement procedure. REDUCE HOLDING TANK ODOR: Rinse the NOTICE toilet with water, drain the holding tank, and add Thetford Holding Tank Deodorant. Warranty: Review the one-page warranty statement included in the informa- tion packet. Questions? 1-800-543-1219 Printed in U.S.A.
- Page 2 D / D1 Toilet Bowl / Screw (2x) J / J1 Water Valve Drive Arm / Pin E / E1 Toilet Base / Pedal Pivot Return Spring Water Line Clamp Not included - Reference only. 42208 Rev. A (08.15.2018) www.thetford.com...
- Page 3 3. Flush to drain toilet. 1. Position (new) is at back of K1-1 4. Drain holding tank. To avoid leaking, be sure open tapered 5. Add Thetford Holding Tank Deodorant. NOTICE AVISO CAUTION AVIS side of K1-1 faces K1. 2. Squeeze ends of (new) together;...
- Page 4 42208 Rev. A (08.15.2018) www.thetford.com...
- Page 5 AVIS D’EAUX USÉES : Rincer la toilette avec de vacíe el tanque de retención y añada desodor- l’eau, vider le réservoir et ajouter le désodori- ante de tanques de retención Thetford. sant de réservoir d’eaux usées Thetford. Garantía: Garantie : Consulte la hoja de declaración de la garantía incluida en el pa-...
- Page 6 Bras de commande de valve d’eau/goupille J / J1 Brazo de accionamiento de la válvula de agua / pasador Ressort de rappel Resorte de retroceso Non inclus – pour référence seulement. No se incluye (solo para referencia). 42208 Rev. A (08.15.2018) www.thetford.com...
- Page 7 3. Descargar para vaciar el inodoro. 4. Vider le réservoir d’eaux usées. 4. Vaciar el tanque de retención. 5. Ajouter du désodorisant de réservoir d’eaux usées Thetford. 5. Añadir el desodorante del tanque de retención Thetford. 2. Desmontar el inodoro 2.
- Page 8 CAUTION ATTENTION ATTENTION 4. Ouvrir 4. Abrir 5. Actionner la chasse d’eau et vérifi er qu’il n’y a aucune fuite. 5. Hacer una descarga de prueba; revisar todas las conexiones para ver si hay fugas. 42208 Rev. A (08.15.2018) www.thetford.com...
Need help?
Do you have a question about the 42209 and is the answer not in the manual?
Questions and answers