Advertisement
Available languages
Available languages
Quick Links
INSTALLATION,
OPERATION
AND MAINTENANCE
MANUAL
LINEAR GAS BURNER: ESF.2.B.G37T.EUK
7.5lbs/3.4kg
INSTALLER: Leave manual with the appliance. CONSUMER: Retain this manual for future reference.
WARNING
1. Read the instructions before use.
2. For outdoor use only.
3. Installation and service must be performed by
a qualified installer, service agency or the gas
supplier.
4. Improper installation, adjustment, alteration,
service, or maintenance can cause injury or
property damage.
5. Read the installation and maintenance
instructions thoroughly before installing or
servicing this equipment.
6. If the information in these instructions is not
followed exactly, a fire or explosion may result
causing property damage, personal injury, or loss
of life.
7. Do not connect the gas cylinder directly to the
appliance without the regulator.
8. Use only the type of gas and cylinder specified in
these instructions.
9. Do not obstruct the ventilation holes of the
cylinder housing.
10. Do not move the appliance when in operation.
11. S hut off the valve at the gas cylinder or regulator
before moving the appliance.
12. In case of violent wind, precautions must be
taken against tilting of the appliance.
1
2
3
4
A
B
C
D
E
ROUND GAS BURNER: ESF.2.B.G16T.EUK
F
5.5lbs/2.5kg
QUALITY STANDARD:
ANY VISIBLE IMPERFECTION APPEARANCE OR TOLERANCE ISSUE
MUST REPORT TO MAD DESIGN GROUP PTY LTD. DESIGN TEAM,
OTHERWISE PRODUCTS WILL NOT BE ACCEPTED.
GENERAL TOLERANCE UNLESS SPECIFIED OTHERWISE,
DIMENSIONS ARE IN MM UNLESS SPECIFIED OTHERWISE:
SHEET METAL / MACHINED COMPONENTS: LINEAR ± 1MM, ANGULAR ± 0.5°
CONCRETE: LINEAR ± 5MM, ANGULAR ± 2°
GLASS: LINEAR ± 1MM, ANGULAR ± 0.5°
CARTON / CRATE / FOAM: LINEAR ± 2MM
PLASTIC: LINEAR ± 0.2MM, ANGULAR ± 0.5°
OTHER: LINEAR ± 2MM, ANGULAR ± 0.5°
G
质量标准:
任何可见产品瑕疵或公差问题都必须告知
MAD DESIGN GROUP PTY LTD
的设计人员。否则不接受任何不合格产品。
除特别标注外,请参照以下公差标准,
除特别标注外,规格均以MM表示:
金属件:直线测量± 1MM,角度± 0.5°
水泥:直线测量± 5MM,角度± 2°
玻璃:直线测量± 1MM,角度± 0.5°
纸箱 / 木箱 / 珍珠棉:直线测量± 2MM
塑料:直线测量± 0.2MM,角度± 0.5°
其他:直线测量± 2MM,角度± 0.5°
QTY PER ASSEMBLY 每件组装数量:
1
MATERIAL材料:
SS202 STAINLESS STEEL / SS202 不锈钢
FINISH处理:
BLACK POWDERCOATED 黑色塑粉
H
WEIGHT重量:
-
SURFACE AREA面积:
mm2 平方毫米
1
2
3
4
5
6
7
8
9
MAD Design Group
DATE日期
CLIENT客户
18/09/2023
MAD DESIGN GROUP
Showrooms 3 & 4
40-42 O'Riordan Street
Alexandria NSW 2015 - Australia
DRAWN
DATE
DRAWING NAME 图纸名称
Tel: +61 2 9997 3050
绘制日期
FPK R20 (F530) TRAY ASSEMBLY / FPK R20 (R530) 托盘组装
Fax: +61 2 9997 6050
18/09/2023
maddesigngroup.com
info@maddesigngroup.com
SY
CHECK
DATE
DRAWING Nº. 图纸编号
COPYRIGHT RESERVED FOR:
审核日期
ESF_AS_FPK_R20_G001_R08
MAD DESIGN GROUP.
REPRODUCTION / DISCLOSURE TO
18/09/2023
THIRD PARTIES IN ANY FORM
JL
WHATSOEVER NOT ALLOWED WITHOUT
WRITTEN CONSENT OF PROPRIETORS.
5
6
7
8
9
DANGER
1. Carbon monoxide hazard – This appliance can
produce carbon monoxide which has no odor.
2. Never use this appliance in an enclosed space
such as a camper, tent, car or home. Using this in
an enclosed space can kill you.
3. If you smell gas:
a. Shut off gas to the appliance.
b. Extinguish any open flame.
c. If the odor continues, keep away from the
appliance and immediately call your gas supplier
or fire department.
CAUTION
1. Do not discard this manual.
2. Important operating and maintenance
instructions included.
3. Read, understand, and follow these instructions
for safe installation and operation.
4. It is imperative that the burner be kept clean.
5. Close the gas supply at the valve of the gas
cylinder or regulator after use.
10
11
12
A
B
C
D
E
F
G
PROJECT项目
PROJECT Nº.项目编号
ESF
AS_FPK_R20
H
REV Nº.
SHEET
版本号
图纸
08
1 of 1
SCALE
A3
比例
1:10
THIRD ANGLE
10
11
12
Advertisement
Chapters
Troubleshooting

Related Manuals for EcoSmart Fire ESF.2.B.G37T.EUK


Summary of Contents for EcoSmart Fire ESF.2.B.G37T.EUK
- Page 1 INSTALLATION, OPERATION AND MAINTENANCE MANUAL LINEAR GAS BURNER: ESF.2.B.G37T.EUK ROUND GAS BURNER: ESF.2.B.G16T.EUK 7.5lbs/3.4kg 5.5lbs/2.5kg QUALITY STANDARD: ANY VISIBLE IMPERFECTION APPEARANCE OR TOLERANCE ISSUE MUST REPORT TO MAD DESIGN GROUP PTY LTD. DESIGN TEAM, OTHERWISE PRODUCTS WILL NOT BE ACCEPTED.
-
Page 3: Table Of Contents
Veuillez lire ces instructions dans leur intégralité avant de faire fonctionner le système EcoSmart™ Fire. 安装, 操作 中文 和维修指南 请在使用EcoSmart Fire®产品前仔细阅读指南说明。 MANUALE DI INSTALLAZIONE, ITALIANO USO E MANUTENZIONE Leggere il manuale di istruzioni per l’uso prima di operare un prodotto EcoSmart™ Fire. - Page 4 ENGLISH Important: The burner supplied with this fire pit is Propane ready. Contact your local dealer for instructions to convert to Natural Gas. © Copyright 2004 - 2023 MAD Design Group. All rights reserved. V1023...
- Page 5 ENGLISH 0359-16 (EU) 2016/426 Product Name: Fire burner 2575 0359 Part numbers: ESF.2.B.G16T.EUK MAD DESIGN CHINA ESF.2.B.G37T.EUK Serial number: Model numbers: Main burner: ESF.2.B.G16T.EUK Country of Destination Appliance Category Gas and Supply Pressure ESF.2.B.G37T.EUK Injector size Ø: Total Nominal Heat Inputs (Hs) Butane(G30) 28-30 mbar 2.15mm...
- Page 6 ENGLISH Contents Markings Important Safety Information Clearances Before You Start Gas Hookup Standard Equipment Received Burner Assembly - Propane Lighting and Operating Troubleshooting - General Troubleshooting - Loud Gas Flow Service and Maintenance Reference Materials Warranty © Copyright 2004 - 2023 MAD Design Group. All rights reserved. V1023...
-
Page 7: Markings
ENGLISH Markings Listing Label Information/Location The model information regarding your specific appliance can be found on the rating plate attached to your burner via a metal chain. See the sample rating plate below for locations of specifications. FOR YOUR SAFETY, MAD Design USA 311 N. Robertson Blvd. READ BEFORE LIGHTING Private Mail Box #932 Beverly Hills, CA 90211 BURNER EcoSmart Inc DBA MAD Design USA WARNING! If you do not follow these instructions exactly, a fire or... -
Page 8: Important Safety Information
ENGLISH Important Safety Information Congratulations on your purchase of this decorative gas f. The parts sealed by the manufacturer shall not be manipulated appliance. The appliance you have selected is designed to provide by the user. safe operation, reliability and efficiency. g. Do not use the appliance near flammable materials. This manual contains instructions for the safe installation and use of your new gas appliance. -
Page 9: Clearances
ENGLISH Clearances Minimum Clearances When planning an appliance installation, it’s necessary to determine the following information first: Note: Measurements are distances closest to the flame Environmental Conditions Side clearances to fixed and stable furniture items that are not susceptible to movement such as lounges or patio furniture must remain WARNING: Ensure that your fire is positioned away from flammable a minimum of 24in (610mm) away from the flame at all times. -
Page 10: Before You Start
ENGLISH Before You Start Tools and Supplies • Do not move the appliance while it is working. Before beginning the installation, be sure that the following tools and supplies are at hand: • The gas cylinder needs to be shut off when the appliance is not •... -
Page 11: Gas Hookup
ENGLISH Gas Hookup Fuel CAUTION: A small amount of air will be in the gas supply lines. When first lighting appliance it will take a short time for air to purge from lines. Before making gas connections, ensure the appliance being installed is Subsequent lighting of the unit will not require such purging. -
Page 12: Lp Gas Supply
ENGLISH Gas Hookup LP Gas Supply • The pressure regulator and hose assembly supplied with LP models must be used. Replacement pressure regulators and hose assemblies must be those specified in this manual. • The LP gas supply cylinder used with LP models must be constructed and marked in accordance with the specifications for LP gas cylinders of the U.S. -
Page 13: Standard Equipment Received
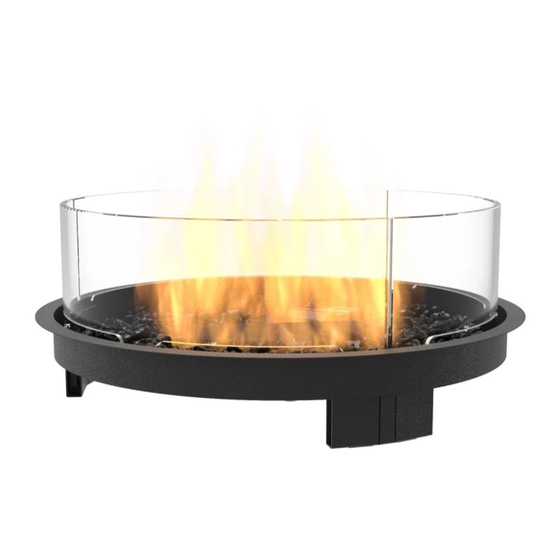
ENGLISH Standard Equipment Received Please ensure that all items have been received. The burners include the minimum equipment required to operate the burner safely. Burners Linear Gas Burner - ESF.2.B.G37T.EUK Round Gas Burner - ESF.2.B.G16T.EUK Included items INSTALLATION, OPERATION AND MAINTENANCE... -
Page 14: Assembling The Control Panel
ENGLISH Standard Equipment Received Assembling the control panel Confirm you have received all necessary parts as illustrated on page 11. 1. Locate the EcoSmart cover plate on the unit, remove the four(4) 5. Insert AAA battery, ensuring the + direction of the battery is facing plastic screw caps and unscrew the cover plate from the unit. -
Page 15: Burner Assembly - Propane
ENGLISH Burner Assembly - Propane 6.Position the burner assembly so that the gas input exible line (where the ori ce is located) is pointing towards the control plate cutout location of the surround. Carefully uncoil the thermocouple tube. Feed the exible gas line, thermocouple tube, grounding wire and the ignitor wire through the burner location opening rst then place lower the burner into its nal location. - Page 16 ENGLISH Burner Assembly - Propane 9. Pull all hoses and wires from inside the unit out through the 13. Connect the thermocouple to the control valve. Hand-tighten first control plate cutout. then securely tighten (1/2 turn) with a 10mm wrench. Damage to the thermocouple and/or loose connections will cause operation issues.
- Page 17 ENGLISH Burner Assembly - Propane 18. Ensure propane tank is in the OFF position. Attach propane hose Adequate and constant ventilation is important to keep the appliance and included regulator to propane tank. functioning properly and safely, including ventilation of the appliance undersides.
-
Page 18: Lighting And Operating
ENGLISH Lighting and Operating FOR YOUR SAFETY, READ BEFORE LIGHTING 5. If burner does not light or remain lit after 20 seconds of attempting ignition, turn control valve to off position and wait 5 minutes to allow gas to dissipate before attempting to ignition again. DO NOT ATTEMPT TO LIGHT BURNER IF YOU SMELL GAS. -
Page 19: Troubleshooting - General
ENGLISH Troubleshooting - General Symptom Possible Causes Corrective Actions Check the LP (propane) tank. You may be out of No LP in tank, or NG main not turned on. gas. Or check Natural Gas valve at main. Check the burner orifice for stoppage. Plugged burner orifice. -
Page 20: Troubleshooting - Loud Gas Flow
ENGLISH Troubleshooting - General Ensure that a new AAA battery is installed in the Battery is dead or not installed, installed incorrectly. push-button sparker switch. Check contact at the bottom of the battery cavity Corrosion on battery contacts. for corrosion. Clean with a small piece of sandpaper or a file. -
Page 21: Service And Maintenance
ENGLISH Service and Maintenance Although the frequency of appliance servicing and maintenance will WARNING depend on use and the type of installation, a qualified service technician should perform an appliance check-up annually. Annual inspection by qualified technician recommended. Storage of an appliance indoors is permissible only if the cylinder is disconnected and removed from the appliance. -
Page 22: Reference Materials
ENGLISH Reference Materials Service Parts List Replacement Parts LP / NG BURNER ESF.1.P.GSB Sparker Box ESF.1.P.G36 Grounding Wire (36”) ESF.1.P.H10 LP Hose & Regulator (10’) ESF.1.P.KEY Control Key ESF.1.P.KNB Control Knob ESF.2.P.VAL Variable Control Safety Valve ESF.3.P.CPF Control Panel ESF.2.P.FMA 1/2”... -
Page 23: Warranty
ENGLISH Warranty Limited One Year Warranty The manufacturer and associated distributors extend the following distributors may fully discharge its obligations under this warranty by warranty for GB Series decorative outdoor gas fire products used in the repairing or replacing, at its discretion, the defective components. The United States of America, Canada, Europe or United Kingdom. -
Page 24: Deutsch
DEUTSCH © Copyright 2004 - 2023 MAD Design Group. Alle Rechte vorbehalten. V1023... -
Page 25: Installations-, Bedienungs- Und Wartungshandbuch
DEUTSCH INSTALLATIONS-, BEDIENUNGS- UND WARTUNGSHANDBUCH LINEAR GAS BURNER: ESF.2.B.G37T.EUK ROUND GAS BURNER: ESF.2.B.G16T.EUK 7.5lbs/3.4kg 5.5lbs/2.5kg INSTALLATEUR: Lassen Sie das Handbuch beim Gerät. KUNDE: Bewahren Sie dieses Handbuch zur späteren Verwendung auf. WARNUNG ACHTUNG 1. Lesen Sie die Anweisungen vor der Verwendung. - Page 26 DEUTSCH Wichtige: Der Brenner, der mit diesem Feuerstelle geliefert wird, ist für Propan vorbereitet. Kontaktieren Sie Ihren örtlichen Händler für Anweisungen zur Umstellung auf Erdgas. © Copyright 2004 - 2023 MAD Design Group. Alle Rechte vorbehalten. V1023...
- Page 27 DEUTSCH 0359-16 (EU) 2016/426 Produktname: Feuerbrenner 2575 0359 Teilenummern: ESF.2.B.G16T.EUK MAD DESIGN CHINA ESF.2.B.G37T.EUK Seriennummer: Modellnummern: Hauptbrenner: ESF.2.B.G16T.EUK Gas- und ESF.2.B.G37T.EUK Bestimmungsland Bestimmungsland Versorgungsdruck Injektordur- Gesamtnominale chmesser Ø: Wärmeleistung (Hs) Butan (G30) 28-30 mbar 2.15mm 19 kW 1237g/h BE,CH,CY,CZ,ES,FR,GB,GR,IE,IT,LT, I3+(28-30/37)
- Page 28 DEUTSCH Inhalt Markierungen Wichtige Sicherheitsinformationen Abstände Bevor Sie beginnen Gasanschluss Standardzubehör erhalten Brennermontage - Propan Beleuchtung und Betrieb Fehlerbehebung - Allgemein Fehlerbehebung - Lauter Gasfluss Service und Wartung Informationsmaterialien Garantie © Copyright 2004 - 2023 MAD Design Group. Alle Rechte vorbehalten. V1023...
-
Page 29: Markierungen
DEUTSCH Markierungen Standort der Aufkleberinformationen Die Modellinformationen zu Ihrem speziellen Gerät finden Sie auf dem Typenschild, das mit einer Metallkette an Ihrem Brenner befestigt ist. Siehe das Muster-Typenschild unten für die Standorte der Spezifikationen. FOR YOUR SAFETY, MAD Design USA 311 N. Robertson Blvd. READ BEFORE LIGHTING Private Mail Box #932 Beverly Hills, CA 90211 BURNER EcoSmart Inc DBA MAD Design USA... -
Page 30: Wichtige Sicherheitsinformationen
DEUTSCH Wichtige Sicherheitsinformationen Herzlichen Glückwunsch zum Kauf dieses dekorativen 3. DAS FEUER BETREIBEN Gasgeräts. Das ausgewählte Gerät wurde für sicheren Betrieb, a. Benutzen Sie es nicht, wenn es beschädigt ist oder nicht richtig Zuverlässigkeit und Effizienz entwickelt. funktioniert. Dieses Handbuch enthält Anweisungen für die sichere Installation b. -
Page 31: Abstände
DEUTSCH Abstände Mindestabstände Bei der Planung einer Geräteinstallation ist es zunächst erforderlich, die folgenden Informationen zu ermitteln: Hinweis: Die Maße beziehen sich auf die Entfernungen zum nächsten Umweltbedingungen Punkt der Flamme. ACHTUNG: Stellen Sie sicher, dass das Feuer jederzeit in sicherem Der seitliche Abstand der Flamme zu schweren bzw. -
Page 32: Bevor Sie Beginnen
DEUTSCH Bevor Sie beginnen Werkzeuge und Materialien • Überprüfen Sie den mitgelieferten Schlauch auf etwaige Beschädigungen. Verwenden Sie ihn nicht, wenn Anzeichen von Vor Beginn der Installation stellen Sie sicher, dass die folgenden Beschädigungen vorhanden sind. Werkzeuge und Materialien griffbereit sind: • Positionieren Sie den Schlauch, nachdem er montiert wurde, außerhalb von Durchgangsbereichen, in denen Personen darüber •... -
Page 33: Gasanschluss
DEUTSCH Gasanschluss Kraftstoff VORSICHT: In den Gasleitungen befindet sich eine geringe Menge Luft. Beim ersten Anzünden des Geräts dauert es eine kurze Zeit, Vor dem Herstellen von Gasanschlüssen stellen Sie sicher, dass das zu bis die Luft aus den Leitungen entfernt ist. Beim erneuten Anzünden installierende Gerät mit dem verfügbaren Gastyp kompatibel ist. - Page 34 DEUTSCH Gasanschluss LP Gasversorgung • Der mit den LP-Modellen gelieferte Druckregler und Schlauchbaugruppe muss verwendet werden. Ersatz-Druckregler und Schlauchbaugruppen müssen den in dieser Anleitung angegebenen Spezifikationen entsprechen. • Der mit den LP-Modellen verwendete LP-Gas-Zylinder muss gemäß den Spezifikationen für LP-Gas-Zylinder des U.S. Department of Transportation (DOT) hergestellt und gekennzeichnet sein.
-
Page 35: Standardzubehör Erhalten
Standardzubehör erhalten Bitte stellen Sie sicher, dass alle Artikel erhalten wurden. Die Brenner enthalten die Mindestausstattung, die für einen sicheren Betrieb des Brenners erforderlich ist. Burners Linear Gas Burner - ESF.2.B.G37T.EUK Round Gas Burner - ESF.2.B.G16T.EUK Inkludierte Gegenstände INSTALLATION, OPERATION... - Page 36 DEUTSCH Standardzubehör erhalten Zusammenbau der Steuerungseinheit Bestätigen Sie, dass alle erforderlichen Teile gemäß Seite 33 vorliegen. 1. Finden Sie die EcoSmart-Abdeckplatte an der Einheit und entfernen 5. Setzen Sie eine AAA-Batterie ein und stellen Sie sicher, dass die + Sie die vier Kunststoffschraubenabdeckungen. Schrauben Sie die Richtung der Batterie nach außen zeigt, wenn sie installiert ist.
-
Page 37: Brennermontage - Propan
DEUTSCH Brennermontage - Propan 6.Position the burner assembly so that the gas input exible line (where the ori ce is located) is pointing towards the control plate cutout location of the surround. Carefully uncoil the thermocouple tube. Feed the exible gas line, thermocouple tube, grounding wire and the ignitor wire through the burner location opening rst then place lower the burner into its nal location. - Page 38 DEUTSCH Brennermontage - Propan 9. Ziehen Sie alle Schläuche und Kabel vom Inneren der Einheit 13. Verbinden Sie den Thermoelement mit dem Steuerventil. Zuerst von durch den Ausschnitt des Bedienfelds heraus. Hand festziehen und dann mit einem 10-mm-Schlüssel festziehen (1/2 Umdrehung).
- Page 39 DEUTSCH Brennermontage - Propan 18. Stellen Sie sicher, dass der Propantank in der ausgeschalteten Ausreichende und gleichmäßige Belüftung ist wichtig, um das Gerät Position ist. Befestigen Sie den Propanschlauch und den ordnungsgemäß und sicher funktionieren zu lassen, einschließlich der mitgelieferten Regler am Propantank. Belüftung der Unterseite des Geräts.
-
Page 40: Beleuchtung Und Betrieb
DEUTSCH Beleuchtung und Betrieb ZU IHRER SICHERHEIT, BITTE VOR DEM 5. Falls der Brenner nach 20 Sekunden des Versuchs der Zündung nicht brennt oder nicht dauerhaft brennt, drehen Sie das ANZÜNDEN LESEN Steuerungsventil in die AUS-Position und warten Sie 5 Minuten, damit das Gas sich verteilen kann, bevor Sie erneut versuchen zu WARNUNG! Wenn Sie diese Anweisungen nicht zünden. -
Page 41: Fehlerbehebung - Allgemein
DEUTSCH Fehlerbehebung - Allgemein Symptom Mögliche Ursachen Abhilfemaßnahmen Überprüfen Sie den LP (Propan)-Tank. Möglicherweise Kein LP im Tank oder NG-Hauptventil nicht ist das Gas ausgegangen. Oder überprüfen Sie das eingeschaltet. Naturgasventil am Hauptanschluss. Überprüfen Sie das Brennerdüsenloch auf Verstopftes Brennerdüsenloch. Verstopfung. -
Page 42: Fehlerbehebung - Lauter Gasfluss
DEUTSCH Fehlerbehebung - Allgemein Stellen Sie sicher, dass eine neue AAA-Batterie im Batterie ist entladen oder nicht korrekt installiert. Druckknopf-Zündschalter installiert ist. Überprüfen Sie den Kontakt am Boden der Korrosion an den Batteriekontakten. Batteriekammer auf Korrosion. Reinigen Sie ihn mit einem kleinen Stück Schleifpapier oder einer Feile. -
Page 43: Service Und Wartung
DEUTSCH Service und Wartung Obwohl die Häufigkeit der Gerätewartung und -pflege von der WARNUNG Verwendung und Art der Installation abhängt, sollte ein qualifizierter Kundendiensttechniker einmal jährlich eine Geräteüberprüfung durchführen. Jährliche Inspektion durch qualifizierten Techniker empfohlen. Die Lagerung eines Geräts im Innenbereich ist nur zulässig, wenn die Gasflasche vom Gerät getrennt und entfernt wurde. -
Page 44: Informationsmaterialien
DEUTSCH Informationsmaterialien Ersatzteile Ersatzteile LP / NG BURNER ESF.1.P.GSB Zündbox ESF.1.P.G36 Erdungsdraht 91,44cm, [36”] ESF.1.P.H10 LP-Schlauch und Regulator 25,4cm [10”] ESF.1.P.KEY Schlüssel ESF.1.P.KNB Steuerknopf ESF.2.P.VAL Variables Steuerungssicherheitsventil ESF.3.P.CPF Steuerungseinheit ESF.2.P.FMA 1,27cm [1/2-Zoll]-Flare-Weibchen x 0,95cm [3/8-Zoll]-Flare-Männchen-Adapter ESF.2.P.F22 55,88cm [22-Zoll]-Edelstahl-Flexleitung mit 1,27cm [1/2-Zoll]-Fittings ESF.2.P.FSA Flammensensor ©... -
Page 45: Garantie
DEUTSCH Garantie Begrenzte Einjährige Garantie Diese Garantie beschränkt sich auf den Austausch oder die Reparatur von defekten Komponenten oder Herstellungsmängeln und der Hersteller und Der Hersteller und die zugehörigen Vertriebspartner gewähren in den die zugehörigen Vertriebspartner können ihre Verpflichtungen im Rahmen USA, Kanada, Europa oder Großbritannien für die Produktpalette GB dieser Garantie vollständig erfüllen, indem sie die defekten Komponenten Series für dekorative Außengasfeuer die folgende Garantie. -
Page 46: Français
FRANÇAIS © Copyright 2004 - 2023 MAD Design Group. Tous droits résevés. V1023... -
Page 47: Manuel D'installation, D'utilisation Et D'entretien
FRANÇAIS MANUEL D’INSTALLATION, D’UTILISATION ET D’ENTRETIEN LINEAR GAS BURNER: ESF.2.B.G37T.EUK ROUND GAS BURNER: ESF.2.B.G16T.EUK 7.5lbs/3.4kg 5.5lbs/2.5kg INSTALLATEUR : Laissez le manuel avec le produit. CONSOMMATEUR : Conservez ce manuel pour référence ultérieure. ATTENTION DANGER 1. Lisez les instructions avant utilisation. - Page 48 FRANÇAIS Important: Le brûleur fourni avec cette cheminée d’extérieur est prêt à fonctionner au propane. Contactez votre revendeur local pour obtenir des instructions de conversion au gaz naturel. © Copyright 2004 - 2023 MAD Design Group. Tous droits résevés. V1023...
- Page 49 FRANÇAIS 0359-16 (EU) 2016/426 Nom du produit : Brûleur à feu 2575 0359 Numéros de pièce : ESF.2.B.G16T.EUK MAD DESIGN CHINA ESF.2.B.G37T.EUK Numéro de série : Numéros de modèle: Brûleur ESF.2.B.G16T.EUK principal: Gaz et pression ESF.2.B.G37T.EUK Pays de destination Catégorie d’appareil d’alimentation...
- Page 50 FRANÇAIS Sommaire Repères & Marquages Conditions d’utilisation Distances de dégagement Avant de commencer Raccordement de gaz Équipement standard reçu Assemblage du brûleur - Propane Allumage et fonctionnement Problèmes et Solutions - Général Problèmes et Solutions - Débit de gaz fort Service et entretien Matériaux de référence Garantie...
-
Page 51: Repères & Marquages
FRANÇAIS Repères & Marquages Informations/d’emplacement de l’étiquette de liste Les informations sur le modèle de votre appareil spécifique se trouvent sur la plaque de classification attachée à votre brûleur par une chaîne en métal. Veuillez consulter la plaque de classification ci-dessous pour connaître l’emplacement des spécifications. FOR YOUR SAFETY, MAD Design USA 311 N. Robertson Blvd. READ BEFORE LIGHTING Private Mail Box #932 Beverly Hills, CA 90211 BURNER EcoSmart Inc DBA MAD Design USA WARNING! If you do not follow these instructions exactly, a fire or installation, ensure that all manual shut-off valves on the supply line explosion may result causing property damage, personal injury,... -
Page 52: Conditions D'utilisation
FRANÇAIS Conditions d’utilisation Félicitations pour votre achat de cet appareil à gaz décoratif. f. Les parties scellées par le fabricant ne doivent pas être le produit que vous avez choisi est conçu pour offrir un manipulées par l’utilisateur. fonctionnement sûr, fiable et efficace. g. Ne pas utiliser le produit à proximité de matériaux inflammables. Ce manuel contient des instructions pour l’installation et l’utilisation sécuritaire de votre nouvel appareil à... -
Page 53: Distances De Dégagement
FRANÇAIS Distances de dégagement Dégagements minimaux Lors de la planification de l’installation d’un appareil, il est nécessaire de déterminer les informations suivantes en premier : Remarque : Les mesures sont les distances les plus proches de la flamme. Conditions environnementales Les dégagements latéraux pour les meubles fixes et stables tels que ATTENTION : Assurez-vous que votre cheminée est constamment les canapés ou autres meubles de salon doivent toujours rester à... -
Page 54: Avant De Commencer
FRANÇAIS Avant de commencer Outils et fournitures • Ne modifiez pas la structure de le produit ou de ses composants scellés. Avant de commencer l’installation, assurez-vous d’avoir à portée de • Ne déplacez pas le produit pendant son fonctionnement. main les outils et fournitures suivants : •... -
Page 55: Raccordement De Gaz
FRANÇAIS Raccordement de gaz Carburant Avant de réaliser les raccordements de gaz, assurez-vous que le produit ATTENTION : Une petite quantité d’air peut se trouver dans les à installer est compatible avec le type de gaz disponible. conduites d’alimentation en gaz. Lors de la première mise en marche de le produit, il faudra un court laps de temps pour que l’air soit purgé... - Page 56 FRANÇAIS Raccordement de gaz Alimentation en gaz de pétrole liquéfié (GPL) • Le détendeur et le tuyau de raccordement fournis avec les modèles GPL doivent être utilisés. Les détendeurs et les raccords de remplacement doivent être ceux spécifiés dans ce manuel. • Le cylindre d’alimentation en GPL utilisé avec les modèles GPL doit être construit et marqué...
-
Page 57: Équipement Standard Reçu
Équipement standard reçu Veuillez vous assurer que tous les articles ont été reçus. Les brûleurs comprennent l’équipement minimum requis pour faire fonctionner le brûleur en toute sécurité. Brûleurs Linear Gas Burner - ESF.2.B.G37T.EUK Round Gas Burner - ESF.2.B.G16T.EUK Articles inclus INSTALLATION,... - Page 58 FRANÇAIS Équipement standard reçu Assemblage du panneau de commande Confirmez que vous avez reçu toutes les pièces nécessaires, comme illustré à la page 55. 1. Localisez la plaque de couverture EcoSmart sur le produit, retirez 4. Par l’avant de la plaque de commande, fixez la boîte de l’allumeur les quatre(4) capuchons de vis en plastique et dévissez la plaque de en attachant l’écrou en plastique.
-
Page 59: Assemblage Du Brûleur - Propane
FRANÇAIS Assemblage du brûleur - Propane 6.Position the burner assembly so that the gas input exible line (where the ori ce is located) is pointing towards the control plate cutout location of the surround. Carefully uncoil the thermocouple tube. Feed the exible gas line, thermocouple tube, grounding wire and the ignitor wire through the burner location opening rst then place lower the burner into its nal location. - Page 60 FRANÇAIS Assemblage du brûleur - Propane 9. Faites passer tous les tuyaux et fils de l’intérieur de l’unité à 13. Raccordez le thermocouple à la vanne de contrôle. Serrez d’abord travers l’ouverture découpée du panneau de commande. à la main, puis serrez fermement (1/2 tour) à l’aide d’une clé de 10 mm.
- Page 61 FRANÇAIS Assemblage du brûleur - Propane 18. Assurez-vous que la bouteille de propane est en position fermée. Une ventilation adéquate et constante est importante pour garantir Attachez le tuyau de propane et le régulateur inclus à la bouteille de un bon fonctionnement et une sécurité appropriée de le produit, propane.
-
Page 62: Allumage Et Fonctionnement
FRANÇAIS Allumage et fonctionnement POUR VOTRE SÉCURITÉ, LISEZ AVANT D’ALLUMER 5. Si le brûleur ne s’allume pas ou ne reste pas allumé après 20 secondes de tentative d’allumage, tournez la vanne de commande en position off et attendez 5 minutes pour permettre au gaz de se dissiper avant de tenter une nouvelle allumage. -
Page 63: Problèmes Et Solutions - Général
FRANÇAIS Problèmes et Solutions - Général Symptôme Causes possibles Actions correctives Vérifier le réservoir de gaz propane. Vous n’avez Pas de gaz propane dans le réservoir, ou vanne du peut-être plus de propane. Ou vérifier la vanne de gaz naturel non ouverte. gaz naturel sur le principal. -
Page 64: Problèmes Et Solutions - Débit De Gaz Fort
FRANÇAIS Problèmes et Solutions - Général Assurez-vous qu’une nouvelle pile AAA est installée La pile est déchargée ou mal installée. correctement dans l’interrupteur d’allumeur à bouton-poussoir. Vérifiez le contact au bas de la cavité de la pile pour Corrosion sur les contacts de la pile. détecter une éventuelle corrosion. -
Page 65: Service Et Entretien
FRANÇAIS Service et entretien Bien que la fréquence de l’entretien et de la maintenance de le produit ATTENTION dépendra de son utilisation et du type d’installation, un technicien de service qualifié devrait effectuer une vérification annuelle de le produit. Une inspection annuelle par un technicien qualifié est Le stockage de le produit à... -
Page 66: Matériaux De Référence
FRANÇAIS Matériaux de référence Liste des pièces de service Pièces de rechange LP / NG BRÛLEUR ESF.1.P.GSB Boîte d’allumage ESF.1.P.G36 Fil de mise à la terre de 36” ESF.1.P.H10 Tuyau et régulateur GPL (10’) ESF.1.P.KEY Clé de contrôle ESF.1.P.KNB Bouton de contrôle ESF.2.P.VAL Soupape de sécurité... -
Page 67: Garantie
FRANÇAIS Garantie Garantie limitée d’un an Cette garantie est limitée au remplacement ou à la réparation des composants défectueux ou de la main-d’œuvre et le fabricant et Le fabricant et les distributeurs associés accordent la garantie suivante les distributeurs associés peuvent entièrement s’acquitter de leurs obligations en vertu de cette garantie en réparant ou en remplaçant, pour les produits de feu de gaz extérieur décoratifs de la série GB utilisés aux États-Unis, au Canada, en Europe ou au Royaume-Uni. - Page 68 中文 ©版权所有2004–2023 MAD Design Group有限公司保留所有权利。 V1023...
-
Page 69: 安装, 操作 和维修指南
中文 安装, 操作 和维修指南 LINEAR GAS BURNER: ESF.2.B.G37T.EUK ROUND GAS BURNER: ESF.2.B.G16T.EUK 7.5lbs/3.4kg 5.5lbs/2.5kg 安装人员: 将说明书留在设备旁边。 消费者: 保留本说明书以供以后参考。 警告 危险 1. 使用前请仔细阅读说明书。 1. 一氧化碳危险 - 该设备会产生没有气味的一氧化碳。 2. 绝不能在封闭空间 (如房车, 帐篷, 汽车或家庭) 中使用 2. 仅适用于室外使用。 此设备。 在封闭空间使用可能会导致死亡。 3. 安装和维修必须由合格的安装人员、 服务机构或燃气 3. 如果闻到气味:... - Page 70 中文 重要提示: 附带的燃烧器已经准备好使用丙烷。 请联系您当地的经 销商获取转换为天然气的使用说明。 ©版权所有2004–2023 MAD Design Group有限公司保留所有权利。 V1023...
- Page 71 中文 0359-16 (EU) 2016/426 产品名称: 火炉燃烧器 零件编号: ESF.2.B.G16T.EUK MAD DESIGN CHINA 2575 0359 ESF.2.B.G37T.EUK 序列号: 型号: ESF.2.B.G16T.EUK 主燃烧器: 目的地国家 设备类别 气体和供应压力: ESF.2.B.G37T.EUK 喷嘴尺寸 Ø: 总名义热输入 (Hs) 丁烷 (G30) 28-30毫巴 2.15mm 19 千瓦 1237克/小时 BE,CH,CY,CZ,ES,FR,GB,GR,IE,IT,LT, I3+(28-30/37) LU,LV,PT,SK,SI 丙烷 (G31) 37毫巴 2.15mm 19 千瓦...
- Page 72 中文 目录 图标 重要安全信息 安装间距 在开始之前 燃气连接 标准配件 燃燒器組裝-丙烷 照明和操作 故障排除 - 常规 故障排除 - 大声的燃气流动 服务和维护 参考资料 保修 ©版权所有2004–2023 MAD Design Group有限公司保留所有权利。 V1023...
- Page 73 中文 图标 标记信息/位置 关于您的具体设备的型号信息可以在连接到燃烧器上的金属链上的评级板 上找到。 参见下面的示例评级板以了解规格的位置。 FOR YOUR SAFETY, MAD Design USA 311 N. Robertson Blvd. READ BEFORE LIGHTING Private Mail Box #932 Beverly Hills, CA 90211 BURNER EcoSmart Inc DBA MAD Design USA WARNING! If you do not follow these instructions exactly, a fire or installation, ensure that all manual shut-off valves on the supply line explosion may result causing property damage, personal injury, are open.
- Page 74 中文 重要安全信息 祝贺您购买了这款装饰性燃气器具。 您选择的这款器具旨在提供安全的操 3. 操作火源 作、 可靠性和效率。 a. 如果设备损坏或功能失常, 请不要使用。 本手册包含了关于安全安装和使用您的新燃气器具的说明。 在安装和使用 b. 仅供装饰使用, 不适合连续运行。 不要使用设备加热或煮沸水, 或作为烹 这款器具之前, 请仔细阅读整本手册, 并严格按照说明和警告进行操作。 饪设备。 火源中不要放入木头、 木炭、 纸张或其他可燃物质。 这本使用说明书应保留以供日后参考。 如果您是安装者 (而非拥有者) , 请确 c. 对于因使用不正确燃料造成的损失, 生产商和相关经销商概不负责。 保将本手册交给拥有者以便他们了解器具的安全操作, 并供日后参考。 d. 永远不要留下无人看管的火源。 该器具是一款仅用于户外使用的装饰性燃气器具, 严禁用于烹饪。 请勿在该 器具中燃烧固体燃料。...
- Page 75 中文 安装间距 最小间隙 在规划设备安装时, 首先需要确定以下信息: 注意: 测量距火焰最近的距离 易固定和稳定的家具物品 (如沙发或露台家具) 的侧侧间隙必须始终保持在 环境条件 距火焰24英寸 (610毫米) 的最小间隙处。 警告: 确保火源始终远离易燃材料和其他点火源 (易燃材料、 汽油和其他易 对于易移动的物品 (如窗帘/树木) 的上方间隙, 最小间隙必须始终: 燃蒸汽和液体) 。 注意将火源远离可能因风和气流而移动的物品, 例如树/树 - 距火焰78.7英寸 (2000毫米) 。 枝/窗帘/纸张等。 天花板间隙必须保持最小: 模型内的火口底部永远不能直接接触易燃材料。 - 72英寸 (1,829毫米) 到燃烧器顶部的悬挂处。 处于极端气候条件下, 比如积雪严重, 四季户外保护套可以有效地保护产 请注意:...
- Page 76 中文 在开始之前 工具和设备 • 在气瓶和设备之间始终使用适当的压力调节器。 允许的压 力 (取决于您所在的位置) 为: 美国/加拿大为11WC。 对于欧 在开始安装之前, 请确保以下工具和设备齐全: 盟: 30mbar、 37mbar、 50mbar, 并且只能使用符合EN16129标准的调压 • 手套 器。 • 安全眼镜 • 交叉螺丝刀 • 将气瓶充气的任务应委托给经认证的气体充装站。 • 防腐蚀检漏液 • 仅在授权地点更换空瓶。 • 可调节扳手 (2只) • 1节AAA电池 • 10毫米扳手 • 11毫米扳手 (仅适用于天然气转换) 警告...
- Page 77 中文 燃气连接 燃料 警告: 燃气供应管路中将有少量空气。 第一次点火时, 需要一段时间将空气 在进行燃气连接之前, 确保安装的设备与现有的燃气类型兼容。 从管路中排出。 随后启动该设备将不需要进行此类排气。 气阀必须按下点火 器按钮, 直到点火器按钮第一次点火。 燃气压力 警告 需要正确的输入压力以实现最佳的性能。 警告 检查燃气泄漏 火灾危险 爆炸危险 火灾危险 窒息危险 爆炸危险 • 检查所有配件和连接处。 验证进气压力。 • 不要使用明火。 • 高压可能导致过度燃烧条件。 • 燃气管路安装完成后, 必须使用商用泄漏检测液检查 • 低压可能导致爆炸。 并紧固所有连接处, 并检查泄漏情况。 务必冲洗所有泄漏 • 在其他家用燃气设备工作时, 请验证最小压力。 检测液。...
- Page 78 中文 燃气连接 液化石油气供应 • 必须使用液化石油气型号所附带的压力调节器和软管组件。 更换压力调 节器和软管组件必须符合本手册规定。 • 液化石油气型号所使用的液化石油气储存气瓶必须根据美国交通部 (DOT) 规定的液化石油气气瓶规格建造和标记。 • 气瓶必须存放在室外通风良好的区域, 不处于儿童可触及的范围内。 已断 开连接的气瓶必须紧固安装螺纹阀塞, 并不能存放在建筑物、 车库或任何 封闭区域内。 • 只有当该设备已经从其燃料供应 (天然气管道或液化石油气储存气瓶) 中 断开连接时, 才允许将其存放在室内。 • 液化石油气储存气瓶供应系统必须设置为气体蒸汽吸收方式。 • 使用的液化石油气储存气瓶必须包括一个保护气瓶阀门的环。 • 当液化石油气型号未使用时, 必须关闭储存气瓶的液化石油气。 • 所使用的气瓶的具体大小和容量: 6公斤或更大或直接连接到丙烷储罐。 • 液化石油气储存气瓶必须通过CE-EN的认证。 错误的安装、 调整、 改装服务或维护可能会导致人员伤害或财产损失。 请参 考并了解本手册。...
- Page 79 中文 标准配件 请确认所有物品已收到。 燃烧器包括最少的设备, 以确保安全运行。 燃烧器 线性燃气燃烧器 - ESF.2.B.G37T.EUK 圆形燃气燃烧器 - ESF.2.B.G16T.EUK 包含的物品 INSTALLATION, OPERATION AND MAINTENANCE MANUAL LONG GAS BURNER ROUND GAS BURNER ESF.2.B.G37 7.5lbs/3.4kg ESF.2.B.G16 5.5lbs/2.5kg INSTALLER: Leave manual with the appliance. CONSUMER: Retain this manual for future reference.
- Page 80 中文 标准配件 组装控制面板 请确认您已收到所有必要的零件, 如第77页所示。 1. 在设备上找到EcoSmart盖板, 取下四个塑料螺丝盖, 并将盖板从设备 5. 插入AAA电池, 确保电池的+方向朝外安装。 上拧下。 保留四颗螺丝和螺丝盖。 燃气控制面板应直接位于EcoSmart盖板后 6. 螺上点火器盖子以固定电池。 面。 不再需要EcoSmart盖板。 7. 使用提供的螺钉将控制阀装在控制面板板的背面。 阀门必须按照所示 2. 取下点火器盒的盖子和塑料螺母。 的方向安装。 3. 将点火器盒放在控制面板板后, 插入控制面板板。 8. 安装旋钮。 4. 从控制面板板的正面, 通过固定塑料螺母来固定点火器盒。 1.Locate the Control panel location on the Unit, remove the four plastic screw caps and unscrew the cover plate from the Unit. 3.Remove the sparker cover and plastic nut from the sparker box.
- Page 81 中文 燃燒器組裝-丙烷 6.Position the burner assembly so that the gas input exible line (where the ori ce is located) is pointing towards the control plate cutout location of the surround. Carefully uncoil the thermocouple tube. Feed the exible gas line, thermocouple tube, grounding wire and the ignitor wire through the burner location opening rst then place lower the burner into its nal location.
- Page 82 中文 燃燒器組裝-丙烷 9. 将所有软管和电线从装置内部拉出, 通过控制面板切割口。 13. 将热电偶连接到控制阀上。 先用手拧紧, 然后用10毫米扳手牢牢拧紧 ( 旋转1/2圈) 。 热电偶受损和/或连接松动会导致操作问题。 9.Pull all hoses and wires from inside the unit out through the control plate cutout. 10. 确保按照第78页的说明组装控制面板。 14. 将点火线和接地线插入点火器的背面。 这些线可以插入点火器盒背面 的任一端口。 13.Connect the thermocouple to the control valve. Hand-tighten rst then securely tighten (1/2 turn) with a 10mm wrench. Damage to the thermocouple and/or loose connections will cause operation issues.
- Page 83 中文 燃燒器組裝-丙烷 17. 均匀地铺置玻璃颗粒在燃烧器表面上。 使用提供的所有黑晶炭石效果 确保充足和持续的通风对于保持设备正常和安全运行非常重要, 包括对设 最佳。 炭石颗粒不能存在于点火器风防内。 将点火风防内的纸板覆盖物取 备底部的通风。 将设备放置在没有空气流通的情况下, 会导致热量积聚和 下。 不正确的燃烧。 不要拆下脚或缺少脚的情况下操作设备。 1. 将设备和液化石油气罐罩放在硬而平坦的表面上, 该表面延伸到设备 的整个长度和宽度。 设备和液化石油气罐罩可以放置在可燃表面 (如木甲 板) 或不可燃材料 (如混凝土) 上。 始终确保遵守设备两侧和上方的所有间 隙要求 (见图1和2) 。 2. 通过向上或向下调整活动脚, 确保设备侧壁与地面之间保持至少1/2英 寸 (12.5毫米) 的空间。 3. 不要将设备放置在草地、 人造草地、 地毯或任何不平坦的表面上, 因为 这会阻塞设备下方的空气流通。...
- Page 84 中文 照明和操作 为了您的安全, 点火之前请仔细阅读 熄灭火焰 警告! 如果您不按照这些指示进行操作, 可能会导致火灾或 1. 将控制旋钮转至低/点火位置, 然后轻轻按下控制旋钮并将其拧至关闭 位置。 爆炸, 导致财产损失、 人身伤害和/或生命损失. 2. 如果使用的是丙烷气罐, 请关闭阀门。 为了您的安全, 点火之前请仔细阅读 警告! 如果您不按照这些指示进行操作, 可能会导致火灾或爆炸, 导致财 警告 产损失、 人身伤害和/或生命损失. A. 这个设备可以通过电子点火或使用火柴点火. 在点火时请严格按照以 火灾风险 - 高温 下指示进行操作. 请将易燃的家居物品远离设备。 B. 在点火之前, 请在设备周围的区域闻一闻是否有气味. 请确保在设备底 座旁边闻一闻, 因为一些气体比空气重, 会落到地面上. •...
- Page 85 中文 故障排除 - 常规 故障状态 可能产生的原因 正确的操作方法 检查石油气 (丙烷) 罐。 可能是燃气用尽了。 或者检查天 石油气罐没有气体, 或天然气主阀没有打开。 然气主阀。 燃烧器孔堵塞。 检查燃烧器孔是否堵塞。 清除堵塞。 设备无法点燃 点火器无法点燃燃烧器。 参考第6节的点火器。 确保按照媒体安装说明操作, 并且点火器周围没有媒 点火器周围的媒体积累过多。 体或杂物。 手动关闭阀 (开/关控制旋钮) 打开或未安装在石油气罐 关闭石油气罐和手动关闭阀。 首先打开石油气罐阀, 然 和设备之间。 后按照点火指示进行操作。 通风孔在出厂时调整为最佳性能。 对于天然气, 通风孔 通风孔调整不正确。 应关闭。 对于丙烷气, 通风孔应打开1/4英寸。 确保设备在第69页上详细说明的理想进口燃气压力下...
- Page 86 中文 故障排除 - 常规 电池电量耗尽或未安装或安装错误 确保在按钮点火器开关中安装了一块新的AAA电池 检查电池腔底部的接触处是否有腐蚀。 用一小块砂纸 电池接触处有腐蚀 或锉刀清洁。 点火器没有火花或 如果电池盖无法完全拧紧, 电池将无法与点火器正常 发出咔嗒声 电池盖没有完全拧紧 连接, 无法工作。 请确保使用20-22号钢板等薄表面安 装点火器。 点火电极或接地线未连接到点火器 确保点火电极和接地线正确连接到点火器。 故障排除 - 大声的燃气流动 过多的冲洗和尖叫声 2. 嘶嘶声是来自喷口吗? 喷口是控制设备使用燃气量的部件。 有时喷口的形状会因燃气流量和 燃气设备发出过多噪音有多种原因。 燃气流量越大 (最大控制阀设定) , 噪 燃气压力的不同而产生嘶嘶声。 音越大的可能性越高。 这是由于燃气通过设备的管道以更高的速度流动时 的更大体积导致的。 燃气流动会产生噪音, 因此以下内容旨在解决声音过 如果重新调整设备中的柔性管道未修复尖叫声,...
- Page 87 中文 服务和维护 虽然设备的维护和保养频率取决于使用方式和安装类型, 但是应该每年由 警告 合格的维修技术人员进行一次设备检查。 只有在气瓶断开并从设备中拆下时, 才允许把设备存放在室内。 建议定期由合格技师检查。 检查: 如果不及时清洁或清除污染物或杂质, 不锈钢将随着时间的推移而生锈或 腐蚀。 建议在不使用时, 用防护套覆盖保护您的壁炉免受水损害或腐蚀。 • 燃烧和通风风口的障碍物 • 燃烧器组件的状况 • 燃烧器点火和操作 警告 • 燃烧器气门调整 • 气体连接和配件 伤害或财产损失的风险。 维修前: 风险: • 火灾 • 关闭设备的公用事业 • 延迟点火或爆炸 • 确保设备完全冷却 • 接触燃烧烟气 • 气味 维护和维修任务...
- Page 88 中文 参考资料 服务部件清单 更换零件 LP/NG燃烧器 点火器盒 ESF.1.P.GSB 接地线 (36英寸) ESF.1.P.G36 LP软管和调节器 (10英尺) ESF.1.P.H10 控制钥匙 ESF.1.P.KEY 控制旋钮 ESF.1.P.KNB 可变控制安全阀 ESF.2.P.VAL 控制面板 ESF.3.P.CPF 1/2英寸母扁接头x 3/8英寸公扁接头适配器 ESF.2.P.FMA 22英寸不发出哨音的不锈钢软管, 带1/2英寸配件 ESF.2.P.F22 火焰传感器组件 ESF.2.P.FSA ©版权所有2004–2023 MAD Design Group有限公司保留所有权利。 V1023...
- Page 89 中文 保修 有限一年保修 制造商和相关经销商针对在美国、 加拿大、 欧洲或英国使用的GB系列装饰 若要获得本保修的服务, 您必须: 性户外燃气火焰产品提供以下保修。 制造商和相关经销商的经销商和员 1. 向您的相关经销商发送有关所需条件的书面通知 ( 工没有权利提供超出或与本保修条款不一致的任何保修或授权任何补救 地址可在封底找到) 。 措施。 本保修为您赋予特定法律权利。 您可能还享有州与州之间不同的其 它权利。 2 .确认您是产品的第一所有人。 制造商和相关经销商保证该GB系列装饰性燃气器具 ( “产品” ) 将在购买日 3. 将事故照片或视频提交给经销商评估保修索赔。 期后一年内免于材料和制造缺陷。 不锈钢零件和组件享有有限的终身保 4. 给制造商和相关经销商合理的机会进行调查, 包括在进行任何维修或 修。 本保修受以下条件、 排除和限制的约束。 更换工作, 以及在产品或产品的任何组件被拆除之前给制造商和相关 本保修仅适用于产品的原始所有人, 不可转让。 制造商和相关经销商的责 经销商进行检查。...
-
Page 90: Italiano
ITALIANO © Proprietà limitata 2004 - 2023 MAD Design Group. Tutti i diritti riservati. V1023... -
Page 91: Manuale Di Installazione, Uso E Manutenzione
ITALIANO MANUALE DI INSTALLAZIONE, USO E MANUTENZIONE LINEAR GAS BURNER: ESF.2.B.G37T.EUK ROUND GAS BURNER: ESF.2.B.G16T.EUK 7.5lbs/3.4kg 5.5lbs/2.5kg INSTALLATORE: Lasciare il manuale con l’apparecchio. CONSUMATORE: Conservare questo manuale per riferimenti futuri. AVVERTENZA PERICOLO 1. Leggere le istruzioni prima dell’uso. 1. Pericolo di monossido di carbonio - Questo apparecchio può... - Page 92 ITALIANO Importante: Il bruciatore fornito con questo camino è pronto per il propano. Contattate il vostro rivenditore locale per le istruzioni sulla conversione al gas naturale. © Proprietà limitata 2004 - 2023 MAD Design Group. Tutti i diritti riservati. V1023...
- Page 93 ITALIANO 0359-16 (EU) 2016/426 Nome del prodotto: Bruciatore a fuoco 2575 0359 Numeri di parte: ESF.2.B.G16T.EUK MAD DESIGN CHINA ESF.2.B.G37T.EUK Numero di serie: Numeri di modello: Bruciatore ESF.2.B.G16T.EUK principale: Categoria di Gas e pressione di ESF.2.B.G37T.EUK Paese di destinazione apparecchiatura...
- Page 94 ITALIANO Contenuti Etichettature Importanti Informazioni di sicurezza Sicurezze Prima di iniziare Allacciamento del gas Attrezzatura standard inclusa Montaggio del bruciatore - Propano Accensione e funzionamento Risoluzione dei problemi - Generale Risoluzione dei problemi - Flusso di gas rumoroso Assistenza e manutenzione Materiale di riferimento Garanzia ©...
-
Page 95: Etichettature
ITALIANO Etichettature Informazioni sull’etichetta di elenco / Localizzazione Le informazioni sul modello riguardanti il tuo specifico apparecchio possono essere trovate sulla targhetta di classificazione fissata al tuo bruciatore tramite una catena metallica. Consulta la scheda di valutazione di esempio riportata di seguito per le posizioni delle specifiche. FOR YOUR SAFETY, MAD Design USA 311 N. Robertson Blvd. READ BEFORE LIGHTING Private Mail Box #932 Beverly Hills, CA 90211 BURNER EcoSmart Inc DBA MAD Design USA WARNING! If you do not follow these instructions exactly, a fire or... -
Page 96: Importanti Informazioni Di Sicurezza
ITALIANO Importanti Informazioni di sicurezza Congratulazioni per l’acquisto di questo apparecchio a gas f. Le parti sigillate dal produttore non devono essere maneggiate decorativo. L’apparecchio che hai selezionato è progettato per dall’utente. fornire un funzionamento sicuro, affidabilità ed efficienza. g. Non utilizzare l’apparecchio vicino a materiali infiammabili. Questo manuale contiene istruzioni per l’installazione e l’uso sicuro del tuo nuovo apparecchio a gas. -
Page 97: Sicurezze
ITALIANO Sicurezze Spazi minimi di pulizia Quando si pianifica l’installazione di un elettrodomestico, è necessario determinare prima le seguenti informazioni: Nota: Le misurazioni sono le distanze più ravvicinate dalla fiamma. Condizioni ambientali Distanze laterali a mobili fissi e oggetti stabili che non sono soggetti a movimento come salotti o mobili da giardino devono rimanere un minimo ATTENZIONE: Assicurarsi che il fuoco sia posizionato lontano da di 610mm [24in] lontano dalla fiamma in ogni momento. -
Page 98: Prima Di Iniziare
ITALIANO Prima di iniziare Strumenti e forniture • Una volta assemblato, posizionare il tubo flessibile fuori dai percorsi in cui le persone potrebbero inciampare o in aree in cui il tubo Prima di iniziare l’installazione, assicurarsi di avere a disposizione i potrebbe subire danni accidentali. -
Page 99: Allacciamento Del Gas
ITALIANO Allacciamento del gas Carburante ATTENZIONE: Una piccola quantità di aria sarà presente nelle linee di alimentazione del gas. Quando si accende l’apparecchio per la prima Prima di effettuare le connessioni del gas, assicurarsi che volta ci vorrà poco tempo per purgare l’aria dalle linee. La successiva l’apparecchio da installare sia compatibile con il tipo di gas accensione dell’unità... - Page 100 ITALIANO Allacciamento del gas Fornitura di gas GPL • Il regolatore di pressione e il tubo forniti con i modelli GPL devono essere utilizzati. I regolatori di pressione di ricambio e gli assemblaggi del tubo devono corrispondere a quelli specificati in questo manuale. •...
-
Page 101: Attrezzatura Standard Inclusa
ITALIANO Attrezzatura standard inclusa Verifica che tutti gli elementi siano stati ricevuti. I bruciatori includono l’attrezzatura minima necessaria per far funzionare il bruciatore in sicurezza. Bruciatori Linear Gas Burner - ESF.2.B.G37T.EUK Round Gas Burner - ESF.2.B.G16T.EUK Elementi inclusi INSTALLATION, OPERATION... - Page 102 ITALIANO Attrezzatura standard inclusa Assemblaggio del pannello di controllo Verifica di aver ricevuto tutte le parti necessarie come illustrate a pagina 99. 1. Trova la piastra di copertura EcoSmart sull’unità, rimuovi i quattro 4. Dalla parte anteriore della piastra del pannello di controllo, fissare la tappi a vite in plastica e svita la piastra di copertura dall’unità.
-
Page 103: Montaggio Del Bruciatore - Propano
ITALIANO Montaggio del bruciatore - Propano 6.Position the burner assembly so that the gas input exible line (where the ori ce is located) is pointing towards the control plate cutout location of the surround. Carefully uncoil the thermocouple tube. Feed the exible gas line, thermocouple tube, grounding wire and the ignitor wire through the burner location opening rst then place lower the burner into its nal location. - Page 104 ITALIANO Montaggio del bruciatore - Propano 9. Estrarre tutti i tubi flessibili e i cavi dall’interno dell’unità 13. Collega il termocoppia alla valvola di controllo. Prima avvitare a attraverso il ritaglio della piastra di controllo. mano, quindi stringere saldamente (1/2 di giro) con una chiave da 10 mm.
- Page 105 ITALIANO Montaggio del bruciatore - Propano 18. Assicurati che il serbatoio del propano sia in posizione spenta. Una ventilazione adeguata e costante è importante per mantenere il Collega il tubo del propano e il regolatore incluso al serbatoio del corretto funzionamento e la sicurezza dell’elettrodomestico, compresa propano.
-
Page 106: Accensione E Funzionamento
ITALIANO Accensione e funzionamento PER LA TUA SICUREZZA, LEGGERE PRIMA DI 5. Se il bruciatore non si accende o rimane acceso dopo 20 secondi di tentativi di accensione, girare la manopola del controllo in ACCENDERE posizione di spegnimento e attendere 5 minuti affinché il gas si disperda prima di tentare nuovamente l’accensione. -
Page 107: Risoluzione Dei Problemi - Generale
ITALIANO Risoluzione dei problemi - Generale Sintomo Cause possibili Azioni correttive Controlla il serbatoio LP (propano). Potresti essere Serbatoio LP vuoto o valvola del gas naturale non senza gas. Oppure controlla la valvola del gas aperta. naturale principale. Controlla l’sbocco del bruciatore per eventuali Sbocco del bruciatore ostruito. -
Page 108: Risoluzione Dei Problemi - Flusso Di Gas Rumoroso
ITALIANO Risoluzione dei problemi - Generale Verificare che una nuova batteria AAA sia installata La batteria è scarica o non è installata correttamente nell’interruttore dell’accenditore a correttamente. pulsante. Controllare il contatto nella parte inferiore del vano Corrosione sui contatti della batteria. batteria per la presenza di corrosione. -
Page 109: Assistenza E Manutenzione
ITALIANO Assistenza e manutenzione Sebbene la frequenza della manutenzione dell’elettrodomestico dipenda AVVERTENZA dall’uso e dal tipo di installazione, un tecnico di assistenza qualificato dovrebbe eseguire una verifica annuale dell’elettrodomestico. Si consiglia una verifica annuale da parte di un tecnico La conservazione di un elettrodomestico all’interno è consentita solo se qualificato. -
Page 110: Materiale Di Riferimento
ITALIANO Materiale di riferimento Elenco dei pezzi di ricambio Pezzi di ricambio LP / NG BRUCIATORE ESF.1.P.GSB Scatola del generatore di scintille ESF.1.P.G36 Filo di messa a terra da 36” ESF.1.P.H10 Tubo flessibile per gas propano e regolatore (10’) ESF.1.P.KEY Tasto di controllo ESF.1.P.KNB Manopola di controllo... -
Page 111: Garanzia
ITALIANO Garanzia Garanzia Limitata di un anno Questa garanzia è limitata alla sostituzione o riparazione di componenti difettosi o manodopera, e il produttore e i distributori Il produttore e i distributori associati offrono la seguente garanzia per associati possono adempiere pienamente alle loro obbligazioni ai sensi di questa garanzia riparando o sostituendo, a loro discrezione, i i prodotti a gas per esterni della serie GB decorative utilizzati negli Stati Uniti d’America, Canada, Europa o Regno Unito. -
Page 112: Español
ESPAÑOL © Copyright 2004 - 2023 MAD Design Group. Reservados todos los derechos. V1023... -
Page 113: Manual De Instalación, Uso Y Mantenimiento
ESPAÑOL MANUAL DE INSTALACIÓN, USO Y MANTENIMIENTO LINEAR GAS BURNER: ESF.2.B.G37T.EUK ROUND GAS BURNER: ESF.2.B.G16T.EUK 3,4KG 2,5KG INSTALADOR: Deje el manual con la chimenea. CONSUMIDOR: Guarde este manual para futuras consultas. ADVERTENCIA PELIGRO 1. Lea las instrucciones antes de usar. - Page 114 ESPAÑOL Importante: El quemador suministrado con esta hoguera de exterior está listo para utilizar propano. Póngase en contacto con su distribuidor local para obtener instrucciones de conversión a gas natural. © Copyright 2004 - 2023 MAD Design Group. Reservados todos los derechos. V1023...
- Page 115 ESPAÑOL 0359-16 (EU) 2016/426 Nombre del producto: Quemador de fuego 2575 0359 Números de pieza: ESF.2.B.G16T.EUK MAD DESIGN CHINA ESF.2.B.G37T.EUK Número de serie: Números de modelo: Quemador ESF.2.B.G16T.EUK principal: Categoría de Gas y presión de ESF.2.B.G37T.EUK País de destino electrodomésticos suministro Tamaño del...
- Page 116 ESPAÑOL Contenido Etiquetado Información Importante de Seguridad Seguridad Antes de empezar Conexión de gas Equipo estándar incluido Montaje del quemador - Propano Encendido y operación Solución de problemas - General Solución de problemas - Flujo de gas fuerte Servicio y mantenimiento Materiales de referencia Garantía ©...
-
Page 117: Etiquetado
ESPAÑOL Etiquetado Información/Etiqueta de listado e ubicación La información del modelo de su aparato específico se puede encontrar en la placa de clasificación que está fijada a su quemador mediante una cadena de metal. Vea la muestra de la placa de clasificación a continuación para conocer las ubicaciones de las especificaciones. FOR YOUR SAFETY, MAD Design USA 311 N. Robertson Blvd. READ BEFORE LIGHTING Private Mail Box #932 Beverly Hills, CA 90211 BURNER EcoSmart Inc DBA MAD Design USA WARNING! If you do not follow these instructions exactly, a fire or installation, ensure that all manual shut-off valves on the supply line explosion may result causing property damage, personal injury, are open. -
Page 118: Información Importante De Seguridad
ESPAÑOL Información Importante de Seguridad Felicitaciones por su compra de este aparato de gas decorativo. f. Las partes selladas por el fabricante no deben ser manipuladas El aparato que ha seleccionado está diseñado para funcionar de por el usuario. manera segura, fiable e eficiente. g. No use el aparato cerca de materiales inflamables. -
Page 119: Seguridad
ESPAÑOL Seguridad Distancias mínimas Al planificar la instalación de un aparato, es necesario determinar la siguiente información primero: Nota: Las medidas son las distancias más cercanas a la llama. Condiciones ambientales El espacio libre lateral entre la chimenea y mobiliario fijo u estable debe PRECAUCIÓN: Asegúrese de que su chimenea esté... -
Page 120: Antes De Empezar
ESPAÑOL Antes de empezar Herramientas y suministros • No cambie la estructura de la chimenea ni sus componentes sellados. Antes de comenzar la instalación, asegúrese de tener a mano las • No mueva la chimenea mientras esté en funcionamiento. siguientes herramientas y suministros: •... -
Page 121: Conexión De Gas
ESPAÑOL Conexión de gas Combustible PRECAUCIÓN: Puede haber una pequeña cantidad de aire en las líneas de suministro de gas. Al encender la chimenea por primera vez, tomará Antes de empezar con las conexiones de gas, asegúrese de que la un corto tiempo para que el aire se purgue de las líneas. - Page 122 ESPAÑOL Conexión de gas Suministro de gas LP • Se debe utilizar el regulador de presión y el conjunto de mangueras suministrados con los modelos de gas LP. Los reguladores de presión y conjuntos de mangueras de repuesto deben ser los especificados en este manual.
-
Page 123: Equipo Estándar Incluido
Equipo estándar incluido Por favor, asegúrese de que todas las piezas esten recibidas. Los quemadores incluyen el equipo mínimo necesario para operar el quemador de forma segura. Quemadores Linear Gas Burner - ESF.2.B.G37T.EUK Round Gas Burner - ESF.2.B.G16T.EUK Ítems incluidos INSTALLATION,... - Page 124 ESPAÑOL Equipo estándar incluido Ensamblar el panel de control Confirma si ha recibido todas las piezas necesarias tal y como se ilustra en la página 121. 1. Localice la placa de cubierta de EcoSmart en la unidad, retire las 4. Desde el frente de la placa del panel de control, asegure la caja del cuatro tapas de plástico de los tornillos y desenrosque la placa de encendedor sujetando la tuerca de plástico.
-
Page 125: Montaje Del Quemador - Propano
ESPAÑOL Montaje del quemador - Propano 1. Desempaque la caja del quemador. Saque todos los elementos y NOTA: Los agujeros de la bandeja no están diseñados para alinearse con los tornillos del quemador. Simplemente coloque el verifique que coincidan con los elementos enumerados en la página 6.Position the burner assembly so that the gas input exible line (where the ori ce is located) is pointing towards the control plate cutout location of the surround. - Page 126 ESPAÑOL Montaje del quemador - Propano 9. Tire de todas las mangueras y cables desde el interior de la 13. Conecte el termopar a la válvula de control. Apriete a mano unidad hacia afuera a través del recorte de la placa de control. primero y luego apriete firmemente (1/2 giro) con una llave de 10mm.
- Page 127 ESPAÑOL Montaje del quemador - Propano Es importante mantener una ventilación adecuada y constante para el funcionamiento correcto y seguro de la chimenea, incluyendo la ventilación de la parte inferior la chimenea. Colocar la chimenea sin circulación de aire debajo puede provocar acumulación de calor y una combustión incorrecta.
-
Page 128: Encendido Y Operación
ESPAÑOL Encendido y operación PARA SU SEGURIDAD, LEA ANTES DE ENCENDER 5. Si el quemador no se enciende o no se mantiene encendido después de 20 segundos de intentar encenderlo, gire la perilla de control a la posición de apagado y espere 5 minutos para permitir que el gas se disipe antes de intentar encenderlo nuevamente. -
Page 129: Solución De Problemas - General
ESPAÑOL Solución de problemas - General Síntoma Posibles causas Acciones correctivas Verifique el tanque de propano. Es posible que se No hay gas en el tanque de propano o la válvula de haya quedado sin gas. O verifique la válvula de gas gas natural no está... -
Page 130: Solución De Problemas - Flujo De Gas Fuerte
ESPAÑOL Solución de problemas - General La batería está descargada o no está instalada, o Asegúrate de que haya una nueva batería AAA está instalada incorrectamente. instalada en el interruptor de encendido con botón. Revisa el contacto en la parte inferior del compartimento de la batería en busca de corrosión. -
Page 131: Servicio Y Mantenimiento
ESPAÑOL Servicio y mantenimiento Aunque la frecuencia del servicio y mantenimiento de los aparatos ADVERTENCIA dependerá del uso y del tipo de instalación, se recomienda que un técnico de servicio calificado realice una revisión anual de la chimenea. Se recomienda realizar una inspección anual por un El almacenamiento de aparato en interiores solo está... -
Page 132: Materiales De Referencia
ESPAÑOL Materiales de referencia Lista de piezas de servicio Piezas de repuesto LP / NG BURNER ESF.1.P.GSB Caja del Encendedor ESF.1.P.G36 Cable de conexión a tierra de 36 pulgadas (91,44cm) ESF.1.P.H10 Manguera y regulador de GLP (10’) ESF.1.P.KEY Llave ESF.1.P.KNB Botón de control ESF.2.P.VAL Válvula de control de seguridad variable. -
Page 133: Garantía
ESPAÑOL Garantía Garantía limitada de un año Esta garantía se limita a la sustitución o reparación de componentes o mano de obra defectuosos y el fabricante y los distribuidores El fabricante y los distribuidores asociados ofrecen la siguiente garantía asociados pueden cumplir totalmente sus obligaciones bajo esta garantía reparando o reemplazando, a su discreción, los componentes para los productos de gas decorativos para exterior de la serie GB utilizados en Estados Unidos de América, Canadá, Europa o Reino... - Page 134 MAD Design Europe S.à.r.l MAD Design Group UK Ltd MAD Design USA 11 Boulevard Prince Henri, 13b Market Place, Caistor 311 N. Robertson Blvd. Private Mail Box #932 Luxembourg 1724 Market Rasen, Lincolnshire LN7 6TP Beverly Hills, CA 90211 T +352 20 88 22 49 T +44 0333 444 0623 T + 1 (888) 590.3335 E info@mad-europe.com...
Need help?
Do you have a question about the ESF.2.B.G37T.EUK and is the answer not in the manual?
Questions and answers