Advertisement
Quick Links
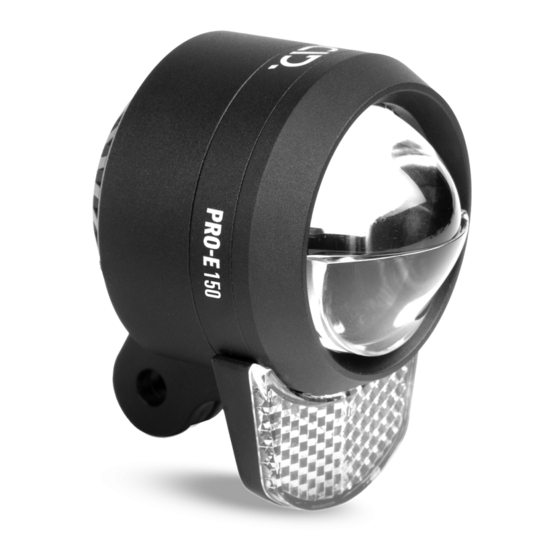
ACID E-BIKE FRONT LIGHT PRO-E 150 X-CONNECT
Technische Daten | Technical Description
Artikelnummer I Article Number
93966
Typenname | Type Name
SEACS-04
K-Nummer I K-Number
K 2444
Modelltyp | Model Type
Frontlicht I Front Light
Beleuchtungsstärke | Light Intensity
150 Lux
Lichtstrom | Luminous Flux
440 Lumen
Tagfahrlicht I Day Running Light
45 Lux / 120 Lumen
Lichtquelle | Light Source
LED
Eingangsspannung | Input Voltage
12 V (DC)
Maximaler Spitzenstrom | Max. Peak Current
850 mA
Betriebstemperatur | Operating Temperature
-25 - +70 °C
Gehäuse | Housing
Aluminium
Kabellänge | Cable Length
150 mm
Stecker | Plug
ACID X-Connect System
Gewicht | Weight
95 g
Abmessung | Dimension
ø 46 x 46 mm
IP Schutzklasse | IP Protection Class
IPX6
Leistung | Wattage
10 W
Lieferumfang | Product Content
Scheinwerfer mit 150 mm Lichtkabel und X-Connect-Stecker
1
Headlight with 150 mm light cable and X-Connect plug
K-Reflektor
Schraube M2,5 x 6 mm
2
2.1
K-Reflector
Screw M2.5 x 6 mm
Universalhalter
Schraube M4 x 10 mm
3
3.1
Universal Holder
Screw M4 x 10 mm
Abstandshalter
3.2
Spacer
FPILink Adapter Universal
Scraube M5 x 17,5 mm
4
4.1
FPILink Adapter Universal
Screw M5 x 17.5 mm
EN
Schraube M4 x 5 mm
4.2
Screw M4 x 5 mm
Zubehör (nicht enthalten)
5
Accessories (not included)
Montage Reflector | Mounting Reflector
2.1
2
1
WICHTIG! Verwendung ohne K-Reflektor entspricht nicht der StVZO.
IMPORTANT! Usage without K-reflector does not comply with the StVZO.
Montage FPILink Universal | Mounting FPILink Universal
Schritt 1 | Step 1
5
FPILink-Vorbauplatte
FPILink-Faceplate
4
4.2
Schritt 2 | Step 2
3 Nm
2 mm
4.1
Anschluss an Stromversorgung | Connection to Power Supply
Das Ein- und Ausschalten des Lichts erfolgt durch die Bedieneinheit
der jeweiligen Stromquelle.
2.5 mm
The light is switched on and off using the control unit of the power source.
CUBE Hybrid Fahrräder
mit X-Connect-Integration
CUBE Hybrid Bikes
with X-Connect-integration
Mit ACID E-Bike Frontlichtkabel
X-Connect - BOSCH BES3
4 mm
With ACID E-Bike Front Light Cable
X-Connect - BOSCH BES3
5
ACID PowerBank
2.5 mm
Montageoptionen | Mounting Options
Auslieferungszustand I Original mounting position
0.5 Nm
Option 2
1 Nm
1
3
5
5
BOSCH
Produkteinstellung | Product setting
Voreinstellung | Presetting
Installation mit 2.5 Grad nach unten
2.5 Degrees downward installation
Schritt 1 / Option 1
Step 1 / Option 1
5
90°
Option 3
1.5 Nm
Korrekte Einstellung | Correct setting
WICHTIG! Stellen Sie den Lichtkegel des Scheinwerfers so ein, dass die Mitte
des Lichtkegels in 5 m halb so hoch ist wie der Scheinwerfer selbst.
IMPORTANT! Adjust the light cone of the spotlight so that the center of the light
cone in 5 m is half as high as the spotlight itself.
Produktspezifische Warnhinweise | Product safety warnings
werfer nicht. Wird das Gehäuse zu heiß, drosselt das integrierte Hitze-
management die Leistung automatisch herunter.
5
Heat generation: The housing gets hot during usage; ensure to keep the light at
a safe distance from any combustible or flammable materials at all times. Howe-
ver, quiescent operation (without cooling the light housing via airflow or likewise)
is possible at any time and will not damage the product. When the light is used
5
stationary, the built-in heat management system will reduce the power.
2.5°
2.5°
WARNING!
Wärmeentwicklung: Das Gehäuse kann heiß werden, achten
Sie deshalb immer auf ausreichenden Abstand zu brennbaren
Materialien. Der ruhende Betrieb (also ohne Kühlung durch
z. B. Fahrtwind) ist jederzeit möglich, er schadet dem Schein-
Advertisement

Related Manuals for ACID PRO-E 150 X-CONNECT


Summary of Contents for ACID PRO-E 150 X-CONNECT
- Page 1 Produkteinstellung | Product setting Auslieferungszustand I Original mounting position Voreinstellung | Presetting 0.5 Nm ACID E-BIKE FRONT LIGHT PRO-E 150 X-CONNECT Installation mit 2.5 Grad nach unten 2.5 Degrees downward installation Technische Daten | Technical Description Schritt 1 / Option 1 2.5°...
Need help?
Do you have a question about the PRO-E 150 X-CONNECT and is the answer not in the manual?
Questions and answers