Table of Contents
Advertisement
Available languages
Available languages
Quick Links
Advertisement
Chapters
Table of Contents

Related Manuals for Fulgor Milano SOFIA FSO 300 P MK 2F X


Summary of Contents for Fulgor Milano SOFIA FSO 300 P MK 2F X
- Page 1 FSO 300 P MK 2F X MANUALE DI ISTRUZIONI INSTRUCTION MANUAL...
-
Page 3: Table Of Contents
INDICE PAGINA INDICE PAGINA Demo 1 - Istruzioni di Sicurezza 12 - Avviare il Forno 2 - Caratteristiche del Prodotto Accendere e spegnere il forno Il Vostro Forno Selezionare la modalità di cottura Ventola di raffreddamento Cambiare la modalità di cottura Posizioni Griglia Cambiare la temperatura Elementi per la Cottura al Forno... -
Page 4: Istruzioni Di Sicurezza
1 - Istruzioni di Sicurezza presenza di bambini. • I bambini devono essere sorvegliati onde garantire che non giochino con l’apparecchio. • Tenere lontani i bambini inferiori agli 8 anni se non continuamente sorvegliati. • Questo apparecchio non è inteso per un utilizzo da parte di persone (inclusi bambini superiori agli 8 anni) con ridotte capacità... -
Page 5: Caratteristiche Del Prodotto
2 - Caratteristiche del Prodotto Elemento Grill Bocchette di Raffreddamento Pannello di controllo Guarnizione porta Luce alogena Sonda carne (se presente) Luce alognea Luce alogena Targhetta Modello e Numero Seriale Elemento Inferiore (non visibile) Elemento Ventilazione (non visibile) Il Vostro Forno Posizioni Griglia Sopra trovate un'illustrazione di un forno che mostra le componenti Il forno ha delle guide per la griglia su sei livelli come mostrato... -
Page 6: Elementi Per La Cottura Al Forno
Elementi per la Cottura al Forno Il forno utilizza due elementi per la cottura al forno: uno situato sulla parte superiore del forno e un secondo situato sotto il pavimento della cavità del forno per garantire comodità nel pulire la cavità del forno. Elementi per la Cottura alla Griglia L'elemento del forno che griglia è... -
Page 7: Installazione Del Forno
3 - Installazione del Forno Rispetto per l’ambiente Per l’installazione del forno nella cucina, praticare un vano di La documentazione del presente elettrodomestico utilizza carta incasso secondo le dimensioni indicate nella figura Vani da Incasso sbiancata senza cloro oppure carta riciclata allo scopo di contribuire e Dimensioni. - Page 8 VANI DA INCASSO E DIMENSIONI Elettrodomestici 72,2 59,0 69,5 69,5 Min. 1,3 70,7 75,4 86,5 Min. 1,9 Forno singolo Le dimensioni sono in centimetri...
-
Page 9: Alimentazione Elettrica
4 - Alimentazione Elettrica Collegare Il Forno Alla Rete Elettrica La mancata osservanza solleva il costruttore da qualsivoglia responsabilità per eventuali danni a persone o cose. Prima di installare il forno, assicuratevi che un elettricista qualificato Per il collegamento usare un cavo di gomma flessibile tipo H05SS-F verifichi che la vostra abitazione sia provvista di un servizio elettrico (3x2,5 mm2 min) ricordandosi di lasciarlo sufficientemente lungo per adeguato e che l'aggiunta di un forno non sovraccariche il circuito su... -
Page 10: Istruzioni Per L'uso
5 - Istruzioni per l’Uso Primo utilizzo del forno Per rimuovere la griglia dal forno: Pulire accuratamente il forno con acqua saponata e sciacquare bene. 1. Tirare la griglia in avanti. Far funzionare il forno per circa 30 minuti alla massima temperatura per bruciare tutte le tracce di grasso che potrebbero altrimenti creare odori sgradevoli durante la cottura. - Page 11 Per rimuovere la griglia estensibile dal forno: 1. Sollevare la griglia leggermente e spingerla fino al rilascio dell’arresto. 2. Risollevare la griglia fino al telaio e smettere di tirare fuori la guida della griglia. 3. Tirare la griglia in basso e fuori. Per riposizionare una griglia forno.
-
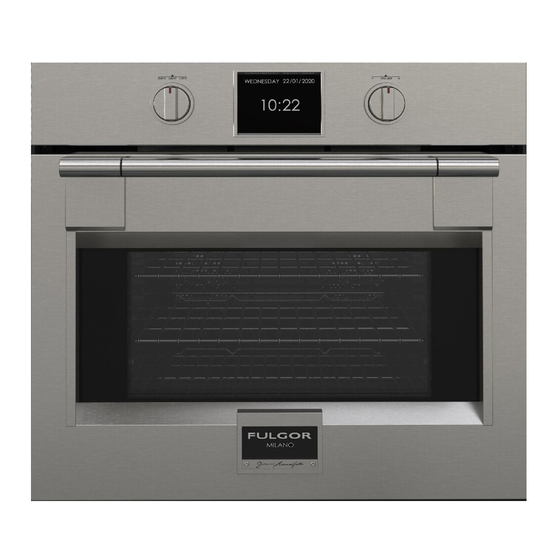
Page 12: Pannello Di Controllo
6 - Pannello di controllo Il vostro elettrodomestico potrebbe differire leggermente dalle illustrazioni sottostanti. - Schermo display - Manopole di controllo per forno Manopole di comando Per utilizzare le manopole di controllo, ruotarle a destra/sinistra e premere delicatamente. Il controllo non funzionerà nel caso in cui vengano premute o ruotate più... -
Page 13: Informazioni Generali Forno
7 - Informazioni generali forno Prima di utilizzare il forno per la prima volta rimuovere tutto l'imballaggio e i corpi estranei dal forno(i). Qualunque materiale di questo tipo lasciato all'interno potrebbe fondersi o bruciare durante l'utilizzo dell'elettrodomestico. Codici errore Preriscaldamento e Preriscaldamento Rapido Questo codice appare in caso il controllo elettrico indichi Ogni qualvolta viene impostata una modalità... -
Page 14: Suggerimenti Generali Forno
8 - Suggerimenti generali forno Come preriscaldare il forno Condensa e temperatura del forno • Preriscaldare il forno quando si utilizzano le modalità • È normale che una certa quantità di umidità evapori Cottura statica, Cottura ventilata e Cottura arrosto dalle pietanze durante qualunque processo di cottura. -
Page 15: Istruzioni Per L'uso
9 - Istruzioni per l’uso Istruzioni per la prima accensione Una volta che il blocco cottura è stato collegato alla corrente elettrica per la prima volta, il controllo si prepara automaticamente per impostare una serie di impostazioni utente, che rimangono immagazzinate in caso di successive accensioni. -
Page 16: Impostazioni Utente
10 - Impostazioni Utente Temperatura e Peso Quando il forno è acceso, selezionare l’icona confermare con la manopola di funzione per entrare nel menù IMPOSTAZIONI. Questo menù consente di personalizzare le Ruotare la manopola di funzione per selezionare una delle impostazioni del proprio forno. -
Page 17: Data
Data Segnale acustico Ruotare la manopola di funzione per selezionare il formato Ruotare la manopola di funzione per selezionare il volume della data tra le opzioni “D.M.Y (Giorno Mese Anno) – del segnale acustico e confermare premendo la manopola Y.M.D. (Anno Mese Giorno) – M.D.Y. (Mese Giorno Anno)” di funzione. -
Page 18: Impostazioni Di Sistema
11 - Impostazioni di sistema Demo Quando il forno è acceso, selezionare l’icona confermare con la manopola di funzione per entrare nel menù IMPOSTAZIONI. Tale menù permette di impostare Lo scopo di questa funzione è impostare la modalità una serie di parametri o funzioni speciali. Permette inoltre DEMO, la quale rende il forno inutilizzabile per la cucina, di accedere alla lista eventi errore. -
Page 19: Avviare Il Forno
12 - Avviare il Forno Accendere e spegnere il forno Funzioni IMPORTANTE AIRFRY • Dopo aver spento il forno, la ventola di raffreddamento continua a funzionare fino a che le parti interne del SCONGELAMENTO forno non si siano raffreddate. ESSICCARE Premere la manopola [ON/OFF] per accendere il forno e premerla di nuovo per spegnerlo. - Page 20 MODALITÀ DI COTTURA ICONA PRERISCAL- SONDA TEMPERATURA DAMENTO TERMICA Min. Preimpostare Max. RAPIDO CARNE SCONGELAMENTO ESSICCARE 120˚ F (50˚ C) 140˚ F (60˚ C) 160˚ F (70˚ C) MANTENERE IN CALDO 85˚ F (30˚ C) 105˚ F (40˚ C) 120˚ F (50˚ C) MANTENERE IN CALDO PLUS 130˚...
-
Page 21: Fase Di Preriscaldamento
Fase di preriscaldamento Per selezionare PRERISCALDAMENTO RAPIDO: 1. Selezionare e avviare la modalità di cottura, dopodiché Mentre il forno è in fase di preriscaldamento, la temperatura ruotare la manopola verso DESTRA. corrente viene mostrata sotto l'icona della modalità di 2. Una volta entrati nel menù delle funzioni, selezionare cottura. -
Page 22: Funzionamento Forno In Modalità Temporizzata
13 - Funzionamento forno in modalità temporizzata Assicurarsi che data e ora siano impostate correttamente. La modalità temporizzata spegne il forno alla fine del tempo di cottura. ATTENZIONE Non lasciare mai alimenti nel forno per più di un'ora prima e dopo la cottura. Ciò... -
Page 23: Impostazione Sonda Termica Carne (Se Presente)
14 - Impostazione sonda termica carne (se presente) Quando vengono cotti arrosti, bistecche o pollame, questa Per evitare la moltiplicazione dei batteri, è necessario è il modo migliore per vedere quando la pietanza è prendere le seguenti misure: adeguatamente cotta. •... - Page 24 1. Impostare la temperatura della sonda richiesta tramite la ATTENZIONE manopola di temperatura. • Per evitare ustioni, utilizzare un guanto da cucina per rimuovere la sonda termica carne quando il forno è caldo. COTTURA CIRCOLARE VENTILATA • Rimuovere sempre la sonda utilizzando l'impugnatura. Se rimossa utilizzando il cavo, potrebbe danneggiarsi.
-
Page 25: Suggerimenti E Tecniche Per La Cottura Arrosto
Suggerimenti e Tecniche per la Cottura Arrosto momento, distribuire le teglie cosicché una teglia non sia direttamente sopra l’altra. Per risultati migliori, posizionare i dolci nella parte anteriore della griglia superiore e nella parte Arrostire è cuocere con aria riscaldata. Sia gli elementi superiori che posteriore della griglia inferiore (Vedere il grafico a destra). -
Page 26: Suggerimenti E Tecniche Per La Cottura Ventilata
Suggerimenti ricette facili e veloci I tempi di cottura grill standard o ventilato sono approssimativi e potrebbero variare leggermente. Convertire dalla COTTURA AL FORNO standard a quella VENTILATA: Ridurre la temperatura di 25°F (15°C). I tempi di cottura sono indicativi e dipendono anche dallo spessore e Utilizzare lo stesso tempo della cottura al forno se inferiore ai 10 - 15 dalla temperatura di partenza della carne prima della cottura. -
Page 27: Consigli E Tecniche Per La Frittura Ad Aria
Consigli e tecniche per la frittura ad aria Linee guida per gli accessori per la frittura ad aria • Quando si utilizza la modalità Air Fry, utilizzare solo accessori L’Air Fry è una modalità di cottura unica, progettata per sicuri per la cottura alla griglia. produrre cibi con un aspetto più... -
Page 28: Tabella Essiccazione
Tabella Essiccazione ALIMENTO PREPARAZIONE TEMPO DI ESSICCAZIONE CONTROLLO ESSICCAZIONE APPROSSIMATIVO* (ore) FRUTTA Immerse in ¼ di tazza di succo di 11 - 15 Leggermente duttili Mele limone e 2 tazze d'acqua, fette Immerse in ¼ di tazza di succo di 11 - 15 Leggermente duttili Banane... -
Page 29: Ricette
15 - Ricette La funzione Ricette del vostro forno vi da la possibilità di cucinare pietanze senza dover ogni volta impostare il forno manualmente. Selezionando una ricetta "SET", la modalità cottura, la temperatura e il tempo vengono impostati automaticamente in base alla ricetta selezionata dal menù. Lista Ricette Tipo di Alimento Condizione alimento... - Page 30 Salvare una ricetta personalizzata: Una volta che la ricetta è stata selezionata, le impostazioni TACCHINO ARROSTO “Tempo” e “Peso” possono essere cambiate e la ricetta può essere salvata tra quelle “PERSONALI”. GRIGLIA RETTANGOLARE LIVELLO 1. Una volta selezionata una ricetta, ruotare la manopola 2500g PESO di funzione e confermare premendo la medesima...
-
Page 31: Pizza Pizzeria 350°C (Su Alcuni Modelli)
16 - Pizza Pizzeria 350°C (Su Alcuni Modelli) PIZZA PIZZERIA 350˚°C è stato specificatamente studiato per cucinare al forno PIZZE perfette in appena pochi minuti. Per ottenere perfetti risultati selezionare il tasto per accedere a questa speciale ricetta. Dopo aver inserito le vostre impostazioni, le ricette Pizza Pizzeria 350˚°C faranno il resto, raggiungendo circa 650˚°F (345˚°C) attivando gli elementi riscaldanti al 100% della loro capacità. - Page 32 Suggerimenti Per Una Buona Pizza. Date le alte temperature e il tempo di cottura ridotto, raccomandiamo di inserire e rimuovere le pizze velocemente cosicché la porta rimanga aperta il minor tempo possibile e la temperatura non cali. Una volta che il segnale acustico e il display indicano che la cottura è terminata, rimuovere immediatamente la pizza, dato che i tempi di cottura sono molto brevi e anche pochi secondi possono avere un effetto importante.
-
Page 33: Istruzioni Modalità Sabbath (Su Alcuni Modelli)
17 - Istruzioni Modalità Sabbath (su alcuni modelli) La funzione Modalità Sabbath del vostro forno rispetta le norme Ebraiche. Tale funzione permette la forno di eseguire solo la funzione statica. Quando la funzione Sabbath è selezionata, le seguenti funzioni sono disabilitate: •... -
Page 34: Cura E Pulizia Del Forno
18 - Cura e Pulizia del Forno Per la pulizia non devono essere utilizzati detergenti di apertura della porta mentre l'interno del forno è a abrasivi né pulitori a vapore. temperature di pulizia. • La luce del forno non è in funzione durante questa modalità. -
Page 35: Impostare La Modalità Di Autopulizia
19 - Impostare la modalità di autopulizia Come impostare la modalità Autopulizia Come Ritardare l'Inizio della Pulizia 1. Premere la manopola ON/OFF e selezionare l’icona 1. Seguire i passaggi da 1 a 3 descritti sopra. dopodiché confermare con la medesima manopola. 2. -
Page 36: Sistema Di Blocco Della Porta (Disponibile Solo In Alcuni Modelli)
20 - Sistema di Blocco della Porta (disponibile solo in alcuni modelli) Blocco automatico della porta durante il ciclo pirolitico Per motivi di sicurezza, la porta si blocca automaticamente non appena viene selezionata la modalità auto-pulizia. La porta viene sbloccata automaticamente anche quando il tempo di pulizia è... -
Page 37: Sostituzione Della Luce Del Forno
21 - Sostituzione della luce del forno • Ciascun forno è dotato di luci alogene situate sulle pareti LUCI DEL FORNO laterali del forno. • Le luci si accendono quando la porta è aperta o quando il forno è in un ciclo di cottura. •... -
Page 38: Risoluzione Problemi Di Cottura Al Forno
22 - Risoluzione Problemi di Cottura al Forno Sia con la Cottura Tradizionale che con quella Ventilata si possono avere risultati insoddisfacenti per una serie di motivi che esulano dal cattivo funzionamento del forno. Controllare la tabella sottostante per le cause dei problemi più comuni. Dato che la dimensione, forma e materiale degli utensili da forno influisce in maniera diretta sui risultati della cottura al forno, la soluzione migliore potrebbe essere quella di sostituire utensili da forno vecchi che si sono scuriti o si sono deformati col tempo e l'utilizzo. -
Page 39: Risoluzione Problemi Funzionali
23 - Risoluzione Problemi Funzionali Prima di contattare il centro assistenza, controllare quanto segue per evitare costi di assistenza inutili. Problema forno Fasi Risoluzione Problema Errore F1030* o F2030* compare sullo schermo del display. Problema con il meccanismo di bloccaggio Rimuovere la corrente e riaccenderla dopo pochi secondi,. -
Page 40: Assistenza O Manutenzione
24 - Assistenza o Manutenzione Prima di contattare il centro assistenza, si prega di controllare "Risoluzione Problemi". Vi potrebbe far risparmiare il costo della chiamata per assistenza. Se avete ancora bisogno di aiuto, seguire le istruzioni sottostanti. Al momento della chiamata, si prega di sapere la data di acquisto, il modello completo e il numero di serie del vostro elettrodomestico. - Page 41 INDICE PAGINA INDICE PAGINA Demo 1 - Safety Instructions 12 - Starting your Oven 2 - Product Features Switching the oven on and off About Your Oven Selecting the cooking mode Cooling Fan Changing the cooking mode Rack Positions Changing temperature Baking Elements Pre-heating phase Grilling Element...
-
Page 42: Safety Instructions
1 - Safety Instructions • Children should be overseen so as to ensure that they don’t play with the equipment. • Keep children under age 8 away, unless constantly supervised. • This appliance is not intended for use by persons (including children over age 8) with reduced physical sensory or mental capabilities, or lack of experience and knowledge, unless they have been given... -
Page 43: Product Features
2 - Product Features Broil Element Cooling Vents Control panel Door gasket Halogen Light Meat probe (if present) Halogen Light Halogen Light Medel and Serial # Plate Bottom Element (not visible) Convection Fan and Element (not visible) About Your Oven Rack Positions Above you will find an illustration of an oven showing the The oven has rack guides at six levels as shown in the... -
Page 44: Baking Elements
Baking Elements The oven uses two elements for baking: one located at the top of the oven and the second located below the floor of the oven cavity to provide ease in cleaning the oven cavity. Grilling Element The grilling element of the oven is located at the top of the oven cavity. -
Page 45: Installation Of The Oven
3 - Installation of the Oven Respect for the environment To install the oven into the kitchen a cutout should be made The documentation for this appliance is printed on paper in accordance with the dimensions shown in the Cutout & bleached without chlorine or recycled paper to contribute Dimensions figure. - Page 46 CUTOUT & DIMENSIONS Appliances 72.2 59.0 69.2 69.2 Min. 1.3 70.7 75.4 86.5 Min. 1.9 Single oven Dimensions are in centimeters...
-
Page 47: Electrical Supply
4 - Electrical Supply Connecting The Oven To The Mains The manufacturer can not be held responsible for any damages to persons or objects caused by failure to observe these instructions. For connecting use a flexible rubber cable of the H05SS-F Before installing the oven have a qualified electrician verify type (3x2 5 mm2 min) remembering to make it long enough that your home is provided with adequate electrical service... -
Page 48: Instructions For Use
5 - Instructions for Use The first time you use the oven To remove oven rack from the oven: Clean the oven thoroughly with soapy water and rinse well. 1. Pull rack forward Operate the oven for about 30 minutes at maximum temperature to burn off all traces of grease which might otherwise create unpleasant smells when cooking. - Page 49 To remove extendable rack from the oven: 1. Lift of rack slightly and push it until the stop release 2. Raise back of rack until frame and stop clear rack guide 3. Pull rack down and out To replace an extendable rack: 1.
-
Page 50: Control Panel
6 - Control Panel Your appliance could vary slightly compared to the illustrations below. - Display screen - Large oven control knobs Command Knobs To operate the control knobs, rotate them to left/right press gently. The control will not work if more than one knobs is pressedor rotate at the same time. -
Page 51: General Oven Information
7 - General Oven Information Before using your oven for the first time remove all packing and foreign materials from the oven(s). Any material of this sort left inside may melt or burn when the appliance is used. Error codes Preheat and Fast Preheat This code appears in the event of the electronic control Whenever a cooking made is set and the oven is heating,... -
Page 52: General Oven Tips
8 - General Oven Tips Preheating the Oven Oven Condensation and Temperature • Preheat the oven when using the Bake, Convection Bake • It is normal for a certain amount of moisture to evaporate and Convection Roast modes. from the food during any cooking process. The amount depends on the moisture content of the food. -
Page 53: Instruction For Use
9 - Instruction for Use Instruction for initial switch-on Once the range has been connected to the power supply for the first time, the control atomatically prepares for setting a number of user settings, which remain stored in case of any subsequent switch-on. -
Page 54: User Settings
10 - User Settings Temperature & Weight With the oven on, select the iconand confirm with the function knob to enter the SETTINGS menu. This menu permits personalizing the settings of your oven. To make Rotatethe [FUNCTION] knob to selectone of the two access, no active cooking or any set time functions must be temperature options “°C/°F”... -
Page 55: Date
Date Beeper Rotate the [FUNCTION] knob to select the date format from Rotate the [FUNCTION] knob to select the required beep among the options “D.M.Y. – Y.M.D. – M.D.Y.” and confirm level and confirm by means of pressing the [FUNCTION] by means of pressing the [FUNCTION] knob. -
Page 56: System Setting
11 - System Setting Demo With the oven on, select the icon and confirm with the [FUNCTION] knob to enter the SETTINGS menu. This menu permits setting a number of parameters or special functions. The purpose of this function is to set the DEMO mode, It also permits accessing the error events list. -
Page 57: Starting Your Oven
12 - Starting your Oven Switching the oven on and off Functions IMPORTANT DEFROST • After switching off the oven, the cooling fan could continue to operate until the inner parts of the oven DEHYDRATE have cooled down. WARM Press the [ON/OFF] knob to switch the oven ON and press again to switch it OFF. - Page 58 COOKING MODE ICON FAST MEAT TEMPERATURE PREHEAT PROBE Min. Preset Max. DEFROST DEHYDRATE 120˚ F (50˚ C) 140˚ F (60˚ C) 160˚ F (70˚ C) WARM 85˚ F (30˚ C) 105˚ F (40˚ C) 120˚ F (50˚ C) WARM PLUS 130˚...
-
Page 59: Pre-Heating Phase
Pre-heating phase To select FAST PREHEAT: 1. Select and start the cooking mode and turn the knob While the oven is in pre-heating phase, the instantaneous tothe RIGHT. temperature is displayed underneath the cooking mode 2. After entering the functions menu, select the icon icon. -
Page 60: Time Oven Mode Operation
13 - Time Oven Mode Operation Be sure that the time-of-day clock is displaying the correct time. The timed mode turns off the oven at the end of the cook time. CAUTION Never leave food in the oven for more than one hour before and after cooking. This could deteriorate the properties of the food itself. -
Page 61: Setting The Meat Probe (If Present)
14 - Setting the Meat Probe (if present) When roasts, steaks or poultry are being cooked, this is the To prevent bacteria from multiplying, it is necessary to take best way to tell when the food is correctly cooked. the following measures: This oven is optionally provided with the meat probe feature •... - Page 62 1. Set the required probe temperature by means of the WARNING [TEMPERATURE] knob. • To avoid burns, use a kitchen glove to fit and remove the meat probe when the oven is hot. • Always remove the probe using the grip. If it is removed by pulling the cable, it could suffer damage.
-
Page 63: Roast Tips And Techniques
Roast Tips and Techniques - When baking four cake layers at the same time, stagger pans so that one pan is not directly above another. For best results, place cakes on front of upper rack and Roasting is cooking with heated air. Both upper and lower back of lower rack (See graphic at right). -
Page 64: Convection Roast Tips And Techniques
Quick and easy recipe tips Broiling and convection broiling times are approximate and may vary slightly. Converting from standard BAKE to CONVECTION BAKE: Reduce the temperature by 25°F (15°C). Cooking times are indicative and also depend on the Use the same baking time as Bake mode if under 10 to 15 thickness and the starting temperature of the meat before minutes. -
Page 65: Air Fry Tips And Techniques
Air Fry Tips and Techniques Air Fry Cookware Guidelines • Only use broil safe cookware when using Air Fry mode. Air Fry is a unique cooking mode that is designed to produce • Oven baking baskets and baking grids can also be used. A sheet foods with a crispier exterior than traditional oven cooking. -
Page 66: Dehydrate Chart
Dehydrate Chart FOOD PREPARATION APPROXIMATE TEST FOR DONENESS DRYING TIME* (hrs) FRUIT Dipped in ¼ cup lemon juice and 11 - 15 Slightly pliable Apples 2 cups water, ¼ slices Dipped in ¼ cup lemon juice and 11 - 15 Slightly pliable Bananas 2 cups water, ¼... -
Page 67: Recipes
15 - Recipes The Recipe function of your oven gives you the chance to cook food without having to set the oven manually every time. By selecting a “SET” recipe, the cooking mode, the temperature and the time are automatically set according to the recipe selected from the menu. - Page 68 7. To start the recipe, confirm by pressing the [FUNCTION] 4. At this point, the recipe can be saved in the list of knob. “PERSONAL” recipes by selecting “SAVE” and confirming During a recipe, a number of acoustic and visual messages by means of the [FUNCTION] knob.
-
Page 69: Pizza Pizzeria 350°C (On Some Models)
16 - Pizza Pizzeria 350°C (on some models) The PIZZA PIZZERIA 350˚°C was specifically designed so you can bake perfect PIZZAS in just a few minutes. For perfect results, select the to access this special recipe. After you make your settings, Pizza Pizzeria 350˚°C recipes will do the rest, reaching about 650°F (345°C) by turning on the heating elements at 100% of their capacity. - Page 70 Tips For A Good Pizza: Given the high temperatures and short baking time, we recommend that you insert and remove the pizzas quickly so that the door is open for as short a time as possible and the temperature doesn’t drop. Once the beep and display indicate that baking is finished, immediately remove the pizza, since the cooking times are very short and even a few seconds can have a significant effect.
-
Page 71: Sabbath Mode Instructions (On Some Models)
17 - Sabbath Mode Instructions (on some models) The Sabbath Mode function of your oven complied with Jewish laws. This function allows the oven to perform only the static function. When the Sabbath function is selected, the following functions are disabled: •... -
Page 72: Oven Care And Cleaning
18 - Oven Care and Cleaning Abrasive detergents and steam cleaning equipment should help eliminate odors associated with Self-Clean. Odors not be used for cleaning. will lessen with use. • Three hours is the preset length of cleaning. WARNING • The mode automatically stops at the end of the clean hours. -
Page 73: Setting The Self Cleaning Mode
19 - Setting The Self Cleaning Mode To Set the Self-Clean Mode To Delay the Start of Cleaning 1. Press the ON/OFF knob and select the icon and then 1. Follow steps 1 through 3 above. confirm with the same knob . 2. -
Page 74: Automatic Door Locking During Pyrolytic Cycle
20 - Door Locking System (only available in some models) Automatic door locking during pyrolytic cycle For safety reasons, the door is locked automatically as soon as self-clean mode is selected (both standard, both eco clean). The door is also unlocked automatically when the clean time has expired but only after the temperature has fallen below the safety threshold. -
Page 75: Replacing An Oven Light
21 - Replacing an Oven Light Replacing an Oven Light OVEN LIGHT • Each oven is equipped with halogen lights located in the lateral walls of the oven. • The lights are switched on when the door is opened or when the oven is in a cooking cycle. -
Page 76: Solving Baking Problems
22 - Solving Baking Problems SWith either Bake or Convection Bake, poor results can occur for many reasons other than a malfunction of the oven. Check the chart below for causes of the most common problems. Since the size, shape and material of baking utensils directly affect the baking results, the best solution may be to replace old baking utensils that have darkened and warped with age and use. -
Page 77: Solving Operational Problems
23 - Solving Operational Problems Before contacting service, check the following to avoid unnecessary service charges. Oven Problem Problem Solving Steps Error F1030* or F2030* appears in the display window. A problem with latch mechanism occurred. Remove power and turn it back on again after a few seconds. The oven should run a latch auto–test. -
Page 78: Assistance Or Service
24 - Assistance or Service Before contacting service, please check “Troubleshooting.” It may save you the cost of a service call. If you still need help, follow the instructions below. When calling, please know the purchase date and the complete model and serial number of your appliance. - Page 80 09FL10530 06/24...
Need help?
Do you have a question about the SOFIA FSO 300 P MK 2F X and is the answer not in the manual?
Questions and answers