
Related Manuals for Zapi AC0


Summary of Contents for Zapi AC0
- Page 1 ELECTRONIC INDUSTRIAL DEVICES 42028 - POVIGLIO - (R.E.) - Via Parma, 59 - ITALIA Tel. +39 0522 960050 (r.a.) - Fax +39 0522 960259 - e-mail: zapi@zapispa.it AC0 INVERTER OPERATING HANDBOOK AND FUNCTION DESCRIPTION...
-
Page 2: Table Of Contents
INDEX Page Introduction ....................3 Specification ....................3 Technical specifications ................. 3 Control unit ..................... 4 2.2.a Microswitches ................4 2.2.b Accelerator unit ................4 2.2.c Other analog control unit ..............5 2.2.d Speed feedback................5 Protection features ................6 Operational features ................ - Page 3 Description of Console Restore function ..........52 Description of Alarms menu ..............53 Description of Console Program Vacc function ........54 AC0 Inverter diagnostic ................55 Analysis of alarms displayed on console ..........55 Recommended Spare parts for inverter ............ 60 Periodic Maintenance to be repeated at times indicated ......
-
Page 4: Introduction
(Vbatt=36V). This model is available in the standard format, using an encoder, but it's also thought (work in progress) for sensorless control (no shaft encoder is required). The AC0 can directly replace an AC1 inverter having exactly the same I/O connections and param- eter settings. -
Page 5: Control Unit
2.2 CONTROL UNIT 2.2.a Microswitches - The microswitches must have a contact resistance lower than 0.1Ω and a leakage current lower than 100µA. - When full load connected, the voltage between the key switch contacts must be lower than 0.1V. - The microswitches send a voltage signal to the microprocessor when a function request (for ex.: running request) is made. -
Page 6: Other Analog Control Unit
The two graphs show the output voltage from a non-calibrated potentiometer with respect to the mechanical “zero” of the control lever. MI and MA indicate the point where the direction switches close. 0 represents the mechanical zero of the rotation. The Left Hand graph shows the relationship of the motor voltage without signal acquisition being made. -
Page 7: Protection Features
2.3 PROTECTION FEATURES - Battery polarity inversion It is necessary to fit a MAIN CONTACTOR to protect the inverter against reverse battery polarity and for safety reasons. - Connection Errors All inputs are protected against connection errors. - Thermal protection If the chopper temperature exceeds 78°C, the maximum current is reduced in proportion to the thermal increase. -
Page 8: Operational Features
2.4 OPERATIONAL FEATURES - Speed control. - Optimum behaviour an a slope due to the speed feedback: - the motor speed follows the accelerator, starting a regenerative braking if the speed overtakes the speed set-point. - the system can perform an electrical stop on a ramp (the machine is electrically hold on a slope) for a programmable time (see also chapter 4) - Stable speed in every position of the accelerator. -
Page 9: Diagnosis
2.5 DIAGNOSIS The microprocessor continually monitors the inverter and carries out a diagnostic proce- dure on the main functions. The diagnosis is made in 4 points 1) Diagnosis on key switch closing that checks: watchdog circuit, current sensor, capaci- tor charging, phase's voltages, contactor drives, can-bus interface, if the switch se- quence for operation is correct and if the output of accelerator unit is correct. -
Page 10: Susceptibility And Electromagnetic Emission
EN50081-2). 2.9 MAIN CONTACTOR AND EMERGENCY SWITCH - The connection of the battery line switches must be carried out following ZAPI instruc- tions. - If a mechanical battery line switch is installed, it is necessary that the key supply to the inverter is open together with power battery line;... -
Page 11: Installation
3 INSTALLATION Install the chopper with the base-plate on a flat metallic surface that is clean and unpainted. Apply a light layer of thermo-conductive grease between the two surfaces to permit better heat dissipation. Ensure that the wiring of the cable terminals and connectors is carried out correctly. Fit transient suppression devices to the horn, solenoid valves, and contactors not con- nected to the chopper such as those for activating the pump motor or steering motor. -
Page 12: Description Of Connectors - Standard Version
3.4 DESCRIPTION OF CONNECTORS - STANDARD VERSION Negative of main contactor coil. PLC , PEB Positive of main contactor coil and (optional) electromechanical brake coil. NBRAKE Output for driving the electromechanical brake coil; drives the load to -Batt. Maximum current : 3A. Negative of pump contactor coil. - Page 13 Connected to the power supply through a microswitch (KEY) with a 10A fuse in series (this could be mounted on the AC0 cover). Common of FW / BW / SR1 / SR2 / SR3 / TILLER / H&S / BELLY / LIFTING / LOWERING microswitches.
-
Page 14: Description Of Connectors - Mdi Prc Version
3.5 DESCRIPTION OF CONNECTORS - MDI PRC VERSION Negative of main contactor coil. PLC , PEB Positive of main contactor coil and (optional) electromechanical brake coil. NBRAKE Output for driving the electromechanical brake coil; drives the load to -Batt. Maximum current : 3A. Negative of pump contactor coil. - Page 15 Connected to the power supply through a microswitch (KEY) with a 10A fuse in series (this can be mounted on the AC0 cover). Common of FW / BW / SR1 / LIFT AUX / LOW AUX / TILLER / H&S / BELLY / LIFTING / LOWERING microswitches.
-
Page 16: Encoder Installation
3.6 ENCODER INSTALLATION 1) AC0 card is fit for different types of encoder. To control AC motor with Zapi inverter, it is necessary to install an incremental encoder with 2 phases shifted of 90°. The en- coder power supply can be +5 or +12V. It can have different electronic output. -
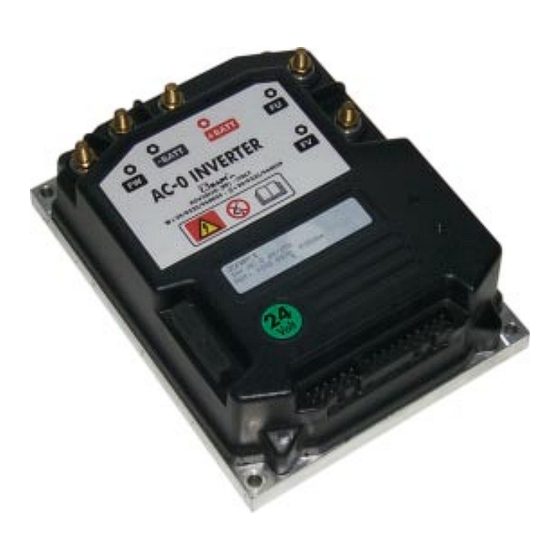
Page 17: Description Of Power Connections
3.7 DESCRIPTION OF POWER CONNECTIONS View of the power bars: -BATT Negative of the battery. +BATT Positive of the battery. FU; FV; FW Connection bars of the three motor phases; follow this sequence and the indication on the motor. Page 16... -
Page 18: Mechanical Drawing
3.8 MECHANICAL DRAWING Page 17... -
Page 19: Connection Drawing - Standard Version
3.9 CONNECTION DRAWING - STANDARD VERSION Page 18... -
Page 20: Connection Drawing - Mdi Prc Version
3.10 CONNECTION DRAWING - MDI PRC VERSION Page 19... -
Page 21: Programming & Adjustments Using Digital Console
4 PROGRAMMING & ADJUSTMENTS USING DIGITAL CONSOLE 4.1 ADJUSTMENTS VIA CONSOLE Adjustment of Parameters and changes to the inverter’s configuration are made using the Digital Console. The Console is connected to the “C” connector of the inverter. 4.2 DESCRIPTION OF CONSOLE & CONNECTION Digital consoles used to communicate with AC inverter controllers must be fitted with EPROM CK ULTRA, minimum "Release Number 3.02". -
Page 22: Description Of Standard Console Menu
4.3 DESCRIPTION OF STANDARD CONSOLE MENU 4.3.a Standard Version Page 21... -
Page 23: Mdi Prc Version
4.3.b MDI PRC Version Page 22... -
Page 24: Function Configuration
4.4 FUNCTION CONFIGURATION 4.4.a Standard Version SUBMENU "SET OPTIONS" TILLER SWITCH - HANDLE input B3 is managed as a tiller input. - SEAT input B3 is managed as a seat input. SET INPUT #1 - OPTION #1: input A13 is managed as a motor thermal sensor analog input. - OPTION #2: input A13 is managed as a cutback speed input (SR#1 - HW modification required). - Page 25 STOP ON RAMP - ON: the stop on ramp feature (truck electrically hold on a ramp) is managed for a time established by "auxiliary time" parameter. After this time, the behaviour depends on the "aux output #1" option programmation (see also the following table). - OFF: the stop on ramp feature is not performed.
- Page 26 - NONE: Means that there aren't any switch or potentiometer installed on the brake. 12QUICK INVERSION - NONE The quick inversion function is not managed. - TIMED The quick inversion function is timed. - BELLY The quick inversion function is managed but not timed. 13AUX VOLTAGE #1 this parameter permits to program the supply voltage of the main contactor coil and the electromechanical brake.
- Page 27 9 THROTTLE Y POINT: These parameter change the characteristic of the accelerator input curve. VACC MIN and VACC MAX are values programmable by the "Program Vacc" function. 10 ADJUSTMENT #01: adjust the upper level of the battery discharge table. 11 ADJUSTMENT #02: adjust the lower level of the battery discharge table.
- Page 28 STOP BEHAVIOUR ON A SLOPE OUTPUT OUTPUT RAMP The truck is electrically hold on a slope; when the time set by "auxiliary time" parameter is elapsed -Drives the coil of a electromagnetic BRAKE the brake is applied and the 3- brake.
-
Page 29: Mdi Prc Version
4.4.b MDI PRC Version SUBMENU "SET OPTIONS" TILLER SWITCH - HANDLE input B3 is managed as a tiller input. - SEAT input B3 is managed as a seat input. SET INPUT #1 - OPTION #1: input A13 is managed as a motor thermal sensor analog input. - OPTION #2: input A13 is managed as a cutback speed input (SR#1 - HW modification required). - Page 30 8 AUX OUTPUT #1 - BRAKE: output A3 drives an electromagnetic brake coil (see also the table below). - HYDRO CONT.: the inverter manages an hydraulic steering function when the direction input or brake pedal input are active or a movement of the truck is detected.
- Page 31 11AUX VOLTAGE #1 this parameter permits to program the supply voltage of the main contactor coil and the electromechanical brake. 12PERFORMANCE - OPTION #1 Set of parameter which determines a "Low Performance". - OPTION #2 Set of parameter which determines a "High Performance". 13VALVE 1 TYPE - OPTION #1 Electrovalve n°1 is an On/Off valve.
- Page 32 11 THROTTLE Y POINT: These parameter change the characteristic of the accelerator input curve. VACC MIN and VACC MAX are values programmable by the "Program Vacc" function. 10ADJUSTMENT #01: adjust the upper level of the battery discharge table. 11ADJUSTMENT #02: adjust the lower level of the battery discharge table.
- Page 33 STOP BEHAVIOUR ON A SLOPE OUTPUT OUTPUT RAMP The truck is electrically hold on a slope; when the time set by "auxiliary time" parameter is elapsed -Drives the coil of a electromagnetic BRAKE the brake is applied and the 3- brake.
- Page 34 Flow chart showing how to make changes to OPTION Menu. 1) Opening Zapi Menu 2) Press Top Left & Right Buttons to enter SET Menu. 3) The Display will show: SET MODEL 4) Press ROLL UP or ROLL DOWN button until SET MODEL Menu appears.
- Page 35 Flow chart showing how to make changes to ADJUSTMENT Menu 1) Opening Zapi Menu 2) Press Top Left & Right Buttons to enter CONFIG Menu. 3) The display will show: SET MODEL 4) Press ROLL UP or ROLL DOWN button until ADJUSTMENTS Menu appears.
- Page 36 Flow chart showing how to use the SET BATTERY TYPE adjustment 1) Opening Zapi Menu 2) Press Top Left & Right Buttons to enter CONFIG Menu. 3) The Display will show: SET MODEL 4) Press ROLL UP button until ADJUSTMENTS. menu appears.
- Page 37 12) Press OUT to exit the Menu. 13) Confirmation request appears. 14) Press ENTER to accept the changes, or press OUT if you do not accept the changes. 15) ADJUSTMENTS Menu appears. 16) Press OUT. Display now show the Opening Zapi Menu. Page 36...
-
Page 38: Parameter Regulation: Standard Version
4.5 PARAMETER REGULATION: STANDARD VERSION The following parameters can be modified: ACC DELAY: determines the acceleration ramp. RELEASE BRAKING: controls the deceleration ramp when the travel request is released. INVERSION BRAKING: controls the deceleration ramp when the direction switch is inverted during travel.. PEDAL BRAKING: determines the deceleration ramp when the travel request is released and the brake pedal switch is... - Page 39 PROGRAMMED LEVEL UNIT PARAMETER ACCELERATION DELAY (*) Sec. RELEASE BRAKING (**) Sec. INVERS BRAKING (**) Sec. PEDAL BRAKING (**) Sec. SPEED LIMIT BRAKING (**) Sec. BRAKE CUTBACK (**) Sec. MAX SPEED FW MAX SPEED BW CUTBACK SPEED 1 %Max Sp CUTBACK SPEED 2 %Max Sp CUTBACK SPEED 3...
-
Page 40: Parameter Regulation: Mdi Prc Version
4.6 PARAMETER REGULATION: MDI PRC VERSION The following parameters can be modified: ACC DELAY: determines the acceleration ramp. RELEASE BRAKING: controls the deceleration ramp when the travel request is released. INVERSION BRAKING: controls the deceleration ramp when the direction switch is inverted during travel.. PEDAL BRAKING: determines the deceleration ramp when the travel request is released and the brake pedal switch is... - Page 41 18 MAX VALVE 1: this parameter determines the maximum voltage applied on the electrovalve 1 when the position of the potentiometer is at the maximum. If the electrovalve 1 is programmed like a On/Off valve (see the configuration chapter) this parameter determines the voltage applied on the electrovalve coil.
- Page 42 The following table shows the different values at which the parameters can be set. PROGRAMMED LEVEL UNIT PARAMETER ACCELERATION DELAY (*) Sec. RELEASE BRAKING (**) Sec. INVERS BRAKING (**) Sec. PEDAL BRAKING (**) Sec. SPEED LIMIT BRAKING (**) Sec. BRAKE CUTBACK (**) Sec.
- Page 43 1) Opening Zapi Display. 2) Press ENTER to go into the General Menu. 3) The Display will show : 4) Press ENTER to go into the Parameter Change facility. 5) The Display will show the first parameter. 6) Press either ROLL UP and ROLL DOWN to display the next parameter.
-
Page 44: Programming Console Functions
4.7 PROGRAMMING CONSOLE FUNCTIONS - Functional configuration (see 4.1 , 4.2 , 4.3 , 4.4) - Parameter programming (see 4.5 , 4.6) - Tester: the user can verify the state of the following parameters: STANDARD Version MDI PRC Version battery voltage (V) battery voltage (V) motor voltage (%) motor voltage (%) -
Page 45: Sequence For Ac Inverter Traction Setting
4.8 SEQUENCE FOR AC INVERTER TRACTION SETTING When the "Key Switch" is closed, if no alarms or errors are present, the Console Display will be showing the Standard Zapi Opening Display. If the chopper is not configured to your requirements, follow the sequence detailed on Chapter 5.2 . -
Page 46: Tester: Description Of The Function; Standard Version
4.9 TESTER: DESCRIPTION OF THE FUNCTION; STANDARD VERSION The most important input or output signals can be measured in real time using the TE- STER function of the console. The Console acts as a multimeter able to read voltage, current and temperature. The following definition listing shows the relative measurements : 1) BATTERY VOLTAGE: level of battery voltage measured at the input to the key switch. - Page 47 19) SEAT SWITCH: the level of the Seat Microswitch digital entry. ON / +VB = active entry of closed switch. OFF / GND = non active entry of open switch. TILLER SWITCH: the level of the Tiller Microswitch digital entry. ("Tiller switch" option set as "Handle").
- Page 48 24) CUTBACK SWITCH 3: the level of the Speed Reduction Microswitch 3. ("Set Input #3" option set as "Present"). ON / GND = active entry of open switch. OFF / +VB = non active entry of closed switch. INCHING BACK: the level of the Inching Microswitch - Backward direction. ("Set Input #3"...
-
Page 49: Tester: Description Of The Function; Mdi Prc Version
4.10 TESTER: DESCRIPTION OF THE FUNCTION; MDI PRC VERSION The most important input or output signals can be measured in real time using the TE- STER function of the console. The Console acts as a multimeter able to read voltage, current and temperature. - Page 50 19) SEAT SWITCH: the level of the Seat Microswitch digital entry. ON / +VB = active entry of closed switch. OFF / GND = non active entry of open switch. TILLER SWITCH: the level of the Tiller Microswitch digital entry. ("Tiller switch" option set as "Handle").
- Page 51 9) When you have finished, Press OUT. 10) The Display shows : 11) Press OUT again and return to Opening Zapi Display. Remember it is not possible to make any changes using TESTER. All you can do is measure as if you were using a pre-connected multimeter.
-
Page 52: Other Functions
10) You can see the items that are being stored whilst the SAVE routine is happening. 11) When finished, the Console shows : 13) Press OUT to return to the Opening Zapi Display. NOTE: in reality the SAVE and RESTORE function requires the Windows PC-Console. Page 51... -
Page 53: Description Of Console Restore Function
RESTORE routine is happening. 12) When finished the Console displays : 13) Press OUT to return to the Opening Zapi Display . NOTE: in reality the SAVE and RESTORE function requires the Windows PC-Console. Page 52... -
Page 54: Description Of Alarms Menu
10) When you have finished looking at the Alarms, press OUT to exit the ALARMS menu. 11) The Display will ask CLEAR LOGBOOK ? 12) Press ENTER for yes, or OUT for NO. 13) Press OUT to return to the Opening Zapi Display. Page 53... -
Page 55: Description Of Console Program Vacc Function
11) Select the Reverse Direction and repeat Item 10. 12) When finished , press OUT. 13) The Display will ask : ARE YOU SURE ? 14) Press ENTER for yes, or OUT for NO. 15) Press OUT again to return to the Opening Zapi Menu. Page 54... -
Page 56: Ac0 Inverter Diagnostic
6 AC0 INVERTER DIAGNOSTIC The alarms are signalled by a diagnostic LED. 1 blink: logic failure ("WATCHDOG", "EEPROM KO", "LOGIC FAIL- URE #1", "LOGIC FAILURE #2", "LOGIC FAILURE #3", "CHECK UP NEEDED"). 2 blinks: running request on start-up or error in seat sequence or double direction request ("INCORRECT START", "HANDBRAKE",... - Page 57 4. LOGIC FAILURE #2 Fault in the hardware section of the logic board which manages the phase' s voltage feedback. Replace the logic board. 5. LOGIC FAILURE #3 Fault in the hardware section of the logic board which manages the hardware current protection.
- Page 58 Possible reasons: a) the charging resistance is opened; if it is opened. b) The charging circuit has a failure. c) There is a problem on the power modules. 11. VMN LOW, VMN HIGH The test is carried out during initial diagnosis and in standby. Possible causes: a.
- Page 59 18. MDI COIL SHORTED This failure is detected by MDI PRC and the information is sent to AC0 by Can-Bus link. It means MDI PRC has detected a short-circuit on a coil of one of the On/Off valves.
- Page 60 24. THERMIC SENSOR KO The range of inverter temperature sensor is always checked and a warning is signalled if it is out of range. When this alarm is signalled, check the connection of the sensors. 25. CAN BUS KO The diagnosis of the CAN-BUS line is present only if the inverter uses this link (de- pends on the software version).
-
Page 61: Recommended Spare Parts For Inverter
7 RECOMMENDED SPARE PARTS FOR INVERTER Part Number Description C29508 SW 180 24V Single Pole Contactor Page 60... -
Page 62: Periodic Maintenance To Be Repeated At Times Indicated
The installation of this electronic controller should be made according to the diagrams included in this Manual. Any variations or special requirements should be made after consulting a Zapi Agent. The supplier is not responsible for any problem that arises from wiring methods that differ from information included in this Manual.
Need help?
Do you have a question about the AC0 and is the answer not in the manual?
Questions and answers