Table of Contents
Advertisement
Quick Links
Download this manual
See also:
User Manual
Advertisement
Table of Contents

Related Manuals for Airlink101 AR570WV2


Summary of Contents for Airlink101 AR570WV2
-
Page 1: Quick Installation Guide
Quick Installation Guide Wireless N 150 Green Router Model # AR570Wv2 Ver. 1A... -
Page 2: Package Contents
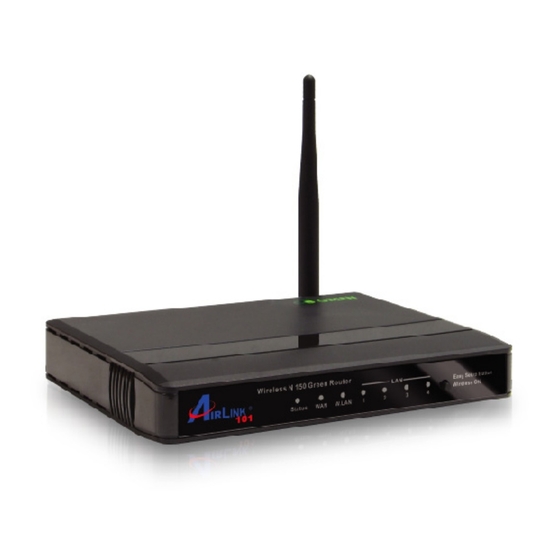
Setup CD • Quick Installation Guide • Ethernet Cable Section 1 This Quick Installation Guide only provides basic instructions. For detailed information on using this product, please refer to the User’s Manual on the supplied CD. Hardware Introduction A. Front Panel... - Page 3 Easy Setup When Wireless is ON, press this button and release it Button immediately to start security synchronization function (WPS (WPS compatible). compatible) Press this button and hold it for about 1 sec. to turn Wireless On on/off router’s wireless radio.
- Page 4 1 - 4 Local Area Network (LAN) ports 1 to 4. Wide Area Network (WAN / Internet) port. Press this button and hold it for 4 seconds to restore factory RESET default settings. Power connector, connects to A/C power adapter.
-
Page 5: Configuring The Router
Prior to connecting the router, be sure to power off your computer, DSL/Cable modem, and the router. Step 1 Connect one end of a network cable to the WAN port of the router and connect the other end of the cable to the DSL/Cable modem. Step 2 Power on the modem. - Page 6 Step 4 Plug the power adapter to the router and connect it to an electrical outlet. Step 5 Power on your computer.
- Page 7 Step 6 Check LEDs of the router: make sure Status, WAN, W.LAN, and the LAN port that the computer is connected to are ON. If one or more LEDs are not on, please refer to Section 4 Troubleshooting. Step 7 Insert the Setup CD into CD-ROM drive.
- Page 8 Windows 7 and Vista users: An AutoPlay window pops up on screen. Please make sure you give permission to run the setup program by clicking Run Autorun.exe. Step 9 Select your language and click Next.
- Page 9 Step 11 Please make sure your computer is connected to the one of the four LAN ports of the router, and your modem is connected to the WAN port of the router. Click Next to configure the basic wireless settings...
- Page 10 WPA2-PSK for best wireless security. Step 13 Configure the SSID (wireless network name, i.e. Airlink101), Channel, Security and Key. It is suggested to select WPA2-PSK for best wireless security. Enter 8~63 characters into Key box, then click Next.
- Page 11 Step 15 Enter the settings based on your WAN service type. Cable (Dynamic IP) If you are using cable Internet service, your WAN type is “Dynamic IP”. You do not need to configure anything here, and then click Next to continue.
- Page 12 DSL (PPPoE or Dynamic IP) For DSL users, your WAN type is either PPPoE or Dynamic IP. You can try both types and determine which one works for you.
- Page 13 For PPPoE settings, please enter the user name and password provided by your ISP (Internet Service Provider). Note: Depending on the settings provided by your ISP, you may need to include the domain name with your user name. Example: username@sbcglobal.net Step 16 Verify the settings you have configured.
- Page 14 Click Next to test the Internet Connection, or you can ignore the test, and just open the Internet browser and verify if your computer is connected to the Internet. If your computer is not connected to the Internet, please go to Section 4, Troubleshooting.
- Page 15 “Open the default web browser to access the advanced configuration”. You will see the status of the router on the web configuration page brought up by the web browser. Valid numbers should be assigned to IP Address, Subnet Mask and Gateway, instead of all 0’s.
- Page 16 Congratulations! Your router is configured successfully.
- Page 17 In this section, you can find the instructions of how to connect to the router wirelessly with your Windows 7 computer. You can also refer to the manual of your wireless adapter on how to connect to the router wirelessly.
- Page 18 Step 2 Enter the key you configured in Step 13 if you have enabled the wireless security, then click OK. The wireless connection should be now established.
-
Page 19: Troubleshooting
Troubleshooting A. Diagnosing problems from LED indicators: 1. If the WAN LED is off, but Status LED is on, please check if the modem is powered on, and the network cable from the modem is plugged into the WAN port of the router. - Page 20 Step 3 Turn on the router and wait for the lights on the router to settle down. Step 4 Turn on the computer. C. Your wireless adapter is not connected to the Router: Please make sure your wireless adapter is connected the Router with the correct security key you configured at Step 13.
-
Page 21: Technical Support
Compatibility with 802.11n devices from other manufacturers is not guaranteed. Specifications are subject to change without notice. Photo of product may not reflect actual content. All products and trademarks are the property of their respective owners. Copyright© 2012 Airlink101®...
Need help?
Do you have a question about the AR570WV2 and is the answer not in the manual?
Questions and answers