Table of Contents
Advertisement
Quick Links
Advertisement
Table of Contents

Related Manuals for Bosch TIE20301IN


Summary of Contents for Bosch TIE20301IN
- Page 1 Fully automatic espresso machine TIE20301IN [en] Information for Use...
-
Page 6: Table Of Contents
Further information and explanations are available online: Table of contents 1 Safety ........... 8 7.4 Dispensing drinks with milk .. 17 1.1 General information.... 8 7.5 Dispensing a coffee drink 1.2 Intended use...... 8 with milk........ 18 1.3 Restriction on user group.. 8 7.6 Frothing up milk ...... - Page 7 14 Customer Service.... 33 14.1 Product number (E-Nr.) and production number (FD).. 33 14.2 Warranty conditions.... 34 15 Technical specifications.. 36...
-
Page 8: Safety
en Safety 1 Safety Observe the following safety instructions. 1.1 General information ¡ Read this instruction manual carefully. ¡ Keep the instruction manual and the product information safe for future reference or for the next owner. ¡ Do not connect the appliance if it has been damaged in transit. 1.2 Intended use Only use this appliance: ¡... - Page 9 Safety en Children may breathe in or swallow small parts, causing them to suffocate. ▶ Keep small parts away from children. ▶ Do not let children play with small parts. WARNING ‒ Risk of electric shock! Incorrect installation is dangerous. ▶ Connect and operate the appliance only in accordance with the specifications on the rating plate.
- Page 10 en Safety WARNING ‒ Risk of fire! The appliance will become hot. ▶ Ventilate the appliance adequately. ▶ Never operate the appliance in a cabinet. It is dangerous to use an extended power cord and non-approved adapters. ▶ Do not use extension cables or multiple socket strips. ▶...
- Page 11 Safety en WARNING ‒ Danger: Magnetism! The appliance contains permanent magnets. These may affect electronic implants, e.g. pacemakers or insulin pumps. ▶ People with electronic implants must stand at least 10 cm away from the appliance. ▶ This minimum distance of 10 cm must also be observed for the water tank when removed.
-
Page 12: Environmental Protection And Saving Energy
en Environmental protection and saving energy Note: Different accessories are en- Environmental protection and saving energy 2 Environmental protec- closed depending on the appliance model. This accessory is shown in a tion and saving energy frame with a dashed line. Environmental protection and saving energy → Fig. -
Page 13: Appliance
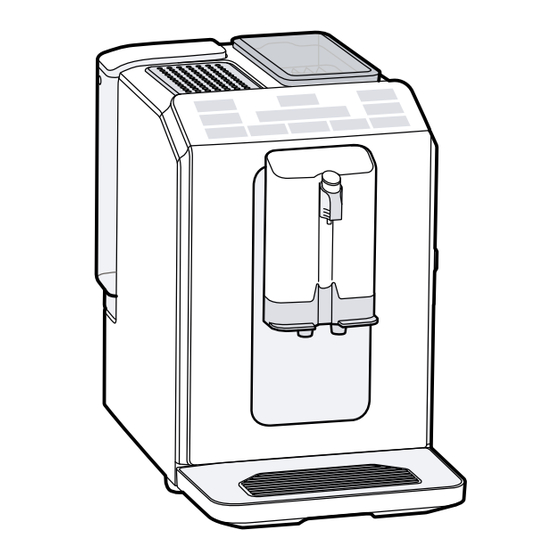
Familiarising yourself with your appliance en Aroma lid Familiarising yourself with your appliance 4 Familiarising yourself Bean container with your appliance Control panel Familiarising yourself with your appliance 4.1 Appliance Milk frother holder You can find an overview of the parts Brewing unit of your appliance here. -
Page 14: Accessories
en Accessories Start service pro- Simultaneously dis- gramme. pense 2 cups of es- → Page 25 presso or caffe crema. → Page 19 Depending on the appliance spe- cifications Switch the cup heater on or off. Depending on the appliance spe- cifications Display Lights up and display ¡... -
Page 15: Before Using For The First Time
Before using for the first time en Press to switch on the appli- Before using for the first time 6 Before using for the ance. first time a The display will show the language that is preset. Prepare the appliance for use. Before using for the first time Press button... -
Page 16: Water Filter
en Before using for the first time ¡ For technical reasons steam can ATTENTION! escape from the appliance. Possible damage to the appliance due to limescale build-up. Change the water filter in good ▶ time. Change the water filter after ▶ 2 months at the latest. -
Page 17: Basic Operation
Basic operation en Press the "ok" button 7.2 Dispensing beverages to save the setting Find out how to prepare a drink of and start rinsing. your choice. a Water will now flow through the fil- ter. WARNING Press "<" button to exit the Risk of scalding! menu. -
Page 18: Dispensing A Coffee Drink With Milk
en Basic operation Tips 7.7 Drink settings ¡ You can also use plant-based al- Prepare a drink according to your ternatives to milk, e.g. soya milk. taste. ¡ The quality of the milk froth de- pends on the type of milk or plant- Adjusting the coffee strength based alternative used. -
Page 19: Grinder
Grinder en ¡ The appliance always brews a min- Place two cups on the left and imum quantity of approx. 25 ml for right under the outlet system. espresso and approx. 80 ml for Press button . coffee. a The LED in the button pulses. Tip: You can change the settings at a The drink is prepared in 2 steps. -
Page 20: Cup Heater
en Cup heater ATTENTION! 9.1 Activating and deactivat- Risk of damage to the grinder. The ing the cup heater grinder may be damaged if the grind- ing level is not set properly. WARNING Only set the grinding level when ▶ Risk of burns! the grinder is running. -
Page 21: Overview Of Basic Settings
Cleaning and servicing en Press "<" button to exit the Tip: You can change the settings at menu. any time. → "Basic settings", Page 20 Note: If you do not press any other button within 90 seconds, the appli- ance switches to the select beverage setting without saving. -
Page 22: Dishwasher-Safe Components
en Cleaning and servicing 11.1 Dishwasher-safe components Here you can find an overview of the components you can clean in the dish- washer. Only clean dishwasher-safe com- ATTENTION! ▶ Some components are sensitive to ponents in the dishwasher. heat and may be damaged if they are Only use programmes that do not ▶... -
Page 23: Cleaning The Appliance
Cleaning and servicing en 11.3 Cleaning the appliance 11.4 Cleaning the drip tray and coffee dregs con- WARNING tainer Risk of electric shock! An ingress of moisture can cause an Clean and empty the drip tray and electric shock. coffee dregs container every day to Never immerse the appliance or prevent deposits. -
Page 24: Cleaning The Brewing Unit
en Cleaning and servicing ATTENTION! 11.6 Cleaning the brewing The brewing unit may be damaged unit by improper cleaning. Do not use washing-up liquid. In addition to automatic rinsing, also ▶ Do not use cleaning agents con- remove and clean the brewing unit ▶... -
Page 25: Service Programmes
Cleaning and servicing en Close the brewing chamber door. Remove and empty the drip tray and coffee dregs container. → Fig. Remove and clean the brewing Note: The door can only be closed if unit. the brewing unit and drip tray are in- Put a cleaning tablet into the duct serted correctly. - Page 26 en Cleaning and servicing Clean the water tank. If you have removed the water fil- ter, re-insert the water filter. Fill the water tank with fresh, cold, non-carbonated water up to the max mark. When flashes, press the button. a The programme starts, cleans and rinses the appliance.
-
Page 27: Troubleshooting
Troubleshooting en Troubleshooting 12 Troubleshooting You can rectify minor faults on your appliance yourself. Read the troubleshoot- Troubleshooting ing information before contacting after-sales service. This will avoid unneces- sary costs. WARNING Risk of electric shock! Improper repairs are dangerous. Repairs to the appliance should only be carried out by trained specialist ▶... - Page 28 en Troubleshooting Fault Cause and troubleshooting Coffee is not dis- Clean the brewing unit. ▶ pensed or has slowed → "Cleaning brewing unit", Page 24 to a trickle. Descale and clean the appliance. ▶ Set quantity is not Residues of limescale remover are blocking the water reached.
- Page 29 Troubleshooting en Fault Cause and troubleshooting Coffee tastes burnt. Grinding level is set too fine. Set a coarser grinding level. ▶ → "Adjusting the grinding level", Page 19 Type of coffee is not optimal. Change the coffee variety. ▶ Milk froth quality var- Milk froth quality depends on the type of milk or plant- ies widely.
- Page 30 en Troubleshooting Fault Cause and troubleshooting Display shows "Fill Water tank is wrongly inserted. water tank" despite Insert the water tank correctly. ▶ the water tank being Carbonated water is in the water tank. full. Fill the water tank with fresh tap water. ▶...
- Page 31 Troubleshooting en Fault Cause and troubleshooting Display shows "Close Door is not properly closed. door" despite the fact Press the door firmly shut. ▶ that the door is Appliance is too hot. closed. Disconnect the appliance from the mains. Wait 1 hour so the appliance can cool down. Display shows "Empty Appliance is switched off and does not detect empty- trays"...
-
Page 32: Transportation, Storage And Disposal
"Water tank empty". to switch the appliance off. ¡ Please visit our web- Empty the water tank and the drip site https:// tray and thoroughly clean the ap- www.bosch-home.in/ pliance. metapages/e-waste- Disconnect the appliance from the management to find mains power supply. -
Page 33: Customer Service
Helpline no.: 1800-266-1880 but only by authorized (Monday to Saturday – 8 am to service personnel. 8 pm) ¡ The product is not Email ID: service.in@bosch- meant for re-sale to home.com any unauthorized Chat with us (WhatsApp): agencies/scrap deal- +91-8451000555 ers/kabariwalah. -
Page 34: Warranty Conditions
Important: Please present this warranty card to our staff at the time of service. 1) Contact the following for availing the support of your Product: 1-800-266-1880(toll free) Monday – Saturday – 8:00 am to 8:00pm 2) Email: service.in@Bosch-Home.com I Website: www.bosch-home.com/in... - Page 35 Note: Warranty will start from the date of purchase. Customer Service Regardless of the nature of your concern, you can always be sure of personal attention from the Bosch Customer Service: on the internet and on the phone. www.bosch-home.com/in 1 - 800 - 266 - 1880 (toll-free)
-
Page 36: Technical Specifications
en Technical specifications Technical specifications 15 Technical specifica- tions Technical specifications Voltage 220– 240 V ∼ Frequency 50 / 60 Hz Connection rating 1300 W Maximum static pump 15 bar pressure Maximum capacity of 1,3 l water tank (without fil- ter) Maximum capacity of ≈250 g bean container Length of the power 100 cm cable Appliance height... - Page 37 IN India, Bhārat, भारत BSH Household Appliances Mfg. Pvt. Ltd. Arena House, Main Bldg, 2nd Floor, Plot No. 103, Road No. 12, MIDC, Andheri East Mumbai 400093 Toll Free 1800 266 1880* www.bosch-home.com/in *Mon-Sat 8am to 8pm (exclude public holidays)
- Page 40 Expert advice for your Bosch home appliances, help with problems or a repair from Bosch experts. Find out everything about the many ways Bosch can support you: www.bosch-home.com/service Contact data of all countries are listed in the attached service direct- ory.
Need help?
Do you have a question about the TIE20301IN and is the answer not in the manual?
Questions and answers