
Related Manuals for Convotherm maxx pro easyTouch ConvoSense C4 eT 6.10 ES


Summary of Contents for Convotherm maxx pro easyTouch ConvoSense C4 eT 6.10 ES
- Page 1 Combi Oven Convotherm maxx pro easyTouch ConvoSense C4 eT 6.10 ES Operating instructions - Original, ENG Advancing Your Ambitions...
-
Page 3: Table Of Contents
Table of Contents Table of Contents General About These Operating Instructions Safety Information That Must Be Read without Exception The User Interface at a Glance How the User Interface Works Software Layout Main Menu Navigation Menu Energy Saver Mode Custom Cooking Made Easy Custom Cooking at a Glance The 'Individual Cooking' Menu How to Set Up a Cooking Profile... - Page 4 Table of Contents Deleting a Cooking Profile from the Cookbook Cleaning The Cleaning Sequences at a Glance The 'Cleaning' Menu How to Set Up a Cleaning Profile Creating a Cleaning Favorite The 'Cleaning' Process Menu Fully Automatic Oven Cleaning Workflow Semi-Automatic Oven Cleaning Workflow Error Indicators During Cleaning Processes Making Unit Settings in 'Settings'...
-
Page 5: General
1 General 1 General 1.1 About These Operating Instructions Purpose The purpose of these operating instructions is to provide everyone working with/on the combi oven with an overview of its easyTouch software and how to use it, as well as to enable them to carry out basic tasks with the software. -
Page 6: Safety Information That Must Be Read Without Exception
1 General 1.2 Safety Information That Must Be Read without Exception Safety information found in the documentation for the customer Only the installation manual and operating manual provide safety information for the combi oven. The installation manual provides safety information for the transportation, setup, installation, placing- into-operation, and removal-from-service tasks it describes. -
Page 7: The User Interface At A Glance
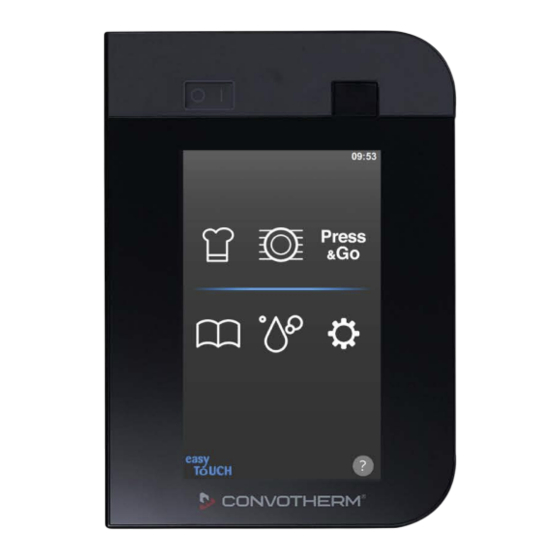
2 The User Interface at a Glance 2 The User Interface at a Glance 2.1 How the User Interface Works How it works easyTouch is the name of the control interface for your combi oven. You can use the touch screen to easily operate the corresponding software with your finger. -
Page 8: Software Layout
2 The User Interface at a Glance 2.2 Software Layout The software’s layout Header Main pane Footer Top bar The software’s top bar will show various displays depending on the specific menu and function that are selected: Selected cooking profile Shows a selected cooking profile, e.g., croissant, with a pic‐ ture and text KitchenConnect®... - Page 9 2 The User Interface at a Glance Main pane The software’s main pane will show various buttons and displays depending on the specific menu and function that are selected: Light gray button Function available / selected, e.g., core temperature Dark gray button Function not available / not usable Green checkmark Button / function selected...
-
Page 10: Main Menu
2 The User Interface at a Glance 2.3 Main Menu Accessing the main menu This menu is password-protected and can only be accessed by specific operators in order to make changes to existing cooking profiles if necessary. Main menu functions Provides access to all available operating modes ■... - Page 11 2 The User Interface at a Glance Main menu buttons When this menu is active, the main pane will show the main functions available for selection: Custom cooking 'Custom cooking' operating mode Used to access the 'custom cooking' menu Can be used to manually enter cooking profiles; access is password-protected Rethermalization 'Rethermalization' operating mode...
-
Page 12: Navigation Menu
2 The User Interface at a Glance 2.4 Navigation Menu Navigation menu functions Provides access to all available operating modes, may be password protected. ■ Navigation menu layout Navigation menu Prompt to put food inside the oven Navigation menu buttons The navigation menu shows all available main functions that can currently be selected. Main menu Used to access the main menu Access is password-protected and for specific user profiles... -
Page 13: Energy Saver Mode
2 The User Interface at a Glance 2.5 Energy Saver Mode Energy saver mode display If the combi oven is not used for about 30 minutes, it will automatically switch to standby mode and the 'energy saver mode' display will appear. To resume operation, simply tap the button at the center of the display. -
Page 14: Custom Cooking Made Easy
3 Custom Cooking Made Easy 3 Custom Cooking Made Easy 3.1 Custom Cooking at a Glance Accessing the 'Custom cooking' menu This menu is password-protected and can only be accessed by specific operators in order to make changes to existing cooking profiles if necessary. The Cooking Methods The 'custom cooking' menu can be used to enter your cooking profiles with the following cooking modes:... -
Page 15: The 'Individual Cooking' Menu
3 Custom Cooking Made Easy 3.2 The 'Individual Cooking' Menu 'Individual cooking' menu functions Manually entering cooking data for your individual cooking profile. For more information, please re‐ ■ fer to page 20 Changing the cooking data for an opened cooking profile from the Cookbook ■... - Page 16 3 Custom Cooking Made Easy Cooking parameter buttons Cooking temperature Used to enter the cooking temperature in °C or °F Cooking time Used to enter the cooking time in hh:mm:ss Core temperature Used to enter the core temperature in °C or °F Fan speed Used to control the flow speed inside the oven.
- Page 17 3 Custom Cooking Made Easy Start / Stop buttons Start Starting a Cooking Sequence Start with pre-heating If the unit door is closed, the oven cavity will be heated up to the set cooking temperature after starting Start with Cool down If the unit door is open and the fan is running, the oven cav‐ ity will be cooled down to the set cooking temperature after starting Stop...
- Page 18 3 Custom Cooking Made Easy The Cooking Steps View buttons Cooking step number Number of all defined cooking steps Cooking parameters Display of cooking parameters for each defined cooking indicator step Edit Edit cooking step Delete Delete cooking step from the cooking profile Press to scroll down Change the order of the cooking steps Press to scroll up...
- Page 19 3 Custom Cooking Made Easy Step prompt buttons Step prompt Function used to show messages during a cooking se‐ quence Text box Used to enter a text prompt that should be displayed during the cooking sequence Pause Used to set the display duration for a prompt, i.e., until it is confirmed by the operator or until the cooking sequence ends Repeat...
-
Page 20: How To Set Up A Cooking Profile
3 Custom Cooking Made Easy 3.3 How to Set Up a Cooking Profile How to set up a cooking profile using the 'custom cooking' menu Select a cooking method, e.g. 'Hot air'. Enter the cooking temperature you want. Enter the cooking time you want. Select a 'fan speed' setting. -
Page 21: Saving A Cooking Profile In The Cookbook
3 Custom Cooking Made Easy 3.4 Saving a Cooking Profile in the Cookbook Prerequisites You must have entered a new cooking profile in the 'individual cooking' menu. ■ How to save a new cooking profile in the Cookbook Press the 'Save cooking steps' button in the 'Custom cooking' menu. Enter a new cooking profile name. -
Page 22: The 'Individual Cooking' Process Menu
3 Custom Cooking Made Easy 3.5 The 'Individual Cooking' Process Menu Cooking workflow functions Changing the cooking temperature ■ Press to use TrayTimer ■ Canceling a Cooking Sequence ■ 'Custom cooking' process menu layout Cooking settings Progress and action display Action bar Cooking setting buttons Cooking mode Shows the cooking mode for the cooking profile, e.g., hot... - Page 23 3 Custom Cooking Made Easy Progress and action display buttons Do not open the unit Indicates that the unit door should not be opened during the door sequence Unit door open Indicates that the unit door must be opened during the se‐ quence Prompt Text prompt, e.g.
- Page 24 3 Custom Cooking Made Easy Close Prompt asking the user to close the unit door Placing the smoker Prompt for placing the smoker drawer inside the oven cavity drawer inside the oven cavity Removing the smok‐ Prompt for removing the smoker drawer from the oven cavi‐ er drawer from the oven cavity Cooking sequence...
- Page 25 3 Custom Cooking Made Easy Action bar buttons Stop Stops the running cooking sequence Skip Skips pre-heating / cooling down Confirm Used to confirm the prompt or the end of cooking TrayTimer For using unoccupied shelf levels Operating Instructions...
-
Page 26: The 'Individual Cooking' Workflow
3 Custom Cooking Made Easy 3.6 The 'Individual Cooking' Workflow Prerequisites You must have already familiarized yourself with the corresponding hazards and safety measures, ■ as well as with the steps and cooking sequences. You must have entered a new cooking profile in the 'custom cooking' menu. For more information, ■... -
Page 27: The 'Smoker' Cooking Workflow
3 Custom Cooking Made Easy 3.7 The 'Smoker' Cooking Workflow Prerequisites You must have already familiarized yourself with the corresponding hazards and safety measures, ■ as well as with the steps and cooking sequences. You must have entered a cooking profile in the 'Smoker' cooking method in the 'Individual cooking' ■... -
Page 28: Custom Cooking - Special Cooking Methods
4 Custom Cooking – Special Cooking Methods 4 Custom Cooking – Special Cooking Methods 4.1 Special Cooking Methods at a Glance The Cooking Methods You can use the 'custom cooking' menu to create cooking profiles for the following cooking methods in order to meet the special requirements involved in preparing your food: Delta-T cooking ■... -
Page 29: The Delta-T Cooking Method
4 Custom Cooking – Special Cooking Methods 4.2 The Delta-T Cooking Method Applications Delta‑T cooking is a cooking method in which the oven temperature increases depending on the food's core temperature When using this method, you will always have to use the core temperature probe. Delta‑T cooking is particularly well-suited to cooking boiled ham, whole fish, galantine, and custard royale. -
Page 30: The Low-Temperature Cooking Method
4 Custom Cooking – Special Cooking Methods 4.3 The Low-Temperature Cooking Method Applications Low-temperature cooking is a cooking method in which food is cooked at low temperatures. This means that a longer cooking time will be required. When using this method, you will always have to use the core temperature probe. - Page 31 4 Custom Cooking – Special Cooking Methods Preset hot air cooking data Doneness Cooking Cooking mode Cooking Cooking Core tem‐ Extra Func‐ step tempera‐ time in min. perature in tion ture in °C °C Well-done Hot air Hot air Hot air Hot air Medium Hot air...
-
Page 32: Rethermalization
5 Rethermalization 5 Rethermalization 5.1 Rethermalization at a Glance Accessing the 'Rethermalization' menu Access to this menu may be password protected and available only to certain operators so they can edit existing cooking profiles. Available rethermalization functions The 'Rethermalization' menu can be used to enter your cooking profiles with the following rethermali‐ zation functions: À... -
Page 33: The 'Rethermalization' Menu
5 Rethermalization 5.2 The 'Rethermalization' Menu 'Rethermalization' menu functions Manually entering cooking data for your individual cooking profile. For more information on a similar ■ procedure, please refer to page 20 Changing the cooking data for an opened cooking profile from the Cookbook ■... - Page 34 5 Rethermalization Cooking parameter buttons Cooking temperature Used to enter the cooking temperature in °C or °F Cooking time Used to enter the cooking time in hh:mm:ss Core temperature Used to enter the core temperature in °C or °F External core temperature Used to enter the core temperature in °C or °F, external core temperature probe Fan speed...
- Page 35 5 Rethermalization Cooking step navigation and special program step buttons Delete cooking step Deletes all the data for the current cooking step Previous cooking step Moves back one step in the cooking profile Cooking steps view Shows the current cooking step / total number of cooking ■...
- Page 36 5 Rethermalization Step prompt buttons Step prompt Function used to show messages during a cooking se‐ quence Text box Used to enter a text prompt that should be displayed during the cooking sequence Pause Used to set the display duration for a prompt, i.e., until it is confirmed by the operator or until the cooking sequence ends Repeat...
-
Page 37: Automatic Cooking With Convosense
6 Automatic Cooking with ConvoSense 6 Automatic Cooking with ConvoSense 6.1 How ConvoSense Works Automatic Cooking with ConvoSense When cooking with the ConvoSense assistance system, specific preset cooking profiles are automati‐ cally recognized by the unit during loading and the food is then cooked fully automatically. The operator places the food into the oven cavity and the cooking sequence is started immediately after the appliance door is closed. -
Page 38: The 'Convosense' Menu
6 Automatic Cooking with ConvoSense 6.2 The 'ConvoSense' Menu 'ConvoSense' menu layout Shelf levels Cooking profiles Shelf level buttons Shows the number for the available shelf levels Free No food recognized for this shelf level Recognized Food recognized for this shelf level Shows the cooking profile, including the following: Image ■... - Page 39 6 Automatic Cooking with ConvoSense Progress and action display buttons Pre-heat Pre-heats the oven cavity to the set cooking temperature Cool down Cools down the oven cavity to the set cooking temperature Ready The unit is ready for loading Loading Prompt asking the user to put food on the shelf levels for recognition Open...
-
Page 40: Selecting Shelf Levels In Convosense
6 Automatic Cooking with ConvoSense 6.3 Selecting Shelf Levels in ConvoSense How to select shelf levels for cooking in ConvoSense Wait until the oven cavity has been pre-heated. Follow the prompt for placing food inside. Place food on a shelf level. Check whether the correct cooking profile and the desired shelf level have been recognized automatically. -
Page 41: The 'Convosense' Cooking Workflow
6 Automatic Cooking with ConvoSense 6.4 The 'ConvoSense' Cooking Workflow Prerequisites You must have already familiarized yourself with the corresponding hazards and safety measures, ■ as well as with the steps and cooking sequences. You must have followed the software prompt for placing food inside. ■... -
Page 42: Canceling A Cooking Sequence
6 Automatic Cooking with ConvoSense 6.5 Canceling a Cooking Sequence How to cancel a cooking sequence Select one or more shelf levels. Confirm within five seconds. Operating Instructions... -
Page 43: Error Indicators During The Cooking Workflow With Convosense
6 Automatic Cooking with ConvoSense 6.6 Error Indicators During the Cooking Workflow with ConvoSense Error indicators The following errors can be displayed when cooking using the 'ConvoSense' operating mode: Error message Error reason Troubleshooting Connection to the camera for Check connection. Cooking only food recognition interrupted possible via Press&Go A message is displayed when... - Page 44 6 Automatic Cooking with ConvoSense Error message Error reason Troubleshooting Food is not recognized Select the cooking profile via Unknown product ■ Press&Go Create a new cooking profile ■ for new product Operating Instructions...
-
Page 45: Changing An Incorrectly Recognized Cooking Profile
6 Automatic Cooking with ConvoSense 6.7 Changing an Incorrectly Recognized Cooking Profile Prerequisites Food, e.g. croissants, has been inserted into the oven cavity. ■ The food was recognized incorrectly. ■ Changing an Incorrectly Recognized Cooking Profile Select the 'Cancel' button located after the incorrectly recognized cooking profile. Select the correct cooking profile. -
Page 46: Fast Cooking With Press&Go
7 Fast Cooking with Press&Go 7 Fast Cooking with Press&Go 7.1 How Press&Go Works Fast cooking with Press&Go You can use the 'Press&Go' feature to provide operators with specific pre-defined cooking profiles that they will be able to select, but not modify. Once an operator selects the cooking profile they want, the corresponding cooking sequence will start immediately. -
Page 47: The 'Press&Go' Menu
7 Fast Cooking with Press&Go 7.2 The 'Press&Go' Menu 'Press&Go' menu functions Accessing tried-and-true cooking profiles and cooking them immediately ■ Selecting shelf levels. For more information, please refer to page 49 ■ 'Press&Go' menu layout Shows the selected cooking profile Shelf levels Additional cooking profiles Operating Instructions... - Page 48 7 Fast Cooking with Press&Go Shelf level buttons Shows the number for the available shelf levels Free Indicates that the corresponding shelf level is not currently being used Selected Indicates that the corresponding shelf level is selected Shows the cooking profile, including the following: Image ■...
-
Page 49: Selecting Shelf Levels In Press&Go
7 Fast Cooking with Press&Go 7.3 Selecting Shelf Levels in Press&Go How to select shelf levels for cooking in Press&Go Select a product group in the 'Press&Go' menu. Select a cooking profile. Select one or more shelf levels. Caution: The cooking sequence will start immediately after you place food on the shelf lev‐ els. -
Page 50: The 'Press&Go' Cooking Workflow
7 Fast Cooking with Press&Go 7.4 The 'Press&Go' Cooking Workflow Prerequisites You must have already familiarized yourself with the corresponding hazards and safety measures, ■ as well as with the steps and cooking sequences. You must have selected a cooking profile in the 'Press&Go' menu, selected the corresponding shelf ■... -
Page 51: Canceling A Cooking Sequence
7 Fast Cooking with Press&Go 7.5 Canceling a Cooking Sequence How to cancel a cooking sequence Select one or more shelf levels. Confirm within five seconds. Operating Instructions... -
Page 52: Using The Cookbook
If you have a cookbook that you are using with other Convotherm combi ovens and would like to use it with this one as well, you can simply export and import the cookbook using the units’ USB ports. -
Page 53: The 'Cookbook' Menu
8 Using the Cookbook 8.2 The 'Cookbook' Menu 'Cookbook' menu functions After opening cooking profiles, the 'individual cooking' menu can be used to edit and save them af‐ ■ ter making changes. Grouping similar cooking profiles into product groups and managing them ■... - Page 54 8 Using the Cookbook Product group / cooking profile selection pane buttons Product group, e.g., baking Icons for all available product groups Cooking profile, e.g., crois‐ Icons for all available cooking profiles sant Checkmark Used to make selections Scrollbar Used for vertical scrolling in order to view additional menu contents On the side of the menu Action bar buttons...
-
Page 55: Creating New Product Groups
8 Using the Cookbook 8.3 Creating New Product Groups How to create a new product group in the Cookbook In the 'individual cooking' menu, tap the 'Edit' button after selecting the 'Product groups' ba‐ sic selection option. Tap the 'Add' button. Enter a new product name. -
Page 56: Deleting A Cooking Profile From The Cookbook
8 Using the Cookbook 8.4 Deleting a Cooking Profile from the Cookbook How to delete a cooking profile from the Cookbook In the 'individual cooking' menu, tap the 'Edit' button after selecting the 'Cooking profiles' ba‐ sic selection option. Select the cooking profile. Tap the 'Delete' button. -
Page 57: Cleaning
9 Cleaning 9 Cleaning 9.1 The Cleaning Sequences at a Glance What do I need for cleaning? To clean the inside of your combi oven, you will need to use a cleaning profile that is adequate for the degree of soiling. You can create this profile in the 'Cleaning' menu or select a profile that is already ready for use. -
Page 58: The 'Cleaning' Menu
9 Cleaning 9.2 The 'Cleaning' Menu 'Cleaning' menu functions Selecting and starting cleaning profiles ■ 'Cleaning' menu layout Basic selection Selection of cleaning profile ConvoClean+ Cleaning favorites Cleaning Options Action bar Basic selection buttons Favorites Cleaning profiles for Quick select ■ Cleaning schedule for cleaning favorites ■... - Page 59 9 Cleaning The ConvoClean+ cleaning profile selection buttons QuickRinse Rinsing with water only Environmentally sustainable cleaning duration regular Normal cleaning duration express Short cleaning duration Cleaning level 1 Light cleaning setting Cleaning level 2 Medium cleaning setting Cleaning level 3 Strong cleaning setting Cleaning level 4 Very strong cleaning setting...
- Page 60 9 Cleaning Cleaning option buttons ConvoCare Cleaning only with rinse aid from connected canisters ConvoCare S Cleaning with rinse aid from single-measure dispensing bot‐ tles only Semi-automatic Semiautomatic oven cleaning with operator guidance Checkmark Used to make selections Action bar buttons Used to add a cleaning favorite Confirm Press to confirm your selection...
- Page 61 9 Cleaning Schedule buttons Weekday Used to set the weekday on which the cleaning profile will start automatically Alarm time Used to set an alarm time Start time Used to set the scheduled time when a prompt for starting a cleaning profile will be displayed Duration Used to set the time interval (10 min)
-
Page 62: How To Set Up A Cleaning Profile
9 Cleaning 9.3 How to Set Up a Cleaning Profile How to set up a cleaning profile using the 'Cleaning' menu In the 'Fully automatic cleaning' basic selection, select a cleaning mode, e.g., 'eco'. Select a cleaning level, e.g. 'Cleaning level 2'. Select the 'steam disinfection' extra function. -
Page 63: Creating A Cleaning Favorite
9 Cleaning 9.4 Creating a Cleaning Favorite How to create a new cleaning favorite In the 'cleaning' menu, tap the 'Add' button after selecting the 'Favorites' basic selection op‐ tion. Select the cleaning parameters for the new cleaning favorite. Confirm by pushing on the knob. Enter a name for the cleaning favorite. -
Page 64: The 'Cleaning' Process Menu
9 Cleaning 9.5 The 'Cleaning' Process Menu Cleaning process functions Canceling a cleaning sequence ■ 'Cleaning' process menu layout Indicator area Progress and action display Action bar Operating Instructions... - Page 65 9 Cleaning Progress and action display buttons Do not open the unit Indicates that the unit door should not be opened during the door sequence Unit door open Indicates that the unit door must be opened during the se‐ quence Prompt Text prompts for the cleaning sequence Cool down...
- Page 66 9 Cleaning Spraying Prompt for spraying cleaning agent inside the oven cavity Rinse out Prompt for rinsing the oven cavity with water Used to confirm the end of the cleaning sequence Action bar buttons Stop Stops the running cleaning sequence Confirm Used to confirm a sequence or action Cancel...
-
Page 67: Fully Automatic Oven Cleaning Workflow
9 Cleaning 9.6 Fully Automatic Oven Cleaning Workflow Prerequisites You must have already familiarized yourself with the corresponding hazards and safety measures, ■ as well as with the steps and cleaning processes. The unit door must be closed. ■ A fully automatic oven cleaning profile must have been selected. ■... -
Page 68: Semi-Automatic Oven Cleaning Workflow
9 Cleaning 9.7 Semi-Automatic Oven Cleaning Workflow Prerequisites You must have already familiarized yourself with the corresponding hazards and safety measures, ■ as well as with the steps and cleaning processes. The unit door must be closed. ■ Semi-automatic oven cleaning must have been selected. ■... - Page 69 9 Cleaning Operating Instructions...
-
Page 70: Error Indicators During Cleaning Processes
9 Cleaning 9.8 Error Indicators During Cleaning Processes Error indicators Caution Used to indicate a warning for the cleaning process Error code Shows the error number Problem cleaning! Indicates that a cleaning sequence has been canceled Please rinse manual‐ No water Indicates that a cleaning sequence has been interrupted because no water is being supplied Further information... -
Page 71: Making Unit Settings In 'Settings
10 Making Unit Settings in 'Settings' 10 Making Unit Settings in 'Settings' 10.1 Overview of Unit Settings Configuration options and access permissions Use the 'Settings' menu to check the unit settings of your combi oven and make changes. The setting options shown depend on the operator and are linked to access permissions, meaning they can only be accessed with a password. -
Page 72: The 'Settings' Menu
10 Making Unit Settings in 'Settings' 10.2 The 'Settings' Menu Access to the 'Settings' menu Access to this menu may be password protected and only accessible to certain users so they can make changes to the appliance settings. The layout of the 'Settings' menu Settings Selection Action bar... - Page 73 10 Making Unit Settings in 'Settings' Cooking 'Settings' buttons Unit information Information about the unit and the software version General settings Used to select the language for the user interface ■ Used to set the date and time ■ Used to select whether the temperature will be shown in ■...
- Page 74 10 Making Unit Settings in 'Settings' Action bar buttons Cancel Used to cancel a sequence or action Delete Used to delete the selected cookbook Add new Confirm Press to confirm your selection Operating Instructions...
-
Page 75: Operating The Combi Oven In The Event Of A Malfunction
11 Operating the Combi Oven in the Event of a Malfunction 11 Operating the Combi Oven in the Event of a Malfunction 11.1 Working with the Combi Oven in the Event of a Malfunction What to do in the event of a malfunction If a system error occurs while your combi oven is running, the 'System error' display will appear. -
Page 76: The 'Error Messages' Menu
11 Operating the Combi Oven in the Event of a Malfunction 11.2 The 'Error Messages' Menu 'Error messages' menu layout Display area for errors, with error code and error description Operating Instructions... - Page 78 WELBILT DEUTSCHLAND GMBH TALSTRASSE 35, 82436 EGLFING | GERMANY, T +49(0)8847 67-0, F +49(0)8847 414 WWW.CONVOTHERM.COM Combi Oven Convotherm maxx pro easyTouch ConvoSense C4 eT 6.10 ES Serial No. Item no. Order No. Additional technical documentation can be found in the download center at : www.convotherm.com...
Need help?
Do you have a question about the maxx pro easyTouch ConvoSense C4 eT 6.10 ES and is the answer not in the manual?
Questions and answers