
Related Manuals for Brother PT-N10


Summary of Contents for Brother PT-N10
- Page 1 User's Guide PT-N10 PT-N20 PT-N25BT © 2024 Brother Industries, Ltd. All rights reserved.
-
Page 2: Table Of Contents
Home > Table of Contents Table of Contents Before You Use Your Label Maker ....................... 1 Definitions of Notes ............................2 General Precautions ............................3 Trademarks and Licenses ..........................4 Important Note ............................... 5 Set Up Your Label Maker ........................6 Parts Description............................ - Page 3 Print or Open a Saved Label........................64 Print Labels Using Mobile Devices....................65 Install Brother P-touch Design&Print 2 App ....................66 Connect the Printer to a Mobile Device Using Bluetooth ................67 Create Labels and Print Them Using a Mobile Device ................68 Routine Maintenance ..........................
-
Page 4: Before You Use Your Label Maker
Home > Before You Use Your Label Maker Before You Use Your Label Maker • Definitions of Notes • General Precautions • Trademarks and Licenses • Important Note... -
Page 5: Definitions Of Notes
Home > Before You Use Your Label Maker > Definitions of Notes Definitions of Notes We use the following symbols and conventions throughout this User's Guide: DANGER indicates an imminently hazardous situation which, if not avoided, will DANGER result in death or serious injuries. WARNING indicates a potentially hazardous situation which, if not avoided, could WARNING result in death or serious injuries. -
Page 6: General Precautions
• We recommend using genuine Brother supplies to ensure stable print quality and performance. • Be sure to read the instructions provided with the Tape Cassette and observe all precautions noted in the instructions. -
Page 7: Trademarks And Licenses
• The Bluetooth word mark and logos are registered trademarks owned by Bluetooth SIG, Inc. and any use of such marks by Brother Industries, Ltd. is under license. Other trademarks and trade names are those of their respective owners. •... -
Page 8: Important Note
• Brother reserves the right to make changes without notice in the specifications and materials contained herein and shall not be responsible for any damages (including consequential) caused by the reliance on the materials presented, including, but not limited to, typographical and other errors relating to the publications. -
Page 9: Set Up Your Label Maker
Home > Set Up Your Label Maker Set Up Your Label Maker • Parts Description • LCD Overview • Keyboard Overview • Insert Tape Cassette • Install Batteries • Connect the AC Adapter • Turn the Label Maker On/Off • Set Language •... -
Page 10: Parts Description
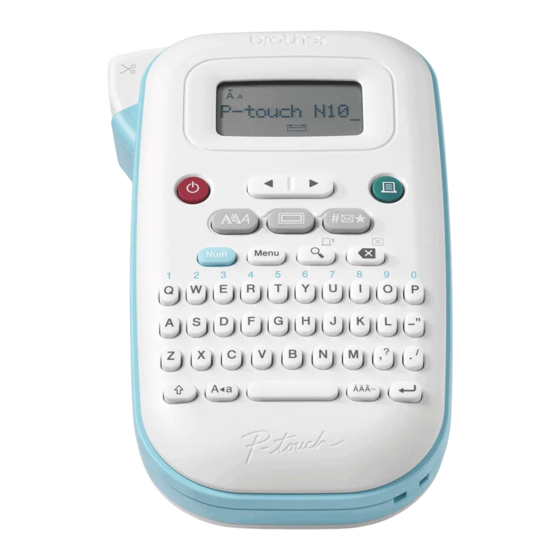
Home > Set Up Your Label Maker > Parts Description Parts Description >> PT-N10 >> PT-N20/PT-N25BT PT-N10 1. Tape Cutter Lever 2. Tape Exit Slot 3. Liquid Crystal Display (LCD) 4. Keyboard 5. Tape Cassette Compartment Cover 6. Tape Viewer 7. - Page 11 PT-N20/PT-N25BT 1. Tape Cutter Lever 2. Bluetooth LED (PT-N25BT) 3. Tape Exit Slot 4. Liquid Crystal Display (LCD) 5. Keyboard 6. AC Adapter Jack 7. Tape Cassette Compartment Cover 8. Tape Viewer 9. Battery Compartment 10. Tape Cassette Compartment 11. Cutter Board 12.
-
Page 12: Lcd Overview
Home > Set Up Your Label Maker > LCD Overview LCD Overview >> PT-N10 >> PT-N20/PT-N25BT PT-N10 1. Character size Indicates the current character size. 2. Character width Indicates the current character width. 3. Character style Indicates the current character style. - Page 13 2. Character size Indicates the current character size. 3. Character style Indicates the current character style. 4. Label length Indicates if the label length is set. 5. Return mark Indicates the end of a line of text. 6. Cursor Indicates the current data entry position. New characters appear to the left of the cursor.
-
Page 14: Keyboard Overview
Home > Set Up Your Label Maker > Keyboard Overview Keyboard Overview >> PT-N10 >> PT-N20/PT-N25BT PT-N10 1. Power Press to turn on or off the Label Maker. 2. Cursor Press to move the cursor in the direction of the arrow. - Page 15 9. Accent Press to select an accented character. 10. Space Press to insert a blank space. Press to return to the default value. 11. Caps Press to use only uppercase letters (ALL CAPS mode). 12. Shift Press and hold this key before pressing a letter key to type an uppercase letter. To move the cursor to the beginning of your text, press Shift and the d key simultaneously.
- Page 16 4. Preview/Feed Press to view an image of the label before printing. To feed the tape, press the Shift key once, and then press the Preview/Feed key. 5. Print/Print Options Press to print. To set Print Options, press the Shift key once, and then press the Print/Print Options key. 6.
-
Page 17: Insert Tape Cassette
Insert Tape Cassette Make sure the ink ribbon is not sagging. If the ink ribbon is sagging, wind the loose ink ribbon back onto the spool, as shown. >> PT-N10 >> PT-N20/PT-N25BT PT-N10 1. Open the Tape Cassette Compartment Cover. - Page 18 a. Clips NOTE • When inserting the Tape Cassette, make sure that the tape does not catch on the Print Head. a. Print Head • Make sure that the end of the tape exits through the Tape Exit Slot, as illustrated.
- Page 19 3. Close the Tape Cassette Compartment Cover. PT-N20/PT-N25BT 1. Open the Tape Cassette Compartment Cover. 2. Insert the Tape Cassette as illustrated. Make sure that the Tape Cassette fits securely between the clips (a) when it snaps into place. a. Clips NOTE •...
- Page 20 a. Print Head • Make sure that the end of the tape exits through the Tape Exit Slot, as illustrated. 3. Close the Tape Cassette Compartment Cover. Related Information • Set Up Your Label Maker...
-
Page 21: Install Batteries
To reduce the risk of battery fires, we recommend that you put tape over the battery terminals when storing loose batteries or disposing of them. 1. Cellophane tape 2. Alkaline battery >> PT-N10 >> PT-N20/PT-N25BT PT-N10 1. Open the Tape Cassette Compartment Cover. - Page 22 3. Close the Tape Cassette Compartment Cover. To remove the batteries, reverse the installation procedure. PT-N20/PT-N25BT 1. Open the Tape Cassette Compartment Cover. 2. Install six new AAA alkaline batteries (LR03). Make sure they are installed in the correct direction. 3.
- Page 23 Related Information • Set Up Your Label Maker...
-
Page 24: Connect The Ac Adapter
Related Models: PT-N20/PT-N25BT If you plan to use an AC Adapter, we recommend using the Brother AC Adapter. This AC Adapter is configured to the exact voltage and current requirements of this Brother machine. Use of unauthorized AC Adapters may result in damage to your product. -
Page 25: Turn The Label Maker On/Off
1. To turn on the Label Maker, press 2. To turn off the Label Maker, press and hold • PT-N10 Your Label Maker has a powersaving function that automatically turns it off if no key is pressed within five minutes. -
Page 26: Set Language
Home > Set Up Your Label Maker > Set Language Set Language >> PT-N10 >> PT-N20/PT-N25BT PT-N10 When you turn on the Label Maker for the first time, the language selection screen appears. Select a language by pressing d or c, and then press To change the language at any time, follow these steps: 1. -
Page 27: Set Measurement Units
Home > Set Up Your Label Maker > Set Measurement Units Set Measurement Units >> PT-N10 >> PT-N20/PT-N25BT PT-N10 1. Press 2. Press d or c to display the [Unit] option, and then press 3. Press d or c to select the [inch] or [mm] option, and then press PT-N20/PT-N25BT 1. -
Page 28: Enable Or Disable Bluetooth
Home > Set Up Your Label Maker > Enable or Disable Bluetooth Enable or Disable Bluetooth Related Models: PT-N25BT 1. Press 2. Press d or c to display the [Bluetooth] option, and then press 3. Press d or c to display the [Bluetooth On/Off] option, and then press 4. -
Page 29: Led Patterns And Indications
Home > Set Up Your Label Maker > Enable or Disable Bluetooth > LED Patterns and Indications LED Patterns and Indications Related Models: PT-N25BT The Bluetooth LED is lit or flashes to indicate the printer's Bluetooth status. Bluetooth LED Indicator Description Bluetooth is on, and the Label Maker is performing one of the following operations:... -
Page 30: Feed Tape
Home > Set Up Your Label Maker > Feed Tape Feed Tape >> PT-N10 >> PT-N20/PT-N25BT PT-N10 Press simultaneously. PT-N20/PT-N25BT Press once, and then press Related Information • Set Up Your Label Maker... -
Page 31: Adjust Lcd Contrast
> Adjust LCD Contrast Adjust LCD Contrast To view the LCD more clearly, adjust the contrast. The LCD Contrast default setting is [0]. >> PT-N10 >> PT-N20/PT-N25BT PT-N10 1. Press 2. Press d or c to display the [LCD Contrast] option, and then press 3. -
Page 32: Edit A Label
Home > Edit a Label Edit a Label • Add Text to Your Label • Make a Two-Line Label • Delete Text • Enter Symbols • Enter Accented Characters • Set Character Attributes • Set Label Length • Set Underline or Frame... -
Page 33: Add Text To Your Label
Home > Edit a Label > Add Text to Your Label Add Text to Your Label Type the text or symbols you want (up to 80 alphanumeric characters, including spaces and punctuation marks). Related Information • Edit a Label... -
Page 34: Make A Two-Line Label
> Make a Two-Line Label Make a Two-Line Label You can have up to two lines in your labels. >> PT-N10 >> PT-N20/PT-N25BT PT-N10 1. When finished typing the first line of text, make sure the cursor is at the end of the current line. - Page 35 Printed Label Result Related Information • Edit a Label...
-
Page 36: Delete Text
Home > Edit a Label > Delete Text Delete Text >> PT-N10 >> PT-N20/PT-N25BT PT-N10 Do one of the following: To delete one character at a time: Press To delete all text at the same time: 1. Press simultaneously. 2. Press d or c to display the [Text Only] option, and then press To delete all text and all format settings: 1. -
Page 37: Enter Symbols
Home > Edit a Label > Enter Symbols Enter Symbols • Enter Symbols Using the Symbol Function • Print the Pictograph List • Symbol Options... -
Page 38: Enter Symbols Using The Symbol Function
Enter Symbols > Enter Symbols Using the Symbol Function Enter Symbols Using the Symbol Function For a list of all symbols, see Related Topics:Symbol Options. >> PT-N10 >> PT-N20/PT-N25BT PT-N10 1. Press 2. Press d or c to select the [Basic] or [Pictograph] option, and then press 3. -
Page 39: Print The Pictograph List
Edit a Label > Enter Symbols > Print the Pictograph List Print the Pictograph List Related Models: PT-N10 1. Press 2. Press d or c to display the [Print List] option, and then press 3. Press to confirm. Related Information •... -
Page 40: Symbol Options
Home > Edit a Label > Enter Symbols > Symbol Options Symbol Options >> PT-N10 >> PT-N20/PT-N25BT PT-N10 [Basic] To display the next group of symbols, press... - Page 41 [Pictograph] To select the image you need, press the corresponding category button (A to O), and then use the d c keys. PT-N20/PT-N25BT [Basic] Category Symbols Punctuation Brackets Arrows...
- Page 42 Category Symbols Mathematics Units Shapes [Pictograph] Category Symbols Emojis Family Fashion Accessories Food Kitchen Healthcare Signs Stationery Gadgets...
- Page 43 Category Symbols Hobbies Vehicles Weather Garden Animals Events Related Information • Enter Symbols...
-
Page 44: Enter Accented Characters
Home > Edit a Label > Enter Accented Characters Enter Accented Characters >> PT-N10 >> PT-N20/PT-N25BT PT-N10 1. Enter the character you want. 2. Press 3. Press d or c to select an accented character, and then press • You can enter accented characters while in Caps mode. -
Page 45: Accented Character Options
Home > Edit a Label > Enter Accented Characters > Accented Character Options Accented Character Options The accented characters displayed on the LCD depend on your language. Character Accented Characters... - Page 46 Character Accented Characters Related Information • Enter Accented Characters...
-
Page 47: Set Character Attributes
Home > Edit a Label > Set Character Attributes Set Character Attributes When you set character attributes, they apply to all characters in your label. >> PT-N10 >> PT-N20/PT-N25BT PT-N10 1. Type the text you want. 2. Press 3. Press d or c to select an attribute, and then press 4. -
Page 48: Attribute Setting Options
Home > Edit a Label > Set Character Attributes > Attribute Setting Options Attribute Setting Options Font Value Result Helsinki F1 (PT-N20/PT-N25BT) Brussels F2 (PT-N20/PT-N25BT) Berlin F3 (PT-N20/PT-N25BT) Character Size Available Sizes: [Small], [Medium], [Large] Character Width Value Result Normal x 1/2 Character Style Value... -
Page 49: Set Label Length
Set Label Length Labels can be between 1.2" (30 mm) and 12.0" (300 mm) in length. When you select [Auto], the label length is automatically adjusted based on the amount of text it contains. >> PT-N10 >> PT-N20/PT-N25BT PT-N10 1. Press 2. -
Page 50: Set Underline Or Frame
Edit a Label > Set Underline or Frame Set Underline or Frame You can set an underline style or a frame before or after typing your label text. >> PT-N10 >> PT-N20/PT-N25BT PT-N10 1. Press 2. Press d or c to select an underline or a frame, and then press PT-N20/PT-N25BT 1. -
Page 51: Underline And Frame Options
Home > Edit a Label > Set Underline or Frame > Underline and Frame Options Underline and Frame Options >> PT-N10 >> PT-N20/PT-N25BT PT-N10 Style Underline/Frames Underline Round Square Octagon Bubble Star Heart Flower Trip Unicorn... - Page 52 PT-N20/PT-N25BT Style Underline/Frames Underline Round Square Octagon Bubble Star Heart Flower Trip Unicorn Mermaid Peter Pan...
- Page 53 Style Underline/Frames Sweets Decorative Related Information • Set Underline or Frame...
-
Page 54: Print Labels
Home > Print Labels Print Labels • Preview Labels • Print Labels • Set Margins • Adjust the Label Length • Adjust the Print Density... -
Page 55: Preview Labels
Print Labels > Preview Labels Preview Labels You can preview labels before printing to make sure they are correct. >> PT-N10 >> PT-N20/PT-N25BT PT-N10 Press The LCD displays all text and the label length (inch/mm), then returns to the original text. -
Page 56: Print Labels
• Do not block the Tape Exit Slot during printing. Doing so will cause the tape to jam. >> PT-N10 >> PT-N20/PT-N25BT PT-N10 1. After creating your label, press 2. - Page 57 • Mirror Printing Related Topics: • Adjust the Print Density...
-
Page 58: Sequential Printing
Home > Print Labels > Print Labels > Sequential Printing Sequential Printing Related Models: PT-N20/PT-N25BT You can print up to nine sequential labels at a time using auto-numbering. This feature allows you to automatically increase the initial number by one in each consecutive label. 1. -
Page 59: Mirror Printing
Home > Print Labels > Print Labels > Mirror Printing Mirror Printing Related Models: PT-N20/PT-N25BT Use clear tape when mirror printing, so the labels can be read correctly from the opposite side when attached to glass or other transparent surfaces. 1. -
Page 60: Set Margins
> Set Margins Set Margins You can select the margin options, regardless of the label length. For more information, see Related Information: Margin Options. >> PT-N10 >> PT-N20/PT-N25BT PT-N10 1. Press 2. Press d or c to display the [Margin] option, and then press 3. -
Page 61: Margin Options
Home > Print Labels > Set Margins > Margin Options Margin Options This table shows how different margin options appear on labels. Print area Margin Setting Description Example Small The tape automatically feeds 0.4" • When the label length is (10.5 mm) first, and then each label is approximately 1.0"... - Page 62 (PT-N25BT) The size of the margin is different when Chain Print is set on the printer and when Chain Print is set on the Brother P-touch Design&Print 2 app. Chain Print set on the printer prints a slightly smaller margin.
-
Page 63: Adjust The Label Length
Print Labels > Adjust the Label Length Adjust the Label Length Related Models: PT-N10 When the Tape Cassette is almost empty, the printed label length may be less accurate. In this case, adjust the label length manually. There are 11 levels for this setting: -5, -4, -3, -2, -1, 0 , +1, +2, +3, +4, + 5 Approximately 1% of the total label length is adjusted by one level. -
Page 64: Adjust The Print Density
Print Labels > Adjust the Print Density Adjust the Print Density Related Models: PT-N10 1. Press 2. Press d or c to display the [PrintDensity] option, and then press 3. Press d or c to select the number you want from [Set 1 - 4], and then press... -
Page 65: Use The File Memory
Home > Use the File Memory Use the File Memory • Save Label Files • Print or Open a Saved Label... -
Page 66: Save Label Files
Save Label Files You can save up to 10 labels and recall them for printing at a later date. Each label file can contain a maximum of 80 characters. You can also edit and overwrite saved labels. >> PT-N10 >> PT-N20/PT-N25BT PT-N10 1. -
Page 67: Print Or Open A Saved Label
Home > Use the File Memory > Print or Open a Saved Label Print or Open a Saved Label >> PT-N10 >> PT-N20/PT-N25BT PT-N10 1. Press 2. Press d or c to display the [File] option, and then press 3. Do one of the following:... -
Page 68: Print Labels Using Mobile Devices
Home > Print Labels Using Mobile Devices Print Labels Using Mobile Devices Related Models: PT-N25BT • Install Brother P-touch Design&Print 2 App • Connect the Printer to a Mobile Device Using Bluetooth • Create Labels and Print Them Using a Mobile Device... -
Page 69: Install Brother P-Touch Design&Print 2 App
Print Labels Using Mobile Devices > Install Brother P-touch Design&Print 2 App Install Brother P-touch Design&Print 2 App Related Models: PT-N25BT Use the Brother P-touch Design&Print 2 app to create labels and print them directly from your iPhone, iPad, and ™ Android mobile devices. -
Page 70: Connect The Printer To A Mobile Device Using Bluetooth
> Connect the Printer to a Mobile Device Using Bluetooth Connect the Printer to a Mobile Device Using Bluetooth Related Models: PT-N25BT When launching the Brother P-touch Design&Print 2 app for the first time, you must connect the printer to your mobile device. 1. Turn on the Label Maker. -
Page 71: Create Labels And Print Them Using A Mobile Device
Home > Print Labels Using Mobile Devices > Create Labels and Print Them Using a Mobile Device Create Labels and Print Them Using a Mobile Device Related Models: PT-N25BT Make sure the Label Maker is connected to your mobile device via Bluetooth. 1. -
Page 72: Routine Maintenance
Home > Routine Maintenance Routine Maintenance • Maintenance... -
Page 73: Maintenance
Home > Routine Maintenance > Maintenance Maintenance • PT-N10 Always remove the batteries before performing routine maintenance of the Label Maker. • PT-N20/PT-N25BT Always remove the batteries and disconnect the AC Adapter before performing routine maintenance of the Label Maker. - Page 74 PT-N20/PT-N25BT Do not touch the Print Head directly with your bare hands. Clean the Cutter Blade Tape adhesive can build up on the Cutter Blade after repeated use, which may result in poor cut quality. If the Cutter Blade does not cut the tape cleanly, remove the residue with a piece of Letter or A4 paper:...
- Page 75 The Cutter Blade becomes blunt after repetitive use and cannot cut the tape cleanly. Turning the Cutter Board around allows you to continue cutting using the other side. The Cutter Board can be turned only once to improve cutting. PT-N10...
- Page 76 PT-N20/PT-N25BT If the problem continues, contact Brother Customer Service or your local Brother dealer. Related Information • Routine Maintenance...
-
Page 77: Troubleshooting
Home > Troubleshooting Troubleshooting • If You Are Having Difficulty with Your Label Maker • Error and Maintenance Messages • Check the Version Information • Reset the Label Maker... -
Page 78: If You Are Having Difficulty With Your Label Maker
Your mobile device’s Bluetooth setting is on. The Label Maker is connected to your mobile device via Bluetooth. The Label Maker is selected in the Brother P-touch Design&Print 2 app. The Label Maker is not paired with another device. The Label Maker and your mobile device are within range to communicate. - Page 79 Problem Solution Previously saved label files • PT-N10: All files saved in the internal memory will be deleted when the batteries are are not available. low or are depleted. • PT-N20/PT-N25BT: All files saved in the internal memory will be deleted when the batteries are low, depleted, or the AC Adapter is disconnected.
- Page 80 Related Information • Troubleshooting Related Topics: • Reset the Label Maker • Set Language • Check the Version Information • Margin Options • Insert Tape Cassette • Connect the Printer to a Mobile Device Using Bluetooth...
-
Page 81: Error And Maintenance Messages
• is pressed when no text is entered. SystemErrorX Contact Brother Customer Service or your local Brother dealer. Text Limit! The number of characters entered exceeds the label length. Reduce the text or select Auto as the label length. - Page 82 • is pressed when no text is entered. SystemErrorX Contact Brother Customer Service or your local Brother dealer. Text Full The maximum number of characters (80 characters) has been entered. Text Limit The number of characters entered exceeds the label length.
-
Page 83: Check The Version Information
> Check the Version Information Check the Version Information Related Models: PT-N25BT If you need to contact Brother with a question or regarding your warranty, you can confirm the firmware version number and other information on your Label Maker's LCD. 1. Press 2. -
Page 84: Reset The Label Maker
Home > Troubleshooting > Reset the Label Maker Reset the Label Maker Reset the internal memory of your Label Maker to clear all saved label files or if the Label Maker is not operating correctly. • Reset the Printer to the Factory Settings... -
Page 85: Reset The Printer To The Factory Settings
Home > Troubleshooting > Reset the Label Maker > Reset the Printer to the Factory Settings Reset the Printer to the Factory Settings NOTE All text, format settings, option settings, and saved label files are deleted when you reset the Label Maker. Language and measurement unit settings are also deleted. -
Page 86: Appendix
Home > Appendix Appendix • Specifications • Brother Help and Customer Support... -
Page 87: Specifications
Media Tape Width Standard Btag Tape Cassette: 0.47" (12 mm) No. of Lines 1 - 2 lines For a list of compatible supplies, visit the Brother support website at support.brother.com Memory Text Buffer Maximum 80 characters File Storage Maximum 10 files Compatible Operating Systems (PT-N25BT) For the latest list of compatible software, visit support.brother.com/os. -
Page 88: Brother Help And Customer Support
Visa, MasterCard, Discover, American Express credit card, or PayPal account, you can order directly from Brother. Visit us online for a complete selection of the Brother accessories and supplies that are available for purchase. - Page 89 Related Information • Appendix...
- Page 90 USA/CAN Version 0...
Need help?
Do you have a question about the PT-N10 and is the answer not in the manual?
Questions and answers
Which button do you press to increase the font size on the PT-N20?
To increase the font size on the Brother PT-N10, press the "Character Style" button to set the character font, size, width, and style.
This answer is automatically generated
HOW DO i ENLARGE THE FONT SIZE
To enlarge the font size on the Brother PT-N10:
1. Press the button to set the character size.
2. Press the d or c button to choose a size ([Small], [Medium], or [Large]).
3. Press the confirmation button to set the selected size.
This will increase the font size on your label.
This answer is automatically generated
How do you increase the font size.