Table of Contents
Advertisement
Quick Links
Advertisement
Table of Contents

Subscribe to Our Youtube Channel
Related Manuals for Konquest KBP-2704A


Summary of Contents for Konquest KBP-2704A
- Page 1 Owner’s Manual Digital Automatic Arm Blood Pressure Monitor KBP-2704A...
-
Page 2: Table Of Contents
CONTENTS Safety Notice ................. 02 Contents / Unit Illustration ..........05 Important Testing Guidelines ..........08 Quick Start ................09 Unit Operation ............... 10 Battery Installation ............11 System Settings ..............11 Instructional Videos ............12 Applying the Arm Cuff ............ 13 Testing ................ -
Page 3: Safety Notice
SAFETY NOTICE Thank you for purchasing KBP-2704-A Blood Pressure Monitor. The unit has been constructed using reliable circuitry and durable materials. Used properly, this unit will provide years of satisfactory use. The device is intended for use by individuals 12 years and older to measure the systolic and diastolic blood pressure and pulse rate. - Page 4 SAFETY NOTICE Important Instructions Before Use Do not confuse self-monitoring with self-diagnosis. Blood pressure measurements should only be interpreted by a health professional who is familiar with your medical history. Contact your physician if test results regularly indicate abnormal readings. If you are taking medication, consult with your physician to determine the most appropriate time to measure your blood pressure.
- Page 5 SAFETY NOTICE 20.The system might produce incorrect readings if stored or used outside the manufacturer's specified temperature and humidity ranges. 21.Do not use the device near strong electrical or electromagnetic fields generated by cellphones or other devices, they may cause incorrect readings and interference or becomeinterference source to the device.
-
Page 6: Contents / Unit Illustration
CONTENTS Monitor Unit 2. Cuff 3. 4 AAA Batteries 4. Owner's Manual 5. Storage Bag... -
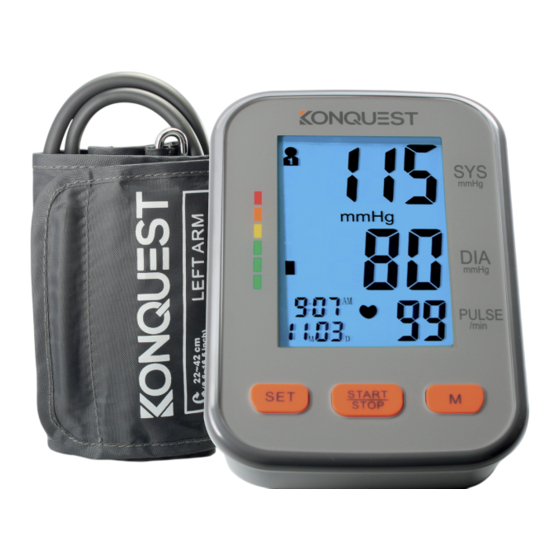
Page 7: Monitor Unit
UNIT ILLUSTRATION Monitor Unit Blood Pressure Classification Indicator Systolic Blood Pressure Diastolic Blood Pressure Pulse Rate Air Jack "M" Button "START/STOP" Button "SET" Button USB-C Connector Battery cover... - Page 8 UNIT ILLUSTRATION Arm Cuff Medium size cuff (fits arm circumference: 22.0 cm -42.0 cm). Air Tube Air Plug Arm Cuff If air is leaking from the arm cuff, replace the arm cuff with a new one. It is generally recommended to have the cuff replaced timely to ensure correct functioning and accuracy.
-
Page 9: Important Testing Guidelines
IMPORTANT TESTING GUIDELINES Avoid eating, exercising, and bathing for 30 minutes prior to testing. Sit in a calm environment for at least 5 minutes prior to testing. Do not stand while testing. Sit in a relaxed position while keeping your arm level with your heart. -
Page 10: Quick Start
QUICK START Install batteries. Make sure to install them correctly the way it's shown in the unit. (See Figure A) Insert cuff air plug into the left side of monitor unit. (See Figure B) 3. Remove thick clothing from the arm area. 4. -
Page 11: Unit Operation
UNIT OPERATION Battery Installation Slide battery cover off as indicated by arrow. Install 4 new AAA alkaline batteries according to polarity. (Make sure to install them properlyfor the unit to work.) Close battery cover. USB-C Connector jack is on the right side of the monitor. Use a 60601- 1 certified Medical USB charger power supply and a USB Type-C charging cable (NOT INCLUDED). -
Page 12: System Settings
UNIT OPERATION System Settings With the unit "OFF", press "SET" button to activate System Settings. The Memory Group icon flashes. Select Memory Group While in the System Setting mode, you may accumulate test results into 2 different groups. This allows multiple users to save individual test results (up to 60 memories per group.) Press "M"... -
Page 13: Instructional Videos
UNIT OPERATION 3. Saved Settings While in any setting mode, press "START/STOP" button to turn the unit off. All information will be saved. Note: If unit is left on and not in use for 3 minutes, it will automatically save all information and shut off. INSTRUCTIONAL VIDEOS Instructional videos are available at www.konquestusa.com/videos... -
Page 14: Applying The Arm Cuff
UNIT OPERATION Applying the Arm Cuff 1. Firmly insert air plug into opening located on left side of monitor unit. 2. With sticky nylon section facing outward, insert end of cuff underneath metal ring of cuff. 3. Fasten cuff about 1-2cm (0.4-0.8'') above the elbow joint. For best results apply cuff to bare arm and keep level with heart while testing. -
Page 15: Testing
UNIT OPERATION Testing Power On Press the "START/STOP" button until a beep sounds. The LCD screen will turn on as the unit performs a quick diagnosis. A long tone indicates device is ready for testing. Note: Unit will not function if residual air from previous testing is present in cuff. - Page 16 UNIT OPERATION 2. Pressurization The unit will automatically inflate to the upper limit and stop inflating. During this time, please keep calm and quiet. Note: Pressurization will gradually subside and ultimately stop when cuff is not properly applied to the arm. If this occurs, press "START/STOP"...
- Page 17 UNIT OPERATION 3. Testing After cuff inflation, air will slowly subside as indicated by the corresponding cuff pressure value. A flashing " " will appear simultaneously on screen signaling heart beat detection. Note: Keep relaxed during testing. Avoid speaking or moving body parts. 4.
-
Page 18: Power Off
UNIT OPERATION Irregular Heartbeat Indicator If the monitor detects an irregular heart rhythm two or more times during the measuring process, the Irregular Heartbeat Symbol " " appears on screen along with measurement results. Irregular heartbeat rhythm is defined as rhythm that is either 25% slower or faster than the average rhythm detected while measuring systolic blood pressure and diastolic blood pressure. -
Page 19: Memory Check
UNIT OPERATION Memory Check With power off, you may check past test results by using the "M" button. The most recent test result and oldest test result in memory can be viewed by pressing and holding the "M" button upon activating test results you can press the “M”... -
Page 20: Memory Deletion
UNIT OPERATION Memory Deletion Memory for a selected group may be deleted while in Memory Check mode. Press and hold the "SET" button for approximately 3 seconds to delete all memory records from the selected group. The monitor will beep indicating successful deletion and then transfer into testing mode. Press the "START/STOP"... -
Page 21: Last 3 Tests Average
UNIT OPERATION Last 3 Tests Average With power OFF, press the "M" button to activate screen display. After the unit performs a self diagnosis, the screen will display the average test results from the last 3 readings of the last group used. The "AVG"... -
Page 22: Low Battery Indicator
UNIT OPERATION Low Battery Indicator 4 short warning beeps sound when battery life is depleting and unable to inflate cuff for testing. The " " appears simultaneously for approximately 5 seconds prior to shutting off. Replace batteries at this time. No memory loss will occur throughout this process. Static Pressure Measurement In the power down state, press and hold the "START/STOP"... -
Page 23: Troubleshooting
UNIT OPERATION Troubleshooting Problem Possible Cause Solution Firmly reposition cuff Cuff is too tight or not approximately 1-2 cm properly positioned on (1/2") above the elbow the arm. joint (See Page 13). Sit in a relaxed position with arm Blood pressure placed near heart. -
Page 24: Blood Pressure Information
BLOOD PRESSURE INFORMATION Blood Pressure Blood pressure is the force of blood pushing against the walls of arteries. It is typically measured in millimeters of mercury (mmHg.) Systolic blood pressure is the maximum force exerted against blood vessel walls each time the heart beats. Diastolic blood pressure is the force exerted on blood vessels when the heart is resting between beats. - Page 25 BLOOD PRESSURE INFORMATION WHO Blood Pressure Classification Indicator The KBP-2704A is equipped with a classification indicator based on established guidelines from the World Health Organization. The chart below (color coded on monitor unit) indicates test results.
- Page 26 BLOOD PRESSURE INFORMATION Health Reminder Hypertension is a dangerous disease that can affect the quality of life. It can lead to a lot of problems including heart failure, kidney failure, and cerebral hemorrhaging. By maintaining a healthy lifestyle and visiting your physician on a regular basis, hypertension and relative diseases are much easier to control when diagnosed in their early stages.
-
Page 27: Blood Pressure Q A
BLOOD PRESSURE Q & Q: What is the difference between measuring blood pressure at home or at a professional healthcare clinic? A: Blood pressure readings taken at home are now seen to give a more accurate account as they better reflect your daily life. Readings can be elevated when taken in a clinical or medical environment. -
Page 28: Maintenance
MAINTENANCE 1. Avoid dropping, slamming, or throwing the unit. 2. Avoid extreme temperatures. Do not expose unit directly under sunshine. 3. When cleaning the unit, use a soft fabric and lightly wipe with mild detergent. Use a damp cloth to remove dirt and excess detergent. - Page 29 MAINTENANCE 4. Cuff Cleaning: Do not soak cuff in water! Apply a small amount of rubbing alcohol toa soft cloth to clean cuff's surface. Use a damp cloth (water-based) to wipe clean. Allow cuff to dry naturally at room temperature. The cuff must be cleaned and disinfected before use between different users.
-
Page 30: Specifications
SPECIFICATIONS Product Description Arm-type Fully Automatic Blood Pressure Monitor Model KBP-2704A Display LCD Digital Display Size: 84.1mm×55.1mm (3.31" x 2.17") Measurement Method Oscillometric Method Systolic Pressure 60mmHg 280mmHg Diastolic Pressure 30mmHg 200mmHg Pressure 0mmHg 300mmHg Measurement Range Pressure ±3mmHg or ±2% above 200mmHg... - Page 31 SPECIFICATIONS Battery Life Approximately 2 months at 3 tests per day Unit Weight Approx.382g (13.47 oz.) (excluding battery) Unit Dimensions Approx.148x100x56mm (5.83"x3.94"x2.21") LxWxH Cuff Circumference Medium cuff: Fits arm circumference 22-42 cm Temperature 10℃ ~ 40℃ (50℉~104℉) Oerating Humidity 15% 93%RH Environment Pressure 700hPa~1060hPa...
- Page 32 SPECIFICATIONS 4. AAMI/ANSI/IEC 60601-1-2, Medical Electrical Equipment -- Part 1-2: General Requirements For Basic Safety And Essential Performance- Collateral Standard: Electromagnetic Disturbances -- Requirements and Tests (General II (ES/EMC)). 5. IEC 60601-1-11, medical electrical equipment - part 1-11: general r e q u i r e m e n t s f o r b a s i c s a f e t y a n d e s s e n t i a l p e r f o r m a n c e - collateral standard: requirements for medical electrical equipment a n d m e d i c a l e l e c t r i c a l s y s t e m s u s e d i n t h e h o m e h e a l t h c a r e environment.
-
Page 33: Warranty
WARANTY The Blood Pressure Monitor is guaranteed for 2-year from the date of purchase. If the Blood Pressure Monitor does not function properly due to defective components or poor workmanship, we will repair or replace it freely. The warranty does not cover damages to your Blood Pressure Monitor due to improper handling. -
Page 34: Electromagnetic Compatibility Information
ELECTROMAGNETIC COMPATIBILTY INFORMATION The device satisfies the EMC requirements of the international standard IEC 60601-1-2. The requirements are satisfied under the conditions described in the table below. The device is an electrical medical product and is subject to special precautionary measures with regard to EMC which must be published in the instructions for use. - Page 35 ELECTROMAGNETIC COMPATIBILTY INFORMATION Table 2 Guidance and declaration of manufacturer-electromagnetic immunity The device is intended for use in the electromagnetic environment specified below. The customer or the user of the device should assure that it is used in such an environment. IEC 60601 test Compliance Electromagnetic environment...
- Page 36 ELECTROMAGNETIC COMPATIBILTY INFORMATION Table 3 Guidance and declaration of manufacturer-electromagnetic immunity The device is intended for use in the electromagnetic environment specified below. The customer or the user of the device should assure that it is used in such an environment. IEC 60601 test Compliance Electromagnetic environment...
- Page 37 ELECTROMAGNETIC COMPATIBILTY INFORMATION Table 4 Recommended separation distances between portable and mobile RF communications equipment and the device The device is intended for use in an electromagnetic environment in which radiated therefore disturbances are controlled. The customer or the user of the device can help prevent electromagnetic interference by maintaining a minimum distance between portable and mobile RF communications equipment (transmitters) and the device as recommended below, according to the maximum output power of the communications...
- Page 38 Document No.:KBP-2704A-1 Version: English Date of Issue: 2022.11 Manufactured for Konquest Group Inc. Email: info@konquestusa.com www.konquestusa.com Phone: +1 833 KONQUEST (566 7837)
Need help?
Do you have a question about the KBP-2704A and is the answer not in the manual?
Questions and answers