Table of Contents
Advertisement
Available languages
Available languages
Quick Links
Advertisement
Table of Contents

Subscribe to Our Youtube Channel
Related Manuals for BSVILLAGE SharkVAC XL Pilot


Summary of Contents for BSVILLAGE SharkVAC XL Pilot
- Page 1 MANUALE di UTILIZZO Robot Piscina Hayward SharkVAC XL Pilot www.bsvillage.com...
- Page 2 PULITORE AUTOMATICO MANUALE PER L’USO SharkVAC XL Pilot ™ I pulitori automatici Hayward sono sinonimo di standard elevati in termini di design, prestazioni e qualità. Il pulitore leviga, pulisce e filtra la piscina in modo indipendente. È completamente automatico e non richiede installazione né accessori. È sufficiente immergerlo nella vasca e accenderlo. Pulire il filtro non è...
- Page 3 Al fine di garantire la massima sicurezza durante l’utilizzo dell’apparecchio, si raccomanda di osservare le precauzioni basilari di seguito riportate. Il mancato rispetto delle suddette indicazioni può causare danni gravi e/o morte. ⚠ Prestare particolare attenzione alle indicazioni precedute da questo simbolo. Quando presente sull’apparecchio o nel manuale, tale simbolo è...
- Page 4 INFORMAZIONI E INDICAZIONI DI SICUREZZA ⚠ PERICOLO Rischio di scossa elettrica o elettrocuzione L’alimentatore elettrico deve essere installato conformemente alla legislazione e alla normativa locale in vigore (v. p. 17). Un’installazione impropria potrebbe provocare scosse elettriche suscettibili di generare morte o lesioni gravi a persone e operatori della piscina, nonché...
- Page 5 STOP LEGGERE ACCURATAMENTE LE PRESENTI ISTRUZIONI PER L'USO PRIMA DI AVVIARE L'UNITÀ! Gentile Acquirente, Grazie per aver scelto Hayward. Per ottenere prestazioni ottimali dall'apparecchio, leggere e seguire scrupolosamente le seguenti indicazioni: 1. Le cartucce filtranti devono essere accuratamente pulite dopo ogni utilizzo o ogni quanto necessario per garantire prestazioni ottimali.
- Page 6 ISTRUZIONI OPERATIVE GENERALI Osservare la figura 3 per conoscere il pulitore. Grazie all'illustrazione, sarà possibile individuare i diversi componenti dell'unità citati nel presente manuale. Fig. 1 Rimuovere il pulitore posizionando a terra il cartone ed estraendo l'apparecchio dalla scatola, come mostrato in figura. Il pulitore e l'alimentatore sono premontati sul carrello.
- Page 7 7. Al termine del ciclo di pulizia, spegnere l'alimentatore prima di rimuovere il pulitore dalla piscina. 8. Estrarre il pulitore dall'acqua, all'estremità più bassa della vasca, tirando il cavo fino a quando l'unità non raggiunge la superficie. Sollevare l'apparecchio fuori dall'acqua utilizzando il maniglione, NON il cavo.
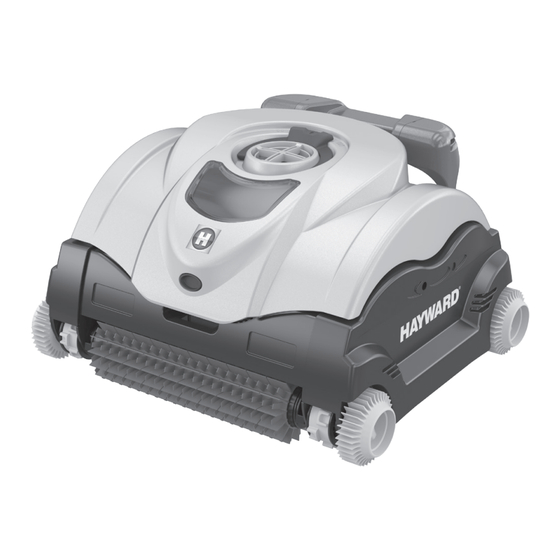
- Page 8 Fig. 3 1. Alimentatore 8. Unità motore sigillata 2. Cavo galleggiante 9. Pannello laterale 3. Maniglia 10. Gruppo calotta 4. Interruttore ON/OFF 11. Cestello filtrante 5. Cartuccia filtrante 12. Ruota 6. Binario di guida 13. Porta di accesso al filtro 7.
- Page 9 ISTRUZIONI PER IL MONTAGGIO DEL CARRELLO - FARE RIFERIMENTO ALL’ILLUSTRAZIONE - Il carrello è parzialmente assemblato all'interno del cartone, ad eccezione del maniglione e dell'asse delle ruote. - Inserire la vite nell'asse alla base del carrello e stringerla con un bullone (3). - Inserire il maniglione nella sommità...
-
Page 10: Manutenzione
MANUTENZIONE Pulire la cartuccia filtrante dopo ogni utilizzo: 1. Aprire il pulitore premendo il pulsante sul coperchio e sollevare la calotta. 2. Rimuovere il cestello del filtro sollevandolo verso l'alto con entrambe le mani. 3. Girare il cestello per rimuovere i detriti al suo interno e risciacquare con una canna da giardino per eliminare ogni piccola particella. - Page 11 5. Rimuovere le cartucce filtranti: a. Sganciare e sollevare entrambe le levette della porta di accesso al filtro b. Estrarre le cartucce. Con una canna da giardino e una bocchetta, lavare gli elementi filtranti per rimuovere i detriti. Tenere tali elementi come mostrato in figura per consentire ai residui di cadere.
- Page 12 6. Reinserire il cestello nel pulitore facendo riferimento all'illustrazione per individuare la parte anteriore e la parte posteriore. 7. Chiudere la calotta e premere l'apposito pulsante per chiudere. NOTA: Una soluzione pulente per filtro può essere utilizzata per rimuovere tracce eccessive di sporco e/o sabbia.
- Page 13 LINEA DI GALLEGGIAMENTO Risalita pareti - retro Posizione di galleggiamento Pulizia normale Pulizia linea di galleggiamento Pulizia attiva fondo Metodo di selezione FUNZIONE RISALITA PARETI Il pulitore SharkVAC XL™ Pilot è dotato di una "tecnologia di galleggiamento mobile" brevettata. In ogni posizione di galleggiamento (I, II, e III) verrà...
- Page 14 CARATTERISTICA PULIZIA SOLO BASE La modalità Solo Fondo può essere usata quando si desidera puliresolo il fondo della propria piscina o quando state utilizzando una copertura per la piscina. La sua principale funzione consiste nel pulire la piscina più velocemente pulendo solo il fondo quando la parete non necessita di pulizia. La modalità Solo Fondo è...
-
Page 15: Guida Alla Risoluzione Dei Problemi
GUIDA ALLA RISOLUZIONE DEI PROBLEMI • Se il pulitore non raccoglie detriti fini o pesanti: ο Pulire il filtro. Potrebbe essere ostruito. L'utilizzo di una soluzione pulente per filtri può facilitare la rimozione di tracce eccessive di sporco e/o sabbia. •... -
Page 16: Specifiche Tecniche
SPECIFICHE TECNICHE RC9743WCP / RC9745WCP Peso (senza cavo) 10,45 Kg Lunghezza cavo, Tipo 16,76 m Materiali ABS Alto Impatto - Parti metalliche di acciaio inox non ferroso Unità motore Pompa Trazione Velocità (rpm) 2.700 Tensione 24 V ⎓ 22 V ⎓ 5 V ⎓... - Page 17 GUIDA ALL'USO SICURO Questo pulitore automatico per piscine è stato prodotto secondo gli standard di sicurezza e attenzione più elevati. Si raccomanda di attenersi alle seguenti precauzioni di sicurezza rendendole parte integrante dell'uso sicuro della vasca: CONSERVARE LE PRESENTI ISTRUZIONI 1.
- Page 18 Garanzia limitata HAYWARD ® Tutti i prodotti HAYWARD sono coperti contro difetti di produzione o difetti sul materiale per un periodo di 2 anni dalla data di acquisto. Ogni eventuale richiesta di intervento in garanzia deve essere accompagnata da una prova di acquisto riportante la data.
- Page 19 ROBOTIC CLEANER OWNER’S MANUAL SharkVAC XL Pilot ™ Hayward robotic cleaners represent the highest standard in design, performance, and quality. The cleaner independently scrubs, vacuums, and filters your pool. It is completely automatic and requires no installation, no attachments. Just drop it in and turn it on. Filter cleaning is much easier with the top-access filter cartridge element.
- Page 20 Basic safety precautions should always be followed, including the following: Failure to follow instructions can cause severe injury and/or death. ⚠ This is the safety-alert symbol. When you see this symbol on your equipment or in this manual, look for one of the following signal words and be alert to the potential for personal injury.
-
Page 21: Warning / Caution
CONSUMER INFORMATION AND SAFETY ⚠ DANGER Risk of electrical shock or electrocution The electrical supply to this product must be installed in accordance with all applicable local codes (see p17) and ordinances. Improper installation will create an electrical hazard which could result in death or serious injury to pool users or others due to electrical shock, and may also cause damage to property. - Page 22 STOP READ THESE IMPORTANT OPERATING TIPS BEFORE USING YOUR UNIT! Dear Hayward Robotic Cleaner Owner: Thank you for choosing Hayward. In order to achieve optimal performance, please read and follow these steps: 1. Cleaner filter cartridges should be thoroughly cleaned after each use or as often as needed to ensure cleaner’s optimal performance.
- Page 23 GENERAL OPERATING INSTRUCTION Take a moment to get familiar with the cleaner using the figure 3. Throughout this manual reference to this figure is made when referring to different components of the cleaner. Fig. 1 Remove the cleaner by placing the carton down and removing it from the box as shown.
- Page 24 7. After the pool has been cleaned, switch OFF the power supply before removing the cleaner from the pool. 8. Remove the cleaner from the water at the shallow end of the pool by pulling the cable until the cleaner reaches the surface.
- Page 25 Fig. 3 1. Power Supply 8. Sealed Motor Unit 2. Floating Cable 9. Side Panel 3. Handle 10. Dome Assembly 4. On/Off Switch 11. Filter Bucket 5. Filter Cartridge 12. Wheel 6. Drive Track 13. Filter Door 7. Foam Roller 14.
- Page 26 CADDY CART INSTRUCTIONS - SEE DIAGRAM - Caddy Cart will come partially assembled in the carton less the handle & tube. - Insert the screw into the tube at the base of the caddy cart & secure with bolt (3) - Insert the handle into the top of the tube &...
-
Page 27: Maintenance
MAINTENANCE Clean the filter cartridge after each use: 1. Open the cleaner by pressing the lid button and lifting up the dome cover. 2. Remove the filter bucket assembly by lifting it up out of the cleaner with both hands from each side. 3. - Page 28 5. Remove the filter cartridges: a. Unsnap and lift up both filter door latches. b. Pull out the filter cartridges. Using a garden hose with a spray nozzle, wash the filter elements to remove debris. Hold the filter elements as shown to allow the debris to fall out. c.
- Page 29 6. Return the filter bucket assembly into the cleaner using the diagram shown to determine the front and back. 7. Close the dome and press the lid button to snap dome into place. NOTE: Filter cleaning solution can be used to remove excessive dirt and/or sand. Remember: The cleaner your filter is, the more cleaning will be effective.
- Page 30 WATER LINE Back side wall climbing Float Position Normal Clean Water line scrubbing Active Floor Clean Method of selection WALL CLIMBING FEATURE SharkVAC XL™ Pilot is equipped with patent pending “movable flotation technology”. Each float position (I, II, and III) will provide different wall climbing action. Float position “I”...
-
Page 31: Important Tips
BOTTOM ONLY CLEANING FEATURE The bottom only mode can be used when you want to only clean the bottom of your pool or when you are using a pool cover. Its primary feature is to clean the pool faster by only cleaning the pool bottom when the walls do not need cleaning. -
Page 32: Troubleshooting
TROUBLESHOOTING • If the cleaner fails to pick up fine or heavy debris: ο Clean the filter. It may be clogged. A filter cleaning solution can be used to remove excessive dirt and/or sand • If the cleaner starts working momentarily but then stops working: ο... -
Page 33: Specifications
SPECIFICATIONS RC9743WCP / RC9745WCP Weight (w/o cable) 10.45 Kg Cable Length, Type 16,76 m Materials High Impact ABS - Metal Parts of Non-Ferous Stainless Steel Motor Unit Pump Drive Speed (rpm) 2 700 Voltage 24 V ⎓ 22 V ⎓ 5 V ⎓... - Page 34 IMPORTANT SAFETY INSTRUCTIONS This robotic swimming pool cleaner has been manufactured with the highest degree of care and concern for safety. We suggest the following safety precautions become part of your pool safety regulations: SAVE THESE INSTRUCTIONS 1. ALWAYS PUT THE MACHINE INTO THE WATER BEFORE CONNECTING IT TO THE ELECTRICAL OUTLET. 2.
- Page 35 HAYWARD Limited Warranty ® All HAYWARD products are covered for manufacturing defects or material defects for a warranty period of 2 years as of date of purchases. Any warranty claim should be accompanied by evidence of purchase, indicating date of purchase. We would therefore advise you to keep your invoice.
- Page 36 BUSINESS SHOP S.r.l. a Socio Unico Via della Repubblica n. 19/1 - 42123 Reggio Emilia (RE) P.Iva e C.F. 02458850357 - Cap. soc. 60.000,00 € i.v. www.bsvillage.com 0522 15 36 417 info@bsvillage.com 0522 18 40 494...
Need help?
Do you have a question about the SharkVAC XL Pilot and is the answer not in the manual?
Questions and answers