Table of Contents
Advertisement
Quick Links
ALLEN + ROTH and logo design are
trademarks or registered trademarks of LF,
LLC. All rights reserved.
ATTACH YOUR RECEIPT HERE
Serial Number
Purchase Date
Thank you for purchasing this ALLEN + ROTH product.
Questions, problems, missing parts?
Before returning, contact us on:
866-439-9800, 8 a.m. - 8 p.m., EST, Monday-Sunday or ascs@lowes.com.
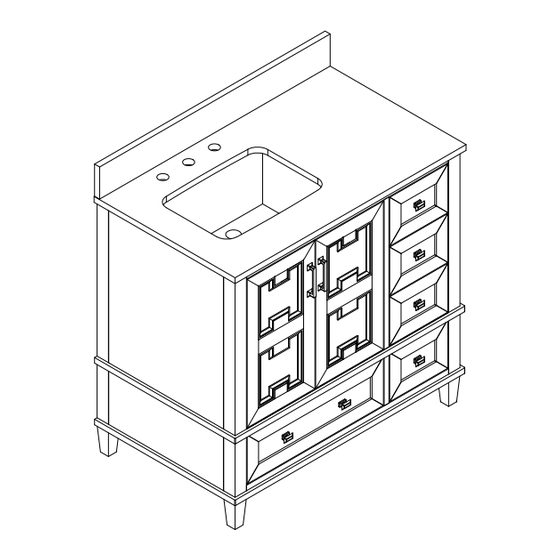
SS24003
36" HAINES VANITY
1
I TEM #5501907
MODEL # TJ-0112V3622BE
WITH TOP
Advertisement
Table of Contents

Subscribe to Our Youtube Channel
Related Manuals for LF ALLEN + ROTH TJ-0112V3622BE


Summary of Contents for LF ALLEN + ROTH TJ-0112V3622BE
- Page 1 I TEM #5501907 MODEL # TJ-0112V3622BE 36" HAINES VANITY WITH TOP ALLEN + ROTH and logo design are trademarks or registered trademarks of LF, LLC. All rights reserved. ATTACH YOUR RECEIPT HERE Serial Number Purchase Date Thank you for purchasing this ALLEN + ROTH product.
-
Page 2: Table Of Contents
TABLE OF CONTENTS Package Contents........................3 Safety Instruction......................3 Preparation.........................4 Assembly Instructions....................4 Care and Maintenance......................10 Troubleshooting....................10 Warranty..........................10 Replacement Parts List......................11... -
Page 3: Package Contents
PACKAGE CONTENTS PART DESCRIPTION QUANTITY Vanity Vanity top Backsplash SAFETY INSTRUCTION Please read and understand this entire manual before attempting to assemble, operate or install the product. WARNING Unpacking requires two adults and several steps are more easily handled with two adults. CAUTION DO NOT try to pry off top from vanity, as damage to top or vanity may occur. -
Page 4: Preparation
PREPARATION Before beginning assembly of product, make sure all parts are present. Compare parts with package contents list and hardware contents list. If any part is missing or damaged, do not attempt to assemble the product. Estimated Installation Time: 30-35 minutes (24 hours for silicone caulk to dry). Tools Required for Assembly (not included): Phillips screwdriver, utility knife or scissors, silicone caulk, power drill with drill bit. - Page 5 ASSEMBLY INSTRUCTIONS → 3. Reinstalling the drawers (step 3 (optional) Fully extend the metal glide tracks. 4. Reinstalling the drawers Gently lower and slide the drawer box into the rear glide catch. Lower the drawer box down to completely rest on extended glides and push plastic levers to lock the drawer box in place.
- Page 6 ASSEMBLY INSTRUCTIONS 6. Adjusting the doors up or down (optional) Loosen screws (4pcs/ hinge) on both hinges. Adjust door up or down. Retighten screws. 7. Adjusting the doors in or out (optional) Loosen screws (1pc/ hinge) on both hinges. Adjust the doors in or out. Retighten screws.
- Page 7 ASSEMBLY INSTRUCTIONS ASSEMBLY INSTRUCTIONS 8. Applying silicon to the Backsplash (step → Apply silicone to the unpolished back side and bottom of the Backsplash (C). Place the Backsplash (C) on the vanity (A). Be sure to align the Backsplash (C) with the top (B) of the vanity (A).
- Page 8 12. Removing top - reinstalling/ replacing top → (step 12 16) (optional) lf you need to remove the top for any purpose, do so in the following manner: Open the doors and remove the top drawer. (Please reference the step 2 on page 4) *Note: When vanity top is preinstalled.
- Page 9 ASSEMBLY INSTRUCTIONS 14. Placing the top on the vanity Place the top on the vanity. Make sure it Flush averages each side and is flush with the back. Overhang 15. Re-installing or replacing the top Use a screwdriver to secure these 10 wood screws. Screws for fixing top layout (10 Screws) Top panel...
-
Page 10: Care And Maintenance
CARE AND MAINTENANCE Dust the vanity regularly with a soft, non-lint producing cloth or household dusting product. You can clean the vanity with a gentle, non-abrasive household cleaner. Make sure to dry the wood immediately with a soft cloth or towel. The stone top can be cleaned using standard marble cleaning agents available at your local supplier. -
Page 11: Replacement Parts List
REPLACEMENT PARTS LIST For replacement parts, call our customer service department at 866-439-9800, 8 a.m. - 8 p.m., EST, Monday - Sunday. You may also contact us at ascs@lowes.com. PART DESCRIPTION PART# Backsplash TJ-0112V3622-BL Left door TJ-0112V3622- LD Right door TJ-0112V3622- RD Right drawer boxes TJ-0112V3622- RDB...
Need help?
Do you have a question about the ALLEN + ROTH TJ-0112V3622BE and is the answer not in the manual?
Questions and answers