Pelgrim IK2164 Series Instructions For Use Manual
Hide thumbs
Also See for IK2164 Series:
- Instructions for use manual (84 pages) ,
- Installation instructions (2 pages)
Chapters
Table of Contents

Related Manuals for Pelgrim IK2164 Series


Summary of Contents for Pelgrim IK2164 Series
- Page 1 IK2164 --- IK2184 --- Gebruiksaanwijzing Inductiekookplaat Mode d’emploi Table de cuisson à induction Bedienungsanleitung Induktionskochfeld Instructions for use Induction hob...
- Page 2 Handleiding NL 3 - NL 22 Manual FR 3 - FR 22 Manual DE 3 - DE 22 Manual EN 3 - EN 22 Gebruikte pictogrammen - Pictogrammes utilisés - Verwendete Piktogramme - Pictograms used Belangrijk om te weten - Important à savoir - Wichtig zu wissen - Important information Handig om te weten - Bon à...
-
Page 3: Table Of Contents
INHOUDSOPGAVE Uw inductiekookplaat Inleiding Beschrijving Bedieningspaneel Veiligheid Temperatuurbeveiliging Kookduurbegrenzer Vermogensbegrenzer Voor het eerste gebruik Gebruik van de aanraaktoetsen Inductiegeluiden Geschikte pannen Pandetectie Vermogen instellen Kookinstellingen Bediening Inschakelen en vermogen instellen Boostfunctie Klaar met koken Pandetectiesymbool De automatische opwarmfunctie Timerbediening Vergrendelfunctie Kinderslot Opwarmfunctie / Warmhoudfunctie Vermogensbegrenzer... -
Page 4: Uw Inductiekookplaat
UW INDUCTIEKOOKPLAAT Inleiding Gefeliciteerd met uw keuze voor dit toestel. In het ontwerp van dit product heeft eenvoudige bediening en optimale gebruiksvriendelijkheid centraal gestaan. In deze handleiding leest u hoe u dit toestel het best kunt gebruiken. Naast informatie over de bediening, vindt u hier ook achtergrondinformatie die u tijdens het gebruik van het toestel van pas kan komen. -
Page 5: Beschrijving
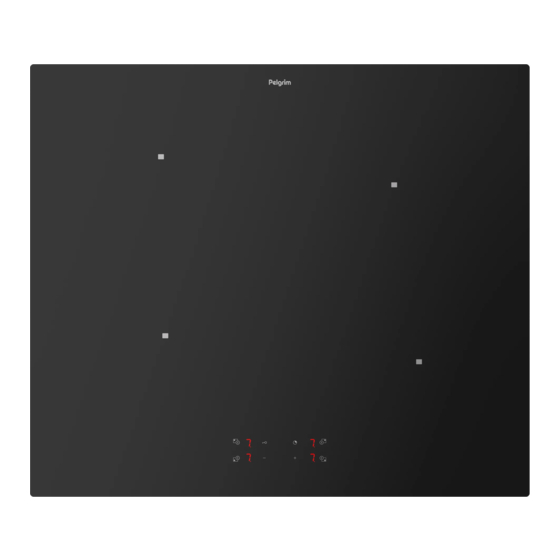
UW INDUCTIEKOOKPLAAT Beschrijving IK2184 --- IK2164 --- 1. Kookzone Ø 240 mm (2,2 kW / 3,0 kW boost) 2. Kookzone Ø 145 mm (1,2 kW / 1,6 kW boost) 3. Bedieningspaneel 4. Kookzone Ø 210 mm (1,5 kW / 2,0 kW boost) 5. -
Page 6: Bedieningspaneel
UW INDUCTIEKOOKPLAAT Bedieningspaneel 1. Aan-/uittoets kookzone en selectietoets kookzone 2. Display kookzone 3. Vergrendeltoets 4. Indicatie vergrendeling bedieningspaneel 5. Timerdiplay 6. Timertoets 7. Indicatie actieve timer (de tijd van deze kookzone wordt getoond in de timerdisplay) 8. Min (-) toets vermogen/timer 9. -
Page 7: Veiligheid
VEILIGHEID Lees eerst de afzonderlijke veiligheidsinstructies voordat u het apparaat in gebruik neemt! Temperatuurbeveiliging Een sensor controleert continu de temperatuur van bepaalde onderdelen van de kookplaat. Elke kookzone is voorzien van een sensor die continu de temperatuur van de bodem van de pan controleert om risico op oververhitting te voorkomen wanneer een pan droogkookt. -
Page 8: Voor Het Eerste Gebruik
VOOR HET EERSTE GEBRUIK Gebruik van de aanraaktoetsen Plaats uw vingertop plat op een toets voor het beste resultaat. U hoeft geen druk uit te voeren. De aanraaktoetsen reageren alleen op lichte druk van een vingertop. Bedien de toetsen niet met andere objecten. -
Page 9: Pandetectie
VOOR HET EERSTE GEBRUIK Minimale pandiameter • De minimale diameter van de panbodem: 90 mm voor een kookzone ø 145 mm. ▷ ▷ 110 mm voor een kookzone ø 210 mm. ▷ 130 mm voor een kookzone ø 240 mm. •... -
Page 10: Kookinstellingen
VOOR HET EERSTE GEBRUIK Kookinstellingen Aangezien de instellingen afhankelijk zijn van de hoeveelheid en samenstelling van het gerecht in de pan, geldt de onderstaande tabel alleen als richtlijn. Gebruik de boost-instelling voor: • snel aan de kook brengen van voedsel of vloeistof; Gebruik instelling 9 voor: •... -
Page 11: Bediening
BEDIENING Lees het hoofdstuk ‘Voor het eerste gebruik’ zorgvuldig door voordat u begint met koken. Dit voorkomt onjuist gebruik van de kookplaat. Inschakelen en vermogen instellen Het kinderslot is actief nadat de kookplaat voor de eerste keer wordt ingeschakeld of na een lange stroomstoring. -
Page 12: Klaar Met Koken
BEDIENING Selecteer de kookzone en raak gelijktijdig de min (-) toets en de plus (+) toets aan om het vermogen meteen op ‘0’ te zetten. Klaar met koken 1. Druk op de selectietoets van de gewenste kookzone. 2. Zet het vermogensniveau op ‘0’ om de kookzone uit te schakelen of schakel de kookzone uit door op de aan-/uittoets te drukken totdat u een geluidssignaal hoort. -
Page 13: Timerbediening
BEDIENING 1. Druk op de aan-/uittoets van de kookzone totdat u een geluidssignaal hoort. Op het display van de geselecteerde kookzone verschijnt een ‘0’. ▷ 2. Raak tweemaal de min (-) toets aan. ▷ In het display verschijnt een ‘A’. 3. - Page 14 BEDIENING Stel de tijd in op ‘00’ om voortijdig de timer uit te schakelen. Raak de min (-) toets of de plus (+) toets kort aan om in stappen van 1 minuut te verkorten of te verlengen. Houd de min (-) toets of de plus (+) toets ingedrukt om de tijd snel te verkorten of te verlengen.
-
Page 15: Vergrendelfunctie
BEDIENING Vergrendelfunctie Door de vergrendelfunctie te activeren, kunt u de toetsen vergrendelen tijdens het gebruik van de kookplaat. Alleen de uittoetsen en de vergrendeltoets zijn actief. De kookplaat is ingeschakeld en in werking. 1. Druk circa 2 seconden op de vergrendeltoets. ▷... -
Page 16: Opwarmfunctie / Warmhoudfunctie
BEDIENING Opwarmfunctie / Warmhoudfunctie Gebruik deze functie om voedsel op te warmen of na het koken warm te houden. Opwarmfunctie 1. Zet de pan met het koude voedsel op een kookzone. 2. Druk op de aan-/uittoets van de kookzone totdat u een geluidssignaal hoort. Op het display van de geselecteerde kookzone verschijnt een ‘0’. -
Page 17: Vermogensbegrenzer
VERMOGENSBEGRENZER Het instellen van de vermogensbegrenzer mag alleen worden uitgevoerd door een erkende en gekwalificeerde installateur. Lees de veiligheidsvoorschriften en de installatie-instructies zorgvuldig door. De begrenzer is af fabriek ingesteld op 7200 W, maar het is mogelijk om deze instelling te wijzigen naar 6000 W / 3600 W / 2800 W. -
Page 18: Onderhoud
ONDERHOUD Reiniging Dagelijkse reiniging • Wij raden u aan het toestel na elk gebruik te reinigen. Zo voorkomt u dat overgekookt eten de glasplaat kan beschadigen. • Voor de dagelijkse reiniging kunt u het best een vochtige doek met een mild reinigingsmiddel gebruiken. -
Page 19: Problemen Oplossen
PROBLEMEN OPLOSSEN Algemeen Schakel de kookplaat onmiddellijk uit als u een barst in het glas ziet (hoe klein ook). Haal de stekker uit het stopcontact of zet de (automatische) zekering(en) in de meterkast uit. Bij een permanente aansluiting zet u de stroomtoevoer op nul. Neem contact op met de serviceafdeling. Probleemoplossingstabel Als het toestel niet naar behoren werkt, betekent dit niet altijd dat het defect is. - Page 20 PROBLEMEN OPLOSSEN Symptoom Mogelijke oorzaak Oplossing De bediening reageert slecht. Er kan een dun laagje water Zorg dat de kookplaat en/of op de kookplaat of op een vinger schoon is. vinger zijn waardoor de bediening slecht reageert. In het display verschijnt Het toestel is oververhit.
-
Page 21: Technische Specificaties
TECHNISCHE SPECIFICATIES Informatie volgens verordening (EU) 66/2014 Metingen volgens EN60350-2 Modelaanduiding IK2164 --- IK2184 --- Type kookplaat Inductiekookplaat Inductiekookplaat Aantal elektrische kookzones en/of kookgebieden Kookzones/ Kookzones/ Verwarmingstechnologie gebieden op basis gebieden op basis van inductie van inductie Voor ronde elektrische kookzones: de diameter van het bruikbare oppervlak per elektrisch verwarmde kookzone in mm 149,5... -
Page 22: Milieuaspecten
MILIEUASPECTEN Verpakking en apparaat afdanken Bij de productie van dit apparaat is gebruik gemaakt van duurzame materialen. Dit apparaat moet aan het einde van zijn levenscyclus op verantwoorde wijze worden afgedankt. De overheid kan u hierover informatie verstrekken. De verpakking van het apparaat is recyclebaar. Mogelijk zijn de volgende materialen gebruikt: •... - Page 23 SOMMAIRE Votre plaque de cuisson à induction Introduction Description Panneau de commande Sécurité Sécurité antisurchauffe Limiteur de temps de cuisson Limiteur de puissance Avant la première utilisation de l’appareil Utilisation des touches tactiles Bruits de l'induction Casseroles appropriées Détection de casserole Réglage de la puissance Réglages de cuisson Fonctionnement...
-
Page 24: Votre Plaque De Cuisson À Induction
VOTRE PLAQUE DE CUISSON À INDUCTION Introduction Nous vous félicitons d’avoir choisi cet appareil. La souplesse et la simplicité de l’utilisation sont les principes qui ont guidé son développement. Ce manuel vous explique comment utiliser cet appareil de manière optimale. En plus des informations relatives au fonctionnement de l’appareil, vous y trouverez des renseignements de base susceptibles d’en faciliter l’utilisation. -
Page 25: Description
VOTRE PLAQUE DE CUISSON À INDUCTION Description IK2184 --- IK2164 --- 1. Zone de cuisson Ø 240 mm (2,2 kW / 3,0 kW boost) 2. Zone de cuisson Ø 145 mm (1,2 kW / 1,6 kW boost) 3. Panneau de commande 4. -
Page 26: Panneau De Commande
VOTRE PLAQUE DE CUISSON À INDUCTION Panneau de commande 1. Touche Marche/Arrêt et touche de sélection de la zone de cuisson 2. Affichage de la zone de cuisson 3. Touche de verrouillage 4. Indication de verrouillage du panneau de commande 5. -
Page 27: Sécurité
SÉCURITÉ Lisez les consignes de sécurité séparées avant toute utilisation de l'appareil ! Sécurité antisurchauffe Chaque zone de cuisson est dotée d’un capteur thermique. Ce capteur contrôle en permanence la température du fond de la casserole et des éléments de la plaque de cuisson, prévenant tout risque de surchauffe, par exemple par une casserole chauffée à... -
Page 28: Avant La Première Utilisation De L'appareil
AVANT LA PREMIÈRE UTILISATION DE L’APPAREIL Utilisation des touches tactiles Placez le bout du doigt à plat sur une touche pour obtenir les meilleurs résultats. Il est inutile d’exercer une quelconque pression. Les touches tactiles ne réagissent qu’à une légère pression du bout du doigt. -
Page 29: Détection De Casserole
AVANT LA PREMIÈRE UTILISATION DE L’APPAREIL Diamètre minimal de la casserole • Le diamètre de la base de la casserole doit être au moins de : 90 mm pour une zone de cuisson ø 145 mm. ▷ ▷ 110 mm pour une zone de cuisson ø 210 mm. ▷... -
Page 30: Réglages De Cuisson
AVANT LA PREMIÈRE UTILISATION DE L’APPAREIL Réglages de cuisson Étant donné que les niveaux dépendent de la quantité et de la composition du contenu de la casserole, le tableau ci-dessous est uniquement fourni à titre indicatif. Utilisez le niveau « boost » pour : •... -
Page 31: Fonctionnement
FONCTIONNEMENT Veuillez lire attentivement le chapitre « Avant la première utilisation » avant de commencer la cuisson. Cela permet d’éviter une utilisation erronée de la table de cuisson. Mise en marche et réglage de la puissance La sécurité enfants est active après la première mise sous tension de la table de cuisson ou après une longue panne de courant. -
Page 32: Finir La Cuisson
FONCTIONNEMENT Sélectionnez la zone de cuisson et appuyez simultanément sur les touches moins (-) et plus (+) pour régler immédiatement la puissance sur « 0 ». Finir la cuisson 1. Appuyez sur la touche de sélection de la zone de cuisson souhaité. 2. -
Page 33: Commande Du Minuteur
FONCTIONNEMENT 1. Appuyez sur la touche marche / arrêt de la zone de cuisson jusqu’à ce que vous entendiez un bip. « 0 » apparaît sur l’affichage de zone de cuisson. ▷ 2. Appuyez deuz fois sur la touche moins (-). ▷... - Page 34 FONCTIONNEMENT réglage de la minuterie. Appuyez ensuite sur la touche minuterie et utilisez la touche moins (-) ou la touche plus (+). L’affichage de la zone de cuisson sélectionnée est éclairé le plus clairement. Réglez le temps sur « 00 » pour annuler la minuterie prématurément. Appuyez brièvement sur la touche moins (-) ou la touche plus (+) pour raccourcir ou rallonger la durée par incréments de 1 minute.
-
Page 35: Fonction De Verrouillage
FONCTIONNEMENT Arrêt prématuré de la minuterie Si vous souhaitez arrêter le minuteur avant la fin du temps défini : 1. Appuyez sur la touche de la zone de cuisson pour laquelle vous souhaitez arrêter le minuteur. 2. Appuyez sur la touche de minuteur. 3. -
Page 36: Fonction De Réchauffement / Fonction De Maintien Au Chaud
FONCTIONNEMENT 3. Appuyez sur la touche de verrouillage pendant environ 2 secondes.. Un signal sonore retentit. ▷ ▷ Le voyant s’éteint. ▷ La sécurité enfants est désactivée. La sécurité enfants est active après la première mise sous tension de la table de cuisson ou après une longue panne de courant. -
Page 37: Limiteur De Puissance
LIMITEUR DE PUISSANCE Le réglage du limiteur de puissance doit uniquement être effectué par un installateur agréé et qualifié. Veuillez lire attentivement les règles de sécurité et les instructions d’installation. Le limiteur est réglé à 7200 W par l’usine, mais il est possible de modifier ce réglage à 6000 W / 3600 W / 2800 W. -
Page 38: Entretien
ENTRETIEN Nettoyage Nettoyage quotidien • Nous vous recommandons de nettoyer l’appareil après chaque utilisation. Cela évite que les aliments qui ont débordé n’endommagent la plaque de verre. • Pour le nettoyage quotidien, le mieux est d’utiliser un chiffon humide et un produit d’entretien doux. -
Page 39: Diagnostic Des Pannes
DIAGNOSTIC DES PANNES Généralités Si vous remarquez une fissure dans la surface en verre (aussi petite soit-elle), arrêtez immédiate- ment la plaque de cuisson, débranchez la plaque, désactivez le(s) fusible(s) automatique(s) au niveau du compteur électrique ou, si l'appareil est raccordé de façon permanente, réglez le commutateur du câble d'alimentation électrique sur zéro. - Page 40 DIAGNOSTIC DES PANNES Symptôme Cause possible Solution Les touches répondent mal. Il peut y avoir une fine Assurez-vous que la table de couche d’eau sur la table cuisson et/ou le doigt sont propres. de cuisson ou sur un doigt, provoquant une mauvaise réponse des touches.
-
Page 41: Spécifications Techniques
SPÉCIFICATIONS TECHNIQUES Informations conformément à la réglementation (UE) 66/2014 Mesures conformes à la norme EN60350-2 Identification du modèle IK2164 --- IK2184 --- Plaque de cuisson à Plaque de cuisson à Type de plaque de cuisson induction induction Nombre de zones et/ou espaces de cuisson électriques Zones et espaces Zones et espaces... -
Page 42: Aspects Environnementaux
ASPECTS ENVIRONNEMENTAUX Mise au rebut de l’appareil et de l’emballage Des matériaux durables ont été utilisés pour fabriquer cet appareil. Veillez à éliminer cet équipement de manière responsable à la fin de son cycle de service. Pour toute information à ce sujet, contactez les autorités compétentes de votre pays. - Page 43 INHALT Ihr Induktionskochfeld Einführung Beschreibung Bedienleiste Sicherheit Überhitzungsschutz Kochzeitbegrenzung Leistungsbegrenzung Vor der ersten Verwendung Verwendung der Touch-Tasten Induktionsgeräusche Geeignetes Kochgeschirr Kochgeschirrerkennung Leistungsstufen einstellen Hinweise zur Wahl der richtigen Leistungsstufe Bedienung Einschalten und Einstellen der Stufe Boost-Funktion Kochvorgang beenden Kochgeschirrerkennungssymbol Ankochautomatik Timer-Steuerung Sperrfunktion Kindersicherung...
-
Page 44: Ihr Induktionskochfeld
IHR INDUKTIONSKOCHFELD Einführung Herzlichen Glückwunsch zum Kauf Ihres neuen Geräts! Bei der Entwicklung dieses Produkts stand optimale Benutzerfreundlichkeit im Mittelpunkt. In diesem Handbuch erfahren Sie, wie Sie Ihr Gerät optimal verwenden. Neben Informationen zur Bedienung finden Sie hier auch Hintergrundinformationen, die bei der Verwendung dieses Geräts nützlich sein können. -
Page 45: Beschreibung
IHR INDUKTIONSKOCHFELD Beschreibung IK2184 --- IK2164 --- 1. Kochzone Ø 240 mm (2,2 kW / 3,0 kW Boost) 2. Kochzone Ø 145 mm (1,2 kW / 1,6 kW Boost) 3. Bedienleiste 4. Kochzone Ø 210 mm (1,5 kW / 2,0 kW Boost) 5. -
Page 46: Bedienleiste
IHR INDUKTIONSKOCHFELD Bedienleiste 1. Ein/Aus-Taste der Kochzone und Auswahltaste der Kochzone 2. Display der Kochzone 3. Sperr-Taste 4. Indikation Verriegelung Bedienleiste 5. Timer-Display 6. Timer-Taste 7. Aktive Timer-Anzeige (die Zeit dieser Kochzone wird in der Timer-Anzeige angezeigt) 8. Minustaste „–“ Leistung/Timer 9. -
Page 47: Sicherheit
SICHERHEIT Lesen Sie vor der Verwendung des Geräts die separaten Sicherheitshinweise! Überhitzungsschutz Ein Sensor kontrolliert laufend die Temperatur bestimmter Teile des Kochfelds. Jede Kochzone ist mit einem Sensor ausgestattet, der die Temperatur des Topfbodens kontrolliert, um Überhitzung und Trockenkochen zu vermeiden. Bei überhöhter Temperatur wird die Leistung automatisch gesenkt oder das Kochfeld wird ganz ausgeschaltet. -
Page 48: Vor Der Ersten Verwendung
VOR DER ERSTEN VERWENDUNG Verwendung der Touch-Tasten Das beste Ergebnis erzielen Sie, wenn Sie Ihre Fingerspitzen flach auf die Tasten legen. Sie brauchen nicht fest zu drücken. Die Sensortasten sind so eingestellt, dass sie auf die leichte Berührung einer Fingerspitze reagieren. Versuchen Sie nicht, die Sensoren mit anderen Objekten zu bedienen. -
Page 49: Kochgeschirrerkennung
VOR DER ERSTEN VERWENDUNG Mindestdurchmesser von Töpfen und Pfannen • Der Durchmesser des Topf-/Pfannenbodens muss mindestens 90 mm betragen bei einem Zonendurchmesser von ø 145 mm. ▷ ▷ 110 mm betragen bei einem Zonendurchmesser von ø 210 mm. ▷ 130 mm betragen bei einem Zonendurchmesser von ø 240 mm. •... -
Page 50: Hinweise Zur Wahl Der Richtigen Leistungsstufe
VOR DER ERSTEN VERWENDUNG Hinweise zur Wahl der richtigen Leistungsstufe Die Werte in der folgenden Tabelle dienen lediglich einer groben Orientierung, weil die richtige Leistungsstufe von der Menge und Zusammensetzung des Garguts abhängt. Boost-Funktion: • Speisen oder Flüssigkeiten schnell zum Kochen bringen Stufe 9: •... -
Page 51: Bedienung
BEDIENUNG Bitte lesen Sie das Kapitel „Vor der ersten Verwendung“ sorgfältig durch, bevor Sie das Kochfeld zum ersten Mal benutzen, um Fehlbedienungen vorzubeugen. Einschalten und Einstellen der Stufe Die Kindersicherung ist nach dem ersten Einschalten des Kochfelds oder nach einem längeren Stromausfall aktiv. -
Page 52: Kochvorgang Beenden
BEDIENUNG Wählen Sie die Kochzone und berühren Sie gleichzeitig die Minustaste (-) und die Plustaste (+), um die Leistung sofort auf „0“ zu setzen. Kochvorgang beenden 1. Drücken Sie auf die Auswahltaste der gewünschten Kochzone. 2. Stellen Sie Leistungsstufe „0“ ein, um die Kochzone auszuschalten oder drücken Sie auf die Ein-/Austaste bis Sie einen Signalton hören, um die Kochzone auszuschalten. -
Page 53: Timer-Steuerung
BEDIENUNG 1. Drücken Sie auf die Ein-/Austaste einer Kochzone, bis Sie einen Signalton hören. Auf die Kochzonendisplay erscheint „0“. ▷ 2. Drücken Sie zweimal die Minustaste (-). ▷ Auf die Kochzonendisplay erscheint „A“. 3. Stellen Sie mit der Minustaste (-) die gewünschte Leistungsstufe ein (von 8 bis 1). In der Anzeige werden abwechselnd „A“... - Page 54 BEDIENUNG werden können. Berühren Sie dann die Timer-Taste und verwenden Sie die Minus-Taste (-) oder die Plus-Taste (+). Die Anzeige der ausgewählten Kochzone leuchtet am hellsten. Stellen Sie die Zeit auf „00“, um den Timer vorzeitig abzubrechen. Berühren Sie kurz die Taste „-“ oder „+“ um die Zeit in 1-Minuten-Schritten zu verkürzen oder zu verlängern.
-
Page 55: Sperrfunktion
BEDIENUNG Vorzeitiges Ausschalten des Timers Gehen Sie zum Ausschalten des Timers vor Ablauf der eingestellten Zeit wie folgt vor: 1. Wählen Sie die Kochzone, für die Sie den Timer ausschalten möchten, indem Sie die Auswahltaste berühren. 2. Berühren Sie die Timer-Taste. 3. -
Page 56: Aufwärmfunktion / Warmhaltefunktion
BEDIENUNG Die Kindersicherung ist nach dem ersten Einschalten des Kochfelds oder nach einem längeren Stromausfall aktiv. Aufwärmfunktion / Warmhaltefunktion Mit dieser Funktion können Sie Speisen aufwärmen oder nach dem Garen warm halten. Aufwärmfunktion 1. Stellen Sie den Topf mit den kalten Speisen auf eine Kochzone. 2. -
Page 57: Leistungsbegrenzung
LEISTUNGSBEGRENZUNG Die Einstellung der Leistungsbegrenzung sollte nur von einem zugelassen und qualifizierten Installateur vorgenommen werden. Bitte lesen Sie die Sicherheitsvorschriften und die Installationsanleitung sorgfältig. Die Leistungsbegrenzung ist werksseitig auf 7200 W voreingestellt, kann aber geändert werden in 6000 W / 3600 W / 2800 W. Das Kochfeld muss ausgeschaltet und entsperrt sein. -
Page 58: Pflege
PFLEGE Reinigung Tägliche Reinigung • Wir empfehlen Ihnen, das Gerät nach jedem Gebrauch zu reinigen. Dadurch wird verhindert, dass übergekochte Speisen die Glasplatte beschädigen. • Zur täglichen Reinigung verwenden Sie am besten ein mildes Reinigungsmittel und ein feuchtes Tuch. • Trocknen Sie das Kochfeld mit Küchenpapier oder einem trockenen Geschirrtuch. -
Page 59: Fehlerbehebung
FEHLERBEHEBUNG Allgemeines Wenn Sie Risse in der Glasoberfläche feststellen (auch geringfügige), schalten Sie das Kochfeld sofort aus. Trennen Sie das Kochfeld von der Stromversorgung. Schalten Sie die Sicherungen im Sicherungskasten aus oder schalten Sie (bei einem festen Anschluss) den Netzschalter auf 0. Wenden Sie sich an den Kundendienst. - Page 60 FEHLERBEHEBUNG Symptom Mögliche Ursache Lösung Die Bedienungstasten Möglicherweise befindet Stellen Sie sicher, dass das Kochfeld reagieren schlecht. sich auf dem Kochfeld oder und/oder der Finger sauber sind. auf einem Finger eine dünne Wasserschicht, die dazu führt, dass die Bedienelemente nicht mehr reagieren.
-
Page 61: Technische Daten
TECHNISCHE DATEN Informationen zur Verordnung (EU) 66/2014 Messungen gemäß EN60350-2 Modellbezeichnung IK2164 --- IK2184 --- Typ des Kochfelds Induktionskochfeld Induktionskochfeld Anzahl der elektrischen Kochzonen und/ oder -bereiche Induktions- Induktions- Heiztechnologie kochzonen und kochzonen und Kochbereiche Kochbereiche Für runde elektrische Kochzonen: Durchmesser der nutzbaren Fläche für jede Kochzone in mm 149,5 179,5... -
Page 62: Umweltschutz
UMWELTSCHUTZ Entsorgung von Gerät und Verpackung Bei der Herstellung dieses Geräts wurden nachhaltige Materialien verwendet. Am Ende seines Lebenszyklus muss es vorschriftsgemäß entsorgt werden. Weitere Informationen erhalten Sie bei den zuständigen Behörden. Die Verpackung des Geräts ist wiederverwertbar. Folgende Materialien können verwendet worden sein: •... - Page 63 CONTENTS Your induction hob Introduction Description Control panel Safety Temperature safety Cooking-time limiter Power limiter Before first use Use of the touch keys Induction noises Appropriate pans Pan detection Power level setting Cooking settings Operation Switching on and power setting Boost function Finish cooking Pan detection symbol...
-
Page 64: Your Induction Hob
YOUR INDUCTION HOB Introduction Congratulations on your choice of this appliance. This product was designed with simple operation and optimum comfort in mind. This manual describes the best way to use this appliance. In addition to information on operation, you will also find background information that may come in handy when using the appliance. -
Page 65: Description
YOUR INDUCTION HOB Description IK2184 --- IK2164 --- 1. Cooking zone Ø 240 mm (2,2 kW / 3,0 kW boost) 2. Cooking zone Ø 145 mm (1,2 kW / 1,6 kW boost) 3. Control panel 4. Cooking zone Ø 210 mm (1,5 kW / 2,0 kW boost) 5. -
Page 66: Control Panel
YOUR INDUCTION HOB Control panel 1. On/off key cooking zone and selection key cooking zone 2. Display cooking zone 3. Lock key 4. Indication locked control panel 5. Timer display 6. Timer key 7. Active timer indication (the time of this cooking zone is shown in the timer display) 8. -
Page 67: Safety
SAFETY Before use, read the separate safety instructions first! Temperature safety A sensor continuously measures the temperature of certain parts of the hob. Every cooking zone is equipped with a sensor that measures the temperature of the bottom of the pan to avoid any risk of overheating when a pan boils dry. -
Page 68: Before First Use
BEFORE FIRST USE Use of the touch keys Place the tip of your finger flat on a touch key to achieve the best results. You do not have to apply any pressure. The touch keys only react to the light pressure of a fingertip. Do not operate the controls with any other objects. -
Page 69: Pan Detection
BEFORE FIRST USE Minimum pan diameter • The diameter of the bottom of the pan must be at least: 90 mm for a cooking zone ø 145 mm. ▷ ▷ 110 mm for a cooking zone ø 210 mm. ▷ 130 mm for a cooking zone ø... -
Page 70: Cooking Settings
BEFORE FIRST USE Cooking settings Because the settings depend on the quantity and composition of the contents of the pan, the table below is intended as a guideline only. Use setting ‘boost’ to: • bring the food or liquid to the boil quickly; Use setting 9 to: •... -
Page 71: Operation
OPERATION Please read the chapter ‘Before first use’ very carefully before you start cooking. This prevents incorrect use of the hob. Switching on and power setting The child lock is active after the hob is switched on for the first time or after a long power failure. -
Page 72: Finish Cooking
OPERATION Finish cooking 1. Touch the selection key of the desired cooking zone. 2. Set the power level to ‘0’ to switch off the cooking zone or switch off the cooking zone by touching the on/off key until you hear an audio signal. Symbol H will appear in the display of the cooking zone which is too hot to touch. -
Page 73: Timer Control
OPERATION 3. Set the desired power level with the minus (-) key or the plus (+) key (from 1 to 8). An ‘A’ appears in the display alternating with the selected power level; the automatic ▷ heat-up function is switched on. ▷... - Page 74 OPERATION Touch and hold the minus (-) key or the plus (+) key to quickly shorten or lengthen the time. Touch the minus (-) key once, when the time is set to ‘00’, to set the time to ‘99’. Simultaneously touch the minus (-) and plus (+) key of the timer to set the time to ‘00’. Changing the preset cooking time The cooking time can be changed anytime during the operation.
-
Page 75: Lock Function
OPERATION Lock function By activating the lock function, you can lock the keys while using the hob. Only the off keys and the lock key will be active. The hob is switched on and in operation. 1. Touch and hold the lock key for approximately 2 seconds. ▷... -
Page 76: Reheat Function / Keep-Warm Function
OPERATION Reheat function / Keep-warm function Use this function to reheat food or keep it warm after cooking. Reheat function 1. Place the pan with the cold food on a cooking zone. 2. Touch the on/off key of the cooking zone until you hear an audio signal. On the cooking zone display a ‘0’... -
Page 77: Power Limiter
POWER LIMITER Setting the power limiter should only be carried out by a registered and qualified installer. Please read the safety regulations and the installation instructions carefully. The limiter is set at 7200W by the factory, but it is possible to change it to 6000 W / 3600 W / 2800 W. -
Page 78: Maintenance
MAINTENANCE Cleaning Daily cleaning • We recommend that you clean the appliance after each use. This will prevent food that has boiled over from damaging the glass plate. • Best for daily cleaning is a damp cloth with a mild cleaning agent. •... -
Page 79: Troubleshooting
TROUBLESHOOTING General If you notice a crack in the glass top (however small), switch the hob off immediately, unplug the hob or turn off the (automatic) fuse switch(es) in the meter cupboard or. In the event of a permanent connection, set the switch in the power supply lead to zero. Contact the service department. - Page 80 TROUBLESHOOTING Symptom Possible cause Solution The control panel lock Lock function/child safety Deactivate the lock function/ indicator light is on. lock is activated. child safety lock. The controls react badly. There may be a thin layer Make sure the hob and/or finger of water on the hob or on is clean.
-
Page 81: Technical Specifications
TECHNICAL SPECIFICATIONS Information according regulation (EU) 66/2014 Measurements according EN60350-2 Model identification IK2164 --- IK2184 --- Type of hob Induction hob Induction hob Number of electric cooking zones and/or areas Induction cooking Induction cooking Heating technology zones and cooking zones and cooking areas areas For circular electric cooking zones: diameter of... -
Page 82: Environmental Aspects
ENVIRONMENTAL ASPECTS Disposal of packaging and appliance In the manufacturing of this appliance durable materials were used. Make sure to dispose of this equipment responsibly at the end of its lifecycle. Ask the authorities for more information regarding this. The appliance packaging is recyclable. The following may have been used: •... - Page 83 EN 23...
- Page 84 Vous trouverez les adresses et numéros de téléphone du service après-vente sur la carte de garantie. Adressen und Telefonnummern des Kundendienstes finden Sie auf der Garantiekarte. You will find the addresses and phone numbers of the service organisation on the guarantee card. www.pelgrim.nl www.pelgrim.be 935922...
Need help?
Do you have a question about the IK2164 Series and is the answer not in the manual?
Questions and answers