
Related Manuals for Pelgrim IK8093R Series


Summary of Contents for Pelgrim IK8093R Series
- Page 1 IK8093R --- Gebruiksaanwijzing Inductiekookplaat Instructions for use Induction hob...
-
Page 2: Table Of Contents
INHOUDSOPGAVE Uw inductiekookplaat Inleiding Beschrijving Bedieningspaneel Meldingen op het display Veiligheid Temperatuurbeveiliging Kookduurbegrenzer Vermogensbegrenzer Voor het eerste gebruik Gebruik van de aanraaktoetsen en de schuifregelaar Inductiegeluiden Geschikte pannen Pandetectie Vermogen instellen Kookinstellingen Bediening Intelligente kookplaat met automatische pandetectie Inschakelen en vermogen instellen Boostfunctie Klaar met koken Pandetectiesymbool... - Page 3 INHOUDSOPGAVE Chef Cook functie Automatische kookfuncties De automatische kookfunctie ‘Koken’ De automatische kookfunctie ‘Stomen’ De automatische kookfunctie ‘Pasta’ De automatische kookfunctie ‘Bakken’ De automatische kookfunctie ‘Temperatuur vasthouden’ Gebruikersinstellingen Servicemenu Onderhoud Reiniging Problemen oplossen Algemeen Probleemoplossingstabel Technische specificaties Informatie volgens verordening (EU) 66/2014 Milieuaspecten Verpakking en apparaat afdanken Gebruikte pictogrammen - Pictogrammes utilisés...
-
Page 4: Uw Inductiekookplaat
UW INDUCTIEKOOKPLAAT Inleiding Gefeliciteerd met uw keuze voor dit toestel. In het ontwerp van dit product heeft eenvoudige bediening en optimale gebruiksvriendelijkheid centraal gestaan. In deze handleiding leest u hoe u dit toestel het best kunt gebruiken. Naast informatie over de bediening, vindt u hier ook achtergrondinformatie die u tijdens het gebruik van het toestel van pas kan komen. -
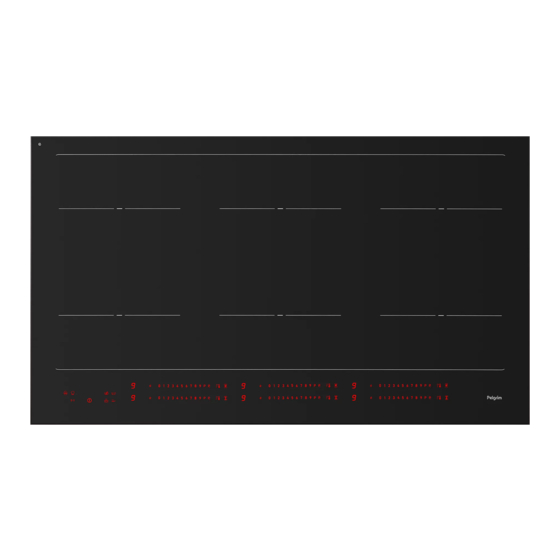
Page 5: Beschrijving
UW INDUCTIEKOOKPLAAT Beschrijving Pelgrim IKA8093F 2331 QUARTZ GREY, RAL7043 , PANTONE 10C 2023-03-30 BFL Zone indication: Thin Line: 0,5mm rounded, Thick line (center mark): 1mm rounded, length 10mm (distance left/right 5mm - anchor to anchor) half round shape: width always 50mm, diameter = induction coildiameter + 5mm horizontal line: total width - coil diameter/width + 5mm 1. -
Page 6: Bedieningspaneel
UW INDUCTIEKOOKPLAAT Bedieningspaneel Automatische kookfuncties 1. Eierwekkertoets 2. Menutoets (Gebruikersinstellingen) 3. Toets ‘Chef Cook’ 4. Vergrendeltoets 5. Pauzetoets 6. Aan-/uittoets 7. Pastatoets 8. Toets ‘Temperatuur vasthouden’ (nauwkeurig temperatuurbehoud) 9. Kooktoets 10. Stoomtoets 11. Baktoets 12. Vermogensdisplay / Timerdisplay 13. Timertoets 14. -
Page 7: Meldingen Op Het Display
UW INDUCTIEKOOKPLAAT Meldingen op het display Display Beschrijving Vermogensniveau 0; de kookzone is geactiveerd. Vermogensniveau: 1 = lage stand / 9 = hoge stand. Boost actief / Dubbele boost actief. Geen (geschikte) pan op de kookzone (pandetectiesymbool). Restwarmte-indicator: de kookplaat heeft voor elke kookzone een restwarmte-indicator waarmee wordt aangegeven welke kookzone nog warm is. -
Page 8: Veiligheid
VEILIGHEID Lees eerst de afzonderlijke veiligheidsinstructies voordat u het apparaat in gebruik neemt! Temperatuurbeveiliging Een sensor controleert continu de temperatuur van bepaalde onderdelen van de kookplaat. Elke kookzone is voorzien van een sensor die continu de temperatuur van de bodem van de pan controleert om risico op oververhitting te voorkomen wanneer een pan droogkookt. -
Page 9: Voor Het Eerste Gebruik
VOOR HET EERSTE GEBRUIK Gebruik van de aanraaktoetsen en de schuifregelaar Plaats uw vingertop plat op een toets of op de schuifregelaar voor het beste resultaat. U hoeft geen druk uit te voeren. De aanraaktoetsen reageren alleen op lichte druk van een vingertop. Bedien de toetsen niet met andere objecten. -
Page 10: Pandetectie
VOOR HET EERSTE GEBRUIK Minimale pandiameter • De minimale diameter van de panbodem: ▷ 100 mm voor een kookzone 220 x 185 mm. 240 mm voor een gekoppelde kookzone. ▷ • U bereikt het beste resultaat met een pan van dezelfde diameter als de kookzone. Als de pan te klein is, wordt de kookzone niet ingeschakeld. -
Page 11: Kookinstellingen
VOOR HET EERSTE GEBRUIK Kookinstellingen Aangezien de instellingen afhankelijk zijn van de hoeveelheid en samenstelling van het gerecht in de pan, geldt de onderstaande tabel alleen als richtlijn. Gebruik de boost-instellingen voor: • snel aan de kook brengen van voedsel of vloeistof; Gebruik instelling 8,5 - 9 voor: •... -
Page 12: Bediening
BEDIENING Lees het hoofdstuk ‘Voor het eerste gebruik’ zorgvuldig door voordat u begint met koken. Dit voorkomt onjuist gebruik van de kookplaat. Als de kookplaat voor de eerste keer wordt aangesloten aan de stroomvoorziening of na een stroomstoring, knippert gedurende 2 minuten de menutoets. De kookplaat staat in de instelmodus. -
Page 13: Boostfunctie
BEDIENING Boostfunctie U kunt de boostfunctie gebruiken om max. 15 minuten op de hoogste kookstand te koken. Er is een boostniveau (P) en een dubbel boostniveau (P2). Omdat de boostfunctie hoge temperaturen kan bereiken, mag deze alleen worden gebruikt voor kookprocessen met water. Olie of vet kunnen gaan verbranden als de boostfunctie wordt gebruikt. -
Page 14: Pan Verplaatsfunctie
BEDIENING Pan verplaatsfunctie De pan verplaatsfunctie maakt het mogelijk om de vermogensinstellingen en een eventueel lopende timer over te nemen van de ene kookzone naar de andere kookzone. Voorwaarden • De kookplaat staat aan. • Er wordt minimaal één pan op de kookplaat geplaatst, er wordt een vermogen en eventueel een timer voor deze pan ingesteld. -
Page 15: Grillfunctie
BEDIENING Grillfunctie Met deze functie maakt u optimaal gebruik van een grillplaat met de juiste vermogensstanden. De stappen tussen de verschillende vermogensstanden zijn voor de grillfunctie vooraf kleiner gedefinieerd. Op deze manier wordt de temperatuur nauwkeuriger geregeld. 1. Plaats een grillplaat op beide bridge-inductiekookzones. De bridgetoets en grilltoets worden zichtbaar. -
Page 16: Eierwekker
BEDIENING De geselecteerde kookzone wordt automatisch uitgeschakeld zodra de ingestelde tijd is ▷ verstreken; er klinkt een geluidssignaal en de display toont ‘00’. ▷ Raak de timertoets aan om het alarm uit te schakelen. Raak de timertoets aan en stel met de schuifregelaar de tijd in op ‘00’ om voortijdig de timer uit te schakelen. -
Page 17: Kookduurteller
BEDIENING Kookduurteller Met deze functie weet u hoe lang de kookzone tijdens het kookproces wordt gebruikt. 1. Plaats een pan op het midden van een kookzone en stel het vermogen in. 2. Druk gedurende 3 seconden op de timertoets totdat ‘00’ in de display verschijnt. De kookduurteller is geactiveerd;... -
Page 18: Vergrendelfunctie
BEDIENING Vergrendelfunctie Gebruik deze functie om ongewenst inschakelen van de kookzones te voorkomen. 1. Schakel de kookplaat in. 2. Druk op de vergrendeltoets totdat op alle displays een ‘L’ verschijnt. De vergrendelfunctie is geactiveerd. ▷ 3. Bij het opnieuw inschakelen van de kookplaat is de vergrendelfunctie actief. ▷... -
Page 19: Chef Cook Functie
BEDIENING 2. Raak de warmhoudtoets eenmaal (44 °C ), tweemaal (70 °C) of driemaal (94 °C) aan. De warmhoudfunctie is actief. Op het display verschijnt het bijbehorende ▷ warmhoudsymbool. 3. Zet het vermogensniveau op ‘0’ om de warmhoudfunctie uit te schakelen. Chef Cook functie Met deze functie worden alle kookzones tegelijk ingeschakeld en is de kookplaat verdeeld in drie gekoppelde zones. -
Page 20: De Automatische Kookfunctie 'Koken
BEDIENING De automatische kookfunctie ‘Koken’ Deze functie brengt het water automatisch tot het kookpunt. Zodra het kookpunt is bereikt, schakelt de geselecteerde zone standaard over naar vermogensniveau 1 om energie te besparen. U kunt deze instelling op elk moment op de schuifregelaar wijzigen tijdens gebruik van deze functie. -
Page 21: De Automatische Kookfunctie 'Pasta
BEDIENING 1. Plaats een pan op het midden van een kookzone. Op de desbetreffende kookzonedisplay verschijnt een ‘0’ en de bijbehorende ▷ schuifregelaar licht op. 2. Raak de toets ‘Stomen’ aan. De toets ‘Stomen’ en de schuifregelaar gaan knipperen. ▷ 3. -
Page 22: De Automatische Kookfunctie 'Bakken
BEDIENING De automatische kookfunctie ‘Bakken’ Deze functie brengt de pan automatisch op de juiste temperatuur voor het bakken van verschillende soorten voedsel. Na het toevoegen van de olie en het voedsel behoudt de functie de juiste temperatuur zonder dat het voedsel verbrandt. Vermogensniveau Toepassing Boter smelten, omelet (zonder korst). -
Page 23: De Automatische Kookfunctie 'Temperatuur Vasthouden
BEDIENING De automatische kookfunctie ‘Temperatuur vasthouden’ Deze functie houdt automatisch de huidige kooktemperatuur van je eten vast. Als er nieuw (koud) eten wordt toegevoegd, wordt het vermogen automatisch weer verhoogd naar de ingestelde temperatuur. Er staan pannen op de kookplaat en de kookplaat is in werking. De toets ‘Temperatuur vasthouden’is zichtbaar. -
Page 24: Servicemenu
BEDIENING Menu-item (A) Waarden (B) Standaard waarden af fabriek U6: permanente pandetectie 0: permanente pandetectie niet actief 1: permanente pandetectie actief U7: geluidssignaal van de 0: geluidssignaal gedurende 120 seconden timer 1: geluidssignaal gedurende 20 seconden 2: een enkel geluidssignaal U8: vermogensbegrenzer --: geen vermogensbegrenzing 2.0: vermogen begrensd tot 2.0 kW... - Page 25 BEDIENING 4. Raak de bovenste schuifregelaar aan om een ander menu-item te kiezen. Het linker gedeelte verlaagt de waarde, het rechter gedeelte verhoogt de waarde. ▷ 5. Raak de onderste schuifregelaar aan om een andere waarde te kiezen. ▷ Het linker gedeelte verlaagd de waarde, het rechter gedeelte verhoogd de waarde. 6.
- Page 26 BEDIENING Configuratie 11,1 kW 3 fase 9,0 kW 3 fase 7,4 kW 2 fase kookgroep 6,0 kW 2 fase kookgroep Opmerking; configuratie 0 ...16 en 21 ... 23 zijn niet geschikt voor deze kookplaat. Er kan een foutcode ontstaan; de kookplaat niet gebruiken. C10 Contrast van de schuifregelaars en toetsen Maximaal contrast tussen gedimd en vol verlicht deel van de schuifregelaar Minder contrast, gedimd deel van de schuifregelaar is iets helderder...
-
Page 27: Onderhoud
ONDERHOUD Reiniging Dagelijkse reiniging • Hoewel overgekookt voedsel niet kan inbranden in het glas, verdient het aanbeveling de kookplaat direct na gebruik schoon te maken. • Voor de dagelijkse reiniging kunt u het best een vochtige doek met een mild reinigingsmiddel gebruiken. -
Page 28: Problemen Oplossen
PROBLEMEN OPLOSSEN Algemeen Schakel de kookplaat onmiddellijk uit als u een barst in het glas ziet (hoe klein ook). Haal de stekker uit het stopcontact of zet de (automatische) zekering(en) in de meterkast uit. Bij een permanente aansluiting zet u de stroomtoevoer op nul. Neem contact op met de serviceafdeling. Probleemoplossingstabel Als het toestel niet naar behoren werkt, betekent dit niet altijd dat het defect is. - Page 29 PROBLEMEN OPLOSSEN Symptoom Mogelijke oorzaak Oplossing De bediening reageert slecht. Er kan een dun laagje water Zorg dat de kookplaat en/of op de kookplaat of op een vinger schoon is. vinger zijn waardoor de bediening slecht reageert. Er ligt een object of water op Haal het object weg, maak het Het display toont of code...
-
Page 30: Technische Specificaties
TECHNISCHE SPECIFICATIES Informatie volgens verordening (EU) 66/2014 Metingen volgens EN60350-2 IK8093R --- Modelaanduiding Type kookplaat Inductiekookplaat Aantal elektrische kookzones en/of kookgebieden Kookzones/gebieden op Verwarmingstechnologie basis van inductie 220x 220x 220x Voor niet-ronde kookzones of kookgebieden: de lengte en breedte van het bruikbare oppervlak per elektrisch verwarmde kookzone of 220x 220x 220x... -
Page 31: Milieuaspecten
MILIEUASPECTEN Verpakking en apparaat afdanken Bij de productie van dit apparaat is gebruik gemaakt van duurzame materialen. Dit apparaat moet aan het einde van zijn levenscyclus op verantwoorde wijze worden afgedankt. De overheid kan u hierover informatie verstrekken. De verpakking van het apparaat is recyclebaar. Mogelijk zijn de volgende materialen gebruikt: •... - Page 32 CONTENTS Your induction hob Introduction Description Control panel Display messages Safety Temperature protection Cooking time limiter Power limiter Before using the appliance for the first time Use of the touch buttons and slide control Induction noises Suitable pans Pan detection Setting power Cooking settings Operation...
- Page 33 CONTENTS Chef Cook function Automatic cooking functions The ‘Boil’ automatic cooking function The ‘Steam’ automatic cooking function The ‘Pasta’ automatic cooking function The ‘Fry’ automatic cooking function The ‘Hold temperature’ automatic cooking function User settings Service menu Maintenance Cleaning Troubleshooting General Troubleshooting table Technical specifications...
-
Page 34: Your Induction Hob
YOUR INDUCTION HOB Introduction Congratulations on choosing this appliance. This product is designed with simple operation and optimum comfort in mind. These instructions for use explain how you can make best use of this appliance. These instructions contain information about the operation of the appliance and background information that may be of help to you during its use. -
Page 35: Description
YOUR INDUCTION HOB Description Pelgrim IKA8093F 2331 QUARTZ GREY, RAL7043 , PANTONE 10C 2023-03-30 BFL Zone indication: Thin Line: 0,5mm rounded, Thick line (center mark): 1mm rounded, length 10mm (distance left/right 5mm - anchor to anchor) half round shape: width always 50mm, diameter = induction coildiameter + 5mm horizontal line: total width - coil diameter/width + 5mm 1. -
Page 36: Control Panel
YOUR INDUCTION HOB Control panel Automatic cooking functions 1. Minute minder button 2. Menu button (User settings) 3. ‘Chef Cook’ button 4. Lock button 5. Pause button 6. On/off button 7. Pasta button 8. ‘Hold temperature’ button (precise temperature control) 9. -
Page 37: Display Messages
YOUR INDUCTION HOB Display messages Display Description Power level 0; the cooking zone is activated. Power level: 1 = low setting / 9 = high setting. Boost active / Double boost active. No pan (or unsuitable pan) on the cooking zone (pan detection symbol). -
Page 38: Safety
SAFETY Read the separate safety instructions before you first use the appliance! Temperature protection A sensor continuously monitors the temperature of certain parts of the hob. Each cooking zone has a sensor that continuously monitors the temperature of the bottom of the pan to prevent risk of overheating when a pan boils dry. -
Page 39: Before Using The Appliance For The First Time
BEFORE USING THE APPLIANCE FOR THE FIRST TIME Use of the touch buttons and slide control Place the tip of your finger flat on a button or the slide control to achieve the best results. You do not have to apply any pressure. The touch buttons only respond light pressure from a fingertip. Do not operate the controls with any other objects. -
Page 40: Pan Detection
BEFORE USING THE APPLIANCE FOR THE FIRST TIME Minimum pan diameter • The minimum diameter of the pan bottom: ▷ 100 mm for a 220 x 185 mm cooking zone. 240 mm for linked cooking zones. ▷ • You will achieve the best results with a pan of the same diameter as the cooking zone. If the pan is too small, the cooking zone will not switch on. -
Page 41: Cooking Settings
BEFORE USING THE APPLIANCE FOR THE FIRST TIME Cooking settings As the ideal settings depend on the quantity and consistency of the dish in the pan, the following are merely guidelines. Use the boost settings for: • quickly bringing food or liquid to a boil Use setting 8.5 - 9 for: •... -
Page 42: Operation
OPERATION Read the ‘Before first use’ section carefully before you start cooking. This prevents improper use of the hob. When the hob is connected to the power supply for the first time or after a power failure, the menu button flashes for 2 minutes. The hob is in the setting mode. You can use the hob simply by switching it on with the on/off button. -
Page 43: Boost Function
OPERATION Boost function You can use boost function to cook at the highest setting for up to 15 minutes. There is a boost level (P) and a double boost level (P2). As the boost function can reach high temperatures, it should only be used for cooking processes with water. -
Page 44: Move Pan Function
OPERATION Move pan function The move pan function allows power settings and any running timer to be transferred from one cooking zone to another. Conditions • The hob is on. • At least one pan is placed on the hob, and a power setting and possibly a timer are set for this pan. -
Page 45: Grill Function
OPERATION Grill function This function allows you to make the best use of a griddle with appropriate power settings. The steps between the different power levels are smaller for the grill function. This provides more precise temperature control. 1. Place a griddle on both bridge cooking zones. The bridge button and grill button are shown. -
Page 46: Minute Minder
OPERATION The selected cooking zone switches off automatically once the set time has elapsed; ▷ you hear a sound signal and the display shows ‘00’. ▷ Touch the timer button to stop the alarm. Touch the timer button and then set the time to ‘00’ with the slide control to switch off the timer earlier. -
Page 47: Cooking Time Counter
OPERATION Cooking time counter This function tells you how long the cooking zone has been used during the cooking process. 1. Place a pan in the middle of a cooking zone and set the power level. 2. Touch the timer button for 3 seconds until '00' appears on the display. The cooking time counter is activated;... -
Page 48: Locking Function
OPERATION Lock function Use this function to prevent the cooking zones from being turned on unintentionally. 1. Switch on the hob. 2. Touch the lock button until ‘L’ appears on all displays. The lock function is active. ▷ 3. When the hob is switched on again, the lock function is active. ▷... -
Page 49: Chef Cook Function
OPERATION 2. Touch the keep warm button once (44 °C ), twice (70 °C) or three times (94 °C). The keep warm function is active. The display shows the corresponding keep warm ▷ symbol. 3. Set the power level to ‘0’ to turn off the keep warm function. Chef Cook function With this function, all cooking zones are switched on at the same time and the hob is divided into three linked zones. -
Page 50: The 'Boil' Automatic Cooking Function
OPERATION The ‘Boil’ automatic cooking function This function automatically brings water to a boil. Once the boiling point is reached, as standard the selected zone switches to power level 1 to save energy. You can change this setting on the slide control at any time while using this function. -
Page 51: The 'Pasta' Automatic Cooking Function
OPERATION 1. Place a pan in the middle of a cooking zone. A '0' appears on the corresponding cooking zone display and the corresponding slide ▷ control lights up. 2. Touch the ‘Steam’ button again. The ‘Steam’ button and slide control will flash. ▷... -
Page 52: The 'Fry' Automatic Cooking Function
OPERATION The ‘Fry’ automatic cooking function This function automatically brings the pan to the right temperature for frying different types of food. After the oil and food are added, the function maintains the right temperature without burning the food. Power level Melting butter, omelette (without crispy edges). -
Page 53: The 'Hold Temperature' Automatic Cooking Function
OPERATION The ‘Hold temperature’ automatic cooking function This feature automatically maintains the current cooking temperature of your food. When new (cold) food is added, the power is automatically raised to the set temperature again. There are pans on the hob and the hob is operating. The ‘Hold temperature’ button is visible. 1. -
Page 54: Service Menu
OPERATION Menu item (A) Values (B) Factory default values U6: permanent pan detection 0: permanent pan detection not active 1: permanent pan detection active U7: timer sound signal 0: timer sound signal for 120 seconds 1: timer sound signal for 20 seconds 2: timer sound signal one time only U8: power limiter --: no power limitation... - Page 55 OPERATION 4. Touch the top slide control to select another menu item. The left part decreases the value, and the right part increases the value. ▷ 5. Touch the lower slide control to select a different value. ▷ The left part decreases the value, and the right part increases the value. 6.
- Page 56 OPERATION Configuration 11.1 kW 3-phase 9.0 kW 3-phase 7.4 kW 2-phase cooking group 6.0 kW 2-phase cooking group Note: configurations 0 to 16 and 21 to 23 are not suitable for this hob. An error code may occur; do not use the hob. C10 Contrast of slide controls and buttons Maximum contrast between dimmed and fully lit part of slide control Less contrast: dimmed part of slide control is slightly brighter...
-
Page 57: Maintenance
MAINTENANCE Cleaning Daily cleaning • Although overcooked food cannot burn into the glass, it is recommended to clean the hob immediately after use. • For daily cleaning, it is best to use a damp cloth with a mild detergent. • Dry the glass plate with a paper towel or dry cloth. -
Page 58: Troubleshooting
TROUBLESHOOTING General Switch off the hob immediately if you see a crack in the glass (no matter how small). Unplug the power cord, or turn off the circuit breaker(s) or remove the fuse(s) in the meter cupboard. For permanent connection, set the switch in the power supply lead to zero. Contact the service department. - Page 59 TROUBLESHOOTING Symptom Possible cause Solution The controls respond poorly. There may be a thin layer Make sure the hob and/or of water on the hob or on a finger is clean. finger, causing the controls to respond poorly. There is an object or water on Remove the object;...
-
Page 60: Technical Specifications
TECHNICAL SPECIFICATIONS Information required by EU Regulation 66/2014 Measurements according to EN 60350-2 IK8093R --- Model designation Hob type Induction hob Number of electric cooking zones and/or cooking areas Induction cooking Heating technology zones/areas 220x 220x 220x For non-round cooking zones or areas: the length and width of the usable area per electrically heated cooking zone/area in mm 220x 220x... -
Page 61: Environmental Aspects
ENVIRONMENTAL ASPECTS Disposal of packaging and appliance Sustainable materials were used in the manufacture of this appliance. At the end of its life cycle, this appliance must be disposed of in a responsible manner. You can obtain more information about this from the government. The appliance packaging is recyclable. - Page 62 EN 32...
- Page 63 EN 33...
- Page 64 When contacting the service department, have the complete type number to hand. Adressen en telefoonnummers van de serviceorganisatie vindt u op de garantiekaart. You will find the addresses and phone numbers of the service organisation on the guarantee card. www.pelgrim.nl www.pelgrim.be 916058...
Need help?
Do you have a question about the IK8093R Series and is the answer not in the manual?
Questions and answers