Table of Contents
Advertisement
Quick Links
Advertisement
Table of Contents

Related Manuals for Olitech EasyFlip SMART OLT2021-S


Summary of Contents for Olitech EasyFlip SMART OLT2021-S
- Page 1 User Manual V1 Model number: OLT2021-S...
- Page 2 This work is copyright. Apart from any use permitted under the Copyright Act 1968, no part may be reproduced by any process, nor may any other exclusive right be exercised, without the permission of Olitech Technology, 6/6 Enterprise Drive, Rowville, VIC, 3178. 2024.
-
Page 3: Table Of Contents
Table of contents Contents Contents Specifications Alarm Hardware guide Voice memo Screen icons Calendar Phone setup Note SIM insertion Calculator Battery charging Magnifier Power phone on File manager Message (SMS/MMS) Connecting to a PC Writing Phone settings Receiving Time and date Deleting Language WhatsApp... -
Page 4: Specifications
Vol. key status WLAN/Wi-Fi Pre-programmed voice Mobile data guidance Mobile hotspot Talking keys Airplane mode Main menu Menu visibility Charger connected Icon View Message settings Message font size Troubleshooting Connectivity Safety Information Bluetooth Warranty Specifications Design 108 X 57 X 21 mm (closed) 134 g incl. -
Page 5: Hardware Guide
Hardware Guide... -
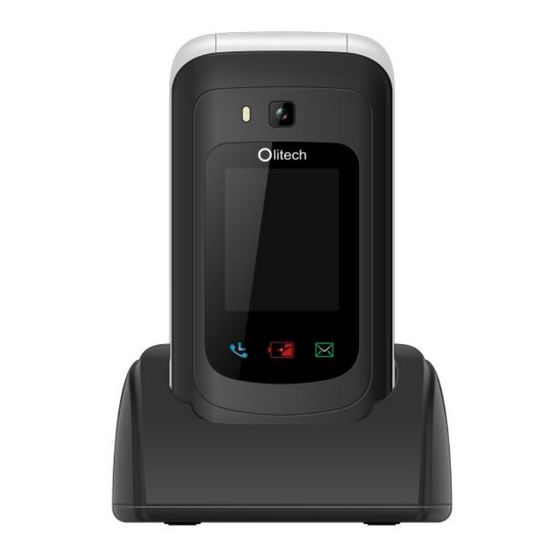
Page 6: Hardware Descriptions
Hardware Descriptions 1. Earpiece speaker 2. Camera 3. Arrows: Used to navigate menu and settings. Yellow “select” key: Used to select an icon/list item. 4. Selection key: Used to select word written above key on screen e.g. “Options”. 5. Green key: Used to answer or make a call. - Page 7 9. Star (*) key When typing, a single press will show symbol options. 10. Microphone hole Opening for microphone. 11. Back key Used to go back to previous screen OR delete a letter/number when typing. 12. Up Volume key: Single press turns volume up. Can be deactivated.
- Page 8 battery is charging; if the light is solid the battery is fully charged. 18. Unread message indicator: Illuminates when an unread message (SMS/MMS) is present. 19. Front display LCD screen 20. Loudspeaker speaker: Ringtone and loudspeaker audio sounds from this speaker. 21.
-
Page 9: Screen Icon Descriptions
Screen icon descriptions Symbol Explanation Shows charging status & battery level Indicates mobile phone reception/service strength Phone is using the 4G network VoLTE (Voice over LTE) Phone is connected to WLAN/Wi-Fi Bluetooth function is active Indicates silent mode is activate Headphones are plugged in You have an unacknowledged missed call (on main screen) -
Page 10: Phone Setup
Phone setup Instructional videos available at www.olitech.com.au/easyflipsmartvideos Insert SIM card – Step 1 - Remove the back phone cover Find the small recess in the bottom left corner of the phone (white edge). Using the back-opening tool (resembles guitar pick), lever the back cover off. - Page 11 Step 3 - Insert the SIM card (Nano size: 8.8 X 12.3 mm) The SIM slot is located in the top left corner of the phone’s interior (visible when battery is not installed). A micro SD card slot is located below the SIM slot. Please ensure you insert the SIM card into the SIM slot, NOT the micro SD card slot.
- Page 12 Please obtain assistance from another individual, consult Olitech’s instructional videos www.olitech.com.au/easyflipsmartvideos or call Olitech on 03 9755 8885 if required. Before fixing the back cover in place, please insert the SD card (optional), lanyard (optional) and battery. Micro SD card (optional) A micro SD card can be inserted into the phone to facilitate additional memory.
- Page 13 1. Use the pad of your finger/thumb to gently slide silver clip up. This unlocks the SD clip from its fixed position. Do not use the back opening tool to unlock the SD clip. 2. Move silver clip into a vertical position (hinges from the top).
-
Page 14: Battery Charging
are delicate and can break if mishandled. Insert the battery and secure lanyard (optional) Step 1 – If present, remove protective tape from conductors on bottom right corner of battery. Step 2 - Insert the battery so the conductors on the battery line up with the conductors on the phone’s battery cavity (bottom right corner of battery cavity). - Page 15 Olitech battery and charging accessories. Before using the phone for the first time please charge the battery for at least 4 hours, or until the battery is fully charged. During the charging process, do not remove the battery from the phone. The...
-
Page 16: Battery Charging Options
• Magnetic USB-C charging cable • Wall plug • Cradle charger Battery charging options: Charge via cable direct to phone 1. Connect the USB-C charging cable (magnetic or fixed) to the wall plug. 2. Insert the charging cable into the USB-C charging port on the left side of the phone. - Page 17 If charged via this method, ensure input and output of the other device matches the Olitech wall plug. Important Information When connected to a charger, the battery notification light will be displayed in red. If the battery is charging the light will flash.
-
Page 18: Power Phone On
Powering the phone on/off To power the EasyFlip Smart on, press and hold the red “end call” key for 3-4 seconds. The start-up process takes approximately 40-60 seconds. To power off, reboot or put the phone into airplane mode, press the red end call key for 3-4 seconds, use the navigation key to highlight your desired action and press the yellow key to select. -
Page 19: Writing
Writing messages To write a text message or multimedia message, open Message. Existing message threads will be displayed in a list. A message thread contains all messages sent/received from one contact/phone number and will be identified in the main message inbox by either their name (if saved to the phonebook) or their phone number. - Page 20 1. Open Message. 2. Press the top left key to select Options. 3. Press the yellow key to select New message. 4. Add a recipient: a. If the recipient is saved to the phonebook start typing their name. Their name and phone number will appear below the recipient field.
- Page 21 navigation key to highlight the contact/ person icon to the right of the recipient field; press the yellow key. The Phonebook list will then open. To select recipients, when they are highlighted press the yellow key; a tick will then appear in the box to the right of their name.
- Page 22 • In an existing message thread, if a message is drafted but not sent, it will remain in the text box (as a draft) until deleted or sent. Quick text (templates), audio recordings and attachments can be added to a message.
- Page 23 Save is selected, the audio recording is added to the message. • If Attach is selected, the following options are displayed: Pictures, Capture pictures, Videos, Capture video and Record audio. When pictures or video are selected, the relevant multimedia folder will open. Photos or videos can be highlighted and selected.
-
Page 24: Receiving
Receive and view messages When a new message is received the phone’s default setting is to: 1. Sound a tone; 2. The green notification light on the front of the phone will illuminate; 3. A message icon will appear along the top of the main screen;... - Page 25 If the message is viewed or replied to, the message is seen to be read. If there are no other unread messages, green notification light will turn off and the envelope icon along the top of the main screen will disappear.
- Page 26 Saving photos, videos and audio files received via MMS: When a photo or video is received, it will automatically save to its relevant folder in Multimedia. To view a photo/video received by MMS: 1. Open Menu. 2. Scroll to and select Multimedia. 3.
-
Page 27: Deleting
where the time/date is displayed (below play icon) until Message options appears. b. Scroll to and select/touch Save attachment. c. Press the top left key to select Options. d. Select OK. The audio file will then save to Multimedia. To listen to this file in Multimedia: 1. -
Page 28: Whatsapp
3. Scroll to and select Delete all. 4. Highlight and select Delete. To delete all messages from a specific recipient (one message thread): 1. Open Message. 2. Highlight the message thread you want to delete. 3. Press the top left key to select Options. 4. - Page 29 can be used for messaging and audio/video calls. WhatsApp uses data to send/receive messages make/receive calls. WhatsApp is pre-installed on the EasyFlip Smart however as default it is hidden from the phone’s main menu. To show WhatsApp in the main menu, follow the steps regarding Menu visibility on page 101.
-
Page 30: Calls
• Olitech has no affiliation with WhatsApp and are unable to make any changes to the application. Calls Making a phone call Standard dialling 1. Dial phone number using keypad. 2. Press Green “call” key to initiate call. -
Page 31: Loudspeaker
dial reference screen (4 contact per page screen), press and hold the associated speed dial number key for 3 seconds to initiate a call to the programmed contact. See page 41 for additional information. Answering/rejecting/ending calls • To answer an incoming call, flip open the phone OR press the Green “call”... -
Page 32: Call Logs
the main screen. Missed calls can be viewed in the phones Call logs. To access call logs: 1. Open Menu. 2. Scroll to and select Call logs. When Calls logs opens, the All calls list will be displayed. Calls are displayed with most recent calls at the top of the list. -
Page 33: Blacklist
To access Phonebook options (options not related to a specific contact), when the Phonebook opens a red cursor will be visible in the search bar. Press the top left key to select Options. Options available include Select delete, Blacklist management, Whitelist management, Bulk copy and Export. -
Page 34: Whitelist
blacklist via Blacklist management or Call Logs. To add a phone number to the blacklist via Blacklist management, when Blacklist management is open: 1. Press the top left key to select Add. 2. Enter phone number. 3. Scroll to and select OK. To add a phone number to the blacklist via Call logs: 1. -
Page 35: Managing Contacts
whitelist settings. Phone numbers not listed in the whitelist settings are unable to call the EasyFlip Smart incoming text messages will not be received. The whitelist does not restrict outgoing calls/messages. To access the Whitelist: 1. Open Phonebook. 2. Press the top left key to select Options. 3. - Page 36 assign a voice recording (optional). 4. Scroll to and select Save. The option to add photo, edit ringtone or assign a voice recording are only available if the contact is saved to the phone (not SIM). Additional information: • Contacts manually added Phonebook automatically save to the...
- Page 37 will open. Use the yellow key to start and stop recording; after recording use the navigation key to highlight your preferred action (play, accept or cancel) and the yellow key to select this preferred action. If accept is selected, the voice recording will be assigned as that contacts ringtone.
- Page 38 to assigning it, press the top left key to select Play. To assign the voice file, press the right key to select Done. If a voice file is assigned to a contact, it will read out when the contacts name is highlighted in the Phonebook.
- Page 39 SIM (and vice versa) individually or in bulk. To copy individual contacts from the phone to SIM (and vice versa): 1. Open Phonebook. 2. Highlight the contact you want to copy. 3. Press the top left key to select Options. 4.
- Page 40 Internal shared storage → Phonenumberbackups. This file can be transferred to a computer to create a backup Phonebook contacts (see Connecting to a PC information on page 59). To export contacts in the phonebook to a VCF file: 1. Open Phonebook. 2.
-
Page 41: Photo/Speed Dial
5. Scroll to and select OK. Contacts will appear in the phonebook (saved to Phone). Photo/speed dial Eight speed dial phone numbers can be programmed to the number keys 2-9; the number 1 key is reserved for voicemail. Programmed speed dial numbers can be dialled via two different methods. - Page 42 keys 6-9, press the right pointing navigation key when in the photo dial reference screen. The purpose of the photo dial reference screen is to provide a visual guide in regards to which contact is programmed to which number key. This screen does not need to be visible in order to initiate a call to a photo dial contact.
-
Page 43: Multimedia
the phonebook will open. Highlight the desired contact and press the yellow key to select. 5. Select Save. Multimedia Camera The camera is accessed by opening the main Menu, scrolling to and selecting Camera. The phone has two cameras. Images are captured by pressing the yellow “select”... - Page 44 contains two folders: Photos and Videos. All photos captured on the phone will be stored in Photos. All videos captured on the phone will be stored in Videos. Images/videos stored in the gallery can be sent via MMS (subject to size allowed by SIM provider).
-
Page 45: Fm Radio
hidden, the top right and left keys can still be pressed to perform their intended function. FM Radio The EasyFlip Smart has an FM radio. To open the FM radio: 1. Open Menu. 2. Scroll to and select Multimedia. 3. Scroll to and select FM radio. Radio stations can be found by selecting Options →... -
Page 46: Emergency (Sos) Key
Safety Safety features on the EasyFlip Smart include the Emergency (SOS) key, Low battery notification and Auto answer. These features can be programed in Safety. To access Safety: 1. Open Menu. 2. Scroll to and select Safety. Emergency key The EasyFlip Smart is fitted with an emergency key. - Page 47 and the emergency (text) message edited. It is strongly recommended that the phone numbers programmed emergency contacts list are: 1. Not answered by automated services as the call must be answered and accepted (see below); AND 2. Programmed to ring for 20+ seconds. The emergency message and location link are sent via SMS.
- Page 48 sent to all mobile phone numbers in the emergency contacts list detailing the phone’s location. If the Google maps link is not received, text Location to the EasyFlip Smart. Additional information regarding location links can be found in Share location on page 49. 4.
-
Page 49: Share Location
press the red end call key. The audio for emergency calls is automatically sent to loudspeaker. To transfer the audio to the ear speaker, press direct access loudspeaker key (key above number 3 key). Important information If the emergency sequence loops 3 times without call being... - Page 50 Disclaimer If you wish to use the Emergency key feature, please carefully read all related information prior to use. Please note, Olitech accepts no liability/responsibility for any of the following: • Loss/harm to persons caused by the functioning/malfunctioning emergency key or device itself.
-
Page 51: Low Battery Notification
health complications if the emergency key does not function correctly. • Lack of functionality of the device due to insufficient credit, no mobile service/ reception or being on a foreign network. Low battery notification The low battery notification function allows up to three mobile phone numbers to receive a text message stating that the EasyFlip Smart’s phone battery is low. -
Page 52: Auto Answer
navigation key to highlight the person icon (located to the right of the recipient field), then press the yellow key to select the icon. When the Phonebook opens, highlight the desired contact and press the top left key to select them. 8. -
Page 53: Alarm
6. When a number field is highlighted (as default this is Empty), press the top left key to select Add. 7. Type phone number; or To add a contact saved to the Phonebook, press the right pointing navigation key to highlight the person icon, then press the yellow key to select the icon. -
Page 54: Voice Memo
Organiser: 1. Select Alarm. 2. If no alarms are set, press the top left key to select New; or If an existing alarm is programmed, press the top left key to select Options, select New Alarm. 3. Edit alarm details. 4. -
Page 55: Calendar
sound, Due date, Due time, Repeat, Sound loop and Remind interval. To program a voice memo, when in Organiser: 1. Scroll to and select Voice memo. 2. If no voice memo’s are programmed, press the top left key to select New; or existing voice memo... -
Page 56: Note
1. Scroll to and select Calendar. 2. Press the top left key to select Options. 3. Select Add task. 4. Edit task details. 5. Select Save. Note Notes can be written and stored on the EasyFlip Smart. This note can then be saved or sent as a text message. -
Page 57: Calculator
sending via Message. When Message is selected, the note will pre-fill into a new text message. Add the recipient and send. Refer to Writing messages on page 19 for additional instructions in regards to adding a recipient. Additional information: There is no specific number of items that can be saved in Alarm, Voice memos, Calendar or Note. -
Page 58: Magnifier
press the hash (#) key. The image below will be displayed on screen as a guide when using the calculator. Magnifier The EasyFlip Smart has a magnifier function. To access the magnifier, when in Organiser, scroll to and select Magnifier. The magnifier uses the back camera. -
Page 59: File Manager
File manager The file manager can be used to access files transferred to the phone when connected to a computer. To open the file manager, when in Organiser, scroll to and select File Manager. Images/videos taken on the phone or sent to the phone via MMS are stored in Multimedia →... - Page 60 USB cable (remove from other charging components prior to connecting to computer). 2. When connected, a message will appear on the EasyFlip Smart’s main screen. Scroll to and select your desired function. If Charge this device is selected, the phone will charge but the phone will not be visible in the computers connected devices.
-
Page 61: Phone Settings
Additional information: • Photo’s saved to the DCIM or Pictures folders in JPG format will be visible in the EasyFlip Smart’s photo gallery and can be assigned to a contact. • Audio files saved to the Ringtone folder in WAV or MP3 format can be assigned as a ringtone. -
Page 62: Time And Date
Language, Input method, Display, Answer mode, Notification light status, Accessibility, Shortcut key status, Torch key status, and System. Date and time Date and time settings can be accessed by selecting Settings → Phone settings → Date and time. As default, the time and date will automatically update if there is an active SIM card installed in the phone. -
Page 63: Input Method
Input method Input method refers to what is typed (letters or numbers) and the method of typing text (manual entry or predictive text). The default input method (123, Abc, abc, ABC, R9) can be changed in Input method. Input method settings can be accessed by selecting Settings →... - Page 64 key. If any other input method is displayed (except R9), to enter a number, press the number key in quick succession until the number is highlighted along the bottom of the screen. Abc abc ABC (Individual letters) When Abc, abc or ABC is selected, individual letters are manually entered by pressing the number key associated with that letter 1, 2, 3 or 4 times in quick...
- Page 65 succession 5 times, D will be highlighted. R9 (Predictive text) When R9 is selected, predictive text is active. If using predictive text, the number key associated with the desired letter is pressed once per desired letter. Options for words are then displayed along the bottom of the screen.
-
Page 66: Display
quick succession to highlight the required symbol. E.g. If the number 1 key is pressed 5 times in quick succession a ? will be highlighted and then after two seconds it will be added to the text. Input space: When writing text, press the 0 key to insert a space. - Page 67 the main screen (not the screen visible when the phone is flipped closed). Sleep: the length of time the main screen (screen visible when the phone is flipped open) remains lit after a key is pressed or a notification is received can be changed. As default the main screen will go to sleep 30 seconds after a key has been pressed or a notification has been received.
-
Page 68: Touchscreen
screen remains active (lit) for longer periods of time the battery will be consumed at a higher rate. Keypad backlight: the length of time that the keypad remains lit after a key is pressed or a notification is received is controlled in the keypad backlight setting. -
Page 69: Answer Mode
To activate/deactivate the touchscreen, when in Display, scroll to and select Touchscreen. When active, the toggle located to the right of Touchscreen will be blue towards right. When deactivated, this toggle will be white and towards the left. Icon view: As default, when the EasyFlip Smart is flipped open, a home screen showing the time and date is visible. -
Page 70: Not. Light Status
audio for incoming and outgoing calls will sound from the loudspeaker (not earpiece speaker). If Loudspeaker is active, in-call audio can be switched back to the earpiece speaker during a call by pressing the direct access loudspeaker (key above number 3 key). Multiple answer modes can be active at one time. - Page 71 clear this notification light, the call must be viewed in Call logs. See page 31 for more information. Battery status: The battery status light will illuminate red in two different instances. 1. If the EasyFlip Smart is NOT connected to a charger and the red battery light is flashing, the remaining charge on the battery is less than 15%.
-
Page 72: Accessibility
charge, the missed call and unread message light will not illuminate even if a missed call/unread message is present. This is a battery saving measure. As default, the notification lights will not illuminate between 11pm and 6 am. Notification lights can be deactivated or the timeframe in which they illuminate can be programmed in the Notification light status... - Page 73 caller’s details are also voiced out. As default, Talkback is not activated on the EasyFlip Smart. To activate/deactivate this setting: 1. Open Menu. 2. Scroll to and select Settings. 3. Select Phone Settings. 4. Scroll to and select Accessibility. 5. Select Talkback. 6.
-
Page 74: High Contrast Text
High contrast text When high contrast text active, highlighted text will have a contrasting outline. E.g. If black text is highlighted, it will have a white outline and vice versa. To activate high contrast text, when in Accessibility, scroll to and select High contrast text. -
Page 75: Shortcut Keys
Shortcut keys four navigation arrows navigation key can be programmed as shortcut keys. When programmed, these keys can be used to provide direct access to specific functions in the phone. As default, the Shortcut keys are programmed as per below: •... -
Page 76: Torch Key Status
Note: Shortcut keys can only function when the phone is in single icon per page view (default setting). Torch key status Torch key status can be accessed by selecting Settings → Phone settings → Torch key status. This setting allows the torch key to be activated/deactivated. -
Page 77: Call Settings
The phone will then power off, reset to factory setting and power back on. This process can take 1-2 minutes. Call settings Call settings relate to SIM card or network relating settings. Items visible in Call settings and access to these settings can vary depending on the SIM card provider or pre-established SIM settings. -
Page 78: Fixed Dialling Numbers
Settings → Call settings → Voicemail. Here the voicemail location (service), setup and notification settings can be managed. Voicemail cannot be activated/deactivated in this setting, nor can a voicemail PIN be requested/reset. Fixed dialling numbers Fixed dialling numbers allow the phone to only call numbers listed in the Fixed dialling numbers list. - Page 79 through WhatsApp. See page 28 for additional information. Call forwarding Call forwarding can be accessed by selecting Settings → Call settings → Call forwarding. Here various call forwarding scenarios can be programmed. These include: always, when busy, when unanswered, when unreachable. Call barring Call barring can be accessed by selecting Settings →...
-
Page 80: Audio Settings
can be turned on and off. Important information If the SIM provider has specific call settings in place, modifying call settings on the phone may be restricted or un-successful. In this instance, please contact the SIM provider and request these setting changes. Audio settings In Audio settings, Tones and volume can be programmed, the amplify receiver volume... - Page 81 the volume type you want to change. 2. Press the right and left navigation keys to increase/decrease the volume. Vibrate for calls: As default the EasyFlip Smart will vibrate when incoming calls are ringing. To turn this function on/off, when Also vibrate for calls is highlighted, press the yellow key.
-
Page 82: Ringtone
Ringtone: The EasyFlip Smart has 24 pre- loaded ringtones. Custom ringtones can also be uploaded from a computer to the EasyFlip Smart. page information regarding connecting EasyFlip Smart to a computer. If a custom ringtone has been uploaded to the EasyFlip Smart, it will appear in the ringtone list. - Page 83 tone that sounds when a message is received can be changed in Default notification sound. To change this tone: 1. Open Menu. 2. Scroll to and select Settings. 3. Scroll to and select Audio settings. 4. Select Tones and volume. 5.
-
Page 84: Amplify Rec. Vol
Sound enhancement (volume booster for speaker): As default this setting is on. It is recommended to leave this setting on and adjust the volume using the volume keys. Amplify receiver volume The volume of the earpiece speaker can be boosted beyond the maximum volume set by the EasyFlip Smart’s volume keys. -
Page 85: Talking Keys
1. Open Menu. 2. Scroll to and select Settings. 3. Scroll to and select Audio Settings. 4. Scroll to and select Volume key status. When selected the function will be turned On/Off. When the volume keys are off, they will not function when they are pressed. -
Page 86: Charger Connected
1. Open Menu. 2. Scroll to and select Settings. 3. Scroll to and select Audio Settings. 4. Scroll to and select Main menu voice output. When selected the function will be turned On/Off. Charger connected voice output The EasyFlip Smart can be programmed to announce when connects to... - Page 87 message settings the following functions can be managed: request delivery report, manage SIM card messages, edit quick text, SMS service centre and SMS storage location. Request delivery report: If this function is ticked, when a message is sent, a temporary message will appear on the EasyFlip Smart stating “Message received by (recipients phone number).”...
- Page 88 +61 4XXXXXXXX. Do not change the SMS service centre number unless instructed to do so by the SIM provider or Olitech. SMS storage location: Text messages (SMS’s) can be stored on either the SIM card or the phone. The default storage location is set in this setting.
- Page 89 Individual text messages can be copied to the SIM/Phone. To do so: 1. Open Message. 2. Highlight message thread containing the message you want to copy. 3. Press the yellow key. 4. Highlight the message you want to copy. 5. Press and hold the yellow key for 2 seconds.
- Page 90 Request delivery report: If this setting is ticked, when a message is sent, a temporary message will appear on the EasyFlip Smart stating “Message received by (recipients phone number).” Request read report: This setting is not supported by the EasyFlip Smart. Send read report: This setting is not supported by the EasyFlip Smart.
- Page 91 providers MMS capacity limitations. If the size limit is modified, the ability to send/receive MMS may be compromised. Notifications (message) Notification settings can be accessed by selecting Menu → Settings → Message Settings → Notifications. In notification settings the following functions can be managed: message notifications, mute, sound, vibrate, popup notification.
-
Page 92: Message Font Size
vibrate when a message is received. This setting can be modified here. Popup notification: When a message is received, as default a popup notification will appear on the phones main screen. This popup notification can be deactivated in this setting. General General message settings can be accessed by selecting Menu →... -
Page 93: Bluetooth
mobile network and external devices. These settings include Bluetooth, WLAN (Wi-Fi), Mobile data, Mobile hotspot and Airplane mode. Connectivity settings are accessed through Menu → Settings → Connectivity. Bluetooth Bluetooth is a wireless method that enables the EasyFlip Smart to connect to other devices e.g. - Page 94 Has Bluetooth on/active; and Bluetooth is visible and searching for other devices. If required, please refer to the connecting device’s user manual specific instructions regarding pairing. Step 2. Activate Bluetooth on EasyFlip Smart 1. Press the top left key to select Menu. 2.
-
Page 95: Wlan/Wi-Fi
to pair with the EasyFlip Smart. Depending on the device being paired with, a pairing code may be displayed on the EasyFlip Smart and the device it’s being paired to. On the EasyFlip Smart, this code is confirmed by scrolling to and selecting Pair. Paired devices will then be shown under Paired devices. - Page 96 Area Network. It is also commonly known as Wi-Fi. WLAN allows you to connect to a wireless internet network. WLAN settings can be accessed by selecting Menu → Settings → Connectivity → WLAN. In WLAN settings, WLAN can be turned on and connections can be made to networks in range.
-
Page 97: Mobile Data
the network, not the EasyFlip Smart), then scroll to and select Connect. When connected to a network, Connected will appear below the networks name in the list displayed on the EasyFlip Smart. When the EasyFlip Smart is connected to WLAN, data used by the EasyFlip Smart is taken from the WLAN device’s data allowance (e.g. -
Page 98: Mobile Hotspot
EasyFlip Smart does not have an internet browser or App Store. Access to the mobile data provided by the SIM card can be turned On or Off in the Connectivity settings. As default, mobile data is On. To change access to mobile data provided by the SIM card: 1. - Page 99 and edited (in Setup Wi-Fi hotspot) and connected devices viewed. To open the mobile hotspot on the EasyFlip Smart: 1. Open Menu. 2. Scroll to and select Settings. 3. Scroll to and select Connectivity. 4. Scroll to and select Mobile hotspot. 5.
- Page 100 hotspot. 2. Scroll down past password (as default the password is hidden and shown as dots) until the tick box to the left of show password is highlighted. Select this tick box. The password will then become visible. The password can be edited. If the password is edited, scroll down and select Save.
-
Page 101: Airplane Mode
Airplane mode Airplane mode allows the phone to remain powered on but disconnected from all network connections. To turn airplane mode on/off: 1. Open Menu. 2. Scroll to and select Settings. 3. Scroll to and select Connectivity. 4. Scroll to and select Airplane mode. When Airplane mode is selected, the status will change from On to Off and vice versa. -
Page 102: Icon View
display/hide. 5. Press the yellow key to change the status from On to Off and vice versa. Important information: • Settings cannot be hidden via Menu visibility. • As default, WhatsApp and App are hidden from the main menu via Menu visibility. -
Page 103: App
key or the yellow select key; Contacts are accessed by pressing the top right key (back arrow key). There are also four additional shortcut keys linked to the navigation arrows that personalised. See page 75 for additional information. If six icon per page view is selected, when the phone is flipped open, the time, date and day are visible in the top third of the screen and the first four menu icons are... - Page 104 software update. Information instructions required to complete a software update can be found below. Important information: • The file size of the update is typically 50 MB however this can vary. • The EasyFlip Smart must be connected to WLAN/Wi-Fi in order to install the update.
- Page 105 available, a message will appear on screen stating "No updates available." 6. If a new update is available, press the down pointing navigation key several times until a thin green square appears around Download. Press the yellow key to select. The update will then download.
-
Page 106: Troubleshooting
Troubleshooting If you are experiencing difficulties with your phone, please consult following information prior to accessing after-sales support. The phone does not ring Check whether the silent mode icon (portrait-oriented rectangle with lines either side of it) or do not disturb icon (speaker with a diagonal line through it) appears along the top of the main screen. - Page 107 Settings → Audio settings → Volume key status. The torch does not work The torch key can be deactivated in the phone’s settings. Check to see whether the torch key status is On/Off in Menu → Settings → Phone settings → Torch key status.
- Page 108 charger) the light is flashing, the battery is charging; if the light is constantly lit, the battery is fully charged. As default, notification lights are off between 11 pm and 6 am therefore no light will illuminate during this time. If the phone is not charging: •...
- Page 109 No network coverage • If the chip on the SIM card is dirty or damaged it can impact the phones’ ability to read the SIM card. Please clean/replace the SIM card as required. • Please ensure the SIM card is installed in accordance with the instructions provided in this user manual.
- Page 110 • Check if any call barring is active. Failure to receive GPS location • Ensure “Send location” is ticked in the SOS key setup. • Ensure mobile data is available on the SIM card and that there is adequate 4G reception.
- Page 111 • Using Talkback does consume the battery at a higher rate. • As is the case with all batteries, over time, the battery’s life will slowly decrease. The EasyFlip Smart’s battery replaceable. Enquiries regarding replacement batteries should directed to Olitech.
-
Page 112: Charging Failure
• The battery, charging accessories or phone may be damaged/non-functional. If you have attempted troubleshooting and are still experiencing difficulties, please contact Olitech on 03 9755 8885 or email support@olitech.com.au. Safety Information Use with a Pacemaker • Keep the mobile phone at a distance of... - Page 113 Failure to do so will void warranty. • If the phone/battery is charged at a higher/lower voltage than that provided by the Olitech wall plug, the stability and functionality of the battery can be compromised. • Do not place the battery under high temperatures or in a fire/flame.
-
Page 114: Operating Environment
• Within 24-hour period recommended that the phone not be connected to a charger for more than 12 hours. If the phone is always connected to a charger, the battery life will reduce at a faster rate than standard. • Charging capacity is negatively affected in extreme temperatures. -
Page 115: Professional Service
Failure to comply with this will result in loss of product warranty. Warranty and Certification The Olitech EasyFlip Smart is guaranteed by a 12-month warranty (6 months for battery). The warranty period commences on the date of retail sale. Please retain your... - Page 116 This includes but is limited breakages, water/ temperature damage, misuse or loss. Olitech accepts no liability for loss of data due to a damaged/faulty phone. Resources 1. EasyFlip Smart Accessibility Guide V1: provided with purchase and online at www.olitech.com.au/manuals...
Need help?
Do you have a question about the EasyFlip SMART OLT2021-S and is the answer not in the manual?
Questions and answers
how to add the number before the name in the phonebook