Table of Contents
Advertisement
Quick Links
Advertisement
Table of Contents

Related Manuals for netta OL20-BD068A


Summary of Contents for netta OL20-BD068A
- Page 1 20L COMPACT DEHUMIDIFIER Power Cable 1.5m Product Weight 12.5kg Timer 1-24 hour Room Coverage 20-30m² ------------------------------------------------------------------------------------------------- EN USER INSTRUCTION & OPERATION MANUAL Please keep this manual safe for future reference!
- Page 2 Thank you for purchasing this NETTA product. Please read the user manual carefully before operating this appliance. We will update our instruction manuals if necessary. For the most up-to-date user manual, please visit our official website: www.nettadirect.com. You can download a copy of up to date user manuals at any time in electronic format.
-
Page 3: Safety And Warnings
Safety and Warnings Regular Check-Ups Intended Use Ensure the power cable and NETTA Design is for domestic and plug are not damaged before indoor use only. This product is not plugging into a socket. intended for use by people who have... -
Page 4: The Following Should Always Be Observed For Safety
SYMBOLS FROM THE UNIT AND USER MANUAL his unit uses a flammable refrigerant. If refrigerant leaks and comes in contact with fire warning or heating part, it will create harmful gas and there is risk of fire. Read the USER MANUAL carefully before operation. - Page 5 The unit is designed only for use with R- ⚫ 290(propane) gas as the designated refrigerant. The refrigerant loop is sealed. Only a ⚫ qualified technician should attempt to service! Do not discharge the refrigerant into the ⚫ atmosphere. R-290 (propane) is flammable and heavier than air. ⚫...
-
Page 6: For Your Safety
FOR YOUR SAFETY Please read this manual carefully and fully understand before operating your dehumidifier. General Warnings OPERATIONAL PRECAUTIONS WARNING: To reduce the risk of fire, electric shock or injury to persons or property: ⚫ If the supply cord is damaged, it must be replaced by the manufacturer, its service agent, or similarly qualified persons in order to avoid a hazard. - Page 7 ⚫ Do not operate the unit if it is dropped, damaged or showing signs of product malfunction. ⚫ Do not clean the appliance with any chemicals. ⚫ Ensure the unit is far away from fire, inflammable, or explosive objects. ⚫ The unit shall be installed in accordance with national wiring regulations.
- Page 8 SAFETY PRECAUTIONS ON SERVICING Please follow these warnings when to undertake the following when servicing a dehumidifier. Checks to the area Prior to beginning work on systems containing flammable refrigerants, safety checks are necessary to ensure that the risk of ignition is minimized.
- Page 9 No person carrying out work in relation to a refrigeration system which involves exposing any pipe work that contains or has contained flammable refrigerant shall use any sources of ignition in such a manner that it may lead to the risk of fire or explosion. All possible ignition sources, including cigarette smoking, should be kept sufficiently far away from the site of installation, repairing, removing and disposal, during which flammable refrigerant can possibly be released to the...
-
Page 10: Assembling The Product
– Marking to the equipment continues to be visible and legible. Markings and signs that are illegible shall be corrected. – Refrigeration pipe or components are installed in a position where they are unlikely to be exposed to any substance which may corrode refrigerant containing components, unless the components are constructed of materials which are inherently resistant to being corroded or are suitably protected against being so corroded. - Page 11 Assembling the Product...
- Page 12 Installation Location 1. Place the unit on a firm, level surface in an area with at least 30cm of free space around it to allow for proper air circulation. 2. Never install the unit where it could be subject to: ⚫...
-
Page 13: Operating The Device Safely
WARNING Install the unit in rooms which exceed 4m². OPERATING THE DEVICE SAFELY ⚫ Check the device after unpacking for any damages or scratches on it. ⚫ Operate this unit in an ambient temperature from 5°C to 35°C. ⚫ Do not use in the outdoors. This dehumidifier is intended for indoor residential applications only. -
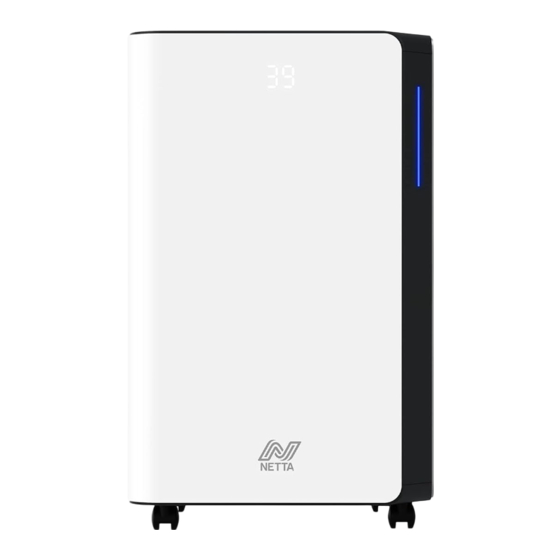
Page 14: Control Panel
3-colors indicator light Ambient humidity ≤ 45%, the indicator light will show Blue 45% < ambient humidity < 65%, the indicator light will show Green ambient humidity ≥ 65%, the indicator light will show Red CONTROL PANEL SETTINGS... - Page 15 Stand By Button Press the STAND-BY button to turn on the machine, the running indicator lights up and the default fan speed is high, and the default humidity setting is 50%. When the machine is running, press the power button to turn off, the running indicator light goes off and the compressor stops immediately, and then the fan will shut down after 30 seconds delay.
- Page 16 When room humidity ≥ 63%RH,the fan&compressor will start working . In sleeping mode, when the water tank is full , the machine will not alarm , but the water tank full indicator light will be on (red color) to remind that the water tank is full and you need to empty the water tank.
- Page 17 Adjust button Press this button to set humidity and timing time; To humidity adjusting , press one time to add 5% humidity value, the humidity adjusting follow the order as below : 30% - 35% - 40% - 45% - 50% - 55% - 60% - 65% - 70% - 75% - 80% - 30% cycle To timing,press one time to add 1 hours timing value, the timing follow the order as below: 00-01-02-03-04-05-06-07-08-09-10-11-...
- Page 18 Drainage There are two ways of removal collected water produced by the unit. A. Manual draining: Empty water tank by manual. B. Continuous draining: Use gravity to drain condensate water by attaching a drain hose. Emptying the Water Tank The built-in water tank will fill up and shut the unit down once it is full.
- Page 19 1.Pull out the water tank 2.Empty the water tank 3.Replace the empty tank back into the unit. Operating the Product Drainage (continued)
- Page 20 1. Do not discard the magnets and plastic rivets in the tank. Otherwise, the dehumidifier cannot be started, or the machine will not automatically stop working when the water tank is full, and the condensed water overflow will damage the floor of the room. 2.
- Page 21 1. Straighten the drainage pipe 2. Insert one end of the drain into the drain into the cistern hole and connect the other end to the bathroom, outdoor or bucket like container, or the prescribed drainage area Warning 1. Please do not block the drain or drainpipe as, if this happens, condensed water will flow into the water tank.
-
Page 22: Cleaning, Maintenance And Storage
Cleaning, Maintenance and Storage Note: Before cleaning and maintaining the machine, be sure to turn off the machine and pull the power plug to prevent electric shock. Cleaning the Air Filter (every two weeks) Dust collects on the filter and restricts the airflow. The restricted airflow reduces the efficiency of the system and if it becomes blocked it can cause damage to the unit. - Page 23 Cleaning, Maintenance and Storage Cleaning the Air Filter (continued) 2.Use a vacuum cleaner to gently absorb the dust on the surface. If the filter is very dirty, wash it with water and a soft detergent and dry it thoroughly afterwards. 3.Put the filter back.
- Page 24 Cleaning, Maintenance and Storage Storage Long-Term Storage: If you will not be using the unit for an extended period of time (more than a few weeks) it is best to clean the unit and dry it out completely. Please store the unit per the following steps: Press the power button to switch off and unplug the unit.
-
Page 25: Before Calling For Service
Troubleshooting Functioning Temperature 5°C ≤ Ambient Temp. ≤ 38°C When the ambient temp is lower or higher than the functioning temp, the dehumidifier stops. When 5°C ≤ Ambient temp. ≤ 20°C, the compressor automatically defrosts at intervals; during defrosting, the compressor stops and the fan keeps running. - Page 26 ✓ Check if the air ➢ Clean the air filter filter the air filter clogged by dust ✓ Check if the air ➢ Remove the obstruction from the inlet or air outlet air inlet or air outlet obstructed There is little ✓...
-
Page 27: Spare Parts And Repairs
You can also find this code on the back of this User Manual. For our Repair Service, please contact our customer support via email at support@nettadirect.com. They will provide you with more details of the repair service offered by NETTA. Disposal of Product IMPORTANT INFORMATION FOR CORRECT DISPOSAL OF THE PRODUCT IN ACCORDANCE WITH EC DIRECTIVE 2002/96/EC. - Page 28 Copyrights NETTA and its logo including images and contents in this manual and website is copyrighted. All intellectual property rights belong to NETTA owner CONSUMABLE DIRECT LIMITED. ANY UNAUTHORISED USE, MODIFICATION or DISTRIBUTION of the NETTA logo, website image, and its contents (from website, manuals) will violate worldwide copyright, trademark and associated laws.
Need help?
Do you have a question about the OL20-BD068A and is the answer not in the manual?
Questions and answers