Advertisement
Quick Links
Advertisement

Related Manuals for komodo KDCRU1KAYKA


Summary of Contents for komodo KDCRU1KAYKA
- Page 1 INFLATABLE CRUISER KAYAK KDCRU1KAYKA & KDCRU2KAYKA...
- Page 3 SAFETY & WARNINIGS Warning • This is not a lifesaving device. Use only under competent supervision. Never allow diving into this product. Never leave in or near the water when not in use. Never tow from any vehicle. • for future reference. •...
- Page 4 • Safety and Operating Instructions Before Departing from the Shore or Dock: • Take a boating safety course and get hands-on training from your boat dealer or local boating authorities. • Know all local regulations and hazards related to water activities and boat operation. •...
- Page 5 • Remember that weather conditions can rapidly deteriorate. Always ensure you can reach shelter quickly. • Everyone on board must always wear a personal flotation device (PFD). • Do not drink alcohol or take drugs before or while operating your boat. Maintain passenger sobriety.
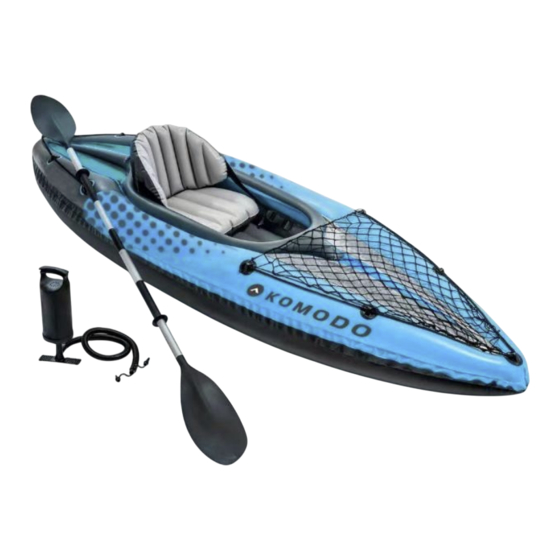
- Page 6 OVERVIEW 1-Seater Underside 2-Seater Boston valve Grab Line Seat or seat cushion Inflatable floor Cargo net Skeg Drain valve Recommended seating arrangement of the occupants. Note: Drawings for illustration purpose only. Actual product may vary. Not to scale.
- Page 7 ASSEMBLY Note: 1 & 2-seater models include one large skeg only for deep water use. Step 1: Step 2: Step 3:...
- Page 8 Paddle Assembly Press and align the push-bottom on the short shaft with the paddle blade hole, ensure the push-bottom is securely snapped onto the paddle blade hole. Join the 3 shafts together with the couplers and securely tighten the coupler covers. To disassemble, reverse the assembly steps.
-
Page 9: Inflating The Kayak
INFLATING THE KAYAK Preparation: Find a clean area free from stones or sharp objects. Unroll the kayak so it lies flat. Locate your air pump. Inflation Process: Use a hand or foot-operated air pump. Do not use high-pressure air compressors. Adults should follow the numerical sequence marked on the valves for inflating the chambers. - Page 10 Deflation: To deflate, unscrew the quick-deflation cap. Note that the double valve does not operate when this cap is off. Do not unscrew this cap while the kayak is in the water. Caution: Double valve does not operate when this cap is off. Do not unscrew this cap while boat or inflatable is in water.
- Page 11 Grab Line Installation (Certain Models) Installation: Inflate the boat before starting the installation. Begin at the rear of the boat and thread the grab line through the rope holders completely around the boat. Tie the loose ends in a square knot at the rear of the boat. Square knot...
-
Page 12: Cleaning And Care
CLEANING & CARE • The kayak is made of the highest quality materials and complies with ISO 6185 standards. Altering the construction of the kayak will endanger your safety, the safety of the occupants, and void the limited warranty. • There is very little that you must do to keep your kayak in good condition for many years. -
Page 13: Troubleshooting
TROUBLESHOOTING If your kayak appears a bit soft, it might not be because of a leak. If the kayak was inflated late in the day with 32°C (90°F) air, that air might cool down to 25°C (77°F) overnight. The cooler air exerts less pressure on the hull, so it could appear soft the next morning. If there has been no temperature variation, you need to start looking for a leak: •... - Page 14 NOTES...
- Page 16 Need more information?
Need help?
Do you have a question about the KDCRU1KAYKA and is the answer not in the manual?
Questions and answers