Advertisement
Quick Links
Advertisement

Related Manuals for Bauer Kompressoren JUNIOR II


Summary of Contents for Bauer Kompressoren JUNIOR II
- Page 1 Instruction Manual and Spare Parts Catalog JUNIOR II-B JUNIOR II-E JUNIOR II-W...
- Page 3 Instruction Manual w Junior II INTRODUCTION This manual contains operating instructions and mainten ance schedules for the high pressure breathing air com pressor unit Junior II WARNING ! Pneumatic high pressure system ! The breathing air produced with the compressor units de...
- Page 4 Instruction Manual w Junior II Dear customer Do you have problems with maintenance or repair work? Technical customer service We are happy to give you advice on any questions regarding Phone no: (089) 78049-246 or -176 your BAUER compressor and help as soon as possible with Fax no: (089) 78049-101 any arising problems.
- Page 5 Instruction Manual w Junior II CONTENTS GENERAL ......SAFETY MEASURES ....
- Page 6 Instruction Manual w Junior II NOTES Model: Serial No..: Date of purchase: Dealer address / phone no.:...
- Page 7 PURPOSE filter system P21 filling assembly The JUNIOR II breathing air compressor is designed to com press air for breathing as required in diving applications. The base plate and frame max. allowable operating pressure (adjusted pressure on automatic condensate drain unit final pressure safety valve) is 225 bar or 330 bar.
- Page 8 Instruction Manual w Junior II 1 Filling hose 2 Exhaust 3 Air filter 4 Tank 5 Throttle lever 6 Choke lever 7 Fuel cock 8 Starter rope 9 Engine stop switch (ignition) 10 Filling valve with final pressure gauge 11 Safety valve, final pressure...
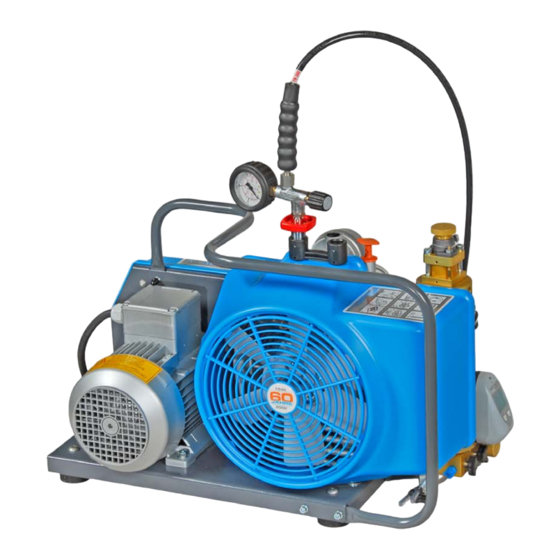
- Page 9 Instruction Manual w Junior II 1 Filling hose 2 Filling valve with pressure gauge 3 Motor terminal box 4 Three-phase motor 5 Final pressure safety valve 6 Handle 7 Fanwheel cover 8 B-Timer 9 Condensate drain valves 10 Mains plug with ON-OFF switch and motor protection circuit breaker (dep.
- Page 10 Instruction Manual w Junior II AIR FLOW DIAGRAM vice it is possible to fill bottles with 200 bar nominal pressure, just by opening valve V9 at filling valve V2. Safety valve U5.2 See Fig. 6 . The air is drawn in through telescopic tube is adjusted to a blow off pressure of 225 bar.
- Page 11 Instruction Manual w Junior II TECHNICAL DATA Compressor unit JuniorII-B JuniorII-E JuniorII-W Medium breathing air Intake pressure atmospheric Delivery 100 l/min. (3,5 Scfm, 6 m Operating pressure PN200/PN300 Pressure setting, final pressure safety valve 225/330 bar Pressure setting, pressure maintaining valve...
- Page 12 Instruction Manual w Junior II Compressor unit JuniorII-B JuniorII-E JuniorII-W Filter system Residual moisture content < 10 mg/m Residual oil content < 0,1 mg/m Pressure dew point -20°C, corresponds to 3 mg/m at 300 bar Filter capacity 0,57 l Automatic condensate drain unit...
- Page 13 Instruction Manual w Junior II SAFETY MEASURES 2.1. NOTES AND WARNING SIGNS 2.2. IDENTIFYING THE SAFETY NOTICES Important instructions concerning the endangerment of per Notes and warning signs displayed on compressors accord sonnel, technical safety and operating safety will be specially ing to model, application or equipment.
- Page 14 Instruction Manual w Junior II pecially the safety notices chapter. When work is already devices, soundproofing is provided and in good working underway it is too late. This is particularly relevant for order. temporary personnel, e.g. maintenance personnel. At least once every day, check the unit externally for dam...
- Page 15 Instruction Manual w Junior II Ensure safe and environmentally friendly disposal of con Even when moving the unit only slightly, the unit must be sumables and old parts. disconnected from all external energy sources. Before putting into use again, reconnect the machine to the mains according to regulations.
- Page 16 Instruction Manual w Junior II the critically stressed areas of the vessels are examined by 14 BetrSichV. Please contact our Technical Service Depart means of suitable testing methods, in order to ensure the ment with regard to this. They can also supply our leaflet operating safety.
- Page 17 Instruction Manual w Junior II LOCATION, OPERATION, BOTTLE FILLING LOCATION Indoor location Petrol driven units must not be oper Never operate the compressor in WARNING WARNING ated indoors. potentially explosive atmosphere! Keep unit away (min. 2m) from in Ensure adequate ventilation.
- Page 18 Instruction Manual w Junior II OPERATION three phase leads in the plug. Never change leads at the motor terminal board or at control box. Preparation for operation Units with petrol engine, additionally: All compressor units are tested prior to de...
- Page 19 Instruction Manual w Junior II Units with petrol engine: Filling hoses must be in satisfactory WARNING condition and threads undamaged. Open fuel shut-off valve (1, Fig. 10). Pay particular attention to damage on the interface from hose fitting to hose. If the casing Set ignition switch to I (2) is scored, hose must be discarded.
- Page 20 Instruction Manual w Junior II Connecting the bottles On models of 300 bar rated filling pressure do not attach bottles unless rated for this pressure (note pressure stamped on tank neck). Connect air bottle to filling valve (see Fig. 11).
- Page 21 Instruction Manual w Junior II CHANGE-OVER DEVICE PN 300/PN 200 (Fig. 15) This device allows bottle filling to 200 bar (3,200 psig) with a 300 bar (4,700 psig) rated unit. Safety valve -B and filling device PN 200 bar are connected by open...
- Page 22 Instruction Manual w Junior II MAINTENANCE 4.3. MAINTENANCE SCHEDULE The maintenance schedule is contained in the service manual delivered with every compressor unit. 4.1. MAINTENANCE RECORD 4.4. MAINTENANCE WORK We recommend that all maintenance work is recorded in the This chapter contains the maintenance work as well as a service book, showing the date and details of the work car...
- Page 23 Instruction Manual w Junior II OIL CAPACITY 4.4.2. INTAKE FILTER Junior II approx. 360 ml DESCRIPTION A dry micronic filter is used to filter intake air (Fig. 30). OIL PACKAGES BAUER compressor oil is available in various quantities, refer to oil list in chapter 8.
- Page 24 Instruction Manual w Junior II Fig. 31 Condensate drain taps 4.4.4. FILTER SYSTEM P21 Fig. 32 Filter system P21 DESCRIPTION 1 Filter inlet The air leaving the final stage is cooled in the after-cooler to 2 Jet pipe approx. 10 - 15 C (18 - 27 F) above ambient temperature 3 Filter head and then enters filter system P21 with TRIPLEX longlife car...
- Page 25 Instruction Manual w Junior II The nozzle type separator of the TRIPLEX filter system is Venting bore maintenance-free besides the regular condensate drain age. CONDENSATE DRAINAGE Drain condensate from separator and cartridge chamber regularly by slowly opening drain taps (2 and 3, Fig. 31)
- Page 26 Instruction Manual w Junior II alent to between 10 and 13 operating hours at a filling pres sure of 200 bar. The longer service life of the cartridge at a filling pressure of 300 bar is annihilated by the larger volume of filled air per bottle, therefore the possible number of bottle fillings stays the same at different pressures.
- Page 27 Instruction Manual w Junior II 4.4.5. PRESSURE MAINTAINING VALVE bar for the standard units, 330 bar for models -H or -HU. All safety valves are sealed at the factory. DESCRIPTION If one of the intermediate pressure safety valves blows off, the valves in the next stage are not closing properly, afford...
- Page 28 Instruction Manual w Junior II Mark Intake Pressure Fig. 36 Final pressure gauge Fig. 37 Valve operation MAINTENANCE We recommend that the final pressure gauge is checked Pressure side Intake side from time to time. For this purpose we have developed a special test pressure gauge with an adaptor which immedi...
- Page 29 Instruction Manual w Junior II CHANGING THE VALVES OF THE 1ST STAGE Intake and pressure valves of the 1st stage are combined in one plate valve under the valve head, see Fig. 39. 1 Nut 2 Spring-washer 3 Plate 4 Pressure valve...
- Page 30 Instruction Manual w Junior II Unwind torque stud (1) a couple of turns. Check that after tension adjustment and tightening the motor mounting nuts, both pulleys are in a straight line Remove allen screws (7), take off valve head cover (6).
- Page 31 Instruction Manual w Junior II condensate drain valve is open as well because there is no control air available at this moment. At start-up of the compressor, the solenoid valve is energized and closes: due to build-up of pressure by compressor operation, control air flows into condensate drain valve.
- Page 32 Instruction Manual w Junior II 4.4.11. ELECTRICAL SYSTEM MOTOR PROTECTION SWITCH (THREE-PHASE MOTOR) The motor is switched on manually by turning the switch to DESCRIPTION 1 (Fig. 47). It is switched off manually by turning the switch to 0. This section describes the standard electrical system. The amount of built-in components varies depending on order.
- Page 33 Instruction Manual w Junior II Overload relay F3 (three phase units only) The factory set condensate drain intervals are valid for 20 C (68 F) air temperature of the surrounding air. It is possible to shorten the condensate drain interval when operating the unit at a higher temperature.
- Page 34 Instruction Manual w Junior II Finally place DIP switches 3 to OFF and 1 to ON as shown 4.4.12. COOLING SYSTEM in B, Fig. 52. In this configuration the preliminary The cylinders of the compressor block, the intermediate condensate drain interval is converted in a range setting coolers and the after-cooler are air-cooled.
- Page 35 Instruction Manual w Junior II 4.5. TROUBLE-SHOOTING Trouble Cause Remedy Drive motor (electric) Motor will not start Electric circuitry faulty Check all fuses, terminal connections, wire leads, make sure that motor data complies with mains supply Motor/engine runs eccentrically V-belt worn Replace Wrong adjustment of the motor pro...
- Page 36 Instruction Manual w Junior II Trouble Cause Remedy Piston rings, Pistons or cylinders worn Replace defective parts High oil consumption Intake filter clogged Replace filter cartridge Compressor too hot Enhance cooling Air escaping through cartridge safety Cartridge missing Insert cartridge bore Cartridge installed but O-rings defec...
- Page 37 Instruction Manual w Junior II TRANSPORT, STORAGE, PRESERVATION PRESERVING THE MOTOR/ENGINE Preserve the motor/engine according to the instructions of TRANSPORT the motor/engine manufacturer. Always unplug the power supply before transporting the unit, even in case of slight displacements. PREVENTIVE MAINTENANCE DURING STORAGE Before transporting, always depressurise the compressor by means of condensate drain taps.
- Page 38 Instruction Manual w Junior II REPAIR INSTRUCTIONS GENERAL Preventive maintenance usually involves replacing the valves, gaskets and sealing rings as well as carrying out the maintenance work. Repair work can be carried out on the compressor block to a certain extent but a certain experience and skill is necessary.
- Page 39 Instruction Manual w Junior II TABLES TIGHTENING TORQUE VALUES Unless otherwise specified in text, the fol lowing torque values apply. All valve head screws require torque wrench tightening! The indicated torque values are valid for bolts in greased condition. Replace self- retaining nuts on reassembly.
- Page 40 Instruction Manual w Junior II LUBRICATION CHART Usage Lubricants Rubber and plastic parts, filter housing threads WEICON WP 300 WHITE part no. N19752 or BAUER special grease part no. 072500 Sealing rings BAUER special grease part no. 072500 Shaft seal (seal) BAUER special grease part no.
- Page 41 Instruction Manual w Junior II...
- Page 42 Instruction Manual w Junior II...
- Page 43 Instruction Manual w Junior II...
- Page 44 Instruction Manual w Junior II...
- Page 45 Instruction Manual w Junior II...
Need help?
Do you have a question about the JUNIOR II and is the answer not in the manual?
Questions and answers