Table of Contents
Advertisement
Quick Links
Advertisement
Table of Contents

Subscribe to Our Youtube Channel
Related Manuals for i-SENS spirit health CareSens Air


Summary of Contents for i-SENS spirit health CareSens Air
- Page 1 User manual - Day...
- Page 2 This manual is intended to help you use CareSens Air correctly. Please read this manual carefully before using the product, and follow all instructions. i-SENS, Inc. has carefully prepared the information in this manual to be as accurate as possible.
-
Page 3: Table Of Contents
Contents Before use ..................8 Document conventions ..............9 Safety information ................11 Risks and benefits ................15 Understanding CareSens Air ..........17 Significance of use ...............17 Operating mechanism ..............18 Product components ..............19 Applicator ..................20 Sensor ...................21 CareSens Air app .................22 Conditions for use ..............23 Expiration date ................23 Conditions for use and storage ...........23 Installing the CareSens Air app .........24... - Page 4 Contents Connecting the sensor to Android app ........37 Connecting the sensor to iOS app ..........41 Attaching the sensor ..............45 Configuring your alert settings after connecting to the sensor ..49 If the sensor fails to connect ............52 If the connection between the sensor and the smart device is interrupted ..............52 Disconnecting and removing the sensor ........53 Understanding the home screen ..........55...
- Page 5 Contents Calibration ................87 How to calibrate a sensor ............87 Calibration interval ................88 Measuring a calibration value ..........89 Entering a calibration value ............90 Enter initial calibration value ............90 Setting and receiving calibration alerts ........91 Using events .................92 Checking your event information ..........92 Viewing the log book ..............92 Viewing events on your glucose trends ........94 Recording an event ..............95...
- Page 6 Contents Sharing your blood glucose information ......118 Invite care providers ..............118 Enter sharing code to invite care providers ......121 Changing sharing options ............123 Removing care providers ............125 Maintenance ...............126 Taking care of the sensor during use ........127 Storing a sensor ...............127 Disposing of this product ............127 Warranty ................128 Warranty of replacements ............128...
-
Page 7: Before Use
All standards and regulations mentioned are in effect as of the date this manual was issued. • i-SENS, Inc. has carefully prepared the information in this manual to be as accurate as possible. • However, i-SENS is not responsible for any errors or omissions contained in the manual. -
Page 8: Document Conventions
Before use Document conventions Notational conventions This manual uses the following notational conventions to aid in understanding its content. Notational Description conventions Boldface is used to display elements of the graphic user interface, Boldface including menus and directories. Single quotation marks are used to indicate pages, portals, and screens from the graphical user interface. - Page 9 Before use Definitions of symbols The following table lists graphical symbols for electrical equipment in medical practice set by the IEC (International Electrotechnical Commission). These symbols not only provide additional information on the product and product use, but also on safety. Symbol Description CE Mark Authorised representative in the European Community/European Union Medical device Caution...
-
Page 10: Safety Information
Before use Safety information You must read, understand, and strictly comply with the indications, contraindications, warnings and precautions listed in this chapter before using CareSens Air. Indications for Use The CareSens Air Continuous Glucose Monitoring System (CareSens Air CGM System) is indicated for continuous monitoring of blood glucose levels via measurement of glucose in the interstitial fluid in persons with diabetes mellitus aged 18 years and older. - Page 11 Before use Warnings • Severe hypoglycemia or shock may result in abnormal measurements. Do not use this product for patients with severe symptoms, as ketoacidosis or a hyperosmolar hyperglycemic nonketotic state may result in abnormally low measurements. • If you use an insulin pump, attach the sensor at least 8 cm away from it. •...
- Page 12 Before use Warnings • If the contents of the desiccant get in your eyes, wash them thoroughly with running water right away. You should consult a physician if you experience any problems. • Choose a new location to attach each new sensor. Continuing to attach new sensors to a previously used location may cause skin irritation or scarring.
- Page 13 Before use Precautions • The applicator and the sensor are intended for single-use only and cannot be reused. • If a skin care product such as sunscreen or insect repellent gets on the sensor, wipe it immediately with a clean cloth. These products may affect the operation of CareSens Air.
-
Page 14: Risks And Benefits
In order not to miss the alerts from the CareSens Air CGM System, your smart device must follow the settings recommended by i-SENS. For detailed information, please refer to Settings > Tutorial in the CareSens Air app. See the “Recommended smart device specifications”, “Using alerts”, and “Frequently asked questions”... - Page 15 Before use Benefits Benefit of using your CareSens Air CGM System are: • Receiving high and low glucose level alerts for the detection of hyperglycemia and hypoglycemia • Tracking glucose trends and patterns for better diabetes management Tracking trends and patterns The CareSens Air CGM System provides continuous blood glucose information to help you track trends and patterns, detect hyperglycemia and hypoglycemia, and make informed decisions about food and exercise habits.
-
Page 16: Understanding Caresens Air
1 Understanding CareSens Air Warning Glucose readings obtained from the CareSens Air CGM System cannot substitute for professional medical care. They are only intended to provide the patient with data on glucose level changes in order to help with diagnosis and treatment through consultation with a medical professional. -
Page 17: Operating Mechanism
Understanding CareSens Air Operating mechanism User app Sensor The user attaches the sensor to their body by pressing the Release button of the applicator. The sensor attached to the back of your upper arm measures glucose levels in interstitial fluid and sends the measurements to a smart device. All the data on your smart device can be backed up on a cloud server to prevent loss of data. -
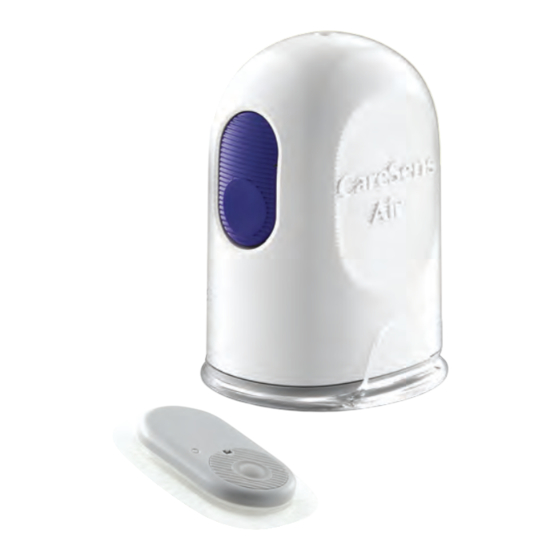
Page 18: Product Components
Understanding CareSens Air 1.1 Product components CareSens Air sensor is only designed for single-use. Once it has been attached, a sensor cannot be re-used. The contents of the package are as follows. Make sure that all of the contents are present upon opening the package. -
Page 19: Applicator
Understanding CareSens Air Applicator The applicator is used to protect the sensor and attach the sensor to the skin. Note • The applicator is intended for single-use only and cannot be re-used. • Do not press the Release button until you have removed the safety cap of the applicator and are ready to attach the sensor. -
Page 20: Sensor
Understanding CareSens Air Sensor The sensor measures glucose levels and sends the readings to a smart device. Note • The sensor is water resistant. The product has been tested as waterproof over the course of 24 hours and at a depth of 1 meter. •... -
Page 21: Caresens Air App
Understanding CareSens Air CareSens Air app You can use the CareSens Air application to monitor your glucose levels. Note • Scan the barcode on the sensor package label to connect the sensor to your smart device. For more information, please refer to 'Connecting the sensor to Android app' 'Connecting the sensor to iOS... -
Page 22: Conditions For Use
Understanding CareSens Air 1.2 Conditions for use Expiration date The sensor's product lifespan ends 12 months after its date of manufacture. The expiration date is indicated on the sensor package label. Check the sensor expiration date before using the product. The sensor can be used for 15 days, and it cannot be re-used. -
Page 23: Installing The Caresens Air App
2 Installing the CareSens Air app You can use the CareSens Air app to monitor glucose readings from the sensor in real time. The following smart device specifications are required to install the app. Recommended smart device specifications To install and use the app on a smart device, the following minimum system requirements must be met. -
Page 24: Installing The App On An Android Smart Device
Installing the CareSens Air app 2.1 Installing the app on an Android smart device to launch the Play Store app on your Android smart device. Type "CareSens Air" into the search bar of the Play Store, then tap Select the CareSens Air app from the list of apps and tap Install. Wait for installation to be completed, then tap Open. -
Page 25: Using The App
3 Using the app Users can monitor blood glucose readings measured with the sensor through the CareSens Air app on their smart devices. The glucose trend arrows, glucose trends, events, and calibration values available on the app allow you to manage your blood glucose more effectively. -
Page 26: Logging In
The app only provides data on the user currently logged in. For first-time users If you sign up for an i-SENS account, you can use all i-SENS apps with one account. Follow the steps below to sign up for an i-SENS account. - Page 27 Using the app Move to the i-SENS login screen. Tap Create an account. • Even if you select Social Login, it is possible to sign up using an account. • Select your country of residence, and language, then enter your information for Social Login.
- Page 28 Using the app Enter the email you want to sign up with and tap Send. A verification code will be sent to the email address you provided. Enter the six-digit code from the verification email and tap Verify. Note • You should enter the code within 5 minutes after the email has been sent.
- Page 29 Using the app After accepting the required terms and conditions, tap Ok. Enter the user information and tap Ok.
-
Page 30: Previously Registered Users
CareSens Air app. Tap Log In on the start screen. On the i-SENS login screen, enter your email address and password, then tap Log In. If you enter a correct email address and password, you will be logged in as a... -
Page 31: Reset Password
Using the app Reset password Take the following steps if you have forgotten your i-SENS login password. Find the CareSens Air app on your smart device and tap Tap Get Started on the start screen. Move to the i-SENS login screen. - Page 32 Using the app Enter your email address on the 'Forgot your password?' screen and tap Send. The verification code is sent to the user's email address. Enter the six-digit code from the verification email and tap Verify. • You should enter the code within 5 minutes after the email has been sent.
- Page 33 Using the app Enter your new password and confirmation password, then tap Ok. Your password has been reset.
-
Page 34: Use Without Login
Using the app Use without login CareSens Air can be used without creating and logging in to an i-SENS account. Follow these steps to use CareSens Air without logging in. Launch the CareSens Air application on your smart device. Tap Continue Without Login on the top right of the login screen. -
Page 35: Connecting To A Sensor
Using the app 3.2 Connecting to a sensor Make sure that the sensor has been attached to the skin and that the power has been turned on. Connect the sensor to the app. Once it is successfully connected, the sensor will warm up. -
Page 36: Connecting The Sensor To Android App
Using the app Connecting the sensor to Android app Connect the sensor to the app. Scan the barcode shown on the sensor package label, or manually enter the sensor PIN code. Follow the steps below to connect the sensor to the app: Turn on Bluetooth on your smart device. - Page 37 Using the app On the 'Scan Sensor Information' screen, scan the barcode on the package label. When the sensor information appears, check that it is the same as the sensor information on the package label and tap Ok. You can manually enter the barcode instead. Tap Enter Manually.
- Page 38 Using the app Enter the 6-digit PIN code and the last 4 digits of the serial number written on the sensor package label, then tap Ok. Note When entering the sensor information manually, please make sure to enter the numbers correctly.
- Page 39 Using the app Once the barcode is successfully recognised or the information is manually entered, you will see the 'Apply the Sensor' screen. Follow the steps below to attach the sensor on the back of your upper arm, and tap Start Pairing. Read the details and words of caution 'Attaching the sensor' before attaching the sensor.
-
Page 40: Connecting The Sensor To Ios App
Using the app Connecting the sensor to iOS app Follow the steps below to connect the sensor to the app: Turn on Bluetooth on your smart device. on your smart device and log in. Tap Safety Information on the 'Overview' screen. Read the information on the 'Safety Information' screen, then tap Scan Sensor Information. - Page 41 Using the app On the 'Scan Sensor Information' screen, scan the barcode on the package label. You can manually enter the barcode instead. Tap Enter Manually. Enter the last 4 digits of the serial number written on the sensor package label, then tap Ok.
- Page 42 Using the app Once the barcode is successfully recognised or the information is manually entered, you will see the 'Apply the Sensor' screen. Follow the steps below to attach the sensor on the back of your upper arm, and tap Start Pairing.
- Page 43 Using the app When a Bluetooth connection request appears on the screen, enter your PIN code and tap Pair. Warning When using iOS, do not close the app after connecting the sensor. It will be disconnected from the sensor.
-
Page 44: Attaching The Sensor
Using the app Attaching the sensor Follow the steps below to attach the sensor to the back of your upper arm: Check the expiration date on the sensor package label. Open the CareSens Air sensor package. Take the applicator out of the package and set it on a flat, stable surface. Wash your hands well with soap and running water, and dry them with a clean cloth. - Page 45 Using the app Hold the applicator and remove the safety cap. When the safety cap is removed, the backing paper covering the skin adhesive is removed at the same time. Note Make sure that the backing paper has been completely removed from the skin adhesive and is on top of the safety cap.
- Page 46 Using the app Remove the safety cap, and place the applicator as shown in the figure on the back of your upper arm where the sensor will be attached. The sensor may not attach properly if the applicator is positioned as shown in the figure.
- Page 47 Using the app Remove the applicator and make sure that the sensor has been properly attached. • If the adhesive on the sensor has weakened during usage, you can use sensor tape to keep the sensor in place more securely. For example, you can use sensor tape to prevent the sensor from coming off your skin after it has been attached for seven days.
-
Page 48: Configuring Your Alert Settings After Connecting To The Sensor
Using the app Configuring your alert settings after connecting to the sensor After the sensor is connected successfully, enter threshold values for very low, low, and high and proceed with setting up your alerts. Consult your healthcare professional for the appropriate threshold values for ‘very low’, ‘low’, and ‘high’. - Page 49 Using the app On the 'Alert settings' screen, enter threshold values for very low, low, high, rapidly changing blood glucose levels and alert types, then tap Finished. Note If you set it to mute, you’ll receive alerts without any sound or vibration. If you want to be sure to recognise alerts, set it to sound or vibrate.
- Page 50 Using the app Note If you need to make a treatment decision during the 2 hours needed for sensor warmup, use a glucose meter. Once warmup is completed, changes its color from grey to red. Tap the red On the ‘Calibration’ screen, enter two finger prick glucose measurements using a glucose meter taken within 5 minute interval of each other and tap Save.
-
Page 51: If The Sensor Fails To Connect
Using the app If the sensor fails to connect If the sensor fails to connect, a pop-up window explaining the cause of the failure will appear. Depending on the cause of the failure, follow these steps to try connecting the sensor again: •... -
Page 52: Disconnecting And Removing The Sensor
Using the app Disconnecting and removing the sensor The sensor is automatically disconnected when it expires. You can manually disconnect from a sensor while it is still in use. You can disconnect from a sensor if it malfunctions due to damage. You may lose any data that hasn't been transferred when you disconnect the sensor. - Page 53 Using the app Remove the sensor attached to the back of your upper arm. Remove it slowly, starting from the edge of the skin adhesive tape.
-
Page 54: Understanding The Home Screen
Using the app 3.3 Understanding the home screen If the sensor is operating stably, a real-time graph of changes in glucose level will be displayed on the home screen of the app. The CareSens Air app home screen contains the following: •... -
Page 55: Basic Information
Using the app Basic information The table below explains the basic information which the CareSens Air app displays at the top of the home screen. Icon Name Description The image uploaded to your profile is shown. Profile You can change this image on the 'Profile' screen by tapping your name. -
Page 56: Menu Bar
Using the app Menu bar The following table explains the icons and features available on the Home screen menu. Icon Name Description Return to the Home screen that shows blood Home glucose trends. • When you tap this icon, a list of events registered by the user will be displayed. - Page 57 Using the app Icon Name Description • When you tap this icon, you will see a display telling you about the sensor connection status, the calibration status, alert type, and your glucose level alerts. • All data saved on the app can be uploaded and saved to the cloud server.
-
Page 58: Glucose Data
Using the app Glucose data The CareSens Air app displays your current glucose level and the glucose change arrow as shown below. You can choose whether to display them vertically or horizontally on your smart device screen. The table below explains how the home screen displays glucose level data: Icon Name Description... - Page 59 Using the app Icon Name Description When you tap this icon, statistics of your glucose levels over the past 24 hours will be displayed: Glucose • Average level, standard deviation, statistics how much time your level was within the target glucose level, and the low and high ranges.
- Page 60 Using the app Icon Name Description Alert History Move to the ' Alert History ' screen. The current rate of change in your glucose level compared with the previous measurement is displayed. Glucose trend Each point indicates a glucose trend arrows reading taken every 5 minutes.
-
Page 61: Trend Arrows
Using the app Trend arrows The glucose trend arrow shows the direction and velocity of change between the most recent glucose reading and the second most recent reading. It is shown as an arrow on the right of the most recent glucose reading on the home screen. -
Page 62: Interpreting Trends In Glucose Data
Using the app Interpreting trends in glucose data Interpreting trends in glucose data shown on the home screen can help you manage your diabetes more effectively. The most recent glucose reading is displayed, and the pace and direction of change in comparison with the last measurement is indicated with an arrow. - Page 63 Using the app Description The most recent glucose reading is 5.7 mmol/L, which is within the target range. It has increased in comparison to the previous value, but is still within the target range. However, even if the glucose reading value is 5.7 mmol/L, it may increase to 8.9 mmol/L or higher after 30 minutes when you see the change arrow.
-
Page 64: Viewing Previous Data
Using the app Viewing previous data You can click the vertical bar on the left of the app home screen to view previous data. You can view all the data delivered from any sensor used on your account. The glucose trend screen appears when you tap on the sensor usage period. -
Page 65: Alert History
Using the app Alert history on the upper right corner of the home screen to see the alert history. You can check the history of blood glucose alarms (very low, low blood glucose, high blood glucose, sudden fluctuations), sensor alerts, and follow-related alerts. Follow the steps below to check the alert history. -
Page 66: Exploring The App Features
Using the app 3.4 Exploring the app features You can use various features of the CareSens Air app to manage your diabetes in your daily life. All the glucose readings collected by the sensor appear together on the glucose trends display. You can record your food intake, physical activity, insulin intake, and other items as events. -
Page 67: Running The Widget
Using the app Running the widget CareSens Air can display important information and features as a widget so that you can view them on the main screen of your smart device. You can use the CareSens Air widget to check your sensor connection status, sensor glucose readings, and trend arrows, or to enter a calibration value. -
Page 68: Entering A Calibration Value
Using the app Entering a calibration value When you need to enter a calibration value, you should use a glucose meter to obtain a blood glucose level from a fingerprick sample. Enter this reading as a calibration value for CareSens Air. Refer to '4 Calibration' for more information on glucose level calibration. -
Page 69: Editing And Checking Your Profile
Using the app Editing and checking your profile You can view or edit the information in your user profile. Follow these steps to enter profile information. at the top of the home screen. The 'Profile' screen is displayed. on the 'Profile' screen to change your profile photo. -
Page 70: Viewing The Log Book
Using the app Viewing the log book The log book displays all the events registered by the user, beginning with the most recent. Follow these steps to check event details in the log book. at the bottom of the home screen. Events registered by the user are displayed. -
Page 71: Recording An Event
Using the app Icon Name Description The amount of carbohydrates, protein, and fat Meal consumed at the time the event occurred are displayed in grams (g). The number of minutes spent exercising is displayed, Exercise along with the time. Recording an event Activities or situations that may affect your glucose level can be registered as events. -
Page 72: Changing Your Settings
Using the app Changing your settings The following table explains the icons and features available on the home screen menu. Your settings are displayed when you tap at the bottom of the home screen. Icon Name Description Contact Us Move to the 'Contact Us' screen. Connection If a sensor is connected, On is displayed. - Page 73 Using the app Icon Name Description Enter the threshold value for Low to receive alerts and select the alert method. Enter the threshold value for High to receive alerts and High select the alert method. Enter the threshold value for Rapidly changing to Rapidly changing receive alerts and select the alert method.
- Page 74 Using the app Icon Name Description Tutorial You can access information related to the product. FAQs You will be directed to the 'FAQs' screen. Announcements Move to the 'Announcements' screen. The current version of the app is displayed. If a new version of the app is available for installation, it will be shown to the right of the current version.
-
Page 75: Setting Passcode
Using the app Setting passcode You can set the passcode feature to protect your personal data. Follow the steps below to set up the passcode feature: at the bottom of the home screen. The Settings screen will be displayed. of Passcode. Enter the 4-digit password. -
Page 76: Connecting With A Glucose Meter
Using the app Connecting with a glucose meter You can connect your CareSens glucose meter with Bluetooth functionality to the CareSens Air app and download your glucose meter data. Follow these steps to connect a glucose meter: at the bottom of the home screen. The Settings screen will be displayed. next to Blood Glucose Meter. - Page 77 Using the app From the list of connectable devices, tap the glucose meter you want to connect to. Enter the PIN code displayed on the glucose meter screen and tap OK. Depending on the blood glucose meter model, pincodes may not be required or connection approval may be required from the blood glucose meter.
-
Page 78: Uploading Data
Using the app When the process is completed, the download will proceed. When the download is completed, you will be directed to the 'Transfer Data' screen, and the downloaded glucose level will be displayed. Tap Save to complete the process. Note Data that has unchecked retrieval is not shown on the app and is excluded from statistics. -
Page 79: Updating The App
Using the app Updating the app If a new version of the CareSens Air app is available and has not be downloaded, it will be shown on the Settings screen. Go to the App Store to download and install the most recent version. Follow these steps to update the CareSens Air app to the most recent version. -
Page 80: See Tutorial
Using the app See tutorial Follow these steps to view the CareSens Air app user guide. at the bottom of the home screen. On the Settings screen, tap next to Tutorial. -
Page 81: See Faqs
Using the app See FAQs next to FAQs to read frequently asked questions and answers. You will be taken to the 'FAQs' screen. on the 'FAQs' screen to check the categories. Tap a FAQs category to see a list of topics. -
Page 82: Making An Inquiry
Using the app Making an inquiry You can use the app to ask questions about CareSens Air. The manufacturer's customer service representatives will check your inquiry and reply by email. Take the following steps to view 1:1 inquiries or register a new inquiry. at the bottom of the home screen. - Page 83 Using the app On the 'New inquiry' screen, tap Submit after making an inquiry. • Email Address: The email address associated with the account is entered automatically and cannot be changed by the user. • Title: Enter the title of the inquiry. •...
-
Page 84: Retrieve Previous Data
Using the app Retrieve previous data If an existing app user reinstalls the app due to changing smart devices, etc., data can be downloaded again from the server. After reinstalling the CareSens Air app, launch the app and log in with your account to restore previous data. -
Page 85: Logging Out
Using the app 3.5 Logging out Follow these steps to log out of the app: at the top of the home screen. The 'Profile' screen is displayed. Tap Log Out on the 'Profile' screen to log out. Tap Log Out on the 'Log Out' pop-up window. Note •... -
Page 86: Calibration
4 Calibration Continuous Glucose Monitoring provides the value of the concentration of blood glucose by measuring the concentration of glucose in interstitial fluid. However, if the glucose concentration in the blood changes, the 'glucose' concentration in the interstitial fluid changes about 5 to 15 minutes later. In order to minimise such errors, CareSens Air calibrates the sensor by using readings taken by a glucose meter using finger pricks that must be entered within 5 minutes by the user. -
Page 87: Calibration Interval
Calibration Calibration interval The calibration intervals are right after sensor warmup (stage 1), twice every 12 hours (stage 2), and then every 24 hours (stage 3). Note Blood glucose is only measured twice in stage 1, right after sensor warmup. It is measured once in all other stages. -
Page 88: Measuring A Calibration Value
Calibration 4.1 Measuring a calibration value Calibration requires a reading taken by pricking a finger. A glucose meter is used to measure your glucose level. Refer to 'Connecting to a glucose meter' for more information on how to connect a glucose meter to a smart device. Caution •... -
Page 89: Entering A Calibration Value
Calibration 4.2 Entering a calibration value In order to ensure that the readings of CareSens Air are accurate, measure the glucose level using finger pricks and enter the calibration value within 5 minutes. The user must enter a calibration value in the following situations: Enter initial calibration value Once the sensor is connected with a smart device, the sensor will warm up for the next two hours. -
Page 90: Setting And Receiving Calibration Alerts
Calibration Setting and receiving calibration alerts The calibration alert message and pop-up window appear at calibration intervals. When a calibration alert occurs, follow these steps to enter a calibration value: • on home screen and enter a calibration value then tap Save. •... -
Page 91: Using Events
5 Using events You can use events to record activities and situations which may affect your glucose levels. You can manage events you have recorded on the CareSens Air app using the log book. You can also view them on your glucose trends, allowing you to manage your glucose levels more effectively. - Page 92 Using events Index Name Description The year, month, and day that the event occurred are Date displayed. Time This displays the time that the event occurred. The event value entered by the user and additional Event value information are displayed. Note The memo entered with the event is displayed.
-
Page 93: Viewing Events On Your Glucose Trends
Using events Viewing events on your glucose trends When the screen is oriented horizontally, event details are displayed using the icons above your glucose trends at each specific time. The app displays events from the last 24 hours by default, and you can zoom in or out to view events from the past 6 hours, 12 hours, or 24 hours. -
Page 94: Recording An Event
Using events 5.2 Recording an event You can record glucose levels, ketones, insulin, oral medication, diet, and exercise that may affect your diabetes management to register them as events Take the following steps to register an event using the CareSens Air app. on the menu bar of the home screen. - Page 95 Using events On the 'Add Event' screen, enter desired information such as blood glucose level, ketone level, insulin, oral medication, meal, and exercise, and then tap Save. • Blood Glucose: Enter your blood glucose value and diet information. The unit selected in the Unit section of the Settings menu is displayed.
- Page 96 Using events Tap Save when you finish entering information.
-
Page 97: Changing An Event
Using events 5.3 Changing an event You can also change or delete any event details you have recorded. Editing an event You can edit the event information you have recorded. If the event includes a blood glucose reading taken with a glucose meter or a calibration value entered by you, the date, time, and glucose level of the event cannot be changed. - Page 98 Using events Edit the category you want to edit and tap Save.
-
Page 99: Deleting An Event
Using events Deleting an event Follow these steps to delete an event you have recorded. on the menu bar of the home screen. Select the event you want to delete and tap Delete. Tap Delete to delete an event on the pop-up window. -
Page 100: Using Alerts
6 Using alerts If you have diabetes, it is extremely important to manage your glucose levels in real time. The CareSens Air app uses alerts to update you with your glucose levels even when it is not running. With the alerts, you can manage your glucose levels as well as your use of CareSens Air in real-time. -
Page 101: Initial App Alert Settings
Using alerts 6.2 Initial app alert settings The initial alert settings are made when you connect a new sensor to the CareSens Air app. You can change your alert settings in the app settings. For more information, please refer to 'Connecting the sensor to Android apps' 'Connecting the sensor to iOS apps'. - Page 102 Using alerts On the 'Alert settings' screen, set the threshold alert levels for Very Low, Low and High and tap Next. On the 'Alert settings' screen, set the rapidly changing glucose level alert and tap Next.
- Page 103 Using alerts Choose an alert type, then tap Finished. Note If you set it to mute, you'll receive alerts without any sound or vibration. If you want to be sure to recognise alerts, set it to sound or vibrate.
-
Page 104: Checking Your Alerts
Using alerts 6.3 Checking your alerts CareSens Air uses various alerts to let you know about changes to your glucose level or the sensor status. If multiple alerts are triggered at the same time, the most important will be delivered, in the following order of priority: •... -
Page 105: Signal Loss Alert
Using alerts Signal loss alert The Signal loss alert occurs when the connection between the sensor and your smart device is lost for 25 minutes or longer. • Measures to take upon signal loss alerts: Refer to 'If the connection between the sensor and the smart device is interrupted'. -
Page 106: Glucose Level Alert
Using alerts Glucose level alert These alerts occur if your glucose level falls below the very low level, above the high alert level, or below the low alert level you have set. Refer to '6.4 Changing alert settings' information on how to change your blood glucose level alert settings. On the following table, you can see the alert settings and the content of messages based on what mode/situation the app is running in. - Page 107 Using alerts Situation Alert type Screen Android banner alert • If you are using your smart device after closing the app • If the smart device screen is locked iOS banner alert...
-
Page 108: Rapidly Changing Glucose Level Alert
Using alerts Rapidly changing glucose level alert Rapidly changing glucose level alert occurs if your glucose level changes faster than the set rate. You can select above 0.1 mmol/L/min or higher and 0.2 mmol/L/min or higher as the standard rate for rapidly changing glucose level. Refer to '6.4 Changing alert settings' for more information on how to change your rapid change alert settings. -
Page 109: Calibration Alert
Using alerts Calibration alert A Calibration alert occurs when a sensor value calibration is required. If you tap Snooze, you'll hear it again after 10 minutes. On the following table, you can check the Calibration alert settings and the content of messages based on what mode the app is running in. -
Page 110: Sensor Replacement Alert
Using alerts Sensor replacement alert The sensor can be used for a maximum of 15 days. This alert occurs 5 days, 3 days, 1 day, and 1 hour before the sensor expires. The sensor is automatically disconnected when it expires. On the following table, you can check the sensor replacement alert settings and the content of messages based on what mode the app is running in. - Page 111 Using alerts Situation Alert type Screen Android banner alert • If you are using your smart device after closing the app • If the smart device screen is locked iOS banner alert...
-
Page 112: Sensor Error
Using alerts Sensor error When an error occurs in the sensor, the following notification occurs: If an error occurs during warmup, “sensor warmup failure” will appear. If an error occurs after warmup has been completed, a “sensor error” alert occurs. When this alert occurs, the app disconnects from the sensor and can no longer be used. - Page 113 Using alerts Situation Alert type Screen Android banner alert • If you are using your smart device after closing the app • If the smart device screen is locked iOS banner alert...
-
Page 114: Care Provider Connection Notification
Using alerts Care Provider connection notification When a new care provider is registered, a alert like the one below will occur. On the table below, you can check the new care provider alert method and the message content depending on the app running status. Situation Alert type Screen... -
Page 115: Changing Alert Settings
Using alerts 6.4 Changing alert settings In the 'Alert settings', you can choose whether to receive alerts for the following categories: • Glucose level alert. • Rapidly changing. • System alerts. • Text-to-Speech. Note Consult with your health care professional regarding the appropriate glucose level alert settings for managing your diabetes. - Page 116 Using alerts Icon Name Description • If mute mode is activated, all alerts are set to mute. When deactivated, all alerts return to the set alert method. Mute • Alerts that are excluded from mute mode - Very low, Signal loss, Sensor error, Sensor expiration, Sensor warmup Set the threshold value for very low.
-
Page 117: Sharing Your Blood Glucose Information
7 Sharing your blood glucose information Blood glucose data can be shared with a care provider such as family and friends. Data from the CareSens Air user app is shared in real time with the Sens365 app on the care providers’... - Page 118 Sharing your blood glucose information Tap Generate Sharing Code. On the 'Data' screen, select the data and permissions you want to share and tap Generate Sharing Code. Data for sharing includes • Glucose readings and Events • Alerts Send the generated code to the care provider you want to share your data with.
- Page 119 Sharing your blood glucose information When a care provider is added, an alert notifying that a new care provider has been successfully added is displayed on the CareSens Air app. Note For more details on using the Sens365 app, refer to the Sens365 app user guide.
-
Page 120: Enter Sharing Code To Invite Care Providers
Sharing your blood glucose information 7.2 Enter sharing code to invite care providers Follow the following steps to enter sharing code to connect care provider. After running the CareSens Air app, tap at the bottom of the home screen. Tap Care Providers. Tap Connect on the 'Care Providers' screen. - Page 121 Sharing your blood glucose information On the "Enter Sharing Code" screen, enter the sharing code and tap OK. If the share code is valid, a care provider confirmation pop-up will appear. Check that it is the correct care provider and tap OK. When a care provider is added, an alert notifying that a new care provider has been successfully added is displayed on the CareSens Air app.
-
Page 122: Changing Sharing Options
Sharing your blood glucose information 7.3 Changing sharing options You can temporarily stop sharing your blood glucose data with your care provider or change your options. Follow the steps below to change the sharing options. at the bottom of the home screen. Tap Care Providers. - Page 123 Sharing your blood glucose information Change your sharing options and tap OK. • Data sharing can be enabled/disabled with the enable sharing option. • You can cancel sharing by unchecking each item. Note When CareSens Air users change their sharing options, care providers are notified of the change in sharing options.
-
Page 124: Removing Care Providers
Sharing your blood glucose information 7.4 Removing care providers If you no longer want to share data with your care providers, you can turn off data sharing. Follow the steps below to disconnect. at the bottom of the home screen. Tap Care Providers. -
Page 125: Maintenance
8 Maintenance Learning and following these guidelines for how to take care of CareSens Air will allow you to use it more effectively. This section will help you to: • Maintain and take care of the sensor effectively. • Safely store the sensor. •... -
Page 126: Taking Care Of The Sensor During Use
Maintenance 8.1 Taking care of the sensor during use Follow these instructions to take care of the sensor during use. Caution Do not wash the sensor. Using an unsuitable solution could damage the device. Method Every day Before and after use When needed •... -
Page 127: Warranty
product. -
Page 128: Appendix A Frequently Asked Questions
Appendix A Frequently Asked Questions This chapter presents situations that may occur while using CareSens Air and how to deal with them. If any situation which is not presented in this chapter occurs, or if you experience an issue that you are unable to resolve on your own, contact the authorised distributor. This section will help you to: •... - Page 129 Appendix A Frequently Asked Questions What should I do if my sensor glucose reading does not match my physical condition? Wash your hands thoroughly with water or an alcohol swab, use your glucose meter to obtain a reading by pricking a finger, and compare the result with your physical condition. Consult a medical professional if necessary.
- Page 130 Appendix A Frequently Asked Questions Why is there an empty region on my glucose trends? When the app is unable to receive sensor glucose readings, the status of the signal icon on the home screen will be displayed as Signal loss, and new glucose readings will not be displayed.
-
Page 131: Appendix B Technical Information
Appendix B Technical information B.1 Device features and characteristics Electromagnetic compatibility • This product requires special attention relating to EMC (electromagnetic compatibility) and must be installed and serviced according to the EMC information provided in the manual. • Using an accessory, sensor, or cable that is not supported by the manufacturer may increase or decrease the system's burst size. - Page 132 Appendix B Technical information Standard Part DC main Testing name Required testing level Note referenced tested power voltage 8 A/m 30 kHz CW Modulation 65 A/m Immunity to proximity IEC 61000-4- 134.2 kHz Enclosure D.C. 3 V magnetic fields 39:2017 PM 2.1 kHz 7.5 A/m 13.56 MHz...
-
Page 133: Safety
Appendix B Technical information Safety IEC 60601-1:2005 + AMD2:2020 Medical electrical equipment – Part 1: General requirements for basic safety and essential performance — Protection against electric shock: Internally powered, Type BF applied part — Mode of operation: Continuous operation —... -
Page 134: Technical Specificaitons
Appendix B Technical information B.2 Technical specificaitons Product specification Parameter Description Product Name CareSens Air Model No. CGM-ST-002 Analysis method Electrochemical method Enzyme type GDH-FAD Measurement range 2.2–27.8 mmol/L Data transfer interval Once every 5 minutes Transmission distance 6 meters maximum •... - Page 135 Appendix B Technical information Parameter Description Number of uses Single-use • Transmitting part: 35.2 x 19.2 x 5.0 mm Dimensions (W x L x H) • Applicator: 51.8 x 49.8 x 73.3 mm • Transmitting part: 4.5 ± 0.5 g Weight •...
-
Page 136: Accurucy Performance (Based On Cobas Integra 400 Plus)
Appendix B Technical information Accurucy performance (based on Cobas Integra 400 plus): • FA (Full Analysis) Set: 50 adults aged 18 or older 1) Overall accuracy FA Set MARD (%) 12.2 % 2) Accuracy according to the number of days worn Number of days worn MARD (%) Day 1... -
Page 137: Cybersecurity
Appendix B Technical information B.3 Cybersecurity Cybersecurity • Install an antivirus software on your smart device to prevent malicious programs from accessing your smart device's information. • If the app and sensor are not connected after scanning the barcode on the sensor package label or manually entering the 6-digit PIN code and 4 digits of the serial number, check if the 6-digit PIN code and 4 digits of the serial number are entered correctly. -
Page 138: Appendix C Glossary
Appendix C Glossary Term Description A program developed for user convenience to be used on the Application operating system of a smart device or a tablet PC. Applicator A small tool used for application. Back The rear portion of an object Paper covered with silicone on one or both sides. - Page 139 Appendix C Glossary Term Description A line segment that connects two points on a circle or sphere Diameter while passing through its center. Electro Magnetic Compatibility, testing for immunity to electro magnetic interference from exterior sources. One type of cyclic ether. It is oxidized ethylene, a colorless oxide gas.
- Page 140 Appendix C Glossary Term Description A symptom in which glucose concentration in the blood is unusually low. It can be caused by insulin overdose, liver complications, thyroid gland disorders, adrenopathy, pituitary Hypoglycemia disease, or gastric resection. Symptoms can include hunger, absent-mindedness, and cold sweat.
- Page 141 Appendix C Glossary Term Description RF communication Wireless communication Radio-Frequency Identification uses electromagnetic waves to uniquely identify an ID, and is often refered to as RFID. RFID RFID technology refers to the technology of using electromagnetic waves to process information over a long distance. The process of acquiring administrator rights on a smart device Rooting running the Android operating system.
- Page 142 Spirit House, Saffron Way, Off Saffron Lane, Leicester, LE2 6UP Medical Technology Promedt i-SENS, Inc. Consulting GmbH 43, Banpo-daero 28-gil Ernst-Heckel-Straße 7 Seocho-gu, Seoul 06646, Korea 66386 St. Ingbert, Germany CareSensAir.com HEA5083JUL24 © 2024 i-SENS, Inc. All rights reserved. PCGAA-000054 REV0 2024-06...
Need help?
Do you have a question about the spirit health CareSens Air and is the answer not in the manual?
Questions and answers
How many buttons come with the monitoring system when first ordered?CareSens Air CGM - continuous glucose monitoring system - 15 day use. Slim, light, accurate and easy to use, all in one device.
The i-SENS CareSens Air continuous glucose monitoring system includes one button on the applicator, which is pressed to complete the sensor attachment.
This answer is automatically generated
DO YOU HAVE TO CALIBRATE THE SENSOR DAILY?
Yes, after the initial calibration stages, the i-SENS CareSens Air sensor requires calibration every 24 hours.
This answer is automatically generated