
Subscribe to Our Youtube Channel
Related Manuals for i-SENS i-Smart 300 Vet


Summary of Contents for i-SENS i-Smart 300 Vet
- Page 1 All manuals and user guides at all-guides.com Operator’s Manual Software version 1.0.0.0 Draft July 2015 Copyright © 2015 i-SENS, Inc. All Rights Reserved...
- Page 2 All manuals and user guides at all-guides.com Operators should read the entire manual before installing and operating the analyzer.
-
Page 3: Table Of Contents
All manuals and user guides at all-guides.com Contents Contents Introduction ··························································································· 1-1 Safety ············································································· 1-3 Symbols and Terms ············································································ 1-5 Product Description Installation ······································································ 2-1 Installation Requirements ······································································· 2-2 Power Cable Connection ······················································································· 2-3 Power-On ······································································· 2-5 Printer Paper Installation ···········································································... - Page 4 All manuals and user guides at all-guides.com Contents Shutdown ············································································· 6-1 Analyzer Shutdown ················································································ 6-3 Cartridge Restart Maintenance ······················································································· 7-1 Calibration ·············································································· 7-4 Cartridge Removal ············································································· 7-6 System Information ············································································· Analyzer Status ···················································································· Cleaning Troubleshooting ················································································· 8-1 Troubleshooting ······················································································· 8-6 Error Code Specification ·····································································...
-
Page 5: Introduction
All manuals and user guides at all-guides.com 1. Introduction 1. Introduction Safety ··················································································· 1-1 Symbols and Terms···································································· 1-3 Product Description ··································································· 1-5... -
Page 6: Safety
You must not discard this electrical/electronic product in domestic household waste. Changes or modifications not expressly approved by i-SENS, Inc. could void the purchaser’s authority to operate the equipment. i-Smart 300 Blood Gas Analyzer... - Page 7 All manuals and user guides at all-guides.com 1. Introduction Safety, continued Biohazard All materials used in collecting blood and/or other samples from Caution humans should be treated as biohazardous materials with the potential carrying infectious agents capable of producing disease. ...
-
Page 8: Symbols And Terms
All manuals and user guides at all-guides.com 1. Introduction Symbols and Terms Symbols Symbol Description CE mark Consult operating instructions Authorized representative in the European community Serial number Caution: Attention, see operating instructions Manufacturer Temperature limitation Catalogue number Batch code Contains sufficient for <n>... - Page 9 All manuals and user guides at all-guides.com 1. Introduction Symbols and Terms, continued Terms Term Description Negative log of the hydrogen ion activity Partial pressure of carbon dioxide Partial pressure of oxygen Concentration of sodium ion Concentration of potassium ion Concentration of calcium ion (ionized calcium) Concentration of chloride ion Hematocrit...
-
Page 10: Product Description
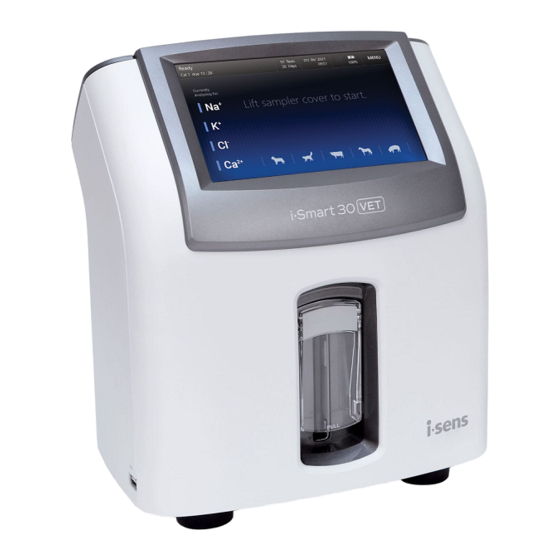
It is for in vitro Veterinary Diagnostic Use only. Analyzer Touchscreen Barcode scanner Cartridge Sampler door cover Printer Handle VGA port Serial port LAN port Vent Power switch Power port ports i-Smart 300 VET Analyzer i-Smart 300 Blood Gas Analyzer... - Page 11 All manuals and user guides at all-guides.com 1. Introduction Product Description, continued Accessories analyzer Power adapter Power code Printer papers Cartridge Cartridge cover i-Smart 300 VET Cartridge Operator’s Manual...
- Page 12 All manuals and user guides at all-guides.com 1. Introduction This page is intentionally left blank. i-Smart 300 Blood Gas Analyzer...
-
Page 13: Installation
All manuals and user guides at all-guides.com 2. Installation 2. Installation Installation Requirements ··························································· 2-1 Power Cable Connection ···························································· 2-2 Power-On ············································································· 2-3 Printer Paper Installation ····························································· 2-5 Cartridge Installation ·································································· 2-7... -
Page 14: Installation Requirements
: 100 ~ 240 Va.c., Requirements Amp : 1.5 A Frequency : 50/60 Hz Power cord 3-wire, approved Power adapter Output : +24 Vd.c., 2.7 A ( i-Smart 300 VET Blood Gas Analyzer... -
Page 15: Power Cable Connection
All manuals and user guides at all-guides.com 2. Installation Power Cable Connection Caution Check that the power switch is in “ ” (OFF) position. Always connect the power according to the steps described in this manual. Always use a grounded electrical outlet. ... -
Page 16: Power-On
All manuals and user guides at all-guides.com 2. Installation Power-On Caution Remove any attached USB memory device or network cable from the analyzer before turning the power switch on. Turn Power Facing the back of the analyzer, flip the black power switch on the lower left side, marked “... - Page 17 All manuals and user guides at all-guides.com 2. Installation Power-On, continued Check that the power cord icon appears at the bottom Turn Power 이 row of the screen. Switch On, continued Note: If the power cord icon does not appear on the screen, ...
-
Page 18: Printer Paper Installation
All manuals and user guides at all-guides.com 2. Installation Printer Paper Installation Install Printer Facing the back of the analyzer, push the PUSH button and flip Paper down the printer cover. Place the paper roll into the paper compartment and place the end of the paper in parallel with the printer slot. - Page 19 All manuals and user guides at all-guides.com 2. Installation Printer Paper Installation, continued Install Printer Close the printer cover. Paper, continued Note: The printer will cut the paper exposed to the outside automatically. Operator’s Manual...
-
Page 20: Cartridge Installation
All manuals and user guides at all-guides.com 2. Installation Cartridge Installation Install Cartridge Note: After opening the cartridge, it must be installed directly to the analyzer. Take out the cartridge from the cartridge box. Press down the cover lock and remove the cartridge cover. Press Install at the following screen Slide down the lever on the cartridge door, open the cartridge door. - Page 21 All manuals and user guides at all-guides.com 2. Installation Cartridge Installation, continued Install Cartridge, Insert the new cartridge into the analyzer, follow the instructions on the screen. continued Facing the cartridge label, insert the cartridge into the analyzer. Close the cartridge door and slide up the lever on the cartridge door.
- Page 22 All manuals and user guides at all-guides.com 2. Installation Cartridge Installation, continued Install Cartridge, If the RFID tag information of the cartridge is valid, the analyzer continued will change to the Cartridge Warming-Up screen. The cartridge warming-up will take approximately 25 minutes. Note: ...
-
Page 23: Analyzer Settings
All manuals and user guides at all-guides.com 3. Analyzer Setting 3. Analyzer Setting Screen Menus ·················································································· 3-1 Sample Setup ·················································································· 3-11 QC Setup ······················································································· 3-14 Instrument Setup ············································································· 3-16 Interface Setup ················································································ 3-20 Species Type Setup ·········································································· 3-22... -
Page 24: Screen Menus
All manuals and user guides at all-guides.com 3. Analyzer Setting Screen Menus Ready Screen Description ① Screen naming ② Analyzer operation schedule ③ Remaining sample number and date of the installed cartridge ④ Current state of interface setup ⑤ Current state of power connection ⑥... - Page 25 All manuals and user guides at all-guides.com 3. Analyzer Setting Screen Menus, continued Menu options Operator’s Manual...
- Page 26 All manuals and user guides at all-guides.com 3. Analyzer Setting Screen Menus, continued Menu Access Press Menu. The quick menus and the category menus will appear. Press the current screen box at the top right corner to show the current menu options. Note: ...
- Page 27 All manuals and user guides at all-guides.com 3. Analyzer Setting Screen Menus, continued Icons and Buttons Icons and Buttons Description Canine icon Feline icon Bovine icon Equine icon Porcine icon Other Species icon Print results or settings on screen Transmit results to LIS/HIS / Transfer complete Close current screen Go to list screen...
- Page 28 All manuals and user guides at all-guides.com 3. Analyzer Setting Screen Menus, continued Icons and Buttons Icons and Buttons Description Scroll to previous or next page Go to previous or next result screen i-Smart 300 혈액가스분석기...
- Page 29 All manuals and user guides at all-guides.com 3. Analyzer Setting Screen Menus, continued Icons and Buttons, Icons and Buttons Description continued Execute search Run 1-point calibration or 2-point calibration Run QC Accept or discard QC results Add or delete QC lot information Delete entered data on current Okay or accept...
- Page 30 All manuals and user guides at all-guides.com 3. Analyzer Setting Screen Menus, continued Icons and Buttons, Icons and Buttons Description continued Unselected item Selected item Item that were transmitted to LIS/HIS Selected item that were transmitted to LIS/HIS Show keyboard for data entry numeric Show keyboard for entry...
- Page 31 All manuals and user guides at all-guides.com 3. Analyzer Setting Screen Menus, continued Keyboards The analyzer offers following keyboards for data entry. Alphabetic Keyboard Numeric & Special Character Keyboard Date and Time Entry Keyboards 사용 설명서...
- Page 32 All manuals and user guides at all-guides.com 3. Analyzer Setting Screen Menus, continued Keyboards, Numerical Keyboard continued i-Smart 300 혈액가스분석기...
- Page 33 All manuals and user guides at all-guides.com 3. Analyzer Setting Screen Menus, continued LCD Brightness When the analyzer has not been in use for more than 10 minutes, the screen turns to screensaver. Note: The screensaver does not apply to the Sample Results screen and the QC Results screen.
-
Page 34: Sample Setup
All manuals and user guides at all-guides.com 3. Analyzer Setting Sample Setup Reference Go to Menu > Setup (Setup menu is protected by password.) > Ranges Reference Ranges Setup. The following screen will appear. Press each box and enter low and high limits of the reference range for each parameter. - Page 35 All manuals and user guides at all-guides.com 3. Analyzer Setting Sample Setup, continued Reference Note: Ranges, To delete the entered data, press Current Tab Clear. continued Before saving the setup, the analyzer will validate the entered values to confirm that: - Values for both low and high limits are entered.
- Page 36 All manuals and user guides at all-guides.com 3. Analyzer Setting Sample Setup, continued Reference Note: Ranges, Reference ranges should be established by individual institutions. continued The reference ranges in the table below are shown only as general guidelines. Unit Parameter Reference Range 7.350 ~ 7.450...
- Page 37 All manuals and user guides at all-guides.com 3. Analyzer Setting Sample Setup, continued Go to Menu > Setup (Setup menu is protected by password.) > Critical Limits Critical Limits Setup. The following screen will appear. Press each box and enter low and high values of the critical limits range for each parameter.
- Page 38 All manuals and user guides at all-guides.com 3. Analyzer Setting Sample Setup, continued Critical Limits, Note: continued High limit value is high than high limits of the reference range. Low limit value is low than low limits of the reference range. ...
-
Page 39: Qc Setup
All manuals and user guides at all-guides.com 3. Analyzer Setting QC Setup QC Lot Setup Go to Menu > Setup (Setup menu is protected by password.) > QC Setup. The following screen will appear. Select the empty list on the left column. Entry tabs to enter QC lot information is activated on the right side as follow. - Page 40 All manuals and user guides at all-guides.com 3. Analyzer Setting QC Setup, continued QC Lot Setup, Press Add after entering QC lot information. The entered QC lot continued will be added to the list on the left column. Note: Continue to select the empty list on the left column and add desired QC lot information.
-
Page 41: Instrument Setup
All manuals and user guides at all-guides.com 3. Analyzer Setting Instrument Setup Date and Time Go to Menu > Setup (Setup menu is protected by password.) > Instrument Setup. The following screen will appear. Note: Changing the Time, Date and Date Format of the analyzer is only allowed before cartridge is installed on the analyzer. - Page 42 All manuals and user guides at all-guides.com 3. Analyzer Setting Instrument Setup, continued Date and Time, Press Date box and enter the current date using the keyboard. continued Press Time box and enter the current local time using the keyboard. 3-17 i-Smart 300 Blood Gas Analyzer...
- Page 43 All manuals and user guides at all-guides.com 3. Analyzer Setting Instrument Setup, continued Volume To adjust the volume, press button of the Speaker Volume. To turn off sound playback, press Mute. To turn to maximum volume, press Max. 3-18 사용 설명서...
- Page 44 All manuals and user guides at all-guides.com 3. Analyzer Setting Instrument Setup, continued LCD Brightness To adjust the LCD brightness, press button of the LCD Brightness. Brightness can be adjusted in 15 steps. Note: To turn to minimum or maximum brightness, press Min or Max. Press Save to save the setup and go back to the main screen.
-
Page 45: Interface Setup
All manuals and user guides at all-guides.com 3. Analyzer Setting Interface Setup Option Setup Note: Make sure that network cable(s) is appropriately connected to the analyzer before starting interface setup. Go to Menu > Setup (Setup menu is protected by password.) > Interface Setup. - Page 46 All manuals and user guides at all-guides.com 3. Analyzer Setting Interface Setup, continued Serial Setup Press Baud Rate and select the desired option from the drop-down list. Default is 9600. Press Data Bit and select the desired option from the drop-down list. Default is 8.
-
Page 47: Species Type Setup
All manuals and user guides at all-guides.com 3. Analyzer Setting Species Type Setup Species Type Go to Menu > Setup > Species type Setup. The following screen Setup will appear. Select the species that will be analyzed its blood sample from the drop-down list. - Page 48 All manuals and user guides at all-guides.com 3. Analyzer Setting This page is intentionally left blank. 3-23 i-Smart 300 Blood Gas Analyzer...
-
Page 49: Sample Analysis
All manuals and user guides at all-guides.com 4. Sample Analysis 4. Sample Analysis Blood Samples ········································································· 4-1 QC Samples ············································································ 4-8... -
Page 50: Blood Samples
All manuals and user guides at all-guides.com 4. Sample Analysis Blood Samples Note: Introduce Sample Sample analysis is available only when the analyzer is in Ready state. When the analyzer is not in Ready state, the sampler cover cannot be lifted because it is locked. Check that the analyzer is in Ready state. - Page 51 All manuals and user guides at all-guides.com 4. Sample Analysis Blood Samples, continued Introduce For a syringe sample, immerse the end of the sampler probe into the Sample, sample container. continued Note: Be careful not to introduce air bubbles, clots, or foreign substances ...
- Page 52 All manuals and user guides at all-guides.com 4. Sample Analysis Blood Samples, continued Introduce If the sampler probe is adequately immersed in the sample, press Sample, Aspirate to begin aspiration. continued The “Aspirating sample... Please wait” message will appear. If the aspiration is completed, the “Remove sample now” message will appear.
- Page 53 All manuals and user guides at all-guides.com 4. Sample Analysis Blood Samples, continued Enter Sample Once the sampler cover is closed, the Sample Information Information screen will appear. If the sample information is available in barcode, scan the barcode using the barcode scanner that is located in front of the analyzer.
- Page 54 All manuals and user guides at all-guides.com 4. Sample Analysis Blood Samples, continued When the sample analysis is completed, the sample results will View Sample Results appear at the Measured Quantity tab of the Sample Results screen. The result values will appear in blue color if the reference ranges have not been setup in the analyzer.
- Page 55 All manuals and user guides at all-guides.com 4. Sample Analysis Blood Samples, continued If any result falls outside of the Critical Limit, the value will View Sample Results appear in red color. The phrase will be accompanied by a double arrow , to indicate above the upper limit or below the lower limit.
- Page 56 All manuals and user guides at all-guides.com 4. Sample Analysis Blood Samples, continued Press Print to print out the results. A printout similar to following View Sample Results will be printed. Note: If the analyzer is on battery power, the printout is only available in more than 50% battery levels.
-
Page 57: Qc Samples
All manuals and user guides at all-guides.com 4. Sample Analysis QC Samples Introduce QC Press Menu and select Run QC. The following screen will appear. Sample Press . The following screen will appear. Note: The Run QC menu will be available only when the QC lot(s) has been setup at QC Setup menu. - Page 58 All manuals and user guides at all-guides.com 4. Sample Analysis QC Samples, continued When “Position QC sample for aspiration” message appears, Introduce QC sample, immerse the end of the sampler probe into the QC sample and continued press Aspirate. The “Aspirating QC sample... Please wait” message will appear. Note: To cancel QC sample, lower the sampler cover to the original ...
- Page 59 All manuals and user guides at all-guides.com 4. Sample Analysis QC Samples, continued Introduce QC If the aspiration is completed, the “Remove QC sample now” sample, message will appear. Remove QC sample from the sampler continued probe. Wait a second until the “Close sampler cover” message will appear.
- Page 60 All manuals and user guides at all-guides.com 4. Sample Analysis QC Samples, continued Once the sampler cover is closed, the QC Information screen will Enter QC appear. Information Select the QC lot of the QC sample. If necessary, enter Operator ID and QC Comment using the screen keyboard.
- Page 61 All manuals and user guides at all-guides.com 4. Sample Analysis QC Samples, continued View QC Results When the QC sample analysis is completed, the QC results will appear at the QC Results screen as following. Note: If a result is within the QC range, the value will appear in blue ...
- Page 62 All manuals and user guides at all-guides.com 4. Sample Analysis QC Samples, continued View QC Results, Press Print to print out the results. A printout similar to continued following will be printed. Note: If the analyzer is on battery power, the printout is only available in more than 50% battery levels.
-
Page 63: Database
All manuals and user guides at all-guides.com 5. Database 5. Database Blood Sample Data ········································································· 5-1 QC Data ······················································································· 5-5 Calibration Data ············································································· 5-9 Cartridge Data ·············································································· 5-12... -
Page 64: Blood Sample Data
All manuals and user guides at all-guides.com 5. Database Blood Sample Data Last Sample Go to Menu > Sample >Last Sample Results. Analysis Results The following screen will appear. Note: The same screen can be accessed through Menu > Last Sample Results. - Page 65 All manuals and user guides at all-guides.com 5. Database Blood Sample Data, continued Sample Results The latest blood sample data are listed on the top. List, continued Use Page UP or Page Down to scroll the list of analysis results. To view a blood sample results, select a desired row from the list.
- Page 66 All manuals and user guides at all-guides.com 5. Database Blood Sample Data, continued Sample Results To transmit blood sample results to the LIS/HIS, select desired List, continued results from the list and press Send. Press Close to exit to main screen. i-Smart 300 Blood Gas Analyzer...
- Page 67 All manuals and user guides at all-guides.com 5. Database Blood Sample Data, continued Sample Results Go to Menu > Sample > Sample Results Search. Search The following screen will appear. Note: Search criteria for blood results are as following: ...
-
Page 68: Qc Data
All manuals and user guides at all-guides.com 5. Database QC Data Last QC Results Go to Menu > QC > Last QC Results. The following screen will appear. Press List to go to the list of QC results. To view the screen of the next QC results or the previous QC results, press Next Results or Prev Results. - Page 69 All manuals and user guides at all-guides.com 5. Database QC Data, continued QC Results List, To view a QC results screen, select a desired row from the list and continued press View Result. The corresponding QC results screen will appear. Operator’s Manual...
- Page 70 All manuals and user guides at all-guides.com 5. Database QC Data, continued QC Results List, To transmit blood sample results to the LIS/HIS, select desired continued results from the list and press Send. To search QC results, press Search on the QC Results List screen.
- Page 71 All manuals and user guides at all-guides.com 5. Database QC Data, continued QC Results Go to Menu > QC > QC Results Search. Search The following screen will appear. Note: Search criteria for QC results are as following: From & To ...
-
Page 72: Calibration Data
All manuals and user guides at all-guides.com 5. Database Calibration Data Cal 1 Results Go to Menu > Calibration > Cal 1 Results. The following screen will appear. To view the screen of the next Cal 1 results or the previous Cal 1 results, press Next Results or Prev Results. - Page 73 All manuals and user guides at all-guides.com 5. Database Calibration Data, continued Cal 2 Results Go to Menu > Calibration > Cal 2 Results. The following screen will appear. To view the screen of the next Cal 2 results or the previous Cal 2 results, press Next Results or Prev Results.
- Page 74 All manuals and user guides at all-guides.com 5. Database Calibration Data, continued Calibration List Go to Menu > Calibration > Calibration List. The following screen will appear. The latest Cal 2 results are listed on the top. Use Page Up or Page Down to scroll the list of Cal 2 results.
-
Page 75: Cartridge Data
All manuals and user guides at all-guides.com 5. Database Cartridge Data Cartridge Data Go to Menu > Status > Cartridge Data. Copy The following screen will appear. The latest cartridge data will appear on the top. Use Page Up or Page Down to scroll the list of cartridge data. - Page 76 All manuals and user guides at all-guides.com 5. Database This page is intentionally left blank. 5-13 i-Smart 300 Blood Gas Analyzer...
-
Page 77: Shutdown
All manuals and user guides at all-guides.com 6. Shutdown 6. Shutdown Analyzer Shutdown ··········································································· 6-1 Cartridge Restart ·············································································· 6-3... -
Page 78: Analyzer Shutdown
All manuals and user guides at all-guides.com 6. Shutdown Analyzer Shutdown The power of the analyzer should be turned off according to the Caution shutdown procedure as described in this manual. Failure to follow the described shutdown procedure can cause damage to the data or the analyzer. - Page 79 All manuals and user guides at all-guides.com 6. Shutdown Analyzer Shutdown, continued Shutdown Wait until the analyzer completes a power cycle and the Analyzer, following screen appears. continued Wait until the progress circle reaches 100%. Facing the back of the analyzer, flip the black power switch on the lower left side, marked “...
-
Page 80: Cartridge Restart
All manuals and user guides at all-guides.com 6. Shutdown Cartridge Restart Power Recovery When the analyzer recovers from power interruption, the cartridge inside the analyzer can be continuously used, only if: The analyzer was in Ready state or in process of calibration when the power was interrupted and the power returns within 1 hour. -
Page 81: Maintenance
All manuals and user guides at all-guides.com 7. Maintenance 7. Maintenance Calibration ······················································································ 7-1 Cartridge Removal ············································································ 7-4 Analyzer Information ········································································ 7-6 Analyzer Diagnosis ··········································································· 7-7 Cleaning ························································································· 7-8... -
Page 82: Calibration
All manuals and user guides at all-guides.com 7. Maintenance Calibration Go to Run Cal Menu > Run Cal 1 The following screen will appear. Go to Menu > Run Cal 2 The following screen will appear. i-Smart 300 Blood Gas Analyzer... - Page 83 All manuals and user guides at all-guides.com 7. Maintenance Calibration, continued Cal 1 Auto If the drift error of a sensor has occurred in the previous Cal 1, Repeat the analyzer will automatically repeat Cal 1 up to three times. ...
- Page 84 All manuals and user guides at all-guides.com 7. Maintenance Calibration, continued Sensor State State of each sensor will appear as okay in blue background, drift error in yellow background or slope error in red background at the main screen based on the results of the last calibration. Press the Sensor State icon twice quickly.
-
Page 85: Cartridge Removal
All manuals and user guides at all-guides.com 7. Maintenance Cartridge Removal Caution Treat the used cartridge as biohazard material. Dispose of the used cartridge in accordance with the laboratory’s established procedures for disposing of biohazardous materials. Before removing the used cartridge, wear appropriate personal protective clothing to protect from biohazard materials. - Page 86 All manuals and user guides at all-guides.com 7. Maintenance Cartridge Removal, continued Remove Go to Menu > Remove Cartridge to remove a cartridge in use. Cartridge in Use The following screen will appear. Note: To cancel the cartridge removal, press No. ...
-
Page 87: System Information
All manuals and user guides at all-guides.com 7. Maintenance System Information Go to Menu > Status > System Information. The following screen will appear. The following information will appear: Software Version and Firmware Version Cartridge: Serial Number, Lot Number, Installation Date & Time, Expiration Date &... -
Page 88: Analyzer Status
All manuals and user guides at all-guides.com 7. Maintenance Analyzer Status Go to Menu > Status > Analyzer Status. The following screen will appear. The following information will appear: Raw Signals Measuring temperature Analyzer temperature Battery level States of Cartridge installation, Cartridge door, and Sampler ... -
Page 89: Cleaning
All manuals and user guides at all-guides.com 7. Maintenance Cleaning Caution Wear appropriate personal protective clothing to prevent infection when cleaning. Clean the analyzer after use or periodically. Do not spray cleaning solution directly onto the analyzer. ... - Page 90 All manuals and user guides at all-guides.com 7. Maintenance This page is intentionally left blank. i-Smart 300 Blood Gas Analyzer...
-
Page 91: Troubleshooting
All manuals and user guides at all-guides.com 8. Troubleshooting 8. Troubleshooting Troubleshooting ··············································································· 8-1 Error Code ······················································································ 8-6... - Page 92 All manuals and user guides at all-guides.com 8. Troubleshooting Troubleshooting Guideline If the problems described below are encountered during installation and/or operation of the analyzer, try the suggested solutions as described in this manual. If the problem persists, please call a service engineer for further assistance.
- Page 93 All manuals and user guides at all-guides.com 8. Troubleshooting Troubleshooting, continued Battery If one of following situations applies: The analyzer was turned off immediately upon disconnection from the outlet. The analyzer was turned off during brief power outages. ...
- Page 94 All manuals and user guides at all-guides.com 8. Troubleshooting Troubleshooting, continued Calibration If the sensor state appears as slope error in red background, Run Cal 2. If needed, repeat additional Cal 2 a few times more. If the analyzer fails to detect a USB memory, Cartridge Data Copy Remove the USB memory from the USB port.
- Page 95 All manuals and user guides at all-guides.com 8. Troubleshooting Troubleshooting, continued Power While the analyzer is connected to the outlet, the power cord icon does not appear: Check for loose power connections between the analyzer and the outlet. Tighten any loose power connections. If one of following situations applies: ...
- Page 96 All manuals and user guides at all-guides.com 8. Troubleshooting Troubleshooting, continued Sample Analysis If one of following situations applies: The “Insufficient sample error” appears on the result screen. The “Out of range” appears on the results screen. A result is suspicious. Try sample analysis again with the same sample.
-
Page 97: Error Code
All manuals and user guides at all-guides.com 8. Troubleshooting Error Code If the analyzer encounters an error during operation, the following error code will appear on the screen. Error Code Description ESYS001 ~ ESYS999 Hardware error EDB001 ~ EDB999 Database error ESW001 ~ ESW999 Software error Memo the error code. - Page 98 All manuals and user guides at all-guides.com 8. Troubleshooting This page is intentionally left blank. i-Smart 300 Blood Gas Analyzer...
-
Page 99: Specification
All manuals and user guides at all-guides.com 9. Specification 9. Specifications Operating Specifications ···································································· 9-1 Analyzer Specifications ····································································· 9-2 Cartridge Specifications ····································································· 9-3 Measuring Principles ········································································· 9-4... -
Page 100: Operating Specification
All manuals and user guides at all-guides.com 9. Specification Operating Specifications Measured Parameters Measured Parameters Reportable Measuring Parameter Unit Resolution Range Range 6.500 ~ 8.000 6.000 ~ 8.500 0.001 mmHg 5.0 ~ 150.0 0.0 ~ 250.0 mmHg 5 ~ 700 0 ~ 800 mmol/L 80 ~ 200... -
Page 101: Analyzer Specification
All manuals and user guides at all-guides.com 9. Specification Analyzer Specifications Internal PC: 1.6 GHz processor / 2 GB RAM / 8 GB flash storage Operating system: Windows® Embedded Standard 7 Display: 8 inch TFT-LCD, touch screen ... -
Page 102: Cartridge Specification
- Cal 1solution, approx. 500 g - Cal 2 solution, approx. 100 g - Reference solution, approx. 100 g Size (HxWxD): 148 mm x 182 mm x 100 mm Weight: 1.4 kg i-Smart 300 VET Blood Gas Analyzer... -
Page 103: Measuring Principles
All manuals and user guides at all-guides.com 9. Specification Measuring Principles Electrochemical Potentiometry (ion selective Amperometry Conductometry electrode) pH and pH, pCO Gases , cK Electrolytes , cCl Hematocrit The i-Smart 300 blood gas analyzer calibrates the sensors using Cal 1 and Cal 2 solutions according to the pre-determined two-point calibration schedule during the lifetime of the cartridge. - Page 104 All manuals and user guides at all-guides.com 9. Specification This page is intentionally left blank. i-Smart 300 Blood Gas Analyzer...
-
Page 105: Appendices
All manuals and user guides at all-guides.com Appendices Appendix A: Sample Collection and Handling Caution Observe the general cautions required of the hospital, laboratory, or other testing facility. All biohazardous materials should be handled and disposed of in accordance with applicable rules and regulations. -
Page 106: Appendics B: Order Information
All manuals and user guides at all-guides.com Appendices Appendix B: Order Information 1. i-Smart 300 Cartridge Available Test number & Uselife Order unit 200 Tests / 2 weeks 6510 2. Quality Control Product Description Order unit QC 623 Level 1 (blood gas/electrolyte) 6200 1 box ampuls... -
Page 107: Appendics C: Warranty
When the analyzer was disassembled, modified, and/or repaired by a person who is not authorized by i-SENS, Inc. When the product was broken by using incorrect power capacity. When the product was broken by the operator's lack of attention or skill.
Need help?
Do you have a question about the i-Smart 300 Vet and is the answer not in the manual?
Questions and answers